
How Drupal Works
Before you can get started working with Drupal, there are a few basic things you should know. This chapter provides a broad overview of how Drupal works, and some basic terms and concepts you should know before you get started.
How Drupal Works
Drupal, much like systems such as WordPress (wordpress.org) or Expression Engine (expressionengine.com), is a Content Management System (CMS). It takes your content as individual pieces of information and gives you a framework for displaying that content in a way that makes sense to your site's audience.
What Drupal Really Does
The easiest way to think about Drupal is as a digital coin sorter. Your nodes are the coins, and content types are the different denominations (quarters, dimes, etc). In addition to content types, you can use taxonomy to organize the coins by the country of currency, color, condition, etc. Views are the mechanism that sorts the coins; they take your nodes and sort them out as Pages or Blocks according to size, shape, color, or whatever criteria you set. Themes and modules are like the coin wrappers and gears; they make sure that everything stays organized and keep the system running smoothly. See Figure 7.
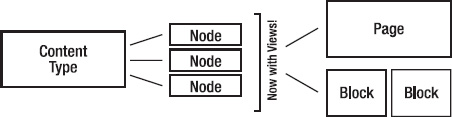
Figure 7. Graphical overview of how Drupal delivers content
Drupal differs from other content management systems in the following ways:
- It's incredibly flexible. Unlike WordPress, which is primarily focused as a blogging platform, Drupal sites can be built to handle almost any functionality that you need from corporate intranet to e-commerce to donor management, and more. You can even blog with it, if you really want to.
- Drupal's huge community of developers, designers, and themers means that even the least experienced site builder can get help breaking in and figuring out sticky issues. While IRC and
drupal.org's Issue Queue can be immensely helpful (and are great places to start), even posting a question using the #Drupal tag on Twitter will often lead to offers of help and answers you may not have thought of. More information on getting help with Drupal can be found in Chapter 9.
Some Terms You Should Know
Node: An individual piece of content. This could be a news item, event listing, simple page, blog entry—you name it. Anything in your site that has a heading and a bit of text is a node. Nodes can also have custom fields, which are useful for all sorts of things.
Fields: Fields are one of the best things about creating content in Drupal. Using fields, you can attach images or files to content, create extra descriptors (like a date for an event, or a subheading for an article), or even reference other nodes.
Block: A standalone piece of reusable content (for example, a sidebar menu or callout box). Blocks can be created by a View (see below) or created by hand in Drupal's Blocks administration menu. The beauty of blocks is the flexibility of display; you can set up blocks to display based on any criteria that you set. This is especially helpful on home pages, for example, or for displaying a menu that's only relevant to a specific section of a website.
Content type: The type of node you're creating. One of Drupal's best features is its support of multiple content types, each of which can be sorted out and displayed by any number of criteria.
Taxonomy: Content categories. At its most basic level, you can think of taxonomy as tags for content (like blog entries). The true power of taxonomy, however, lies in organizing large quantities of content by what an audience might search for. For example, a recipe site can use taxonomy to organize recipes by several criteria type of recipe (dessert, dinner, etc.), ingredients (as tags), and custom indicators (vegetarian, vegan, gluten-free, low carb, etc.). In building the site, you could then use Views to allow users to search by or filter recipes by any one (or several) of these criteria.
Users, Roles and Permissions: Users are exactly what they sound like—users that have registered on your site. The key to working with users is roles; Drupal allows you to create unique roles for anything that might need to happen on your site and set permissions for each role depending on what that role might need to do. For example, if you're creating a magazine-type site with multiple authors, you might want to create a role called “author” that has permission to access, create, and edit their own content, but nobody else's. You might also create a role called editor that has access to edit, modify, and publish or unpublish the content of any of the authors.
Module: A plug-in that adds functionality to your site. Out of the box, Drupal provides a strong framework, but the point of the framework is to add functionality to it using modules.
drupal.org/project/moduleshasa list of all the modules that have been contributed by the Drupal community, sorted by most popular. At the very least, every Drupal installation should use Views, Pathauto, and Token. Pathauto and Token help you create automatic URL aliases for your content; you'll learn more about Views in Chapter 3 as well as Chapter 8 and elsewhere in the book.View: An organized list of individual pieces of content that you create within the site, using the Views module. You'll dive a bit deeper into Views in Chapter 3.
Theme: The templates that control the look and feel of a Drupal site. Drupal core comes with several themes that are very useful for site administration and prototyping; however, custom themes should always reside in your
sites/all/themesfolder and not in the core themes folder.tpl.php: Individual PHP files that Drupal uses for template generation. Most Drupal themes will have, at the very least, a
tpl.phpfor blocks, nodes, and pages. Once you get the hang of working withtpl.php, you can create custom templates for anything from a specific piece of content or specific content types to the output of a specific view.Drupal Core: The actual Drupal project files, as downloaded from
drupal.org. Anything that exists outside your/sitesfolder is considered core.
For other theming-specific definitions, check out Chapters 15 and 16.
Planning a Drupal Project: Designing from the Content Out
Since so much of the power in Drupal is based on the ability to create different types of content and sort it into manageable chunks, the importance of creating an effective content strategy and information architecture BEFORE YOU START DEVELOPING cannot be understated. Drupal is, at its core, a content curation and display engine, so taking time to understand the types and format of your site's intended content, as well as the site's functionality, is essential to success with Drupal.
What follows is a brief overview of the planning of a typical Drupal site. A more comprehensive overview can be found in Chapter 10.
Phase 1: Discovery
The discovery phase of any creative project sets up important information about the project's business objectives, audience, and functional requirements. This is where you work with the client to determine who they are, who their audience is, and what types of things that audience might need to do. At this stage, you're focusing mostly on the client's perspective and objectives; in the phases following, you'll be able to research and confirm or amend these perspectives.
While it's often tempting to dive right in and start building, putting enough time and attention into the discovery phase is essential to avoiding headaches down the road. Ask any Drupaller who's ever had to redo huge sections of a site because the project requirements changed.
During the discovery phase, you're looking to answer the following questions:
- Who is the client? What do they do?
- Who is the primary contact on the client's project team?
- Who are the other decision makers (if any) on the client side? How will feedback be handled?
- What are the primary business objectives surrounding this project? In other words, why are we doing this?
- What is the client's understanding of their primary audience for this project? Secondary audience? What is their understanding of this audience's needs?
- What is the primary message that the audience needs to get from this project?
- What financial, staff, and content resources are being made available for this project?
- What deadlines are you trying to meet with this project?
Phase 2: Information Architecture and Functional Requirements
While the discovery phase sets up the client's objectives and perceptions of their audience, the second phase focuses on gaining a deeper understanding of the site's intended users; it works on making sure that the user experience of the site matches the client's business objectives with the intended audience's needs.
The tangible deliverables of this phase may vary from team to team, but they often include things like:
- User profiles or stories.
- An outline, or matrix of functional requirements.
- Site wireframes.
- Paper or digital prototypes.
- Content strategy documents, including a breakdown of site content, content types, and categories. This may also include a breakdown of the site's user roles (editor, member, etc.) and what content they have permission to access, edit, etc.
The goal of this phase, which can take anywhere from a couple of days to a few months, is for the client and the development team to get on the same page regarding who the site's users are and what they're there for. Additionally, and most importantly, the goal is to identify areas of the project where budget or project scope might need tweaking and head off any confusion that might occur down the road.
Phase 3: Development Implementation
Once functional and content requirements have been established and approvals have been given, the team can begin to install and configure Drupal. In some teams, this installation/configuration process begins in the information architecture process, after functional requirements have been established. The benefit of this approach is that the team can build a working prototype of the site early in the process that can then be iterated. The downside is the potential for some aspects of the project to require re-doing later in the process, as new needs are uncovered.
During development, the site's functionality is developed and iterated. Modules are chosen (more on that in Chapter 4) and implemented, custom functionality is developed, and user roles and permissions are set, along with content types, taxonomy, etc. During this phase, designers can begin working on look and feel issues, and content editors can (and should) begin adding content to the site, with guidance from the project lead.
Phase 4: Design and Theme Implementation
A Drupal site's theme controls the look and feel of the site. While it is possible to implement visual design in a Drupal site at the same time that functionality is being implemented, it's not recommended. The development phase of a Drupal site is an important time to iron out functionality and usability issues; adding visual elements (even simple ones) during this phase causes many clients to focus on aesthetics too early in the project.
Another important distinction to be made is that between visual design and theming. While many themers can design and vice versa, visual design is the act of creating a set of visual standards that will control the way the site looks. This could involve something as simple as picking out colors and font choices for the site, and creating some standards for laying out type, boxes, etc. It often involves creating visual mockups in a program such as Fireworks or Photoshop.
Theming, however, is the process of implementing those visual standards across the site's template files, using HTML, CSS, and PHP. While theming can (and sometimes does) happen without design, design is what truly brings the message home to the client's audience. When well thought out and implemented by talented themers, a site's design is often an important factor in whether the site meets the client's business objectives.
Phase 5: Staging, Testing, and Launch
Once the site's functionality has been implemented, and the visual design has been integrated into the site's theme, it's time to get the site ready for the world to see. While a more comprehensive overview of this can be found in Chapter 13, the basic idea is as follows:
- Back up the site's database and files.
- Establish a staging URL (best as a subdomain of the actual URL, such as
staging.newsite.com) and move the site files and database to that URL. - Test.
- Test.
- Test.
- When you've tested the heck out of it, and fixed any issues that arise, move or copy the site files and database to the live (also called “production”) URL.
- Test.
- Test.
- Test.
- Rejoice!
Now that you have an idea of what you're doing, it's time to set up a development environment and install Drupal for the first time. See Appendices F through I for installation instructions on various operating systems: Windows, Ubuntu (including as a virtual machine on non-Linux computers), Mac OS X, and (the easiest way to get started) a cross-platform Drupal stack installer.