
P A R T VI
![]()
Advanced Site-Building Topics
Chapter 25 covers building an online store and brings you inside the decisionmaking of the ground-up rearchitecture of Ubercart–the number one e-commerce suite for Drupal 6–for Drupal 7 as Drupal Commerce. This chapter is valuable to any person building a commerce site, but it also invites you into the Commerce developer community.
Chapter 26 provides insight into advanced Drush usage to revolutionize your site developing experience as much as using Drush, Drupal's command-line shell, did when you started using it in the first place. It includes examples to get you started writing your own Drush scripts and commands.
Chapter 27 goes over the concepts and practice of using Drupal's pluggable caching and storage mechanisms to scale to millions of site users—not simply visitors, which is relatively simple to scale, but people interacting heavily with your site. See also Appendix B.
Chapter 28 gives the theory and practice of bringing the power of the Semantic Web to Drupal, and vice versa—making data on your web site linked to precise meanings that computers can understand and connect to data elsewhere on the Internet. (SEO hint: Computers include search engines.)
Chapter 29 tours the Drupal's routing system, providing critical background for module developers and site builders alike.
Chapter 30 takes you on a tour of what goes on inside Drupal during a page request, a perfect follow-up to Chapter 29 and a great approach to truly understanding Drupal.
Chapter 31 explains using and extending the Solr module for much more powerful search capabilities. In this latter capacity it provides an example of integrating Drupal with a web service and making use of object-oriented code.
Chapter 32 gives an in-depth look at user experience improvements in Drupal 7 and the decisions behind them and how you can use new best practices and consistent interface design decisions in your own development.
Chapter 33 takes on advanced configuration and lots of glue code–indeed, whatever it takes–for completing the DefinitiveDrupal.org site built out in Chapters 1 and 8.
Chapter 34 covers some popular Drupal distributions–packaged collections of Drupal and modules to serve specific purposes, which are spreading Drupal like never before–and shows you how to make your own distributions with Drupal's installation profile capability.
C H A P T E R 25
![]()
Drupal Commerce
E-commerce with Drupal is more powerful than ever before thanks to the development of Drupal Commerce for Drupal 7. The Drupal Commerce project is comprised of a core set of Commerce modules and an implementation strategy that leverages the many new Drupal 7 features and API improvements. This chapter begins with a broad overview of Drupal Commerce, highlighting its key features before moving on to a closer examination of the core systems, their implementation, and how they should be used together. It also includes words of wisdom for site builders and developers seeking to implement Drupal Commerce on their own sites. The chapter ends with a discussion of the project’s development history, design philosophy, and utilization of key Drupal 7 features.
Drupal Commerce Overview
In many ways Drupal is the ideal platform for e-commerce web sites. Its core modules and systems define APIs for deeply integrating contributed modules into the behavior of the site and for communicating with external web services. It includes a plethora of features for content management and community building, enabling you to build a community around your products and services or promote your brand through your customers' existing social network relationships.
All of the major e-commerce modules dating back to Drupal 4.5 have built on Drupal's base feature set as a foundation for e-commerce instead of integrating with external applications, and Drupal Commerce is no exception. As Drupal has matured, this base of core features and major contributed systems like Views has also grown, giving modules building on them even greater flexibility and power. For this reason, Drupal Commerce was started from scratch with a fresh architecture designed around the latest features in Drupal 7 and greatest developments among Drupal's contributed modules such as Rules and Views.
The end result is an e-commerce solution that can be built from the ground up to address your business needs, no matter how great or small. Drupal Commerce sites benefit from Drupal's security, its ability to scale, and the interoperability of its vast selection of contributed modules. With the content management and social commerce tools baked into the core itself, Drupal is a very robust platform for today's online businesses without requiring integration with external e-commerce applications.
Key Features
The scope of the core feature set is intentionally limited, as the goal of Drupal Commerce has been to provide the building blocks of e-commerce as tools for site builders and developers to create customized e-commerce solutions. However, the Commerce module still encompasses the basic set of features expected of an e-commerce application. These features are mostly enabled by the user interface (UI) modules of some of the core module pairs, such as Product and Product UI, and by strictly UI modules that focus on the customer experience, like Cart and Checkout.
A basic summary of the core features includes:
- Products with any number configurable product image and data fields.
- Dynamic product pricing allowing for UI-based discounts and tax-inclusive price display.
- Flexible product display based on Drupal 7's Fields system, enforcing a separation of the product definition from the point of display.
- “Smart” Add to Cart form that displays differently based on the number and types of products represented on it
- Shopping cart system that includes a cart block and cart update form, with carts implemented as special case order objects.
- Orders consisting of line item and customer profile references and other metadata.
- Line items of various types used for describing items on an order like products, taxes, shipping fees, etc.
- Customer profiles of various user configurable types allowing the collection of data necessary to fulfill or complete an order.
- Flexible checkout form builder with a drag-and-drop user interface supporting single and multi-page checkout.
- Payment system integrating onsite and offsite payment solutions into the normal checkout workflow and allowing for tracking and manual entry by administrators.
- Complete order, customer profile, and payment transaction logging.
- Support for multicurrency and multilingual stores.
Digging Into Drupal Commerce
You can find out more about the origins, philosophy, and core Drupal innovations behind Drupal Commerce later in this chapter and through the project's homepage at drupalcommerce.org. Digging into the Commerce modules themselves first will provide you with the appropriate context for the more advanced topics. Accordingly, this section covers downloading and installing the Commerce modules with a thorough examination of the various entities and fields that make up the project's core systems organized as a walkthrough of a simple store configuration.
The project's source code is hosted in two locations: a development Git repository on GitHub that is mirrored to a repository on drupal.org. To get started quickly, you can simply download the latest release from the project page at drupal.org/project/commerce and extract it to your site's modules directory. If you plan on contributing code back to the project or want to develop against the freshest code, you can clone the Git repository and pull from the most active development repositories by following the instructions in the Code Workflow handbook available at drupalcommerce.org/development/workflow.
![]() Tip Ryan Szrama, the Drupal Commerce project lead, maintains the most active development repository where most of the code that gets committed to the main project repository originates. To find his and other developers' active repositories, you can refer to the developer documentation at
Tip Ryan Szrama, the Drupal Commerce project lead, maintains the most active development repository where most of the code that gets committed to the main project repository originates. To find his and other developers' active repositories, you can refer to the developer documentation at drupalcommerce.org/development/workflow/repositories.
Before you can enable the Commerce modules, you also need to download and extract the latest Drupal 7 version of the following dependencies to your site's modules directory:
- Address Field (
drupal.org/project/addressfield) - Chaos tools suite (
drupal.org/project/ctools) - Entity API (
drupal.org/project/entity) - Rules (
drupal.org/project/rules) - Views (
drupal.org/project/views)
With these modules in place, you are ready to start enabling the modules that you will use to build your store. If you are starting from a Standard installation of Drupal 7, you should already have the optional core Drupal modules that the Commerce modules depend upon enabled: Contextual links and Field UI. If these are not enabled, you should enable them when you enable the following dependency modules from the projects you have downloaded:
- Address Field
- Entity CRUD API
- Entity Tokens
- Rules
- Rules UI
- Views
- Views UI
- Modules in the Chaos tools suite listed as dependencies of the Views module
![]() Tip While not a dependency, the Administration Menu module is highly recommended for navigating the Commerce UI in conjunction with the core Overlay module. You can download the latest Drupal 7 version from its project page at
Tip While not a dependency, the Administration Menu module is highly recommended for navigating the Commerce UI in conjunction with the core Overlay module. You can download the latest Drupal 7 version from its project page at drupal.org/project/admin_menu.
You are now prepared to enable the Commerce modules. While the Commerce fieldset on the module installation page lists modules in alphabetical order, they are listed here in order of dependency:
- Commerce/Commerce UI defines features and API functions common to the Commerce modules, like currency handling and Field API helper functions.
- Price defines a dynamic Price field with multiple display formatters
- Product/Product UI defines the product entity and user interface for creating and managing product types and products.
- Physical Product defines fields for offering physical products for sale.
- Line Item/Line Item UI defines the line item entity, API for modules to define line item types, and the line item reference field used to add line items to orders.
- Product Reference defines the product reference field used to display products on other entities and a product line item type.
- Product Pricing/Product Pricing UI enables Rules based product sell price calculation for dynamic product pricing.
- Tax/Tax UI defines tax types with an API and user interface for defining tax rates and managing tax inclusive price displays.
- Customer/Customer UI defines the customer profile entity, user interface for creating and managing customer profile types and profiles, and a customer profile reference field used to add customer information to orders.
- Order/Order UI defines the order entity and user interface for creating and managing the default order type and orders.
- Payment/Payment UI defines the payment transaction entity and user interface for accepting and managing payments via the checkout form and administration form.
- Checkout defines a flexible checkout form with a drag-and-drop checkout form builder supporting single and multi-page checkout.
- Cart defines the special shopping cart order status and user interface components like the cart block, update form, and checkout integration.
Upon installation, some of these modules will perform automatic field creation to configure some entities for use. For example, when Product Reference is enabled, the Line Item module defines a new line item type with a default price field based on Product Reference's implementation of hook_commerce_line_item_info(). The rest of this section examines the systems and features defined by each module, highlighting aspects requiring further configuration. These configuration tasks include:
- Enabling supported currencies and setting the default store currency.
- Creating product types and adding products.
- Creating a product display node type.
- Enabling payment methods.
- Customizing the checkout form.
- Reviewing the default Rules.
![]() Tip Due to the number of modules involved in running Drupal Commerce, you can use the Commerce Kickstart installation profile that automatically installs the necessary modules during the normal Drupal installation. To locate and download installation profiles and find resources for creating your own, refer to the documentation at
Tip Due to the number of modules involved in running Drupal Commerce, you can use the Commerce Kickstart installation profile that automatically installs the necessary modules during the normal Drupal installation. To locate and download installation profiles and find resources for creating your own, refer to the documentation at drupalcommerce.org/development/installation-profiles.
Commerce
The Commerce module defines a variety of API functions used by the other modules to simplify commonly used features of Views and the Forms API. While this library of functions and general store settings will surely grow as Drupal Commerce matures, the main feature it is responsible for at present is currency definition and formatting. Every possible currency is defined in the Commerce module according to ISO 4217, while the module allows the name and formatting data to be altered via hook_commerce_currency_info_alter().
The Commerce UI module defines a top level Management menu item called Store under which all the other UI modules place their menu items and a Configuration beneath Store to hold Commerce module settings forms. It also adds a Currency settings item in the Configuration menu, as shown in Figure 25–1. Before adding products to your site, you should select the default currency for the store and enable any other currencies that you intend to use in product pricing. Default price fields added by Commerce modules to bundles of entities like products and line items use the default store currency on currency selection widgets, because the default values for these “locked” fields cannot otherwise be adjusted via the Field UI.
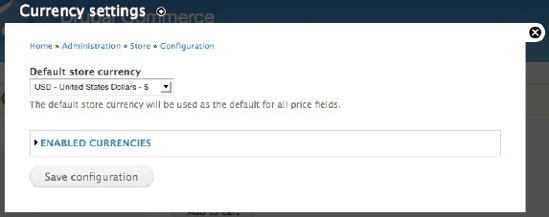
Figure 25–1. The currency settings form lets you specify a default store currency and enable any other currencies.
Price
The Price module primarily defines the price field that can be attached to entities allowing the entry of currency specific pricing. The price field stores an amount and an ISO 4217 currency code for every price value, and it comes with two display formatters that display price values as raw numbers or as numbers formatted for the specified currency. Entering prices is possible via one of two default widgets shown in Figure 25–2, a Price textfield widget that allows price entry for a specific currency and a Price with currency widget that lets you choose a currency from the list of enabled currencies on data entry.
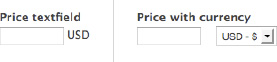
Figure 25–2. The Price module defines these two standard widgets used for entering price values.
While the Price module does not create any price fields on its own, it does provide an API function called commerce_price_create_instance() that other modules in Drupal Commerce use to add required, locked price fields to their entity bundles. The Product module uses this function to add default price fields to product types to ensure every product you create has a price value, like so:
/**

  * Ensures a base price field is present on a product type bundle.

  */

function commerce_product_configure_product_type($type) {

  commerce_price_create_instance('purchase_price', 'commerce_product', $type, t('Price'));

}
If multiple calls to commerce_price_create_instance() use the same first argument representing the field's name, the same field will be used for each instance. In the case of products, this allows Views and other functions to assume they can find price data in the same field across every product type. Without this ability, it would be nearly impossible to build reliable product catalogs and multipurpose Add to Cart forms.
Additionally, price fields created with this function are “locked,” meaning instances of these fields cannot be deleted or altered via the Field UI. For this reason, they all default to the Price with currency widget for data entry, as it uses the default store currency and alters its form elements based on the number of available currencies. While the widget will also accommodate currencies that are disabled after prices have already been entered using those currencies, you should consider it a best practice to plan for and enable the currencies your site will use prior to entering your product data.
Dynamic Pricing
Price fields have the ability to enable other modules to dynamically alter a price's amount and currency on display. Altering prices for various types of discounts and adjusting price displays for things like tax-inclusive pricing and multicurrency support is a major consideration of many e-commerce web sites. The Price module accommodates these needs via integration with Rules in the Product Pricing module, allowing you to configure price adjustments via the Rules UI.
Altering prices based on the point of display or some set of discount parameters on its own is not a difficult task, but because using Rules for dynamic pricing requires Drupal to load and execute code, this data is not readily available in the database for the purpose of sorting or filtering query results. In other words, a View that orders products from lowest to highest price would have incorrect ordering if the most expensive product is discounted when the page is generated to be the cheapest in the list. To avoid this problem, the Price module has the ability to pre-calculate and cache prices derived from independent Rules that use a consistent set of parameters to produce predictable and reproducible price alterations.
Product
After your initial store and currency configuration, your next step will be to implement your site's product strategy. You should have a clear understanding of what types of products you will be selling and how your customers will be paying for them as you begin to interact with the product system. The Product module uses Drupal 7's entity system to define a new fieldable product entity that can have any number of bundles referred to as product types. The entity also defines several view modes that allow you to control how the fields on each product type are displayed in various locations.
Any module can define new entities in the same manner using hook_entity_info(). As you contribute modules to Drupal 7 or write your own modules to extend Drupal Commerce, you should consider using the entity system any time your code depends on a displayable data object with bundles that should be configurable via a user interface. See the development discussions later in this chapter for a code example discussing the definition of an entity type.
Creating a Product Type
In addition to defining product types in code, you can use the default interface provided by the Product UI module to add and configure product types. This interface is located under the Products menu item in the Store menu. The main Products page is a view listing all products on the site in a table with a Product Types tab that lists all currently available product types with some administrative links for managing the types and their fields (see Figure 25–3).
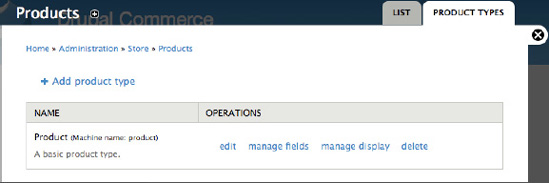
Figure 25–3. The Product Types tab allows you to add and configure product types on your site.
While the Product UI module creates a basic product type on install, most sites will need to define additional product types or at least customize the basic product type. You should add a separate product type for each group of products you sell that share a common set of attributes or features, like the size of a shirt or type of cover on a book. These attributes are represented as fields on the various product types and are added via the manage fields link for the product type. As discussed later in the Cart section, the Add to Cart form adjusts its display to allow product selection based on any required, single-value fields with a definite set of options that each of the products on the form contain.
Follow these instructions to build a t-shirt product type that might be used in an apparel store:
- Click the Add product type link pictured above and enter t-shirt as the product type name. Notice that a valid “machine name” is automatically created for the product type that will be used throughout the code to refer to this type.
- Submit the form using the Save and add fields button to create the new product type and redirect to its Manage Fields tab.
- Drag the Add new field row in the field table to a position between the Title and Price rows. Enter Size in the new field's label textfield and size in its name textfield. Select List (text) as the type of data to store, leave the widget at Select list, and click the Save button to create the new field and redirect to its settings form.
- Leave the Allowed values for the field settings blank, as these allowed values apply to any instance of your Size field and cannot be updated later if you decide you need additional options. Submit the form using the Save field settings button.
- You are now viewing a form with settings specific to the Size field on the t-shirt product type and other general field settings. In the t-shirt settings fieldset, check the Required box beneath the Label textfield to require every t-shirt product to have a size value. In the Size field settings fieldset, ensure the Number of values is set to 1 and enter a few size options in the Allowed values textarea one per line.
- Submit the form using the Save settings button to be returned to the Manage Fields tab, which should now resemble Figure 25–4. You can add any additional fields you need using the same process, including fields of other types like images.
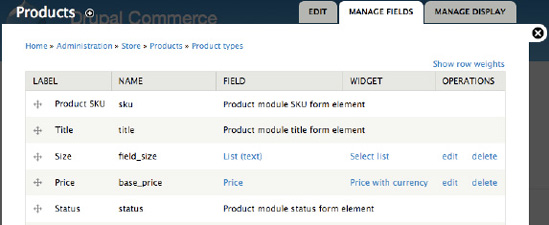
Figure 25–4. The Manage Fields tab of a product type shows the default fields added by modules and any additional fields you add via the Field UI.
Adding Products
Once you have configured the product type, you are ready to start adding products to the site. Returning to the Store ![]() Products page, you can use the Add a product link to choose the product type and start creating products. When you list products of types that have single-value fields like the t-shirt product type, you must add a separate product for each variation you intend to sell.
Products page, you can use the Add a product link to choose the product type and start creating products. When you list products of types that have single-value fields like the t-shirt product type, you must add a separate product for each variation you intend to sell.
The keen observer will realize how many products this will result in for stores that have product types with multiple attribute fields and many options. In Drupal Commerce you can end up creating several to dozens of products that differ from one another in only one field value. This is due in large part to the project's prioritization of normalizing the product data model and is an extension of its emphasis on separating the API from the UI as discussed later.
Drupal Commerce began with discussions on how to better define products in response to the poor developer experience in the Ubercart Product API, resulting from the inconsistency of attribute data, unreliability of SKU adjustments, and opacity of critical data stored as serialized arrays. The main corrective measure architected into the Commerce product system was to enforce a full definition of every possible variation of a product, including a unique product ID and SKU. This approach combined with the storage of attribute data in fields makes the product data much easier to work with and simplifies the product creation API.
![]() Note SKU stands for Stock Keeping Unit and refers to the merchant-defined unique identifier of each variation of a product or billable entity. SKUs often contain meaningful abbreviated product information but can just as well be simple numeric values, especially for stores that don't depend on the data or are in markets where other methods of tracking sold items are dominant.
Note SKU stands for Stock Keeping Unit and refers to the merchant-defined unique identifier of each variation of a product or billable entity. SKUs often contain meaningful abbreviated product information but can just as well be simple numeric values, especially for stores that don't depend on the data or are in markets where other methods of tracking sold items are dominant.
This move to focus on the API and data model at the expense of a simpler core UI was intentional. A critical part of the product strategy involves introducing usability layers on top of the product system to simplify repetitive tasks. One of Drupal's Google Summer of Code 2010 projects focused on this problem, resulting in Commerce Bulk Product Creation available from drupal.org/project/commerce_bpc. If you need to create multiple variations of the same product at once, this module allows you to create them through a form that lets you choose the attribute field options to create products for and specify a token-based pattern to use for their SKUs.
At this point, you still don't have any way to display the products you are creating to your customers for purchase. The product definition exists solely on the back end and will be displayed on the front end through a product display node type utilizing a product reference field, as discussed in the Product Reference section. As mentioned, this separation of a product's definition from its point of display is an extension of Drupal Commerce's emphasis on separating APIs from the default UI. This separation allows the same product to be referenced in multiple places, like on language specific nodes or across multiple domains, without requiring manual data synchronization to ensure that product SKUs, prices, and other information is uniform across all displays. While it may take more work to set up an initial product display, the greater flexibility is well worth the cost.
Finally, using Drupal's entity system to define products enables modules to use special fields to add functionality to different product types. The Physical Product module does just that, defining fields that you can use to describe a product's dimensions, weight, and packaging information. This data is then available on the checkout form where it can be aggregated and used to calculate shipping costs and collect additional information from the user necessary to fulfill orders of physical products.
Line Item
Drupal Commerce line items are used to represent anything on an order that contributes to calculating the order's total or fulfilling the order. The line item entity defined by the module is fieldable and can be configured in any number of module-defined bundles called line item types. Changes to line items are tracked via line item revisions, much like nodes. Every line item contains the following default properties and fields in addition to line item type-specific fields added by the module defining the type:
Any module needing to represent other information on the order, like a discount from a coupon code, can define a new line item type in the same manner using hook_commerce_line_item_info(). An example implementation may be seen in the Product Reference module, which defines the product line item type and uses a default product reference field to relate the line item to the actual product in your database. For current documentation of the line item type data structure, refer to the Line Item page of the “Info hooks” section in the Drupal Commerce Specification handbook at www.drupalcommerce.org/specification.
![]() Tip Bookmark the Specification handbook (
Tip Bookmark the Specification handbook (drupalcommerce.org/specification)and refer to it often for the most current system overviews, hook explanations, and API utilization strategies.
The line item reference field defined by the Line Item module can relate any number of line items to another entity using their line_item_id values. The field itself doesn't store any data other than IDs, but it comes with a very robust Line item manager widget that lets you add, edit, and delete line items via a dynamic form powered by the new #ajax support in the Forms API (see Figure 25–5). Modules like Cart that want to add line items to orders via the API are responsible for both creating the line items and associating them to the orders by adjusting the values of the order's line item reference field. Refer to commerce_cart_product_add() in commerce_cart.module for an example implementation of this process.
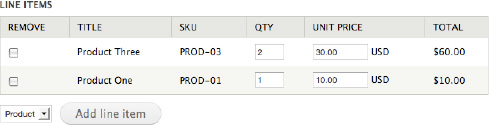
Figure 25–5. The Line item manager widget can be used to add, edit, and delete line items on an order.
Line items can be displayed using Views via a line item relationship or argument, as in the shopping cart block and Line item View display formatter, and by using the API to build a content array based on the line item type's field display configuration. You can access a list of line item types and manage their field display settings through the Line items item in the Store ![]() Configuration menu. Note that line item types can't be added or edited via the user interface because they depend on module-specific code to operate effectively. If you must alter another module's line item types, you can do so using
Configuration menu. Note that line item types can't be added or edited via the user interface because they depend on module-specific code to operate effectively. If you must alter another module's line item types, you can do so using hook_commerce_line_item_info_alter().
In addition to Product Reference and Cart, Tax is the other core module that heavily interacts with the line item system. The Tax module allows modules to define tax rates via hook_commerce_tax_info() that may apply to line items on an order. Storing tax collected in line items allows you to easily create tax reports using Views and access tax rate information via a field referencing the particular rate used to calculate the line item's price.
Product Reference
The Product Reference module defines both a product reference field and the product line item type, which uses the field to reference product data from the line item. The product reference field is the primary tool you will use to build product displays and Add to Cart forms. When the field is placed on a node type, Product Reference pulls the referenced product's fields into the node for display, using both the product and node types' field display settings to format and order the product's fields along with the node's fields. Product reference fields may reference single or multiple products, and using the Add to Cart form display formatter provided by the Cart module may be displayed as Add to Cart forms in the node display. The field also integrates with Views to provide a relationship from the display node to the referenced product's data for use in product catalog Views and other types of displays.
As you can see, this field is quite versatile and is a key part of Drupal Commerce's product strategy. By pulling product fields into node displays, image and price information can be defined and maintained on the single product entity and then referenced from any number of places throughout the site. Any updates to the product will automatically appear wherever it is displayed using a product reference relationship.
Building a Product Display Node Type
Follow these instructions to build a basic Product display node type for your site:
- Browse to Structure
 Content types in the Administration menu and click the Add content type link. Enter Product display as the content type name and adjust the settings in the vertical tabs to your liking.
 - Submit the form using the Save and add fields button to create the new content type and redirect to its Manage Fields tab.
- In the Add new field row in the field table, enter Product as the new field's label and product in its name textfield. Select Product reference, leave the widget at Autocomplete text field, and click the Save button to create the new field and redirect to its settings form.
- Leave the “Product types that can be referenced” checkboxes unchecked, allowing the field to reference products of any type. Submit the form using the Save field settings button.
- You are now viewing a form with settings specific to the Product field on the Product display content type and other general field settings. In the Product display settings fieldset, check the Required box beneath the Label textfield to require every Product display node to reference a product. In the Product field settings fieldset, leave the Number of values set to 1 and submit the form using the Save settings button to be returned to the Manage Fields tab.
- Click the Manage Display tab to see how the content type fields (Body and Product) and referenced product fields (Product: Size and Product: Price) will be ordered and displayed. Only T-shirt products will have the size field, and you don't need to display the field itself via the product display node. You will also want the node's product field to be displayed as an Add to Cart form, requiring you to select that display formatter in the field's Format select box. Update your default field display settings to resemble Figure 25–6 and repeat the process for any other display modes.
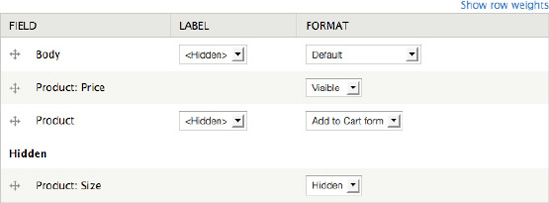
Figure 25–6. The pictured field display configuration hides unnecessary fields and orders the price field from the referenced product to be displayed right above the product reference field rendered as an Add to Cart form.
- Finally, you should review the display settings for the product fields that will be displayed in the node context. These settings are configured via the manage display forms for each product types listed at Administration Store Products Product types. Product fields can be displayed differently on each node view mode, so you may need to configure the field display settings for multiple product view modes.
Following those steps will give you a node type you can now use to list products for sale on your site. The Autocomplete text field widget adds a text field to the Node Edit form where you can enter products by SKU to reference from the node, and it autocompletes on the product SKU or Title during data entry. Nodes of this type will display a simple Add to Cart form that adds the referenced product to the customer's shopping cart.
While this simple product display is good for selling a single product at a time, it will not be sufficient for selling sets of products from the same node. For example, you might want to create four t-shirt products that all have the same style or design but are different sizes. Drupal Commerce's product data model demands each size to be listed as a separate product, but the customer only needs to see a single product display where he or she can choose the appropriate size. To accomplish this, you use a content type with a product reference field whose Number of values setting is greater than one or set to unlimited. The autocomplete text field will function just the same but support a comma separate list of SKUs, and the Add to Cart form will automatically adjust to allow the customer to choose the proper product he or she wants to add to the cart.
The inclusion of product fields on display nodes is a critical feature for this whole system, but it is not without its difficulties. For single value product reference fields, it is easy enough to pull the referenced product's fields into the node for display, and it is clear to see that any display data for the product is best stored in fields on the product type. The most common example would be to add an image field to the product type and upload your images to the products themselves so they can be displayed easily on product display nodes or on other custom displays and Views. However, for multiple value product reference fields, it is more difficult to know which product's fields should be displayed by default and whether or not some data should be stored on the products despite the potential for duplication, like the case of images for t-shirts listed only as separate products to accommodate various size options. As Drupal Commerce matures, your approach is likely to change, but at this point the best strategy is to keep as much raw data about your products, including any related images, stored in fields on the products themselves.
Customer
The Customer module defines a customer profile entity and the related customer profile reference field that works much like the line item reference field to associate customer profile data with orders. The customer profile entity supports any number of module-defined fieldable bundles known as customer profile types. Changes to customer profiles are logged via revisions, and special attention is given to ensure that customer profiles are duplicated instead of merely updated to preserve customer data for profiles referenced by previous orders. Each customer profile type can have its own set of fields to collect data pertinent to the profile type, allowing you to collect different information for billing and shipping profiles if necessary. Customer profile types like the default Billing information type use the postal address field defined by the Address Field module to collect name and address information in conformance with international standards.
Customer profiles are intended to serve as the primary method for collecting the information you need from customers in order to fulfill your orders. This information is maintained separate from the normal user account system to provide several key points of flexibility. First, this model lets users maintain multiple profiles of each type, much like the address book functionality common to most major e-commerce web sites. Second, allowing repeat customers to refer to previously used profiles, creating new profiles only when some information has changed, reduces data duplication. Third, stores that allow group purchasing can grant multiple users access to the same customer profile information, entrusting the ability to create new profiles to the managers of each group. Fourth, customer profile data can be collected and stored in relation to an order for anonymous users such that a store does not need to create user accounts at all if it does not desire. This level of anonymous checkout would not be possible if customer data were tied directly to user accounts.
Customer profile types are defined via modules via hook_commerce_customer_profile_info(). As with line item types, modules can perform configuration steps on these profile types when they are first enabled to ensure the presence of default fields. The Customer module provides checkout form integration for each customer profile type to give customers a place to supply their information, and it adds customer profile reference fields to the order object to give administrators a place to add and edit the profiles. Unlike the line item manager widget, the customer profile manager widget only supports referencing a single profile at a time. Finally, the module adds a Customer profiles item to the Store menu that allows you to create, view, update, and delete customer profiles with a separate tab allowing you to view a list of all the customer profile types and manage their fields. Any fields you add to the profile type will appear on the checkout and order edit forms and in customer profile displays.
Order
The order system consists of the order entity, order state, and status information plus an API designed to assist you in working with order data and updating orders. The order entity defines a single fieldable bundle that supports revisions for any change in the order's data. Tracking changes to orders through their entire workflow is very important from both a marketing and security perspective, allowing administrators to track a customer's interactions with the site leading up to checkout and to track the updates other administrators make to the order afterward. Therefore, special attention is paid to ensure orders and the line items and customer profiles associated with them are also revised as necessary.
In addition to the line item and customer profile data mentioned previously, orders contain metadata that tracks the order's status, creation and update timestamps, and owner information. The order status is its current step in the life-cycle of the order that provides administrators with information on what has occurred to the order and what the next step in processing the order will be. Order statuses range from shopping-cart-related and checkout-related statuses to various post-checkout statuses ending in a completed status. They are organized into containers called order states that represent the larger phases an order goes through. The owner information includes both the ID of the user who created the order, whether it was through a shopping cart or administrative form, and a contact e-mail address that defaults to the user's e-mail if he or she is logged but may be different or supplied by anonymous users on the checkout form.
The default user interface for order administration is a View listing all orders with an order creation link at the Orders item in the Store menu and a settings area in the Store ![]() Configuration menu that includes field management tabs. The default order View shows the most recent orders first and displays the order number, which can be any alphanumeric value even though it defaults to the order ID, along with other metadata including the order's total and current status.
Configuration menu that includes field management tabs. The default order View shows the most recent orders first and displays the order number, which can be any alphanumeric value even though it defaults to the order ID, along with other metadata including the order's total and current status.
While the default order View is fairly basic, it is here that the decision to standardize Drupal Commerce's default UI on Views really pays off. Many stores require tailor-made order administration interfaces that accommodate their unique order workflows and fulfillment needs. Site builders can use the familiar Views interface and theme system to customize the existing interface, add additional sorting and filtering options, and extend it with a variety of contributed Views modules like Views Bulk Operations for batch updating.
Payment
The Payment module defines a payment transaction entity that logs payment attempts for any module-defined payment method, relating these transactions to orders through the checkout process or an order's payment form. Payment methods are defined by contributed modules for each possible method of payment provided by any given payment service. As mentioned, no real payment methods are included in the core project to allow payment service integration code to mature independent of the core development cycle. The Payment module does offer reusable code for common types of payment methods that you should reuse in your integration modules, such as a standardized credit card data entry form.
Payment transactions are created any time a payment is attempted, logging the time and details of the attempt, the data returned by the payment service, and the result or current status of the payment. The payment transaction entity defines bundles for each of the enabled payment methods, but it does not allow fields to be attached to these bundles. Updates to a payment transaction are logged via revisions, with the exception of payload data received from the payment service. This data is maintained in a serialized array with a new value for each message pertaining to the transaction, and it is only visible to payment administrators for debugging purposes.
As payment transactions are created for orders, they are visible in a payment tab on the orders' Payment tab pages. This tab contains a View listing all transactions for the order sorted chronologically with a footer containing the remaining balance to be paid and a form to enter payments manually. During development and testing, you may take advantage of the Payment Method Example module to test the receipt and logging of payments, resulting in fully paid orders as shown in Figure 25–7.
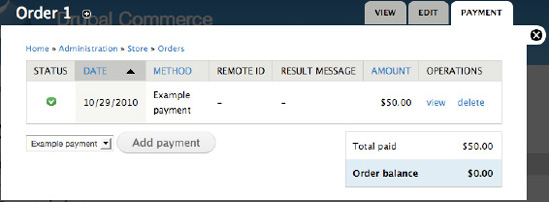
Figure 25–7. Payments are listed in chronological order on the Payment tab, where you will also find links to perform any necessary operations on the payments and a form to manually add new payments to the order.
Enabling Payment Methods
The Payment Method Example module is also useful as a model for developing your own payment method modules. Defining new payment methods is not a terribly complicated process, involving the implementation of hook_commerce_payment_info() and the definition of callbacks governing the collection and communication of information from the customer to the payment service. There are additional accommodations for payment methods that require redirection to a third party web site for the submission of payment details, ensuring these payment methods fit properly into the normal checkout workflow. As with the line item type documentation, refer to the Payment page of the “Info hooks” section in the Drupal Commerce Specification handbook for up to date information on integrating with the payment system properly.
The Payment module defines two checkout panes that handle payment from customers on the checkout form. The basic Payment pane displays any available payment methods to the customer for selection on the Review checkout page and will automatically update itself to include any additional form elements needed to collect process payments of the selected method. If an off-site payment method is selected, the customer will be redirected from the Payment checkout page via the Off-site payment redirect checkout pane that also handles customers returned from the off-site payment service. This page is skipped for payment methods that can be processed directly from your web site.
The list of available payment methods is determined via integration with the Rules module. Each payment method will receive a default rule configuration that you must enable for the payment method to appear on the checkout form. Each payment method will also likely have additional settings that must be configured in the form of the action on the rule configuration that enables it. Additionally, if necessary, you can add any conditions in the rule configuration that must be met for the customer to pay using this method.

Figure 25–8. Payment methods are enabled by rule configurations like the one pictured here for the Example payment method.
Follow these instructions to enable the Example payment method for use by users with the Administrator user role, resulting in the rule configuration pictured in Figure 25–8:
- Browse to the Payment settings page in the Store Configuration menu.
- Click the Enable operation link for the Example payment rule configuration in the Disabled payment rules table and confirm the action on the following form.
- Click the Edit operation link for the rule configuration to view an overview form listing the event that executes this rule, “Select available payment methods for an order,” the conditions that will be checked on execution, and the actions to perform upon successful evaluation. The only action will be the “Enable payment method: Example payment” action. View its configuration form via the Edit operation link to see where you would normally enter payment method settings.
- Return to the overview form for the rule configuration and click the Add condition link in the footer of the Conditions table. Select the “User has role(s)” condition and submit the form via the Continue button.
- You now need to tell Rules what user it should check for which role. In the User fieldset, select or specify site:current-user in the Data selector text field. This Token tells Rules to evaluate this condition using the currently logged in user. In the Roles fieldset, specify Administrator as the Value and submit the form via the Save button.
- Your overview form should now resemble Figure 25–8 and will result in users with the Administrator role having access to the Example payment method on the checkout form.
You will need to repeat this process for any other payment methods you want to enable on your checkout form. The administrative payment form does not depend on Rules, however, displaying any available payment method that can be processed by an administrator. Redirected payment methods will typically not work, as they are often dependent on checkout-specific information or a customer's username and password.
![]() Tip Most major payment services will have modules integrating them into Drupal Commerce, so search the e-commerce modules on
Tip Most major payment services will have modules integrating them into Drupal Commerce, so search the e-commerce modules on drupal.org before developing your own integration.
Checkout
The checkout system consists of a pluggable checkout form and an administrative checkout form builder that lets you order and configure the components of the checkout form using a drag-and-drop interface. The checkout form is comprised of checkout pages containing a set of module-defined checkout panes, which are fieldsets used to display order details and collect customer and payment information.
While the form defaults to using a two-step process with review and payment on a standalone page, it can be configured with a few clicks of the mouse to use a single-step configuration that processes the order upon form submission and redirects to the completion page immediately upon success. Whether or not such a configuration works for your store will depend on the payment methods you are using and any business rules your store has that might require additional checkout steps.
![]() Tip The two-step process is the default so customers can review the full details of their orders prior to submitting payment information. For security reasons, some payments must be processed immediately upon form submission, meaning payment should occur at the final step before checkout completion. Understand the limitations of your payment methods before making the decision to implement to a single-step checkout form.
Tip The two-step process is the default so customers can review the full details of their orders prior to submitting payment information. For security reasons, some payments must be processed immediately upon form submission, meaning payment should occur at the final step before checkout completion. Understand the limitations of your payment methods before making the decision to implement to a single-step checkout form.
The purpose of the checkout form is to collect any information needed for the order to be properly fulfilled, including processing payments as discussed in the “Payment” section. As an order progresses through the checkout form, its status is adjusted to reflect the page it is currently on, allowing you to retain information on where an order was when abandoned during checkout. The data on the order may be critical for recovering those sales and streamlining the checkout process to improve your conversion rate.
The default checkout pages defined by the Checkout and Payment modules include:
- Checkout displays the cart contents and collects customer profile information.
- Review order displays a summary of data entered and collects payment details.
- Payment is the point of redirection for off-site payment methods; skipped if not needed.
- Checkout complete is the final landing page showing an order summary, pertinent order links, and order fulfillment information.
The checkout panes appearing on each page are fully customizable, with any page without panes getting skipped in the checkout workflow. You can expose additional checkout pages and panes to the checkout form builder pictured in Figure 25–9 using the hooks described on the Checkout page of the “Info hooks” section in the Drupal Commerce Specification handbook referred to earlier.
Figure 25–9. The checkout form can be easily reconfigured using the drag-and-drop checkout form builder.
The Checkout module actually does not have a dependency on the Cart module, meaning you can enable the checkout form but devise some other method to create orders based on customer action or give customers checkout links to Administrator-created orders. The basic checkout URL is actually defined by the Cart module as a router to an order specific checkout URL – checkout/#. The checkout form does not use Drupal's multi-step form capabilities to progress through the form on a single URL, so the current checkout page will actually be reflected in the URL as the customer progresses through the form.
You are mostly left to your own devices to configure Drupal to provide an optimal checkout experience. There are many web sites and articles discussing best practices for e-commerce web sites with an eye toward increasing conversions, and the flexibility of Drupal will serve you well to optimize your checkout pages. At the very least, you should disable unnecessary blocks and menus on the checkout pages and use theming to highlight the buttons your customers should use to access the checkout form and progress through it.
Cart
The Cart module enables a fairly standard shopping cart system, allowing customers to add products to shopping cart orders that can then be purchased via the checkout form. As soon as an item is added to a customer's cart, a new order is created that will exist until it is completed via checkout. There is a default Shopping cart order state and status, but additional statuses can also tell the Cart module they are shopping cart statuses, as with the statuses representing the default Checkout and Review steps in the checkout form. This allows customers to update the contents of the shopping cart until they actually submit payment.
The shopping cart is represented by a Drupal block shown in Figure 25–10 that consists of a View listing the line items on the cart order with a footer summarizing the items on the order and linking to the cart page and checkout form. The block is quite dynamic and can be easily customized via the Views user interface and themed to match your site. The cart page provides a form also built through Views that lets users update the contents of the shopping cart and proceed to checkout.
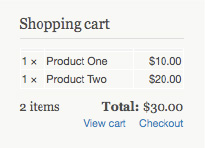
Figure 25–10. The default shopping cart block is entirely configurable via the Views user interface.
The Cart API includes functions for loading and updating shopping cart orders along with a versatile Add to Cart form function. The Add to Cart form display formatter for Product reference fields passes the referenced product IDs to this form, which examines the values passed in to determine how to display the form. Single product forms simply display an Add to Cart button for the product signified in a hidden form value while multiple product forms will vary in appearance; they might either appear as a single select list, radio buttons group, or check boxes group allowing the customer to select products to add based on the products' titles or as a set of dynamically generated widgets representing the common attribute fields on the referenced products. As the customer updates the product or attributes selected, the form uses the #ajax property of the Forms API to update elements on the page accordingly prior to adding the product to the cart.
Summarizing the Main Components
Much more can be written about how the various systems are architected, but this quick examination of the core modules should give you a functional understanding of how the major pieces of Drupal Commerce work together. The key thing you should take away is that even though the core modules do not provide you with a complete e-commerce application out of the box, the necessary systems are in place to be extended by other modules and fleshed out in the site-building process to provide the e-commerce experience your site requires.
Tables 25–1, 25–2, and 25–3 summarize the main Commerce components, specifically all the entities and fields mentioned in the previous module discussions.
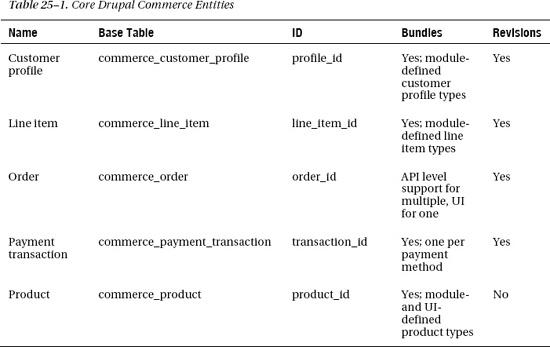
Table 25-2 . Core Drupal Commerce Fields
Table 25-3 . Default Order States and Statuses
| Order state | Order status(es) |
| Canceled | Canceled |
| Shopping cart | Shopping cart |
| Checkout | Checkout: Checkout (functions as cart) |
| Checkout: Review (functions as cart) | |
| Checkout: Payment | |
| Checkout: Complete | |
| Pending | Pending (allows completion page access) |
| Processing (allows completion page access) | |
| Completed | Completed (allows completion page access) |
Implementing Drupal Commerce
Having read through the discussion introducing the various systems, entities, and fields, you should be able to see the power and flexibility this approach to designing an e-commerce system provides. However, as you also likely surmised, the loosely coupled components that make up Drupal Commerce will require an extra dose of intentionality and expertise on your part to ensure they are successfully configured.
The old adage proves true: with great power comes great responsibility. It is now up to you to ensure that you are using the tools as intended while providing an e-commerce experience customized to your site's needs and client's expectations. Setting up Drupal Commerce sites will require extra planning effort in advance, so this final section of the chapter provides a few tips to help you get started and to mitigate some of the repetitive tasks you will encounter developing multiple sites.
Because e-commerce is just one part of your Drupal site, you should ensure that you are following Drupal site-building best practices. Plan your content types, Views, roles, and permissions in advance to ensure the foundation of the web site is strong and secure. Configuring the Commerce components is then just an extension of your normal process, requiring you to plan product types in addition to content types and add roles specifically for store administration.
Additionally, you should take extra precaution to ensure your Drupal site is secure. Plan on regular maintenance to keep Drupal and your contributed modules current; fully test your payment system and checkout workflow to ensure payment data is not exposed and orders are not fulfilled before payment Is complete. When dealing with on-site credit card payments, ensure your checkout configuration allows the payment method module to process payment when the checkout page containing the payment checkout pane is submitted. You should also take advantage of other contributed modules to beef up your security, like using Secure Pages to add SSL protection to your site.
Finally, it has been the project's goal from the beginning to enable site builders and developers to create reusable Drupal Commerce distributions and Features modules targeting specific e-commerce use cases. The amount of work involved in setting up a Drupal Commerce installation is not something you will want to repeat afresh with each new site, and it requires a level of proficiency with Drupal that will be beyond the grasp of most new users. As targeted distributions of Drupal are becoming more popular, aided by the automatic installation profile packaging features of drupal.org itself, the vision for Drupal Commerce is to see many of these geared toward e-commerce sites such as:
- Clothing and apparel stores with ready-made product types and displays.
- Premium content and membership sites selling user roles, node access, and other types of permissions with flat fees and recurring payments.
- Outreach and donation collection sites for non-profit organizations.
- Community-based event registration and support sites.
With this strategy and vision in mind, the Commerce components were also designed to be usable by Features and other modules enabling exportable site configurations. Additionally, the use of Views for the default user interfaces and Rules for order workflow automation allows you to export your setup along with your Commerce configuration. The standardization on entities and fields for all the Commerce objects provides a consistent data model for importing and exporting your e-commerce data. Using all these pieces to develop reusable sites and custom distributions requires intentional planning on your part, but the payoff in your own site building workflow and in community usage is well worth the effort.
Development History
Parts of Drupal Commerce are best understood in light of its development out of the Drupal based e-commerce projects that have gone before it. The Drupal Commerce feature set and usability goals have their roots in Ubercart, and its development philosophy was influenced by both the community experience of developing for Ubercart and the radical changes enacted in the latest version of the e-Commerce module. However, the code and user interface for the Commerce modules look and act almost nothing like the former projects, as the new modules were written specifically for Drupal 7 in conformity with a strict set of development standards outlined later in this chapter.
The principle goals of Commerce in its original departure from Ubercart included desires to:
- Establish a better-documented, easier-to-use API for contributed module developers.
- Separate plug-in modules from the core systems to allow each group of modules to mature independently of the concerns of the other.
- Establish a data object model based on Drupal 7's Entity and Field systems, depending on the UI to reduce any repetitive data entry that might ensue.
- Provide full test coverage for the core modules using Drupal's Testing framework.
- Take advantage of installation profiles and modules like Features to provide default configurations instead of focusing on a complete user experience in the modules alone.
- Provide a migration path from Ubercart to Drupal Commerce. Without a one-to-one feature correlation, a direct module update from one to the other is impossible.
Development has been accomplished in rounds since the project's inception, with systems being proposed and discussed in the project forums, IRC, and physical code sprints before being developed. To learn more about the project's history and stay on top of development proposals and roadmaps, refer to the forums and documentation at drupalcommerce.org.
Design Philosophy
When you first look at the list of Commerce modules, two things are likely to stand out that require a bit of explanation. The first is the raw number of modules available, including the separation of some modules into pairs of API and UI modules. While some users are turned off by the amount of setup required to install and configure the various modules, this division was made intentionally so the same set of modules can be adapted to a wider variety of e-commerce web sites. As your experience grows, you can enable only the modules you need for a particular site, while installation profiles and other modules can provide default configurations for common use cases.
For example, by separating the default UI from the modules that actually define the data objects and core APIs, site builders are freed to provide full drop-in replacements for parts of the UI that do not suit their sites. Additionally, by separating some systems into their component parts, like keeping Cart and Checkout separated, the same core set of Commerce modules may be used for traditional shopping-cart–based stores, sites with no checkout process that use shopping carts to deliver quotes, and invoicing sites where administrators create orders and send customers checkout links to provide payment.
![]() Note This practice should be familiar to most users of Drupal 6, as Views and Rules have separated their default user interfaces to separate modules since then. Drupal 7 continues this practice with its division of the Field system into the Field and Field UI modules.
Note This practice should be familiar to most users of Drupal 6, as Views and Rules have separated their default user interfaces to separate modules since then. Drupal 7 continues this practice with its division of the Field system into the Field and Field UI modules.
The second thing that stands out is the lack of modules adding common e-commerce features like product promotion tools, discounts and coupons, and integration with third party payment and fulfillment services. In the earliest planning stages of Drupal Commerce, the project's goal was to include in the core project only the systems and data objects without which it would not be a coherent project and which are necessary to build and support all necessary non-core features. This does not mean features not included in the core modules are not essential or deserving of special attention and maintenance. This is instead an architectural decision designed to improve the development process overall by freeing the core systems to iterate to new versions without first requiring every plug-in module to be updated.
A great example is the presence of the Payment module in the core project without any modules that actually integrate with the major payment services. It might be inconvenient to include modules integrating with the common payment services in the core project, but decoupling the development of the integration modules from the core project allows the various projects to mature and incorporate new features on their own timelines. The core Payment module can be improved and released without first requiring a collection of payment modules to be tested and updated on the new system, while at the same time the integration modules are free to respond to API and feature changes at the integrated service without having to wait on a new release of Drupal Commerce.
A final major point of the project's design philosophy is a dependence on installation profiles and modules like Features to simplify the process of starting a new Drupal Commerce site for a variety of targeted use cases. The core modules do not make any assumptions about the use case or business needs of sites that will implement them. Instead they focus on being flexible and extensible, supporting exportable configurations, and developing forms to be embedded anywhere instead of limiting them to the default UI implementation. The goal for the project is to see distributions provide an out of the box experience for niche markets, like apparel stores, event registration sites, and non-profit organization donation sites.
Development Standards
In addition to adopting a design philosophy that focuses on modularity and reproducible configurations, Drupal Commerce has adopted and enforced a strict set of development standards to ease development and maintenance. The main objective was to provide a well-documented, consistent API for developers to integrate with in their contributed modules and installation profiles. No patches are accepted that do not conform to the development standards listed at drupalcommerce.org/development/standards.
While the standards do occasionally change in response to core Drupal updates and issues that require the adoption of new standards, the current list of standards addresses the following topics:
- Code syntax and documentation based on Drupal's own coding standards.
- Module file and directory structures.
- Module .
infofile package naming. - Function and hook naming to avoid common PHP inconsistencies and provide pattern-based namespacing for hooks.
- Proper utilization of Drupal's Testing framework.
- Using core and contributed module APIs.
- Embracing fine-grained permissions and extensible access control.
- Localization and user interface string storage.
- Template files and theme functions.
- Appropriately separating core APIs from the default UI.
- Performance considerations covering database and memory usage.
- Normalized data storage via entity and field data tables.
Building on Drupal 7
The Commerce modules were written to take advantage of many improvements in Drupal 7, most notably its fieldable entity system. They also owe much of their flexibility to Views, the query builder providing displays including the shopping cart and product lists, and Rules, the contributed system for performing conditional actions in response to events like checkout completion and order updates. The rest of this book was written to cover the many improvements in Drupal 7, but a few are highlighted here as holding special significance for Drupal Commerce.
Core Entities and Fields
The hallmark new feature of Drupal 7 is its system of fieldable entities. No longer must everything be a node to benefit from modules like Drupal 6's Content Construction Kit, resulting in a rethinking of major systems like user groups and e-commerce. Contributed modules can standardize on the entity system to define new data objects that can be bundled with any number of module-defined or user-configurable fields.
The Product Entity
Drupal Commerce has fully embraced the new system, defining all of its custom data objects as fieldable entities with varying use of bundles and revisioning based on the entity type. For example, whereas previous e-commerce projects for Drupal relied on the node system to implement products, Drupal Commerce defines a specific product entity. This entity has multiple bundles, each constituting a different product type that may contain fields to describe the product and choose from among a group of products on an Add to Cart form.
To define the product entity, the Product module uses the code in Listing 25–1.
Listing 25–1. Defining the Product Entity
/**

  * Implements hook_entity_info().

  */

function commerce_product_entity_info() {

  $return = array(

    'commerce_product' => array(

    'label' => t('Product'),

    'controller class' => 'CommerceProductEntityController',

    'base table' => 'commerce_product',

    'fieldable' => TRUE,

    'entity keys' => array(

      'id' => 'product_id',

      'bundle' => 'type',

    ),

    'bundle keys' => array(

      'bundle' => 'type',

    ),

    'bundles' => array(),

    'load hook' => 'commerce_product_load',

    'view modes' => array(

      …

    ),
    …

  );


  foreach (commerce_product_type_get_name() as $type => $name) {

    $return['commerce_product']['bundles'][$type] = array(

      'label' => $name,

    );

  }


  return $return;

}
Notice that the structure of the entity array includes keys related to product storage in the database and the controller class, CommerceProductEntityController, used to perform CRUD operations on products via save, load, and delete functions. Any of these values may be altered using hook_entity_info_alter() to change the nature of product data storage, though you should be cautious when making such a decision as you may interrupt the ability of other modules like Views to take advantage of the data.
The omitted portions of the previous code snippet handle the definition of the various display modes available for products and the definition of various callbacks that Rules uses to work with the product entity. The foreach loop populates the product entity's bundles array with data from commerce_product_type_get_name(), an API function that invokes hook_commerce_product_info() to gather information from enabled modules on available product types.
The Order Entity
Again, the order object is defined as an entity, allowing administrators to easily add fields to the default order bundle based on the site's business needs. These orders then take advantage of entity revisioning to track all the changes made to the data on an order.
When an entity is not defined to support multiple bundles, it defaults to a single bundle with the same machine name as the entity itself. In the case of orders, a single bundle is explicitly defined, making this unnecessary, a shown in Listing 25–2.
Listing 25–2. Explicitly Defining a Single Bundle
/**

 * Implements hook_entity_info().

 */

function commerce_order_entity_info() {

  $return = array(

    'commerce_order' => array(

      'label' => t('Order'),

      'controller class' => 'CommerceOrderEntityController',

      'base table' => 'commerce_order',

      'revision table' => 'commerce_order_revision',

      'fieldable' => TRUE,

      'entity keys' => array(

        'id' => 'order_id',

        'bundle' => ‘type',

        'revision' => 'revision_id',

      ),

      'bundle keys' => array(

      'bundle' => ‘type',
      ),

      'bundles' => array(

        'commerce_order' => array(

          'label' => t('Order'),

        ),

      ),

      'load hook' => 'commerce_order_load',

      'view modes' => array(

        …

      ),

      …

    ),

  );


  return $return;

}
Notice that the bundles array contains only a single bundle. Should you need to enable multiple order bundles for some reason, you would have to alter this array with hook_entity_info_alter(). The initial version of the Order module defaults to a single bundle with database and API level support for multiple bundles.
If you encounter a situation where you need to define your own revisable entity, you can use the order entity as a model. Notice that you must specify both the revision table and the revision key that links an order to its currently revision. Your controller class must add its own support for saving revisions, but you can depend on Drupal's default entity controller to properly load revision information into the object. In your controller class's save method, the revision should be saved prior to using the Field Attach API to add or update field data to the object to ensure it gets saved with the proper revision.
A full list of entities and their properties is included later in the chapter. You may also want to bookmark drupalcommerce.org/specification/entities as a reference during your development.
Various Commerce modules also take advantage of the field API to link data objects together, add data to entities that would benefit from user configurable display options, and embed Add to Cart forms on any entity in the site. These fields operate in much the same way that CCK fields did in Drupal 6 and will be listed below alongside the core entities. You may also want to bookmark drupalcommerce.org/specification/fields as a reference during your site building.
Forms API Improvements
There are a couple of improvements to the Forms API, both of which are covered in this section.
Dynamic Forms via the #ajax Property
One of the most visible new features of the Forms API that the Commerce modules leverage is the new #ajax property for form elements. With the #ajax property, it is possible without writing a single line of JavaScript to create forms whose elements automatically validate and update on changes and other user interactions.
In the Commerce modules, this functionality is utilized in a few places. On the order edit form, the line items table uses the #ajax property to allow you to add and update line items without a page refresh. The Customer module integrates with the Address Field module that uses it to provide name and address elements that automatically update to reflect the format and vocabulary of the selected country.
The following code shows just how easy it is to implement a dynamic form using #ajax. It is taken from the Payment module form element that updates the checkout form when a customer selects a payment method option. The full implementation is found in commerce_payment.checkout_pane.inc.
// Add a radio select widget to specify the payment method.

$pane_form['payment_method'] = array(

  '#type' => 'radios',

  '#options' => $options,

  '#ajax' => array(

    'callback' => 'commerce_payment_pane_checkout_form_details_refresh',

    'wrapper' => 'payment-details',

  ),

);
The callback function the element specifies simply has to return the portion of the form array that should be rendered into the area of the DOM targeted by the wrapper value which corresponds to an HTML ID. Forms using this functionality are tested without JavaScript enabled to ensure graceful degradation, relying on the ability of form submit handlers to request the form be rebuilt based on the button used to submit the form.
Automatic File Inclusion
Another innovation in the Forms API that the Commerce modules rely on heavily is the ability to specify in a form array the files Drupal should include when rebuilding the form. This allows modules to put forms in include files that can be automatically loaded when the form is processed on submission instead of depending solely on active menu item file handlers. All of the Commerce entity forms use this feature so they can be instantiated at URLs specific to the default UI module or by other contributed modules wherever necessary. The code to allow this is quite simple, as shown in this example from commerce_product.forms.inc:
function commerce_product_product_form($form, &$form_state, $product) {

  // Ensure this include file is loaded when the form is rebuilt from the cache.

  $form_state['build_info']['files']['form'] = drupal_get_path('module', 'commerce_product')

    . '/includes/commerce_product.forms.inc';

  …

}
Both of these new features in the Drupal 7 Forms API are very important for Drupal Commerce. The first enables the project to have dynamic forms that greatly improve the user experience for customers and administrators. For example, the checkout form can be configured to operate on a single page that will gracefully degrade for users on devices that do not support JavaScript. Second, the ability to define forms by Commerce modules that can be embedded anywhere perfectly supports the project's philosophy of a strict separation of the API from the UI.
Contributed Module Dependencies
As part of the strategy to start Drupal Commerce from scratch on Drupal 7, the project determined to make the best possible use of other major contributed modules to avoid duplicating code and effort. This involved introducing dependencies on the ubiquitous Views module, the Rules module, and their dependencies.
Views 3 powers almost the entire default user interface provided by the various Commerce UI modules. This means every listing page, the shopping cart block, and some table displays embedded on other forms are configurable via the Views UI. The Commerce modules rely heavily on Views 3's new pluggable area handler feature to create more powerful displays entirely through Views, like the shopping cart block and Payment tab on orders. Both of these displays use custom area handlers in their footers to add links and forms onto Views.
The dependency on Rules is just as important. The Entity API module, itself a Rules 2 dependency, makes it easy to expose custom entity and field data to Rules. The Commerce modules integrate with Rules to allow administrators to configure dynamic pricing, parts of the checkout form, and the order workflow via a single user interface. This latest version of Rules also makes it easy to embed parts of the UI at various locations, so the Commerce modules can place filtered configuration lists at appropriate places in the default UI.
Address Field, a dependency of the Customer module, is also maintained as a separate contributed module. This project defines a field that lets users enter name and address information via a dynamic set of form elements that update based on the country selected. It was started with the goal of implementing a subset of the xNAL standard for names and postal addresses and remains separate to allow it to mature independently of the core Commerce modules and to enable other projects and sites to use it.
Summary
The Drupal Commerce project is still maturing, and innovations in the core code and contributed module ecosystem are likely to change rapidly in ensuing releases. Be sure to follow along at the project's home page (drupalcommerce.org) and in the issue tracker (drupal.org/project/issues/commerce)to see how the systems outlined here mature and to find places where you can contribute documentation, testing, code, and more. You can also generally find assistance in the #drupalcommerce IRC channel on irc.freenode.net when dealing with issues or guidance when developing contributed modules that extend the functionality of Drupal Commerce.