
Serial Library
The Serial library is a little different from the other libraries that are a part of the standard Arduino distribution. First, the library is automatically included in our sketches along with the normal Arduino library without us needing to do anything. Second, an instance of the Serial library is already created for us in the background that, on the Arduino Uno, is called Serial, and on the Arduino Mega might be Serial1, Serial2, or Serial3. So when we use one of the upcoming functions, it will be preceded by the instance name Serial and a period to separate the library name from the procedural or function name. As an aside, you might have noticed by now that many of the different libraries have similar procedures, including begin(), print(), write(), and others, so it is important that we get the instance of the library correct or who knows what will happen! Enough posturing, let's move onward with our first Serial function.
begin()
With the Serial library already included for us and an instance called Serial already created, the first thing we need to do to work with the Serial functions is to establish a data transfer speed. To do that we use the begin() function.
Serial.begin(datarate)
Again, our instance name on the Arduino Uno is Serial, so we will stick with that for our instance name. The datarate parameter is the speed measured in bits per second that, for communicating with our computer, should be one of the following speeds: 300, 1200, 2400, 4800, 9600, 14400, 19200, 28800, 38400, 57600, or 115200. Generally, you'll find that 9600 is a fairly common speed and is more than fast enough to do what we want to do. In our project sketch, this function took the following form:
Serial.begin(9600);
This sets up our communication to occur at a speed of 9600 bps. You might have a reason to set a more esoteric speed if your device calls for it, but whatever speed is set, both devices need to be set for the same speed. To do this in the built-in Serial Monitor, there is a drop-down menu in the bottom-right corner of the window where these speeds can be selected.
available()
Since we have already looked at sending data to our computer a few chapters ago, we will first talk about reading data and get back to sending it later in this chapter. Before we can read data from the serial line, we need to know if data is available or not. That's where the appropriately named available() function comes in.
Serial.available()
This function has no parameters but will instead return the number of available bytes waiting in the serial buffer. Remember, the hardware serial port on the Arduino microcontroller has a buffer that can store up to 128 bytes of information so that it doesn't get lost. If no data is waiting for us, it will return 0 and we can use this in an if statement like we did in our project code, as follows:
if (Serial.available()) {
If no data is available in the buffer, then this function will return 0 and evaluate as false. On the other hand, if any data is available, the function will return a value other than 0 that will evaluate as true and we can proceed to read from the buffer. In our example, it didn't matter how much data is in the buffer, only that there was data to be read.
read()
Now that we know there is data waiting for us in our buffer, we can use the read() function to do something with it. While the syntax is simple enough, there are some unusual characteristics that we will need to work through before moving on.
Serial.read()
This function simply returns the first byte of information available in the serial buffer. Because the way our serial communications are structured, each character that we send to the Arduino through the Serial Monitor will be converted to that character's ASCII character value. See, I warned you this would come up again. For example, if we were to send the Arduino the number 1, instead of receiving the numerical integer 1, the Arduino will actually receive the numerical value 49 corresponding to that character's ASCII character code. I know, this is not the most intuitive process here but bear with me.
![]() Note As we continue our discussion of characters, remember that the use of single and double quotes is not interchangeable. Single quotes are used for characters, as in the character ‘a’, while double quotes are used for strings of text, as in “Hello, world!”
Note As we continue our discussion of characters, remember that the use of single and double quotes is not interchangeable. Single quotes are used for characters, as in the character ‘a’, while double quotes are used for strings of text, as in “Hello, world!”
When we read a byte from the serial line, we are reading one of the ASCII values from 0 to 127 that correspond to the ASCII characters, shown in Table 10-1, that are received through the serial hardware one byte at a time. We can either leave the numerical value alone by assigning it to a numerical data type, or we could store it as a character by using the char data type. From our example code, it is as follows:
byte incomingByte = Serial.read();
This statement assigns the numerical value of the byte that is read from the serial buffer to the variable named incomingByte of the byte data type. We used the byte data type because that is the largest data type that will be returned by the read() function. In this example, if we send the character '0' to the Arduino it will assign the value 48 to the variable incomingByte. Likewise, if we send the character '9', then the value 57 is assigned instead. While these are not the numbers we would initially expect, we can still work with them to do what we need to do. But first, let's look at what would happen hypothetically if we changed the data type to the following:
char incomingByte = Serial.read();
While the read() function will still read the incoming byte as an ASCII character code, by storing this value in a char data type, we will keep the character as a character. So rather than storing the numerical value 97, we would store the character 'a'; instead of 49 we would have the character '1'. It's important to remember that this is not a numerical value—adding two characters may not give you the expected outcome. For example the character '1' added twice is not equal to 2. Written another way, '1' + '1' != 2. Instead, it would result in a value of 98, which, if we sent that value back to the Arduino Serial Monitor would gives us the character 'b'.
To make things worse, serial communication happens one byte or one character at a time. So we would not be able to send the numerical value 180 straight from the Serial monitor. What would happen is the Arduino would receive three bytes that correspond to the characters '1', '8', and '0'. That's not going to work for the servo. If we refer back to the ASCII Character Codes chart in Table 10-1, we will see that the character '0' has the code 48, '1' is 49, and so on. So if we either subtract the numerical value of 48 from the character code for a number, or subtract the character '0' then we will end up with the actual numerical value that corresponds to the character. For example, we might write a statement like the following:
incomingByte = incomingByte - 48;
Using this statement, we might receive the character '5' that has the ASCII code 53. Subtract 48 from 53 and we end up with 5—a number that can be used with more predictable results. That's nifty, right? We might also write the same statement as the following:
incomingByte = incomingByte - '0';
Every time the compiler sees the single quotes it knows we are talking about the character '0' and not the numerical value 0 and so it makes the substitution for us. Now that we have converted a single digit from a character to a numerical value, we need a way to stitch them together so to speak so that we can get a value like 180. In our earlier code we used the following statement:
angle = angle *10 + (incomingByte - '0'),
The last bit of the statement should look familiar from our previous discussion, so let's look at the operation angle = angle *10 and what happens in this statement when we send 180 from the Serial Monitor. The first time through our loop it is angle == 0, so angle *10 will also equal 0. We then add the result of the first incomingByte after it has been subtracted by the character '0' to get its numerical value, in this case 49 - 48 for a result of 1. That's the first digit. The second time through the loop it is angle == 1; we then multiply by 10 to get a result of 10, and then add the result of the character '0' subtracted from the character '8', or 56 - 48, which is the numerical value 8, when added to 10 is 18. The third time through the loop, angle == 18, angle *10 == 180, and then we add the value 0 and now angle == 180. If we hit the Enter key, with the Newline option selected at the bottom of the window, our sketch will quickly work all this out and send the byte value 180 to the servo function. It's not too bad if you just think it through a few times.
Now our code only has a way of converting the character of numbers to actual numerical values. For the most part it will ignore any character other than a digit from 0 through 9.
print()
Now that we know how to read various characters coming in from the Serial input, let's look at a few functions that will send information out through Serial, beginning with the print() function. These functions work a little differently from the read() function, so we will try to be thorough at the risk of putting our readers to sleep. The syntax for this function follows:
Serial.print(data);
The print() function is used for printing ASCII characters to the connected serial device. The data we specify as a parameter can take many different forms, so we need to make sure that the data we want to send is in a format of our choosing. The print() function makes the general assumption that if you specify a value like 33, what you really want to send are the characters '3' and '3' not the ASCII character code for '!'. There's another function for that, but first, Table 10-3 looks at some of the different examples of various statements and what output will be displayed.
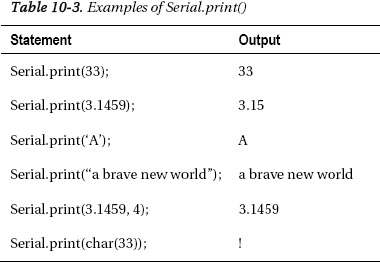
These examples begin with the default behavior of the print() function in that by providing a numerical value to the function, the function will display each of the characters that make up each digit of the number. It is important to note that our example does not print the integer 33 but rather the characters '3' and '3'. The second example shows that by default, the print() function will print to two decimal places. Characters like the letter 'a' are enclosed with single quotes while text strings such as "a brave new world" are bracketed in double quotes. Finally, we bend the function a little by specifying additional decimal places for displaying floats and the last example shows how to force a char data type on a numerical value to display the ASCII character for that value.
Each time the print() function is called, data is displayed in one continuous line. To create spacing between multiple values we might use one of the three following statements:
Serial.print("  ");

Serial.print(char(9));

Serial.print ('	'),
The first of these three statements prints the text string of five spaces. Instead, we could use the ASCII code for the escape sequence for tab. By forcing the char() data type, the print() function will tabulate the next printed data. Alternatively, we could use the '/t' escape sequence to create a tab as well. Likewise, we could use escape sequences to create a new line, but to do that we usually use the following println() function instead.
println()
The println() function is short for print line. After printing the specified data, it will return to the next line and start again. Its syntax is the same as print():
Serial.println(data)
This function is the equivalent to either of the following groups of two statements that print the ASCII codes or escape sequence for both return and new line:
Serial.print(char(13));

Serial.print(char(10));
or
Serial.print('/r'),

Serial.print('/n'),
The println() function is a little easier to use and helps to clean up the output that we receive with the Serial Monitor. You'll often see both the print() and println() functions used in conjunction to format the output, making the text easier to read.
write()
Where the print() function made one assumption about the type of data that we wanted to send, the write() function will make the opposite assumption. Its syntax is also similar to the print() function.
Serial.write(data)
However in this case, the assumption is made that if we specify the value 33 we obviously mean the ASCII character code 33, so this function will display the character '!'. This function effectively replaces the statements Serial.print(33, BYTE); or Serial.print(byte(33)); from versions of the Arduino software prior to 1.0. As these statements are no longer valid, any time we want to display a character by calling its character code, we will need to use the write() function for that. Finally, the write() function can only send data in a single byte, limiting the values to 0–255 or the ASCII codes listed earlier.
And with that, we wrap up the last of the hardware based Serial functions that we will discuss in this chapter. There's a lot we can do with our new form of speaking to the world, but with only one serial port we are a little limited. Say we wanted to connect a new serial device, such as a reader for RFID tags that also uses serial to communicate, we would need to disconnect the device, upload our sketch, and reconnect the device to use it. Needless to say, we would not be able to fully use both the RFID reader and any other serial devices at the same time.
To get around this, we can use a new library called SoftwareSerial to create a software-based serial port on any of the Arduino's digital pins. This is hugely helpful for expanding the number of devices that we can talk to, but it's not without its limits. Our next section will look at how the Software Serial library works and use it to read data embedded in tiny little RFID tags that we can use for all sorts of things.