
C H A P T E R 1
Workflows
These days organizations have two possible ways to get ahead of each other. One is by working harder and the other is by working smarter. Now we all know how much working hard gets you ahead, not much! So it all boils down to working smarter. Working smarter simply means achieving more by doing less. This means finding someone else to do your work, so you don't have to do it, conventionally referred to as outsourcing. Interestingly, we know that doesn't go too far either! Therefore, the only long term and viable alternative that organizations have discovered to better productivity is to automate. Automate more and more processes. Automation in an office environment means creating software that supports business processes that involve numerous roles, people, and perhaps, even external systems.
As a result of following those automated processes, there is never a confusion on whose turn it is next to approve a certain project proposal so it can be efficiently routed to a customer. In contrast, when a serious exception occurs based on predefined rules, appropriate people can be emailed so human intervention can be involved where necessary. By following these processes in a system setup, you can be assured that no particular step was missed. There is no need to double check, because the computers are doing that double-checking for you. Finally, by working through the process defined in a computer system, you are also collecting historical information that can be looked at later or archived using one of the many ways to manage SharePoint data as you have already seen in this book.
To support this endeavor, a new player was introduced in .NET 3.0 called as the Workflow Foundation! SharePoint 2007 and SharePoint 2010 leverage Workflow foundation to provide the capability of authoring and running workflows in SharePoint as well. In other words, SharePoint can act as a workflow host.
Now you might argue that everything I described so far about creating automated business processes in software can be hand-coded from scratch. You'd find me agreeing with you—not everything needs workflow foundation. In fact, using workflow foundation introduces some additional complexity and also ties you down to a certain way of doing things. But, it gives you so much other stuff on top, that maybe in some instances it makes sense to represent complex long-running business processes using workflow foundation. In terms of SharePoint 2010, the following interesting facilities become available to you should you choose to author your business processes in SharePoint Workflows.
- Everything that workflow foundation gives you, such as the reliability of long-running processes to last across machine reboots, is made available to you, if you represent your business processes as workflows in SharePoint.
- Ability to visualize the workflow graphically, so the end users can view the current flow. The running progress of a workflow is made available using Workflow Visualization using Visio if you use Workflow in SharePoint 2010.
- Business users can craft up workflows in tools such as Visio or SharePoint Designer in a very easy-to-use graphical way. These graphical views of the workflow can then show running workflows in SharePoint; reporting analysis tools can be written on the log history of the running workflow instances which can allow you to perform improvements on the running workflow.
- The same workflows that have been written by business users can then be exported to Visual Studio, where developers can extend the workflows and integrate them with custom logic, third party products, and make them interact with proprietary algorithms or systems. Of course, you do have the capability of writing a workflow from scratch in Visual Studio as well.
Given an enterprise processes problem, when should you choose to implement it as a workflow and when should you just write custom code representing that business process? I hope once you have examined all of the preceding scenarios in this chapter, you will be able to answer this question very well.
In this chapter, I will start by demonstrating out of the box workflows that come with SharePoint, so you get an idea of what workflow foundation in SharePoint gives us. Once you have a solid understanding of the basics, then I will enhance it further by involving tools such as Visio and SharePoint Designer. Finally, I will wrap up by involving Visual Studio in authoring complex logic that SharePoint Designer and Visio are unable to express. Let's get started with using out of the box workflows in SharePoint 2010.
Out of the Box Workflows
SharePoint 2010 comes with several workflow templates out of the box. These are generally installed as features, and are available for you to associate with lists or at the site level. In SharePoint 2007, you could only associate workflows with lists. Therefore, step one of having a workflow available for use is for it to be installed as a feature. Once it is available for use, you can then create “Associations” of the workflow with existing lists or sites. At this point, you can optionally ask the user associating the workflow some questions, usually presented as an “Association Form”. An association form is what allows the workflow to interact with the user when the workflow is first associated with a list.
Once you have created an association of a workflow template, you can then choose to run the workflow on individual list items (or run it on the site if you had chosen to associate it). When you start a workflow, it can ask more questions by showing yet another form called as the initiation form. Thus, the “initiation form” is what allows the system to ask questions when a workflow is first initiated/instantiated.
As the workflow is running, it can ask further questions of the users. In asking those questions, the workflow can create tasks for users, and those tasks can then be performed by the end users. Those tasks go in a list, and can be represented as yet another kind of form, called as the “Task Form”. Note that a workflow can have zero or one association forms, it can have zero or one initiation forms, but it can have many task forms.
Similar to task forms, the workflow can also be altered midcourse by end-users by using yet another kind of form called a “Modification form”. Just like the task form, there can be zero or many modification forms on a workflow.
Let's pick an out of the box workflow and understand the usage of all these forms and the workflow lifecycle in general. The workflow I intend to use here is the “Approval” Workflow, which comes out of the box in paid versions of SharePoint.
In your SharePoint site, go ahead and create a new list based on the Custom List Template and name it “Items to be Approved”. Then visit the list settings page of this list and view the versioning settings. Under versioning settings, choose to “require content approval for submitted items”. By choosing this option, you just enabled the ability to have draft items available in the list. Draft items mean items that are currently a work in progress and should not be seen by everyone. They can be seen only by the author or by people who have the ability to view and approve draft items. This is controlled by the “manage lists” permission, which is one of the permission settings that you can give any particular SPPrincipal. An SPPrincipal can be an SPGroup or SPUser. I will talk more about security in Chapter 12 where these object names will make more sense.
Next, back under lists settings visit the workflow settings link. Here you will find the various workflow associations you can create with this particular list. If you are using the enterprise version of SharePoint, the various workflow associations available to you are the following:
- Disposition approval
- Three state
- Collect signatures
- Approval
- Collect feedback
For this example, you will use the approval workflow. Therefore, select the approval workflow template and give it a name of “Approval”. Then, click the next button. Clicking the next button brings up the association form, which is an out of the box InfoPath form. If you have used this workflow in SharePoint 2007, you would note that this form has been redone. Fill out the form as shown in Figure 10-1.

Figure 10-1. The Association form created in InfoPath
Notably, I have checked the check box for “Enable Content Approval”. This means that the completion of this workflow will approve the associated list item that this workflow is running upon. Once you've filled out the form, click the save button. You will then be presented with a screen, as shown in Figure 10-2.
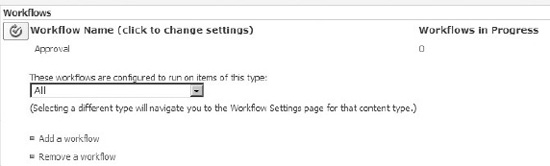
Figure 10-2. The associated workflows with a list
This screen informs you of all the associated workflows with this particular list. If you have used workflows in SharePoint 2007, you would note a notable difference here. Even within a list, you now have the ability to configure to run a particular workflow with a particular content type.
Now add an item into the list and put “Test Item” in the Title. Note that SharePoint informs you that the items in this list require content approval, and that your items will not appear in public views, unless they are first approved by someone with proper rights. This can be seen in the Figure 10-3.
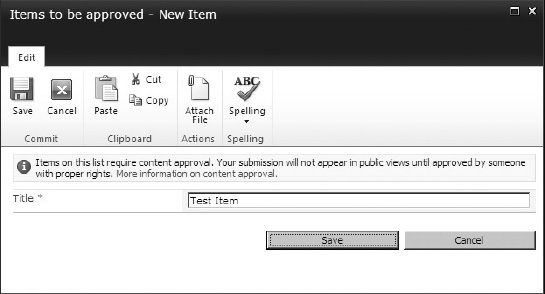
Figure 10-3. You are being informed that items on this list will require content approval.
Once you have created this item you would also note that the default view now contains a column called “Approval Status” and the approval status as of now is “Pending”. Select the item and from the ribbon under the items click the workflows button. Alternatively, you can also choose to access the workflow screen from the ECB menu. Click the approval workflow association that you had created earlier to initiate the workflow. Initiating the workflow will present you with the initiation form. This form can be seen in Figure 10-4.
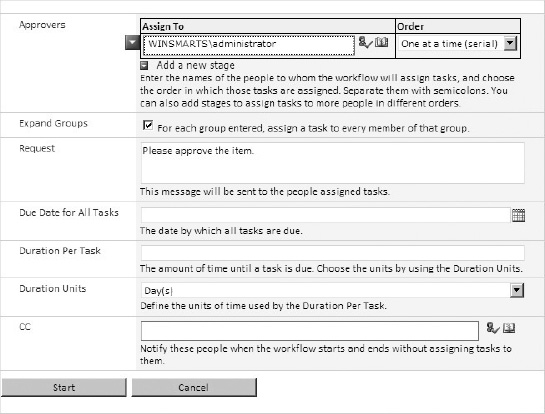
Figure 10-4. The initiation form for the workflow
Click the start button to start the workflow. By starting the workflow, the specified approver will be sent an e-mail message, and a task will be created for them requesting to come and approve the item. This task presents itself as yet another InfoPath form and can be accessed directly from either their e-mail or from the SharePoint site. In the SharePoint site, the task is created in a list called “Tasks”. You specified this list name right before association form. There is another list you specified when creating this association, called “Workflow History”. This is a hidden list and will store all the history activities of the running workflows.
Now visit the tasks list at http://sp2010/Lists/Tasks, and you will see a task created for the administrator. Clicking on this task brings up another form, which is the task form. This can be seen in Figure 10-5.
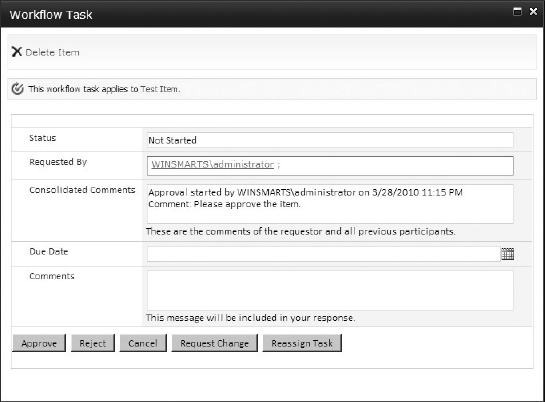
Figure 10-5. Task form for the workflow
At this point, clicking on the request change or reassigned task will bring up the necessary modification forms as well. For now, go ahead and click the approve button and then visit the “items to approve” list one more time. You would note that the item that the workflow was running upon has now been approved. This can be seen in Figure 10-6.
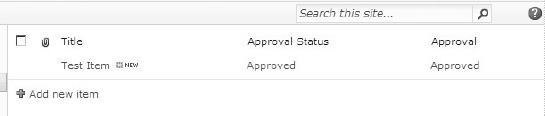
Figure 10-6. Approval Status and Workflow Status on the list item
Now, let me show you something really cool! Click the “Approved” link under the “Approval” column. This should take you to a page that informs you of the status of the current workflow. Assuming that you have office web applications installed in the current site collection you're working in, and you have activated the “SharePoint Server Enterprise Site Collection features”, and that Visio Services of configured on your web application, you should see a graphical view of the current workflow instance as shown in Figure 10-71.
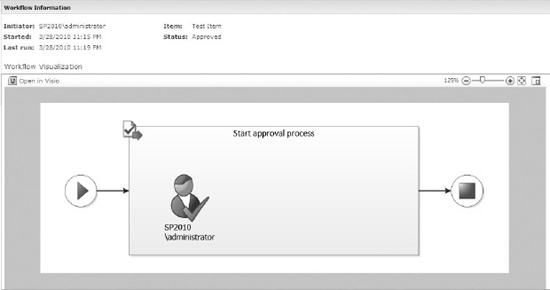
Figure 10-7. Visio Visualization of your workflow
This is really amazing because it gives the user a friendly graphical view of the current workflow instance with the necessary values populated. On the same page, you would also see the historical tasks, and the workflow history associated with this instance of the workflow. This is information that most organizations would find extremely helpful.
Now that Visio services picture was pretty cool! Wouldn't it be helpful if end user's could also craft up a Visio diagram to display their workflow, and perhaps that same visio diagram could be used to give life to an actual running workflow in SharePoint 2010? Exactly this scenario is possible.
Customizing Out of the Box Workflows
Out of the box workflows are great, and the biggest reason they are so great is because you don't have to write them. However, if you have business users like the ones I deal with, there will always request a minor tweak to an out of the box workflow, and then they give me puzzled looks when I give them a time estimate in weeks. In SharePoint 2007, out of the box workflows were pretty much sealed. They were what they were and you could not change them. In SharePoint 2010, however, you have the ability to tweak out of the box workflows and change them to your heart's content.
1 Note that in Figure 10-7, I took the screenshot on a machine with domain name “SP2010”, your domain will be “Winsmarts” or whatever you choose.
Let's take the example of the out of the box workflow. Say that you want to perform a minor tweak to an out of the box workflow. Specifically, the tweak you wish to do is that you don't want to display the CC Field in the initiation form. Also, since I'm not too fond of the colors used on the initiation form let's also change the colors of the inititiation form.
You have the ability of customizing out of the box workflows using SharePoint Designer. Open your site collection in SharePoint Designer and look at all the workflows available within this site. You should see the “Approval - SharePoint 2010” workflow available and you can double-click it and start editing it right through SharePoint Designer. What I like to do is to right-click an existing out of the box workflow definition, choose to make a copy, and then modify the copy. This way the original workflow definition remains intact, so someone else can use it later.
Therefore, right-click the “Approval - SharePoint 2010” workflow template and choose “Copy and Modify”. By doing so, SharePoint Designer will ask you for a name of the copy, call it “Approval Copy”. Also, SharePoint Designer will ask you which content type you want to limit this workflow to. This can be seen in Figure 10-8.

Figure 10-8. Associating the workflow to a particular content type
What you're doing here is creating a reusable workflow. This reusable workflow can be exported as a solution package. It can be imported into Visual Studio for further tweaking or it can be deployed across various other farms. When you create a reusable workflow through SharePoint Designer, you associate it with a content type. By associating a reusable workflow to a content type, you are essentially defining the structure of information that this workflow can always assume will be present. Therefore, if you associate the workflow with announcements, you can be sure that there will be a field called “Expires” because every announcement has an “Expires” field in it.
Any content type that inherits from announcement will be able to use your reusable workflow. Therefore, in order to create a globally reusable workflow, you should associate with the item content type. By doing so, you can be guaranteed that only the title field is present. This workflow can then be associated with any content type, since every content type eventually inherits from the item content type.
For this example, choose the content type to be “All” and click OK. The next screen will show you the workflow logic written out as a series of logical steps and conditions. This can be seen in Figure 10-9.

Figure 10-9. Workflow design in SharePoint Designer 2010
Let's say that at the very end of this workflow you wish to log to the history list that the workflow has finished executing. If you pay close attention to this logic tree, you will see an orange horizontal blinking cursor. By either using your cursor keys or by clicking the mouse left button, you have the ability to move that orange cursor. Take that cursor to the very end of the workflow, as shown in Figure 10-10.

Figure 10-10. I just moved my cursor to the end of the workflow.
With the cursor double-click it using the left button of your mouse. After a text box appears prompting you to start typing to search. Start typing “Log” and you will see that SharePoint Designer has narrowed your search to the Log to History list activity, as shown in Figure 10-11.

Figure 10-11. Picking a workflow activity in SharePoint Designer 2010
As prompted, hit enter to insert the necessary activity and then configure it to log a suitable message into the workflow history list. This can be seen in Figure 10-12.
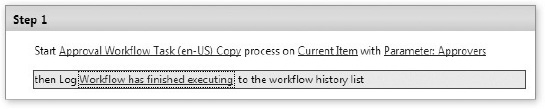
Figure 10-12. A configured workflow activity in SharePoint Designer 2010
Go ahead and save this workflow. Now draw your attention to the ribbon, which shows a button that says “Export to Visio”. Clicking on this button will allow you to export a .vwi file. Save this .vwi file at a convenient location on the disk.
Next, start Visio and create a new diagram under the flowchart category, based on the “Microsoft SharePoint Workflow” stencil. This visio diagram allows a business analyst to craft up an entire workflow from scratch entirely in Visio. This can be imported/exported back and forth from SharePoint Designer as many times as you please. You can experiment by creating a brand new workflow yourself using the Visio stencil, but I'm going to import the .vwi file you had exported from SharePoint Designer earlier. In Visio, go to the flowchart category and create a new diagram based on “Microsoft SharePoint Workflow”. Once the diagram is created, in the ribbon under the process tab, look for the import and export buttons, as shown in Figure 10-13.
Figure 10-13. The import/export buttons for the SharePoint workflow
Click import and choose to import the .vwi file you had exported from SharePoint Designer earlier. You should see a graphical representation of your workflow in Figure 10-14.
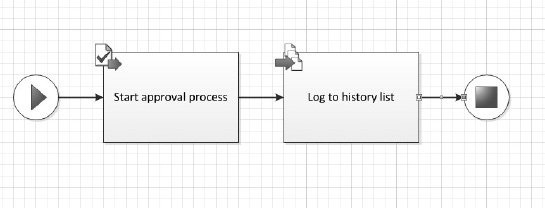
Figure 10-14. Your created workflow depicted graphically in Visio
For a moment, I'd like you to stop here and compare this graphical representation with the Visio Services representation you saw earlier. You will see that the log to history list block is new. Therefore, this diagram accurately reflects my intent.
Again, I leave it up to you to experiment with this Visio stencil and the various workflow actions and conditions you can use in Visio and give those SharePoint flowcharts life as SharePoint workflows with SharePoint Designer.
Now come back to SharePoint Designer and let's make some additional tweaks to the approval copy workflow you were working on. There are two additional things I'd like to do to this workflow. I'd like to tweak the look of the infopath form and I'd like to eliminate the CC Field from the initiation form. In order to do so, open the approval copy workflow in SharePoint Designer and click the Initiation Form Parameters button in the ribbon. This form will allow you to add, modify, or remove various parameters for the workflow, and also choose which ones appear in the initiation form, association form, and which appear in both. Select the CC variable and choose to modify it by having it appear only in the association form. This can be seen in the Figure 10-15.
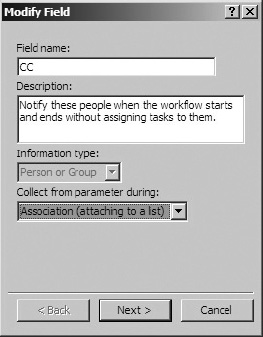
Figure 10-15. Modifying an out of the box workflow
The variables specified over here will also automatically generate the necessary InfoPath forms for you. Now double-click the InfoPath form under the “Forms” section of the workflow and make some modifications to the InfoPath form. Your modified infpath form should look like Figure 10-16.
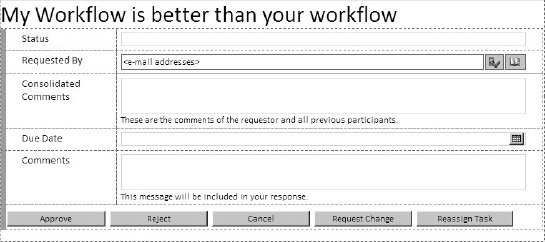
Figure 10-16. Modified InfoPath form
Save this infopath farm anywhere on your machine. Then, publish it by clicking on the quick publish button next to the save button in the title bar of InfoPath.
Your modifications to the workflow are now complete. Click the edit workflow link one more time and from the ribbon choose to save and publish. Publishing the workflow will process all the necessary files, including the workflow visualization and the solution package, and will make the workflow available on the SharePoint site.
Just like before, create a new association to the “Approval Copy” workflow and run the workflow. Note the following:
- The CC Field is no longer being asked for in the initiation form.
- The workflow visualization now shows a log to history list activity at the end of the workflow.
- The task form reflects the changes you had made previously.
- In the workflow history, you should see a new comment saying “Workflow has finished executing”, as shown in Figure 10-17.
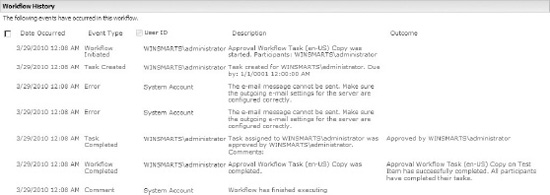
Figure 10-17. The workflow history of the approval copy workflow
Writing Workflows with SharePoint Designer
Just like you have the ability to edit out of the box workflows, using SharePoint Designer you can also craft up brand new workflows. In order to do so, open your site collection and SharePoint Designer and click the workflows section. From the ribbon, you will see three possibilities as shown in Figure 10-18.
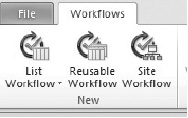
Figure 10-18. The kinds of workflows you can create
A list workflow is associated with an individual list. This is very similar to how it used to be authoring workflows in SharePoint Designer 2007 with the concept of association when an initiation was merged. Compared to SharePoint Designer 2007, SharePoint Designer 2010 offers significant improvements such as a completely redesigned workflow editor, the ability to export workflows as .wsp's, and so forth.
The second button, “Reusable Workflow”, is very similar to the customization of the out of the box workflow that you just did in the previous section of this chapter. Creating a reusable workflow simply means that you're targeting the workflow to a particular content type. Once you have crafted up such a workflow definition, you can then associate this workflow with the source content type or any content types that inherit from the source content type.
The last button is rather interesting. It allows you to target the workflow to the site. This is something you were not able to do in SharePoint 2007. Frequently, you will be presented with enterprise processes that don't really tie to a list item. In fact, they don't even tie to a document set. In those instances, it is helpful to run the workflow on a container that is not exactly an individual list item. SharePoint 2010 allows you to run workflows on a site collection. These are referred to as site workflows. Let's create a site workflow.
The workflow I am about to set up adds the facility of users being enabled to add simple reminders for themselves in the site. Similar to a calendar, by starting a workflow, the user would be able to enter a title, a description, and a date and time at which an e-mail would be sent to the user with the title and description with a reminder.
Start SharePoint Designer, and under workflows, click site workflow in the ribbon. Call your new Workflow “Remind Me”. Add the following initiation form parameters to this workflow:
Remind title:Single line of text, visible on the initiation form only.Remind description:Multiple Lines of text, visible on the initiation form only.Remind time:Date and Time. The form should ask for both date and time, visible on the initiation form only.
Next, craft up the workflow, as shown in Figure 10-19.
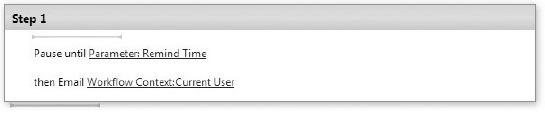
Figure 10-19. Your workflow structure in SharePoint Designer 2010
Now go back to the main workflow page within SharePoint Designer and check the check box for “Show workflow visualization on status page”. Save and publish the workflow. If you get any errors during publishing, make sure that you followed all the previous steps, including populating the subject and body of the email.
Next, visit your site collection in the web browser and visit all site content and click the “Site Workflows” link. Here you should see the option to start the “Remind Me” workflow. Start this workflow but note that by starting up this workflow SharePoint prompts you with the initiation form, as shown in Figure 10-20.

Figure 10-20. The initiation form for your workflow
Fill out the form as shown and click the start button. Note that the workflow visualization clearly tells you exactly where the workflow is at the given point. This can be seen in Figure 10-21.
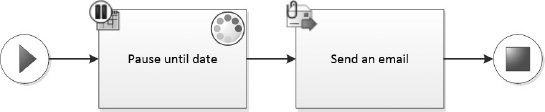
Figure 10-21. Visio Visualization of your workflow
Once the workflow has finished, and assuming that you have your SMTP server configured, you should receive an e-mail with the necessary reminder.
Writing Workflows with Visual Studio
So far you have seen that you can take a workflow between Visio and SharePoint Designer multiple times, and allow the business user to express their workflow desires to a great length. However, there will be situations where you will need to involve a developer. The situations are twofold, either you need to use an activity that you cannot find in SharePoint Designer, in which case you will have to author a custom activity in Visual Studio 2010 and use it in your workflows. Alternatively, your workflow involves crazy proprietary calculations or integration with external systems, stuff that you cannot expect SharePoint to provide out of the box.
In either of these scenarios, you have the ability to use Visual Studio. Visual studio has the ability to import a .wsp package, which was in turn exported from SharePoint Designer, and could contain workflow definitions. Or you can use Visual Studio to craft up a brand new workflow from scratch!
In order to write a brand new workflow in Visual Studio, start Visual Studio and create a new project called “RollOfDiceWF” based on the empty SharePoint project template. Since this project will contain workflow templates, you need to make this a farm solution. What I intend to do in this workflow, is begin by rolling dice. Rolling dice should give me a random number between one to six and that randomly generated number will be updated in the title of the list item the workflow is running upon.
Thus, right-click the project and choose to add a new SPI of type “Sequential Workflow”. You could also choose to add a state machine workflow. Any process can be represented as either a sequential workflow, or a state machine workflow. However, it is generally easier to represent machine involving tasks that you can easily think of as flowcharts as sequential workflows. It is generally easier to represent workflows that go through various states have long pauses between them and involve human being or external system interaction as state machine workflows.
As soon as you choose to add a new sequential workflow, Visual Studio will ask you a couple of questions.
- It will ask if this is supposed to be a site workflow or a list workflow. In this case, choose to make it a list workflow.
- The second and optional step here is to automatically associate this workflow to a list and also specify a tasks and workflow history list. This is a convenience that Visual Studio provides you which facilitate easy debugging; you could assign a workflow yourself manually if you wished. However, associate the workflow with a list called “Test” based on the custom list template. Also, if your site collection currently doesn't have a tasks and workflow history list, just create an association to any out of the box workflow through the browser, and that will give you an option to create the tasks and workflow history list.
As you will note, once the sequential workflow has been added the first activity in the workflow is the onWorkflowActivated activity. This can be seen in the Figure 10-22.
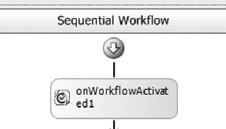
Figure 10-22. The onWorkflowActivated activity
The first activity in any SharePoint workflow has to be the onWorkflowActivated activity. The responsibility of this activity is to set the various context variables, such as the list item you are operating upon, the user that started the workflow, etc. Therefore, when you're adding more activities into your workflow you must always ensure that your activities fall below the onWorkflowActivated activity.
Also, note that in the toolbox you have the ability to add activities from workflow foundation 3.0, workflow foundation 3.5, and SharePoint workflow activities. .NET activities are also usable within SharePoint workflows, but you must be careful of not using certain activities in SharePoint workflows such as TransactionScope activity, CompensatableTransactionScope activity, SynchronizationScope activity etc.
At this point, drag and drop a code activity and place it below the onWorkflowActivated1 activity in your sequential workflow. As soon as you drag and drop the activity, you would see a red exclamation mark on the code activity, which is informing you that further work needs to be done before this workflow is complete. Double-click the code activity to create its MethodInvoking event handler, and add the code shown in Listing 10-1 into this event handler.
Listing 10-1. MethodInvoking event handler for codeActivity
private int diceRoll = 0;

private void codeActivity1_ExecuteCode(object sender, EventArgs e)

{

    Random rnd = new Random();

    diceRoll = rnd.Next(1, 6);

    workflowProperties.Item["Title"] = diceRoll;

    workflowProperties.Item.Update();

}
As you can see from Listing 10-1, you're generating a random number between one and six and updating the items title with the generated number. Next, build and deploy your workflow, and then run the workflow on a new list item that you create in the test list you created earlier. Note that the title of the list changes at random between one to six.
Since you're rolling dice, let's make this a little bit more interesting. The idea here is that anytime you get a number greater than two, a task should be created for you allowing you to win a prize. In order to do so, drop an ifElseActivity under the code activity. This ifElseActivity will have two ifElse branches. You need only one, so go ahead and delete one of those branches. Inside the ifElse branch that is left, drag and drop the createTask activity from under the SharePoint workflow, workflow activities category. Your newly added section in the sequential workflow should look like Figure 10-23.
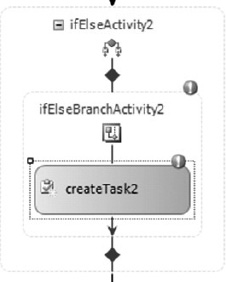
Figure 10-23. Red exclamation marks on my activities. I have more work to do.
The red exclamation marks signify that there is some additional work that needs to be done on those activities to properly configure them. Specifically, the if else branch activity needs a condition supplied on it. Select the if else branch activity and in its properties choose to specify a declarative condition. Give the condition name as “isWinner", and the Expression as “this.diceRoll > 2”.
By specifying the condition in this manner, you will cause the create task activity to be called whenever the diceRoll value is greater than two. The next thing you need to do is to configure the create task activity.
The createTask activity requires a correlation token. Correlation tokens are an integral concept to workflows. Workflows run in a workflow host, and a number of instances of the workflow are multiplexed in a single running instance of an in-memory workflow class. Between various activity executions the workflow can be paused and persisted back to the persistence database, in this case the content database, and then rehydrated as necessary in the future. For the workflow host to keep everything straight between multiple workflow instances but a single in-memory instance of the workflow, workflow foundation relies on correlation tokens. Note that you already have a correlation token for the entire workflow. Since there can be many tasks within a single workflow, you need to create a new correlation token for the task. Therefore, edit the properties of the create task activity, and under the correlation token, type the new correlation token and call it “taskToken”. You will also have to specify an owner activity name. At this point, you can really pick any other activity name that is at the parent level of the createTask activity, but choose to make the workflow itself as the owner activity name.
The next thing you need to do is to specify values for the TaskID and TaskProperties of the create task activity. To do so, click the ellipse by each one of these, and go to the “bind to a new member” tab then choose to create a field, as shown in Figure 10-24.
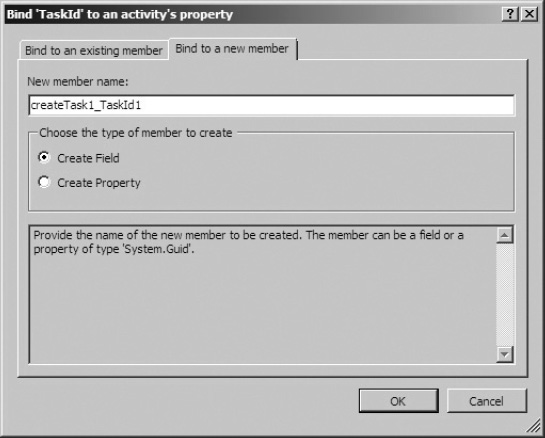
Figure 10-24. Creating a field for TaskID
Repeat this procedure for TaskProperties. Once you have configured the create task activity, the properties pain should look like Figure 10-25.
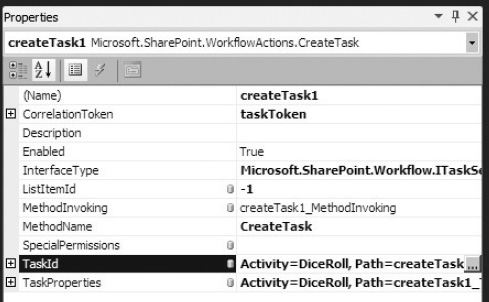
Figure 10-25. Properties of my CreateTask activity
Next, double-click the create task activity to create a MethodInvoking event handler for it. The MethodInvoking event handler is a great opportunity for you to set properties on the task before the task actually gets created. In this event handler, put the code as shown in Listing 10-2.
Listing 10-2. Code for the createTask MethodInvoking Event Handler
private void createTask1_MethodInvoking(object sender, EventArgs e)

{

    createTask1_TaskId1 = Guid.NewGuid();

    createTask1_TaskProperties1.AssignedTo = workflowProperties.Originator;

    createTask1_TaskProperties1.Title = "Congratulations!!";

    createTask1_TaskProperties1.Description =

         "You have won!!! Now go and claim your prize";

    createTask1_TaskProperties1.SendEmailNotification = true;

}
As you can see in the MethodInvoking event handler for the create task activity, you're specifying the task title to task descriptions and sending an e-mail and and assigning the task to the user that originated the workflow.
Rebuild and redeploy this workflow and execute it on a list item again. Run the workflow a couple of times, until you get a value greater than two. Note that whenever you get a value greater than 2, a task is created for you in the tasks list.
Now let's make this workflow even more interesting. What if at the beginning of each workflow you could pick, “On whose behalf I'm playing this game”. In other words, when the workflow is started you could present an initiation form with a dropdown prepopulated with the list of users in the site.
In order to add an initiation form in the workflow, first add the layouts mapped folder in your project. Once the layouts folder has been added, right-click your project and choose to add the new SPI. When prompted to pick the kind of SPI you're adding choose to add a workflow initiation form. Add this workflow initiation form at _layoutsRollOfDiceWFWFInitiationPlayer.aspx.
Your workflow initiation form has been added to the project. It will now be deployed with the project. But you need to do three things to actually make it work with your workflow.
- You need to edit the initiation form so it presents the user with a dropdown with the list of users in the site.
- You need to tell the workflow that the workflow needs to present an initiation form to the end user whenever the workflow is instantiated.
- Finally, in the MethodInvoking event handler off your createTask activity, instead of assigning the POS to the workflow originator you need to assign the task to whoever the user picked in the initiation form.
Let's go implement the previous three steps one by one. Step one is to edit the initiation form so it presents the user with the dropdown list of users in the site. In order to do so in the placeholdermain ContentPlaceHolder of your initiation form, add the code shown in Listing 10-3.
Listing 10-3. Code Necessary to Present the User with the Dropdown with a List of Users
<asp:Content ID="Main” ContentPlaceHolderID="PlaceHolderMain” runat="server">
<SharePoint:SPDataSource runat="server” ID="usersList” DataSourceMode="List”
SelectCommand="<Query><OrderBy><FieldRef Name='Title'
Ascending='true'/></OrderBy></Query>">
<SelectParameters>
<asp:Parameter Name="ListName” DefaultValue="User Information List” />
</SelectParameters>
</SharePoint:SPDataSource>
On whose behalf are you playing?
<br />
<asp:DropDownList ID="userName” runat="server” DataSourceID="usersList”
DataTextField="Title” DataValueField="Account">
</asp:DropDownList>
<asp:Button ID="StartWorkflow” runat="server” OnClick="StartWorkflow_Click” Text="Start Workflow” />
<asp:Button ID="Cancel” runat="server” OnClick="Cancel_Click” Text="Cancel” />
</asp:Content>
As you can see from Listing 10-3, you're creating an SPDatasource object bound to the “User Information List”. The “User Information List” is a hidden list present in any site collection that gives me a list of users in the site collection. You're then data binding that data source to a simple DropDownList.
The second thing you need to do is to tell your workflow that the initiation form needs to be popped up whenever the workflow is instantiated. To do so, you need to edit the workflow element in the element.xml that defines your workflow. The workflow element in the elements.xml is shown in Listing 10-4. Note that my workflow name is DiceRoll, and you need to appropriately reflect the CodeBesideClass attribute in your code.
Listing 10-4. The Edited Workflow Element
<Workflow

   Name="RollOfDiceWF - DiceRoll"

   Description="My SharePoint Workflow"

   Id="05b3d065-ad8a-4a9b-b808-aa32eab22057"

   InstantiationUrl="/_layouts/RollOfDiceWF/WFInitiationPlayer.aspx"

   CodeBesideClass="RollOfDiceWF.DiceRoll.DiceRoll"

   CodeBesideAssembly="$assemblyname$">
As you can see from Listing 10-4, you have added a new attribute called InstantiationUrl. At this point, play with the intellisense offered by the xml schema for elements.xml and try to discover how you will specify an association form a modification form and a task form. Note that all of these details are specified in a manner similar to InstantiationURL.
You've done the first two steps, which will pop open an instantiation form and show the appropriate drop down. The last thing you need to do is to assign the picked value from the dropdown in the create task MethodInvoking method handler. This last step actually involves two steps. The first step is to populate the initiation data. This is done in the code behind of the initiation form in a method called GetInitiationData. The code for this method is as follows:
private string GetInitiationData()

{

    return userName.Text;

}
You're simply returning the picked username text. If you add multiple initiation variables perhaps it is a good idea to return an xml formatted string.
Next, in MethodInvoking event handler of the create task activity comment out the following line:
// createTask1_TaskProperties1.AssignedTo = workflowProperties.Originator;
Instead, replace it with the following code line:
createTask1_TaskProperties1.AssignedTo = workflowProperties.InitiationData;
As you can see, instead of assigning the task to the user that originated the workflow, you are assigning the workflow to the user that was picked in the drop down list.
Your workflow changes are now complete so go ahead and rebuild and redeploy the workflow. Run a workflow instance on a list item, and you will note that an initiation form, as shown in Figure 10-26.
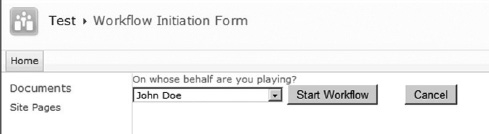
Figure 10-26. Your inititiation form shows up at the start of the workflow.
Pick a user other than the logged in user and click the start workflow button. Keep playing this game until you get a value greater than two. Once you get a value greater than two, visit the tasks list and look at the task created by this workflow. Note that the task has been created for the user that you picked in the dropdown in the initiation form. This can be seen in Figure 10-27.
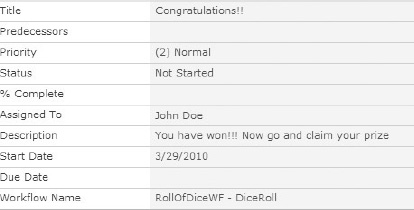
Figure 10-27. Task created if you win the dice roll.
This is how you can write workflows in Visual Studio 2010 and add forms into those workflows allowing them to interact with the user.
Summary
Workflows are an important topic of SharePoint. In this chapter, you familiarized yourself with the basic concepts of authoring and using workflows in SharePoint. You saw that there are certain out of the box workflows. You saw that those out of the box workflows can be visualized using Visio visualizations or they can be tweaked further using SharePoint Designer. You also saw that business users can author the workflows directly inside Visio by using the SharePoint sequential workflow stencil. Also, workflows can be imported and exported back and forth between SharePoint Designer and Visio as many times as you wish.
A huge improvement over SharePoint 2007 workflows is that SharePoint Designer workflows are now much more usable and they can be exported as solution packages. Therefore, they can be moved between farms and environments. Also, when they are exported as solution packages they can be imported right inside Visual Studio and a project can be created out of them.
You can then choose to customize such a workflow in Visual Studio, or you can write a workflow from scratch in Visual Studio, including various kinds of forms associated with the workflow. Obviously when you begin customizing a workflow using Visual Studio, your customizations can include anything, and therefore such highly customized workflows cannot be imported back into SharePoint Designer. Therefore, the move from SharePoint Designer to Visual Studio is one way!