
C H A P T E R 14
Business Connectivity Services
After completing this chapter, you will be able to
- Understand the Business Connectivity Services architecture
- Understand how BCS integrates both inside and outside SharePoint 2010
- Create BCS solutions of simple and medium complexities
- Create custom .NET connectors using Visual Studio 2010
- Configure the Secure Store Service for use by Business Connectivity Services
- Add basic security trimming using Visual Studio 2010
- Understand the potential that BCS exposes for your organization
Business Connectivity Services (BCS) makes it possible to integrate external data sources—typically line-of-business data—with SharePoint 2010. The most exciting features in BCS for SharePoint 2010 are the SharePoint Designer 2010 (SPD 2010) integration, its search capabilities, and Microsoft Office 2010 integration.
The new BCS offers similar functionality to the Business Data Catalog (BDC) in SharePoint 2007. In contrast to the BDC, the BCS is accessible to a much wider audience due to its integration with SharePoint Designer 2010. This was not the case with the BDC in SPD 2007. Also, accessing and manipulating LOB data is now easy. With BDC it was relatively easy to read external data, but manipulating external data presented a number of complexities. The new BCS interface in SPD 2010 makes it easy to both define CRUD operations and even aggregate data between different content types across multiple data sources.
Now BCS is available in SharePoint Foundation 2010, which means it is free. This allows for creating complex business-driven solutions at a low cost.
This chapter describes the high-level architecture, capabilities, and components of BCS, with a special focus on search-related topics. Examples will be given of how to use SPD 2010 to create declarative solutions and Visual Studio 2010 to create custom content types using C# and enable searching of these content types.
BCS Architecture
The architecture of BCS is comprehensive but still makes it easy to use. Considering that BCS can be used for both SharePoint and the MS Office clients, it offers an excellent framework that enables administrators to easily understand and set up BCS solutions that integrate content types from most typical content sources all the way through the pipeline of BCS, finally presenting a data interface in an intuitive way to the end user. Furthermore it allows developers to create new, reusable components as either .NET connectors or custom connectors. BCS can be divided into three layers: presentation, core components, and content sources, as shown in Figure 14-1.
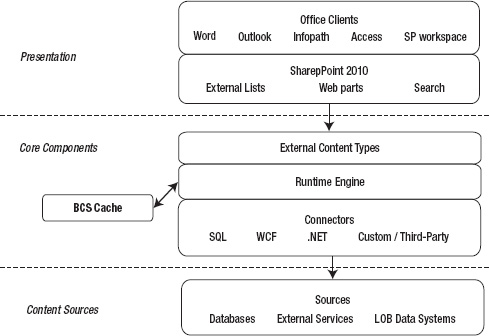
Figure 14-1. BCS architecture
Presentation
BCS presents data that can be consumed or manipulated by SharePoint 2010 and MS Office clients. SharePoint 2010 contains three primary consumers of data exposed through BCS.
- External lists
- Out-of-the-box Web Parts
- Search
External Lists
SharePoint contains a new list type named external lists. This list acts as any other list, with the exception that an external content type must be defined for the list. It does not support version info and alerts, however, as its data is stored externally.
Web Parts
BCS Web Parts are similar to those found in BDC for SharePoint 2007. Although BCS is included for free in SharePoint Foundation 2010, BCS Web Parts are included only in the SharePoint 2010 Enterprise edition. Included Web Parts are
- Business Data Actions
- Business Data Connectivity Filter
- Business Data Item
- Business Data Item Builder
- Business Data List
- Business Data Related List
Business Data Actions
Actions are executed on single results from BCS. The concept is also known from search centers with result actions, which are context-specific actions, such as opening documents in their native application or opening a web page in a new window—in short, actions that differ based on the specific result. Actions are configured by specifying a target URL of an HTTP handler, .aspx page, or similar. By adding parameters to the URL, an action can be constructed such that the URL can invoke a translation using the Bing translation service, looking up addresses on Bing Maps, or even invoke special purpose functionality if a custom HTTP handler or .aspx page is implemented and deployed. The configured actions for a BCS result are displayed in the Business Data Actions Web Part.
Business Data Connectivity Filter
The Business Data Connectivity Filter Web Part is used to perform data filtering of SharePoint Web Parts based on values passed from the Business Data Connectivity (BDC) Filter Web Part. A number of filters are included, allowing manual input such as text or date and time, values picked from a list of choices, or fixed values either defined for the site or passed by URL. If a filter exists on a page, the Connections option becomes available on the Edit page. This allows for creating an association or connection between a filter and, for instance, a list view or data view Web Part. This way selected data columns will be filtered based on the defined filter values to show a custom view for a department, user, KPI event, etc.
Business Data Item
The Business Data Item Web Part shows a single result in a vertical view. A typical use is to show detailed or expanded data of a particular result row from a summarized Business Data List Web Part. The Business Data Item Web Part can be connected to the Business Data List Web Part and respond to selected rows.
Business Data Item Builder
This Web Part is used to pass a unique identifier from the URL parameter to the Web Parts on the page. Using this Web Part, it is possible to pass the unique identifier across pages containing Business Data Item Web Parts.
Business Data List
This is a grid view Web Part and the core display method for BCS data, allowing an overview of the LOB data obtained from a BCS source. The key feature is the connection option that allows this Web Part to be connected to detailed view Web Parts and otherwise used for filtering and/or custom actions by clicking a result row.
Business Data Related List
Sometimes a particular result from one external content type has associations to data in another external content type. The Business Data Related List Web Part is used to show the “many” part of the relationship by using values from other BCS Web Parts or URL-based identifiers to look up associated data for the external content type defined for the Business Data Related List Web Part.
Search
Search results originating from BCS are displayed in a page called the profile page, when the BCS result item gets clicked or opened. The profile page is an .aspx page built with BCS Web Parts. The Web Parts display the relevant BCS entity based on the entity's ID, which is passed to the profile page as URL parameters. Multiple profile pages can be created to accommodate different external content types.
Profile pages are not created automatically for an external content type. Per default, clicking a search result from a BCS source yields the well-known 404 error (page not found). The profile page must be created and configured from the Search service application.
![]() Note Searching for external content using BCS is available only in SharePoint 2010 Standard and Enterprise versions.
Note Searching for external content using BCS is available only in SharePoint 2010 Standard and Enterprise versions.
Core Components
The core of BCS is the ability to connect to a large set of data sources using its connector framework. By defining content types from the data sources, the runtime engine is able to execute CRUD operations on these content types. The core components are
- Runtime engine
- BCS Rich Client Cache
- Connectors
- External content types
The runtime engine is responsible for executing BCS operations on the content sources. The runtime engine is integrated into the supported office applications, SharePoint workspace, InfoPath, and, of course, SharePoint 2010. The integration into these applications makes them independent of SharePoint 2010 as a middle layer for using BCS to connect to content sources.
BCS Rich Client Cache
Business Connectivity Services offers cache and offline features that also support cache-based operations. For users that work with solutions deployed to supported Office 2010 applications (Word, Outlook, SharePoint 2010 Workspace, etc.), they can manipulate external data, even when they are working offline or if the server connectivity is slow or unavailable. The operations performed against cached external entities are synchronized when connection to the server becomes available. It also provides a flexible external data caching mechanism that is as transparent as possible while still enabling the user or application to have explicit control over the content of the cache when required via automatic and manual cleanup.
Connectors
The BCS connector framework in SharePoint 2010 comes with built-in support for creating external connections to SQL, WCF, and .NET assemblies. In general this covers the majority of connection requirements. It would have been nice, however, if a flat file or .xml connector was built in as well. Fortunately the BCS connector framework is designed to be extendable with either custom connectors or custom-made .NET connectors. Later in this chapter, an example will be presented of how to create a .NET flat file connector using Visual Studio 2010.
External Content Types
External content types are the glue of BCS. They describe the metadata definitions of the external content data, connectivity information, and data access capabilities. This way an ECT provides a reusable schema to be used in SharePoint lists and Web Parts.
The external content type is what the IT professional creates in SharePoint Designer 2010. A typical business requirement for an IT professional is to create an ECT for a customer database. This database might contain names, addresses, payment info, and a unique customer ID. When the IT professional creates an ECT for this data source, the ECT will contain both the column definitions for the required fields as well as names and optionally credentials for the customer database. It will also contain information on which CRUD operations can be executed on the customer database. From the IT professional's point of view, an ECT is a mapping between the external data source and SharePoint 2010. The key difference from BDC in SharePoint 2007 is that the ECT now also contains the full CRUD behavior, whereas in BDC it had to be programmed.
Behind the scenes, an ECT is an .xml grammar file containing metadata that describes the ECT. For the ECT to be available, it has to be deployed to the metadata store in SharePoint (or through a click-once package, e.g., Outlook 2010).
Depending on the capabilities of the data sources and connectors, it is possible to create an ECT that provides easy data access with complex logic, such as aggregating data across multiple sources, providing complex transformations, evaluating complex business logic or custom security requirements, or calling systems multiple times in order to provide a single view of data.
![]() Note This chapter uses the term external content type. Sometimes it is also referred to as an entity. This generally is the term used by developers, as it is the name given to the ECT in Visual Studio 2010. They do, however, mean the same thing.
Note This chapter uses the term external content type. Sometimes it is also referred to as an entity. This generally is the term used by developers, as it is the name given to the ECT in Visual Studio 2010. They do, however, mean the same thing.
Content Sources
Content sources are the external part of BCS. They are used by the search engine to index external data. As mentioned, BCS comes with built-in support for connecting to content sources of the types SQL, WCF, and .NET assemblies. Often the content source is made available through installation of Microsoft SQL Server or a data server program that can be accessed and controlled through WCF. In more advanced cases, the content source might provide a .NET API for performing these operations.
On some occasions, the content source does not provide any of the foregoing options for interfacing with the data. In these cases, a developer has to develop either a .NET Assembly Connector or create a custom connector for BCS. Both options have their own benefits and weak points that the developer should be aware of.
Business Connectivity Services Deployment Types
Understanding how and where a BCS solution can be deployed is fundamental when planning how to leverage this new functionality in SP 2010. With the new tool support and wide range of client program support, BCS is a strong candidate to consider when analyzing opportunities to meet business requirements. This section gives an overview of where BCS can be deployed and the general complex levels of deployment.
Functionality for Normal Users “Out-of-the-Box”
SharePoint 2010 now has out-of-the-box support for users to display external data using BCS in a seamless way. Similarly BCS integrates MS Word 2010, MS Outlook 2010, and SharePoint Workspace with SharePoint 2010 to allow users to use it in a well-known manner. Especially the support for Outlook 2010 was a much sought-after functionality in SharePoint 2007. Little or no administrator intervention is required for users to leverage list data in these applications. In most cases, the permissions setup is the most important step to be conscious about when preparing the SharePoint lists, etc. for use by these applications.
Using the external list, Business Data Web Parts, or the new Chart Web Part in SP 2010, it is easy for users to display external data. It is also possible to extend existing standard lists or document libraries by adding an external data column.
External columns can also be used in MS Word 2010 by creating a Quick Part for content control. This is useful, for instance, when a document template is to reflect the latest available data from the SharePoint-based intranet.
MS Outlook 2010 and SharePoint Workspace provide special integration with SharePoint. External lists can be taken offline from the SharePoint server. This way, users can interact with the data in the external list without leaving the client program. The major benefit is that the integration becomes transparent to the user, since the look and behavior are the same as in Outlook and Workspace. The required add-in for Outlook is installed as part of Microsoft Office 2010.
One thing to be aware of is that offline lists in MS Outlook 2010 and SharePoint Workspace require synchronization. This can be done either automatically or on user request. If automatic synchronization is activated, the default interval is three hours. As the structure of the offline list can change or new views can be added or modified, it is even possible to update the structure or view automatically without any user intervention.
The external content types and external lists/columns for these types of solutions are usually created by an administrator using SPD 2010. The SharePoint ribbon has buttons to make a connection between Outlook 2010 or SP Workspace 2010 and the external list/column.
Functionality for Advanced Users and Administrators
Some uses of BCS require the administrator or IT professional to perform certain tasks, such as publishing, to make it available to users. It also allows the IT professional to use custom code-based solutions as reusable components. This is particularly beneficial for the way many companies operate, as a consultant company can make components that the internal IT professionals can use and configure to meet changing demands, without having to go back to the vendor or consultant that provided the custom code-based solution for every tiny change to how the component is used. It makes the BCS installation easier, faster, and cheaper to maintain.s
InfoPath forms presenting external data can be customized in terms of look and feel. This can be done by adding declarative rules and business logic. It is also possible to add code-behind to the forms. The form is published to the server by the administrator.
SharePoint workflows can be extended with new capabilities through SPD 2010 by adding read and write capabilities to external lists or using custom workflow activities from VS 2010. These must be published in SharePoint.
Site administrators can create Web Part pages based on multiple Business Data Web Parts and Chart Web Parts. By creating connections between the Web Parts, it is possible to create highly customized and information-rich pages with data from most common data sources.
When working with external lists in Outlook 2010, it is possible for users of the Outlook client to create new customized views to show this external data. The custom view can then be saved back to SharePoint. This makes it available as a public view for other Outlook users who use the same external list in Outlook.
Microsoft has a number of applications for creating these solutions. The most common tools are the InfoPath Designer, which is used to create forms, and the SharePoint Designer, which is used to create Web Part pages and workflows. Web Part pages can also be created through the browser. Finally MS Outlook 2010 can be used for creating customized views specifically for Outlook.
Code-Based Solutions
Code-based solutions are solutions created in Visual Studio 2010 by a developer. These solutions enable the creation of reusable components as either a .NET Assembly Connector to aggregate or transform data from external systems, custom Web Parts, custom workflow activities, code-behind for InfoPath forms, and code-based actions or external data parts for use in Outlook declarative solutions. Code-based solutions are now made easy for developers with built-in support in Visual Studio 2010. In SharePoint 2007, it required advanced coding skills to do anything more complex than data reading. Now the developer can focus on issues such as reusability instead.
A code-based Microsoft .NET Framework solution created in a tool such as Visual Studio can use any element of the public Business Connectivity Services object model and can enable users to interact with external data. It can register with the Business Data Connectivity service by using the BDC object model to present data in SharePoint, an Office 2010 application such as Microsoft Excel, or a custom application. This object model and BCS runtime is installed with SharePoint 2010 and Office 2010. External data can be retrieved directly from the external system while connected, or it can be retrieved locally from the BCS Rich Client Cache, provided it is already available, for instance, from an offline external list in SharePoint Workspace or Outlook. This type of solution can also be used to extend BCS to MS Office applications that are not integrated with BCS. Typically this will be Excel but also PowerPoint.
Alternatively an entire end-to-end solution that leverages the public Business Connectivity Services object model can be created. The deployment process is, however, more difficult, and there is no tool support for this custom connector solution.
In a code-based end-to-end solution, commonly referred to as a custom connector, the developer controls all of the user interface, packaging, and deployment. This type of solution cannot make use of the Business Connectivity Services rich client runtime, which is used by integrated and declarative solutions to integrate data.
![]() Note For most purposes, a .NET Assembly Connector is sufficient to meet business needs, and it is by far the easiest way to go.
Note For most purposes, a .NET Assembly Connector is sufficient to meet business needs, and it is by far the easiest way to go.
By using “click once” packages, it is possible to create and deploy new task panes or present external data in external data parts in MS Outlook 2010. This requires a number of XML files to be created and use of the BCS Software Developer Kit to create the package.
A BCS project type is available to facilitate the creation of .NET Assembly Connectors. An example of a flat file .NET connector is described later in this chapter.
When working with BCS, creating the external content types is the key task to perform by IT professionals. With the new support for creating ECTs in SPD 2010, it is surprisingly easy to do. This is definitely one of the most powerful new additions to SharePoint 2010. It is also possible to create an ECT from the SharePoint site, but SPD 2010 is the better choice when available.
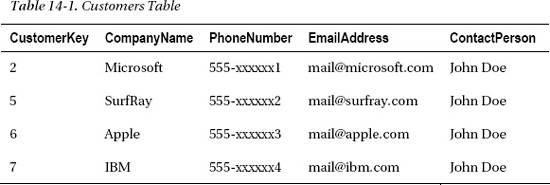
To give an example of creating an ECT, assume a database with customer information (Figure 14-2) that is to be made accessible through an external SharePoint list. The Contact office type is chosen to make it integrate nicely into Outlook as an offline external list.
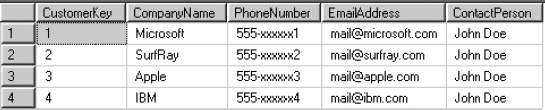
Figure 14-2. Sample customer data
In SPD 2010, connect to a site and open External Content Types from the Navigation menu, as in Figure 14-3. On this page, all current ECTs for the site are displayed. The ribbon has quick access buttons for the typical tasks to be performed.
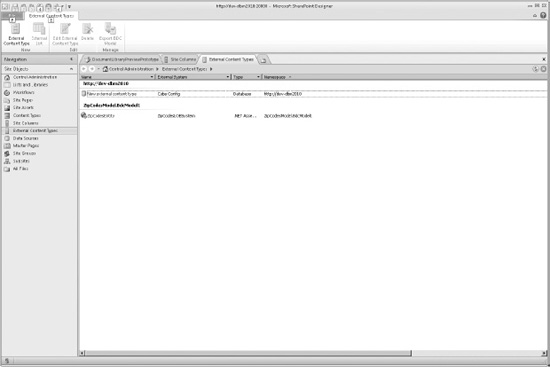
Figure 14-3. External Content Types window
The first step is to create a new external content type
- Click the New External Content Type button. The External Content Type dialog (Figure 14-4) will be displayed.
- Enter a Name and Display Name for the external content type. As this example contains contact info, select Contact as Office Item Type in the External Content Type Information section.
- Click the link named “Click here to discover external data sources and define operations.” This opens the Operation Designer dialog.
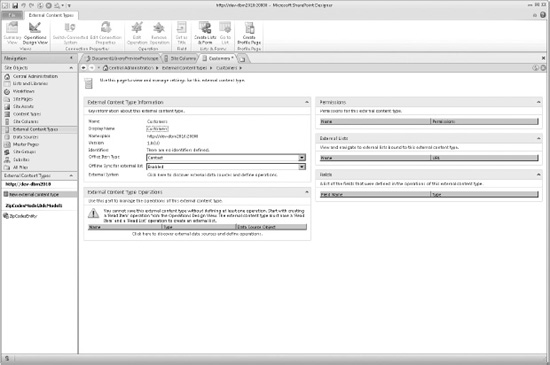
Figure 14-4. Create External Content Type window
On the Operation Designer dialog, click Add a Connection to connect to the database. In this example, it is called CustomersDatabase. This will establish a connection, and the database tables will be displayed. In this example, it has only one table, named CustomersTable.
To specify the types of operations that can be performed, right-click CustomersTable and select the option Create All Operations, as in Figure 14-5. This will enable all CRUD operations on the database table and open the operations wizard.
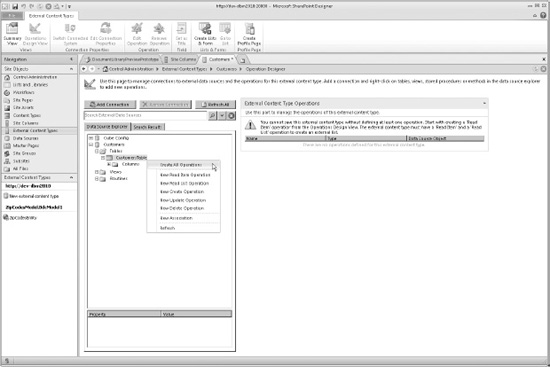
Figure 14-5. Operation Designer
Use the operations wizard (Figure 14-6) to map columns to the respective office properties. To do this, select the appropriate data source elements such as company name, phone number, etc. in the Properties window and specify the corresponding office property. Optionally a display friendly name can be specified. This name is what is showed later on the profile page for the ECT. Finally choose the column containing the values to be used as unique identifiers.
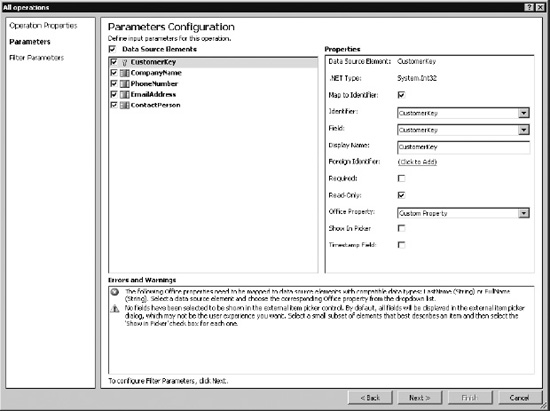
Figure 14-6. Operations wizard
Close the wizard when done, which returns to the Operation Designer window, shown in Figure 14-7.
![]() Note The wizard gives real-time information on suggested and missing tasks in the Errors and Warnings window. The errors must be resolved before the wizard is completed.
Note The wizard gives real-time information on suggested and missing tasks in the Errors and Warnings window. The errors must be resolved before the wizard is completed.
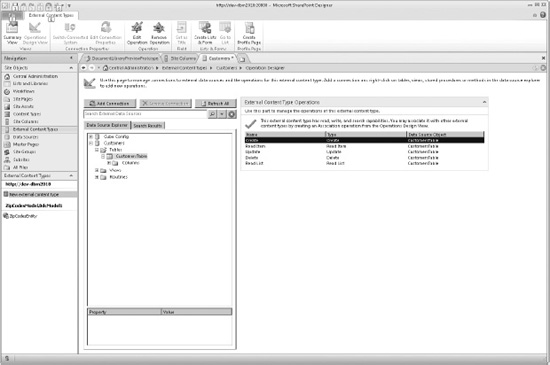
Figure 14-7. Operation Designer
After completing the wizard, save the ECT by clicking File and Save on the ribbon. The new external data type is saved to the metadata store and can be used for creating new external lists in SharePoint 2010.
Navigate to Site Actions, and view all site content. Select External List, and then click Create. This opens the New External List page, shown in Figure 14-8. Enter the name of the new list, select the External Content Type, and finally click Create.
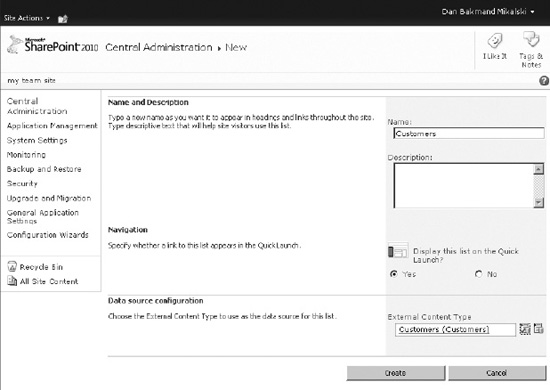
Figure 14-8. Creating an external list
Before users can access the list, the proper permissions must be configured. Go to the service application for the Business Data Connectivity service. Select the newly created external content type and click Set Metadata Store Permissions, as shown in Figure 14-9.
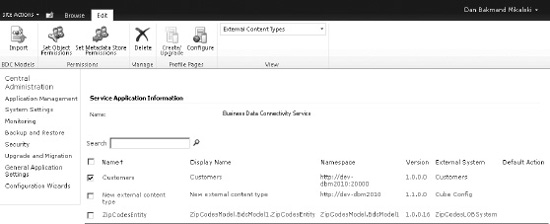
Figure 14-9. Business Data Connectivity service main page
On the Set Metadata Store Permissions page (Figure 14-10), enter the appropriate user permissions, and click OK. Typically at least one administrative user should have all permissions. As administration here is time-consuming in the case of many users, consider using groups instead for easier maintenance.
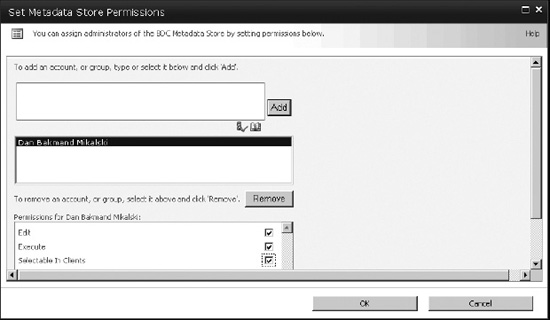
Figure 14-10. Setting metadata store permissions
![]() Note If the ECT is to be used in search, make sure to grant the content access account appropriate permissions. In this example, the content access account is set as the author's account.
Note If the ECT is to be used in search, make sure to grant the content access account appropriate permissions. In this example, the content access account is set as the author's account.
The new external list looks and behaves as any other ordinary list (Figure 14-11), with the exception of not supporting version history or setting up alerts. Items can be displayed, added, changed, and deleted—for example, changing the PhoneNumber in the list updates the value in the CustomersDatabase database.

Figure 14-11. The external list displaying external data
A key feature of BCS is the option to index the external data and present it nicely as search results. There are some required configuration steps for this to be available. The following sections focus on making the Customers ECT, created in the previous section, searchable.
Set the Title Field in the External Content Type
It is not required that a title property is configured for the external content types, but this is essential for achieving meaningful search results. It can be configured in SPD 2010.
In SPD 2010, connect to the site containing the external content type. In the Fields section (shown in the bottom right corner on the summary page in Figure 14-12), highlight the Name field of the most meaningful field to use as the title. Click the Set as Title button on the ribbon, and save the external content type by clicking File and then Save on the ribbon.

Figure 14-12. Setting the external content type title
Creating a Profile Page to Display BCS Results
The profile page is used to display search result items from external content types. Open Central Administration and navigate to Create Site Collections. Create a new blank site to host the profile page, as shown in Figure 14-13. Give it a meaningful name according to the external source it gets paired with. It is important to write down the URL, as it has to be entered manually later.
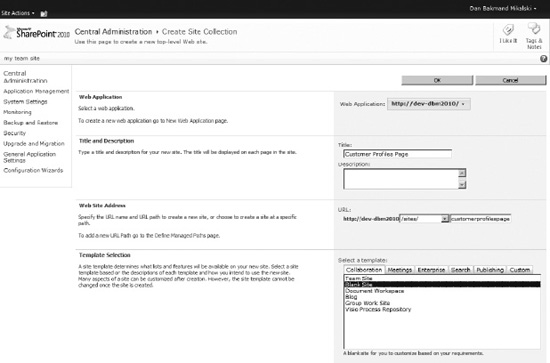
Figure 14-13. Creating a profile page
Navigate to the Manage Service Applications page in Central Administration, and click the Business Data Connectivity service application. On the Edit tab of the ribbon at the top of the page, click Configure. This opens the dialog shown in Figure 14-14.
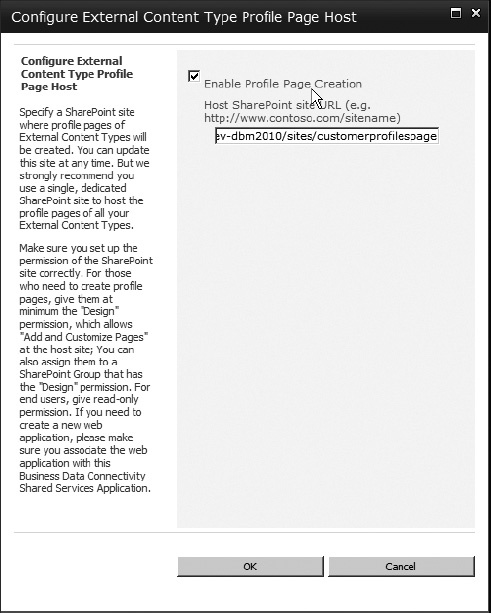
Figure 14-14. Associating the external content type with a profile page
Enter the URL of the profile page into the Host SharePoint site URL field, and click OK. Select the Customers external content type (or your own ECT) using the check box, and click Create/Upgrade. This will create a new profile page and View action for the external content type. Click OK for the warning in Figure 14-15.
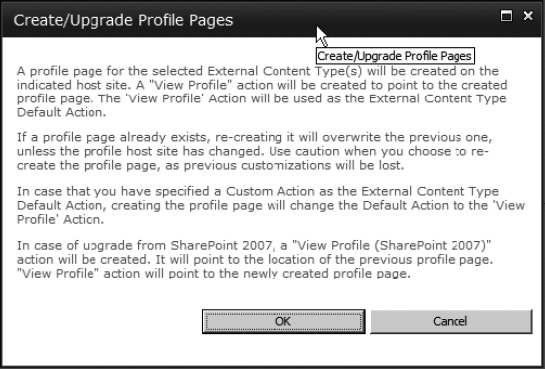
Figure 14-15. Warning page when creating a profile page
Clicking OK to the warning will create a new default action pointing to the profile page, with the ID passed as a URL parameter on the query string. A notification that the operation has succeeded (Figure 14-16) will be displayed.
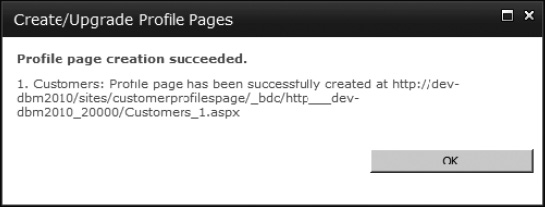
Figure 14-16. Confirming the profile page has been created
Configure Indexing
Now the external content type is fully configured and ready to get indexed. BCS indexing is easy in SharePoint 2010 compared to BDC in SharePoint 2007. Just add the BCS data source as a new search content source in the Search service application by navigating to the Manage Service Applications page in Central Administration. Click the Content Sources link in the navigation pane, which opens the Manage Content Sources page, shown in Figure 14-17. This page shows a list of all content sources.
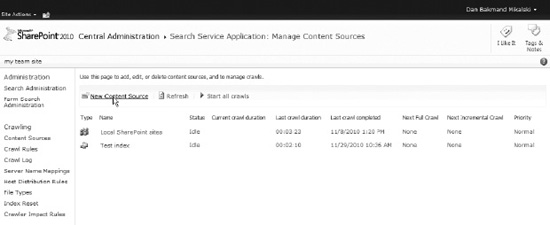
Figure 14-17. Content sources page
Click New Content Source, and enter an appropriate name for the content source. Choose Line of Business Data as the content source type, and choose the relevant BCS application and external data source, as in Figure 14-18.
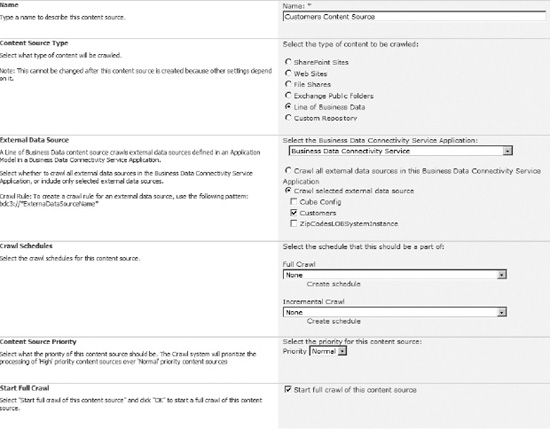
Figure 14-18. Creating a new content source for the LOB data ECT
Now select “Start full crawl”, and click OK. It usually takes a few minutes for the indexer to update and start. When it goes back to idle, the external content source has been crawled.
Performing a Search
In order to test the search, a site that is configured to perform enterprise searches is required (see Chapter 4). Go to the Enterprise Search Center site, and search for a customer name or other contact detail (if you followed the Customers example). The search should now return results from the BCS, as shown in Figure 14-19.
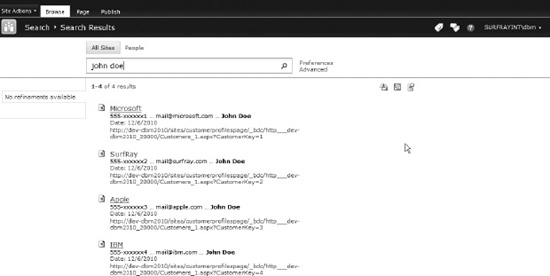
Figure 14-19. Search results displaying external data
Clicking a search result from the BCS source opens it in the newly created profile page, as shown in Figure 14-20. The profile page automatically shows the metadata properties from the external content type.
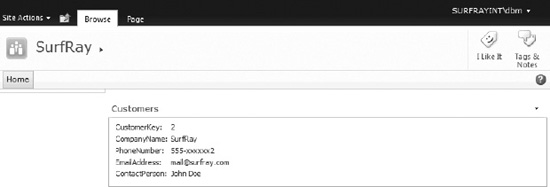
Figure 14-20. Search results item displayed on the profile page for the ECT
After following this walkthrough, it should be easy to create and configure searching for other external content types as well.
Creating a .NET Connector in Visual Studio 2010
One of the major strengths of BCS is how easy it is to integrate with almost any external data source. This section introduces the API and how to use Visual Studio 2010 to create a simple .NET connector. This connector example connects just to a data file but can be extended to connect to more complex data sources. .NET connectors can be discovered through the Discover function in SPD 2010.
Creating a Sample Flat File Data Source
First of all, we need a flat file with some data in it. Start by adding a .txt file on this path on the SharePoint server:
C:Sharedzipcodes.txt
In real-life scenarios, it is likely to be on a file share, but for this example we keep it simple. In this example, the file contains city names and zip codes, separated with a comma and each name/zip pair on a new line. For this example, Danish zip codes are used. The file should look like this:
2750,Ballerup

1810,Frederiksberg

1720,Copenhagen West

...
Creating a .NET Assembly Connector Project in Visual Studio 2010
A .NET Assembly Connector is created as the project type Business Data Connectivity Model (BDC Model) in Visual Studio 2010. Open Visual Studio 2010, click File, select New, and then select Project. Choose the Business Data Connectivity Model project type, and name the project ZipCodesModel, as shown in Figure 14-21. Then click OK.
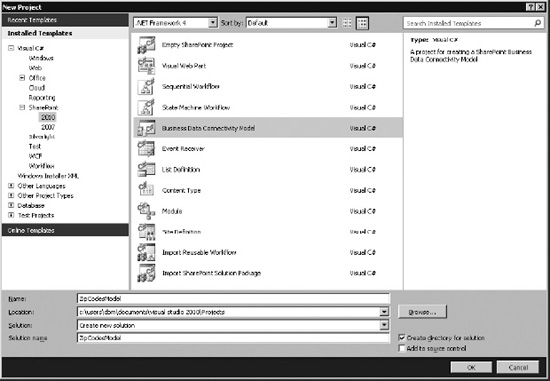
Figure 14-21. Selecting the Business Data Connectivity Model from the Projects window
Specify the SharePoint site where the model should be deployed (Figure 14-22), and click Finish.

Figure 14-22. Setting deployment site
Note that BDCM projects can be deployed only as a farm solution. This is because the model has to be deployed to the metadata store.
The BDCM project type creates a number of files automatically. These files shown in Solution Explorer (Figure 14-23) are the minimum required to make a new model and deploy it. If the BDCM is part of a third-party solution, it is likely that an alternative deployment method is used and the feature files and WSP package files can be removed.
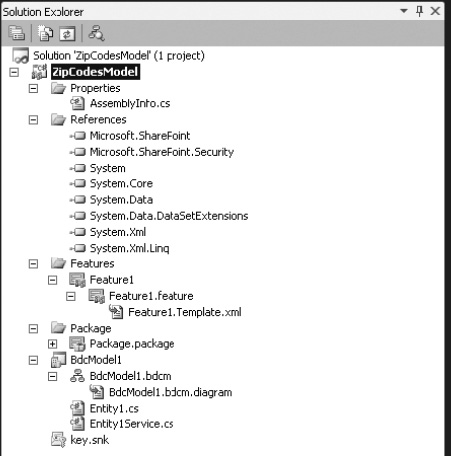
Figure 14-23. Solution Explorer showing the BDC model
The required references to the SharePoint assemblies are automatically added. A feature for enabling and disabling the BDCM is included, and a WSP package containing the feature and model is added.
The BDC model itself contains a definition of the data source, connection information, and access layer information (query and return type information). The BDC model contains two classes: a class that defines the entity or external content type that this BDC model returns, and a class containing the code used to connect to the data source, query it, and return the entities it contains.
Creating an Entity (External Content Type)
The first real development task is to create the entity to be returned. It is very important to make sure that the entity contains the appropriate data to fulfill the business requirement for this .NET connector. To do this, the Entity1.cs file will be renamed ZipCodesEntity.cs and modified to map to the zip codes file.
To rename the file called Entity1.cs, right-click it in Solution Explorer and select Rename from the context menu. Type in ZipCodesEntity.cs, and click Yes when asked if all references should be renamed.
To modify the mapping, open the entity file by double-clicking ZipCodesEntity.cs. Delete the existing properties, and add two new properties called ZipCode and City. The class should now look as follows:
 using System;

 using System.Collections.Generic;

 using System.Linq;

 using System.Text;


 namespace ZipCodesModel.BdcModel1

 {

    public partial class ZipCodesEntity

    {

        public string ZipCode { get; set; }

        public string City { get; set; }

    }

 }
Creating an Entity Service Class
The entity service class is this example is used to query the data source—in this example, the zipcodes text file. The output of the entity service class will be one or all objects of the ZipCodesEntity class, depending on the operation performed.
Rename the Entity1Service.cs file to ZipCodesEntityService.cs as with the entity file, and click Yes when asked to update all references.
In Solution Explorer, double-click ZipCodesEntityService.cs to open it in code view.
As the data source is a text file, add the System.IO namespace, which contains the required classes for reading from the zipcodes text file.
using System.IO;
Some methods are required for the entity service class to function. The entity service class defines the Finder and Specific Finder methods used to return entities from the data source (zipcodes text file).
ReadList() is the Finder method of the BDC model. In this example, it should return all zipcode/city pairs from the data source. The method returns an IEnumerable generic collection of entities, which, in this case, is a collection of ZipCodesEntity objects. In this example, the objects are just created in memory, but advanced streaming schemes might be applied if the data source contains larger data sets. The ReadList() method can be implemented as shown in Listing 14-1.
Listing 14-1. Implementation of the ReadList Method
public static IEnumerable<ZipCodesEntity> ReadList()

 {

     List<ZipCodesEntity> zipCodesEntityList = new List<ZipCodesEntity>();

    TextReader textReader = new StreamReader(@"C:SharedipCodes.txt");

    string zipCodeEntry;


     while ((zipCodeEntry = textReader.ReadLine()) != null)

     {

         ZipCodesEntity zipCodesEntity = new ZipCodesEntity();


         string[] entityData = zipCodeEntry.Split(','),

         zipCodesEntity.ZipCode = entityData[0];

         zipCodesEntity.City = entityData[1];

         zipCodesEntityList.Add(zipCodesEntity);
}
textReader.Close();
return zipCodesEntityList;
}
The ReadItem(string zipCode) method defines the Specific Finder method for the BDC model. In this example, it returns a ZipCodesEntity object with the zipcode/city pair matching the zipcode argument. The ReadItem() method can be implemented as shown in Listing 14-2.
Listing 14-2. Implementation of the ReadItem Method
public static ZipCodesEntity ReadItem(string zipCode)

 {

     foreach (ZipCodesEntity zipCodesEntity in ReadList())

     {

         if (zipCodesEntity.ZipCode == zipCode)

             return zipCodesEntity;

     }

     return null;


 }
It should now be possible to compile the assembly, which can be considered a .NET Assembly Connector at this point. Now the BDC model will be created, and the connection to the relevant data source, query capabilities, and return value type are defined.
BDC Modeling Tools
After defining the entity and service, the BDC model can be created. The BDC model defines how to connect to the data source and how it can be queried. It also defines the type of information it returns. The BDC Explorer and the BDC Designer are used to define the BDC model. Both of these new VS 2010 components are described ahead.
BDC Explorer
VS 2010 extends the windows list with the BDC Explorer, shown in Figure 14-24. This window is used to create or edit the BDC model.
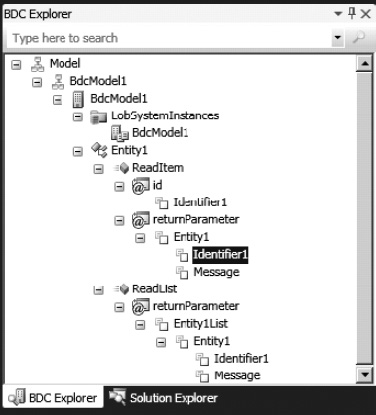
Figure 14-24. BDC Explorer showing the BDC model
Just like with Solution Explorer and class view windows, the BDC Explorer is linked to the Properties window. It shows the relevant properties allowing the developer to view and edit the BDC model. Figure 14-25 demonstrates this. When Identifier 1 is selected in the BDC Explorer, the corresponding properties are displayed in the Properties window.
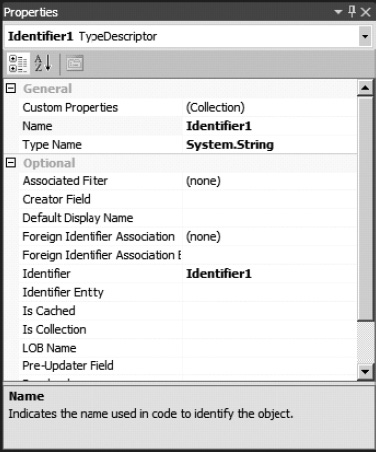
Figure 14-25. Entity properties displayed beneath the BDC Explorer
BDC Designer
VS 2010 includes the BDC Designer (Figure 14-26). This designer window allows the developer to create and edit a BDC model. The BDC Designer works the same way as the BDC Explorer regarding the Properties window.
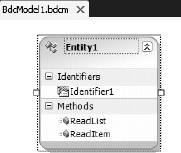
Figure 14-26. A BDC entity displayed in the BDC Designer
Defining the BDC Model
Defining a BDC model is essentially to define the mapping between your .NET Assembly Connector and the BDC. In this series of steps, the mappings between the .NET Assembly Connector and the BDC are defined. To create the mapping, double-click the BDC Explorer to open the BDCModel1.bdcm file in Solution Explorer. The BDC Designer will then open and be visible. From the View menu, select Other Windows. Then click BDC Explorer to open the window.
Configuring the BDC Model and LOB System
Rename the BDC model to ZipCodesModel, as shown in Figure 14-27. Right-click the second node from the top, named BdcModel1, and click Properties. Change the Name property to ZipCodesModel in the Properties window.
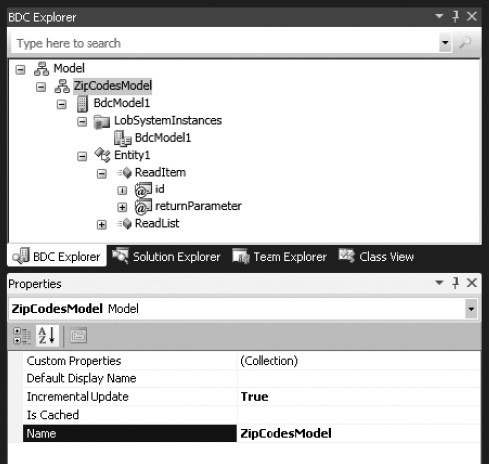
Figure 14-27. Renaming the BDC model
The third node from the top (the LOB system) should also be renamed. Change the Name property to ZipCodesLOBSystem using the Properties window, as shown in Figure 14-28.
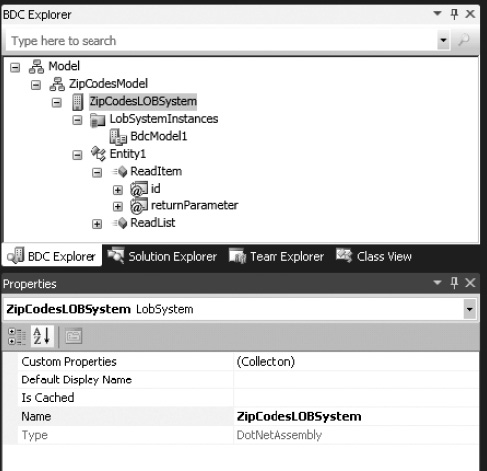
Figure 14-28. Renaming the LOB system
The fifth node from the top (the LOB system instance) should be renamed to ZipCodesLOBSystemInstance by using the Properties window to change its Name property, as shown in Figure 14-29.
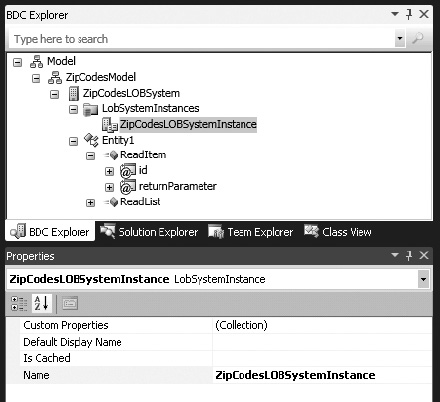
Figure 14-29. Renaming the LOB system instance
The ShowInSearchUI property on the ZipCodesLOBSystemInstance must be set to allow the ZipCodesLOBSystemInstance to be crawled and searched by the SharePoint search service. If the LOBSystemInstance should not be crawled or searched, this property does not need to be changed. To set the ShowInSearchUI property on the ZipCodesLOBSystemInstance, click the ZipCodesLOBSystemInstance node in the BDC Explorer. Then click the button in the Custom Properties row in the Properties window. Use the Properties Editor to set the ShowInSearchUI property. Give it the data type System.String and set the value to x, as shown in Figure 14-30. Click OK.
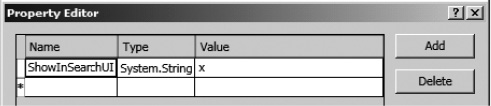
Figure 14-30. Adding the ShowInSearchUI property to the LOB system instance
Configuring the Entity and Entity Methods
The BDC model entity should be renamed to match the entity defined in the .NET Assembly Connector. This is done by selecting Entity1 from the BDC Explorer. Then change the Name property to ZipCodesEntity in the Properties window, as shown in Figure 14-31.
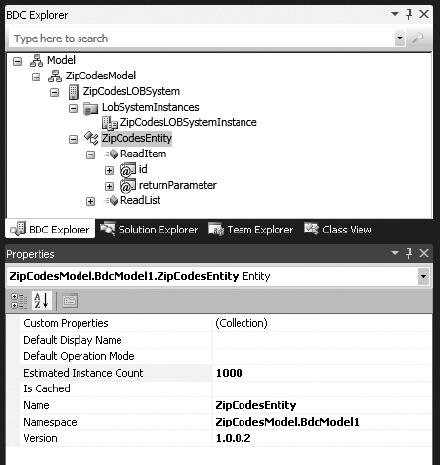
Figure 14-31. Renaming the BDC model entity
The RootFinder property on the Finder method must be set to specify the Finder method used to enumerate the items to crawl. If the Finder method shouldn't be used for crawling, this property can be ignored and left unset. The RootFinder property on the Finder method is set in the BDC Explorer by clicking the ReadList node. After that, click the button in the Custom Properties row in the Properties window. Add the RootFinder property, with a data type of System.String and a value of x in the Properties Editor, as shown in Figure 14-32.

Figure 14-32. Adding the RootFinder property to the Finder method
Next, the identifier for the Finder method return parameter is set for the entity. This is done by selecting the Identifier1 node under the Finder method return parameter for the ZipCodesEntity. Then, in the Properties window, change the Name property to ZipCode, as shown in Figure 14-33.
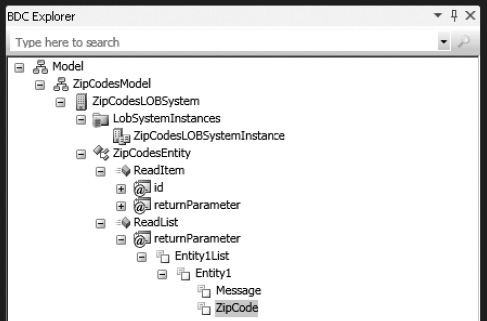
Figure 14-33. Renaming the Finder method
Next, set the identifier for the specific Finder method return parameter and the input parameter in the entity. To do so, first select the Identifier1 nodes under the specific Finder method return parameter for the ZipCodesEntity. Then, in the Properties window, change the Name property to ZipCode, as shown in Figure 14-34.
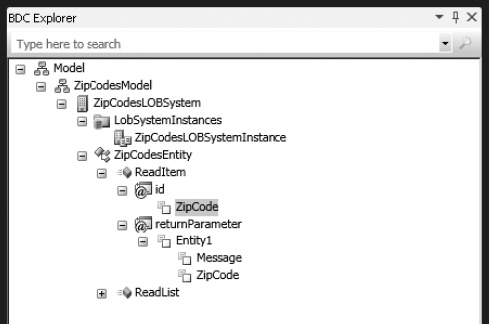
Figure 14-34. Renaming the Finder method return parameter
Right-click Identifier1, and select Rename in the BDC Designer (Figure 14-35). Change the identifier to ZipCode.
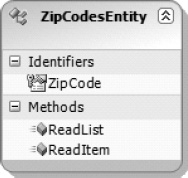
Figure 14-35. Renaming the BDC model in Designer view
The message parameters are not needed, so they should be removed. Right-click the message parameter on the Finder method, and select Delete. This removes the Message node from the BDC Explorer. Repeat this on the specific Finder method. Alternatively delete the entity, and recreate a new “empty” entity.
Adding Parameters to Map the Data Source
Parameters must be added that map to the data in the zipcodes text file data source. In this example, the only parameter to map is the city name.
In the BDC Explorer, right-click Entity1 and select Add Type Descriptor. In the Properties window, change the Name property to City and the Type Name property to System.String, as shown in Figure 14-36. Repeat this for the Finder and the Specific Finder methods.
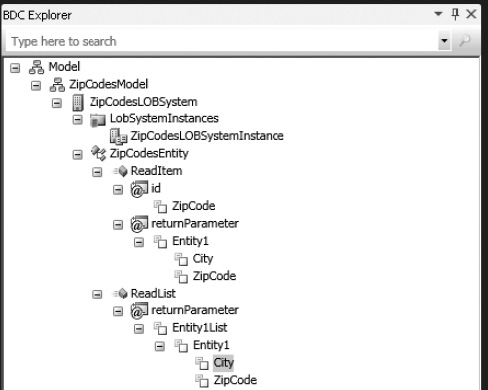
Figure 14-36. Adding parameters to the Finder and Specific Finder methods
Configuring the Finder Method Instance
The method instance properties are configured from the BDC Method Details window. This window is also new in VS 2010. Selecting a method in the BDC Designer will display the corresponding method instances in the BDC Method Details window, as shown in Figure 14-37.
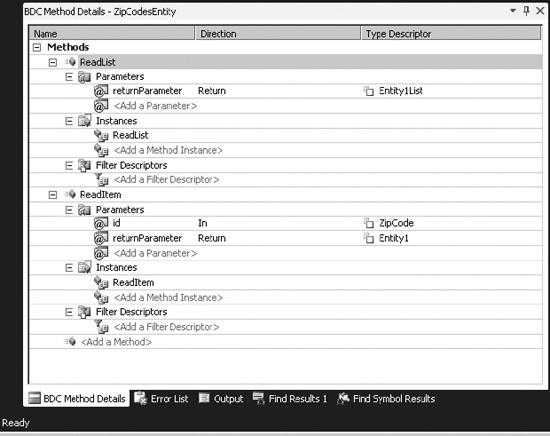
Figure 14-37. Configuring the Finder method instance
The Finder method is specified by setting the RootFinder property on the Finder method instance. It specifies that this instance is used to enumerate the items to crawl. If the Finder method instance is not to be used for crawling, this property can be ignored and left unset. Click the ReadList node in the BDC Method Details window. To set the RootFinder property on the Finder method instance, click the button in the Custom Properties row in the Properties window. Add the RootFinder property. Set the data type as System.String, and set the value to x, as shown in Figure 14-38.

Figure 14-38. Adding the RootFinder property to the Finder method instance
If the data source contained data suitable for incremental crawls, the LastModifiedTimeStampField property on the Finder method instance could also be set. This is not feasible in this example.
Deployment
Deploying the .NET Assembly Connector is made easy in Visual Studio 2010. Open the Build menu on the top bar, and click Deploy Solution. Now VS 2010 begins to compile and packages the .NET Assembly Connector code, BDC model, and the feature. Finally it creates a WSP, which is the package type used for deploying solutions to SharePoint.
The WSP package is then deployed to the specified SharePoint site. The feature is activated, which registers the external content type associated with this .NET Assembly Connector.
The Secure Store Service
The Secure Store Service is used to store accounts inside SharePoint to use when authorizing against databases that require authorization, etc. It typically stores credentials in the form of username and password, but it can also store tokens, pin numbers, etc.
The Secure Store Service application works by a scheme being defined providing authentication information. Then the user- or group-level permissions to pass to the database are mapped in the Secure Store application. The Secure Store Service allows connections using the federation, delegation, or impersonation level. In cases of Business Connectivity Services, the mapped credentials are passed from the Secure Store to the data source.1
Configuring the Secure Store Service
In this section and the ones that follow, we will go through the procedure of configuring the Secure Store Service, while explaining the individual steps and configuration options. The first step is to ensure that the Secure Store Service is started:
- Navigate to Central Administration Manage Service on Server (Figure 14-39).
- Locate the service called Secure Store Service.
- If the Secure Store Service is not started, then start it.
__________
1 Loosely based on http://lightningtools.com/blog/archive/2010/01/20/bcs-secure-store-services.aspx.
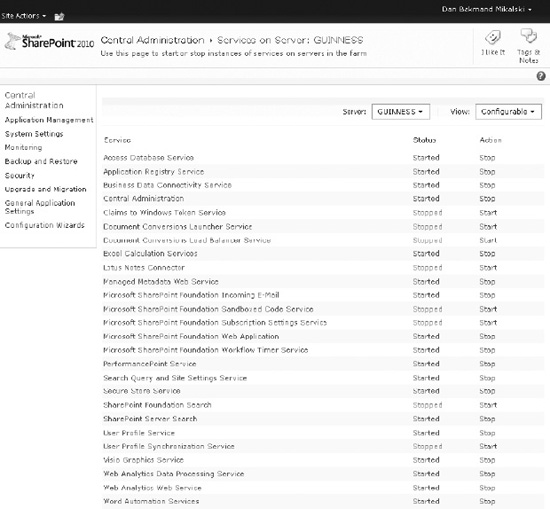
Figure 14-39. Services overview
With the Secure Store Service started, it is now possible to provision a Secure Store Service application as follows:
- Navigate to Central Administration Manage Service Application (Figure 14-40).
- Click the New button on the ribbon.
- Click Secure Store Service to open the dialog for creating the new service application.
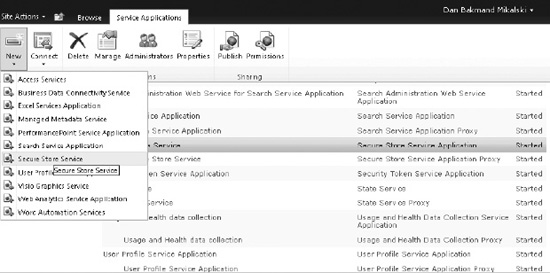
Figure 14-40. Provisioning the Secure Store Service application
The Create New Secure Store Service Application dialog (Figure 14-41) allows administrators to specify a database where the credentials are stored. The credentials are encrypted and accessible by the Secure Store Service application. To create the Secure Store Service, do the following:
- Enter a unique service name.
- Specify the database instance name where the Secure Store database will be created. Also specify a name for the Secure Store database.
- Choose or create an application pool identity, which the Secure Store Service application will run under. It is suggested to use a unique account for this particular service application for security reasons.
- Click OK. The Secure Store Service application and proxy should now be created.
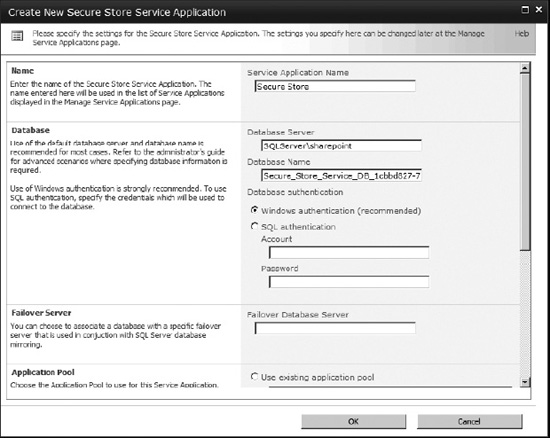
Figure 14-41. Provisioning the Secure Store Service application
With the new Secure Store Service application created, it must be configured with a pass phrase (Figure 14-42) that allows it to securely encrypt and decrypt the stored credentials from the database.
- Click the Secure Store Service application to begin configuring it.
- If it is the first time the Secure Store Service application is being configured, a prompt will appear, asking for a new key to be generated. Click Generate New Key on the ribbon.
- Enter a pass phrase, and click OK.
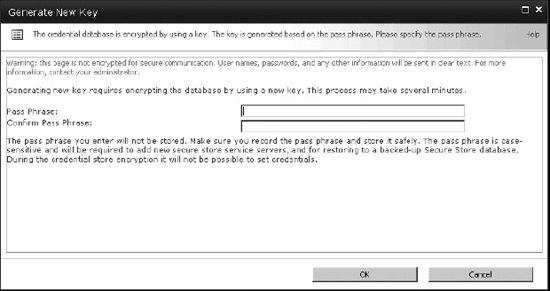
Figure 14-42. Secure Store Service key generation
Creating a Secure Store Service Application for Impersonating
For the Secure Store Service to be able to apply the stored credentials, an application must be created that uses these credentials. In SharePoint, this is called a Secure Store Target Application. In essence the impersonation of the securely stored credentials is done through this application.
- Go to the Secure Store Service application.
- Click New on the ribbon, as shown in Figure 14-43. This opens the Create New Secure Store Target Application page.
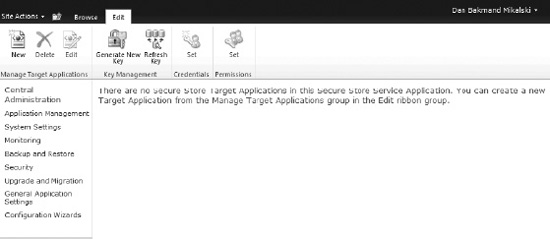
Figure 14-43. Secure Store Service application overview
On the Create New Secure Store Target Application page, the target application settings are specified. In the example in Figure 14-44, Group is chosen as the target application type. This allows members to be defined whose accounts can be impersonated by another account. This is the most often used scenario. Other options include tickets with a limited valid lifetime. On the target application page, do the following:
- Enter a unique name for the application. This is not changeable after the application is created.
- Enter a screen-friendly name and the e-mail address of the administrator, which typically is the creator.
- Choose the Target Application Type, as described before.
- Select a Target Application Page URL. A custom URL can be specified to allow mapping this application to a custom page for users to assign accounts, if there is an organizational need for doing so.
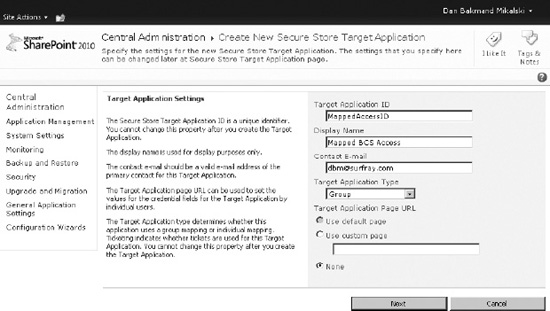
Figure 14-44. Secure Store Service application creation
To alter the fields and thereby information used by this application, add additional fields that the user will have to fill out to authenticate. The default fields are Windows username and password, as shown in Figure 14-45.
- Change fields as required.
- Click Next to go to the credentials mapping page.
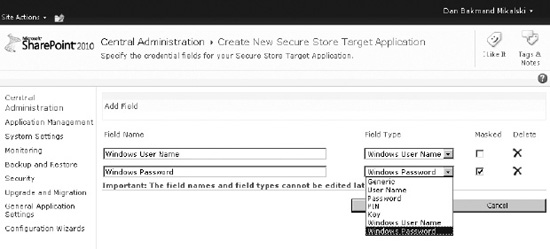
Figure 14-45. Secure Store Service application field mapping
On the user mappings page, the administrators and members are configured. These are then the members and administrators of the target application. In Figure 14-46, one administrator and two users are added: SP_TestUser1 and SP_TestUser2. It will be explained how to add specific permissions to individual users in the “Setting Permissions” section.
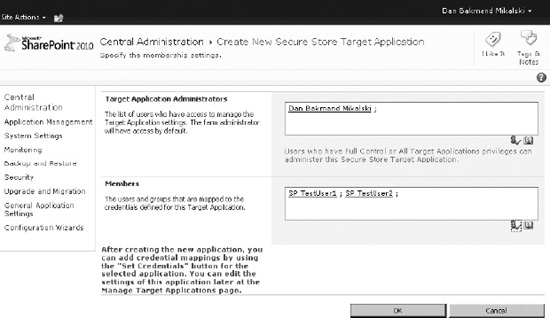
Figure 14-46. Secure Store Service credentials mapping
Finally click the OK button, and the target application will be created. SharePoint now automatically navigates to the Secure Store Service Application page where the target applications are shown, as in Figure 14-47. It lists the target applications by ID, their types, and display name.
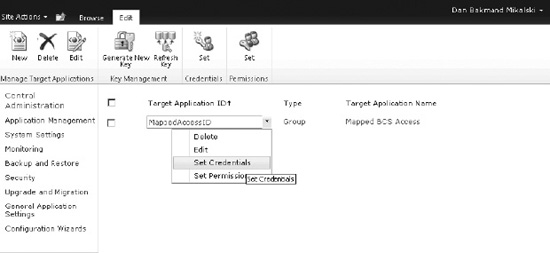
Figure 14-47. Secure Store Service application overview
Setting the Application Impersonation Credentials
Now, the Secure Store Target Application is configured and administrators, members, and credentials type have been defined. At this point, the application impersonation credentials are configured for the members of the target application, as shown in Figure 14-48.
- Provide one or more credential owners, which are the credentials that map to the custom defined credentials.
- Enter the Windows username and password(s) to be used when impersonating in the Secure Store Target Application.
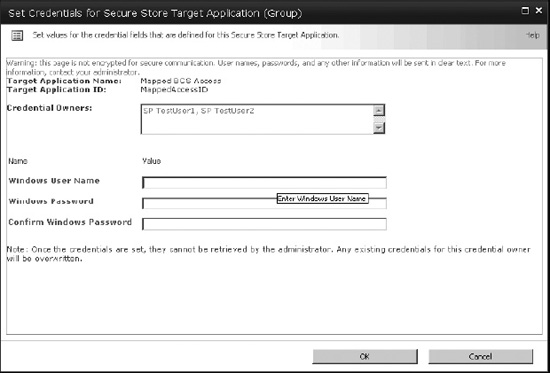
Figure 14-48. Setting the Secure Store Target Application credentials
With everything configured relating to credentials, the Secure Store Target Application can be used by BCS when creating connections to its data sources, as shown in Figure 14-49.
- Select a connection type.
- Enter proper connection details (here it is a SQL Server connection, as shown in Figure 14-49).
- Enter the target application name at the time of creating a connection to the back end. Given the example data used in the section “Creating an External Content Type,” now select the Secure Store Application ID option and enter the application name.

Figure 14-49. Map BCS connection to Secure Store Application ID
As mentioned earlier in this example, two users were added as members. These users can be delegated individual rights. When these users open an external list based on this external content type, they should be able to see the data pulled from the BDC using the impersonation. For this to work, the users must be members of the BCS application, as the BCS checks permissions using the incoming user account before doing the impersonation and getting the data from the back end. This means that the impersonation is not for communicating with the BCS application itself, but for allowing BCS to get data from its data source. Users still need permissions to access the external content type objects.
Setting Permissions
Based on the data source created in the previous section, setting permissions on external content type objects is done by doing the following:
- Going to Central Administration site Manage service applications
- Selecting the BCS service application just created
- Setting permissions on the external content type, as shown in Figure 14-50
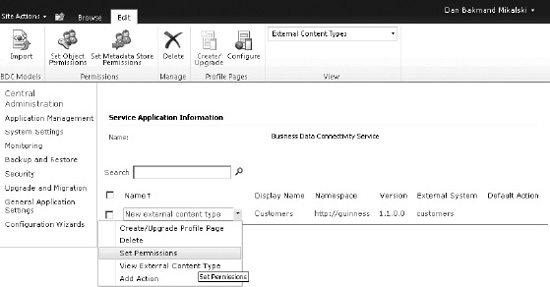
Figure 14-50. Accessing external content type permissions settings
In this case, the users are granted Edit and Execute permissions on the customers external content type object, as shown in Figure 14-51.
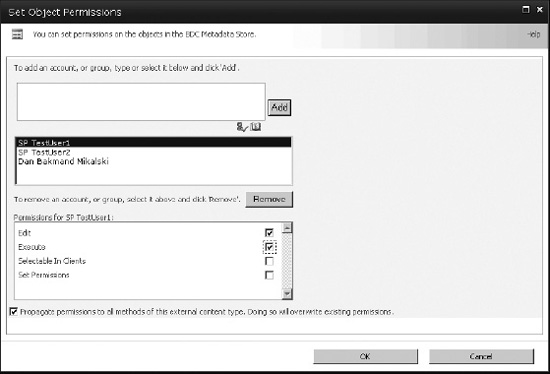
Figure 14-51. Setting external content type permissions
At this point, the external content type permissions are fully configured and can now be used in BCS Web Parts, external lists, etc. by persons with the appropriate credentials.
Creating Security Trimmed CRUD Operations on a SQL Database Using Visual Studio 2010
Earlier it was shown how to create a flat file .NET connector using Business Data Connectivity Designer in Visual Studio 2010. Here we will show you how to pull data from an external database into an external list and enable Create, Read, Update, and Delete (CRUD) functions to the external list.2 The example is based on the same customer data used earlier.
This list will implement security trimming by using a rights table that holds security identifiers for each row.
Connecting Model to Data Source
To begin with, create a new BDC Model project and give it a proper name. Here it is named BdcCustomersModel. To make it easy to use the data obtained from the Customers database, the best way is to add a LINQ to SQL model. LINQ is not the fastest implementation method performance-wise, so if performance is critical, you might prefer to implement a dedicated data adaptor instead.
- Select the project by left-clicking it.
- Click Add New Item on the projects menu to open the Add New Item dialog.
- Select Data templates from the Installed Templates panel.
- Choose the LINQ to SQL Classes project type from the Templates panel.
- Give the project a proper name—here it is called “Customer”—and then click Add.
- Open the Server Explorer, and add a connection to the
Customersdatabase. - Drag
Customerstableand drop it on theCustomer.dbmldesign surface.
At this point, a designer class named CustomerDataContext is automatically added. To allow a connection to be created using a custom connection string, a new class should be added. Name the class CustomerDataContext.cs. Make this class a partial class. Then pass the connection string to the base class through the constructor, as in Listing 14-3.
Listing 14-3. Data Context for Connecting to a Database with a Custom Connection String
public partial class CustomerDataContext

{

    private const string ConnectionString = @"Data Source=localhostSQLEXPRESS;Initial

        Catalog=CustomersDatabase;Integrated Security=True;Pooling=False";
public CustomerDataContext() :
base(ConnectionString, mappingSource)
{
OnCreated();
}
}
__________
2 Loosely based on http://www.facebook.com/note.php?note_id=338666619441.
![]() Note We made the connection string a constant in the code for exemplifying it. In a production environment, it should be added to the
Note We made the connection string a constant in the code for exemplifying it. In a production environment, it should be added to the Web.Config file in encrypted format. When using your own database, the connection string should be modified to match your database and credential requirements.
Mapping BDC Model to Data Source
At this point, the BDC model should be mapped to the data source. This involves making a number of entities and specifying appropriate methods. The purpose is to create the interpretation layer between the database and the BDC model. First an entity with an identifier key needs to be created:
- An entity named “Entity1” is automatically created. Delete it.
- Create a new entity. This can be done using “Drag and Drop” on the Entity from Toolbox and dropping it on the design surface.
- Change the default name of the entity to “Customer.”
- Create a new identifier named, CustomerKey, on the entity “Customer.” This is most easily done by right-clicking the entity and selecting the Add Identifier option. This adds a new identifier to the entity.
- Give the identifier the name “CustomerKey”.
To add functionality, a number of method instances must be added to the entity. This is most easily done by selecting the entity and clicking the <Add a Method> button that appears in the Method Details panel. Create a Specific Finder method on the entity. This will add the
ReadItem, as shown in Figure 14-52.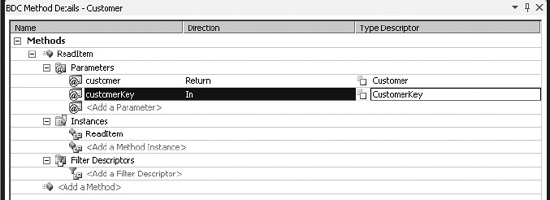
Figure 14-52. Specific Finder method
As shown in the Method Details panel, the
ReadItemmethod has two parameters, namely anInparameter, which takes the identifier key, and aReturnparameter, which is an object instance of the identity type. VS2010 offers some functionality for making it easy to create new methods by copying type descriptors automatically when possible. Therefore it is a good idea to configure those for the Specific Finder method before adding the other methods.To complete the identifier key configuration, the type descriptor for the return parameter named
CustomerKeyshould be added. - Open the Method Details panel.
- Choose the <Edit> command from the type descriptor menu named CustomerKey.
- In the BDC Explorer, add a type descriptor by right-clicking the CustomerKey, as shown in Figure 14-53, and choose the Add Type Descriptor option. This will create a new type descriptor.
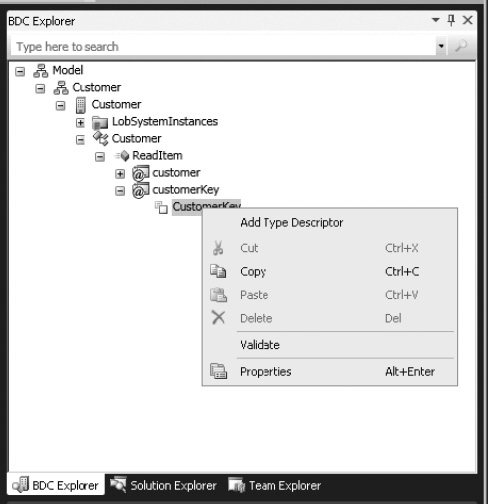
- Rename the just-created type descriptor to “CustomerKey”, using the Properties panel.
- Change the
Identifierproperty toCustomerKey, as in Figure 14-54. This is how the BCS runtime knows that this type descriptor maps to theCustomerKeyidentifier. - Change the
Type Nameproperty to match the type from the LINQ model. In this example, it is not required to change it. - Repeat steps 1–6 for all required type descriptors.
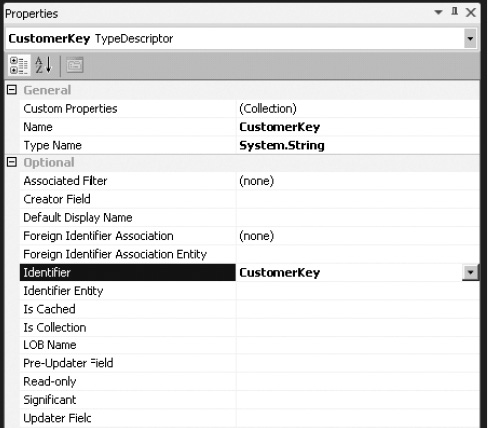
Figure 14-54. Configuring type descriptors
When all type descriptors are added as in steps 1 through 7, the type descriptors shown in Figure 14-55 should be visible. It is always a good idea to check the spelling and Type Name properties at this point, as updating them later on can be a pain. Refactoring does not currently support this.
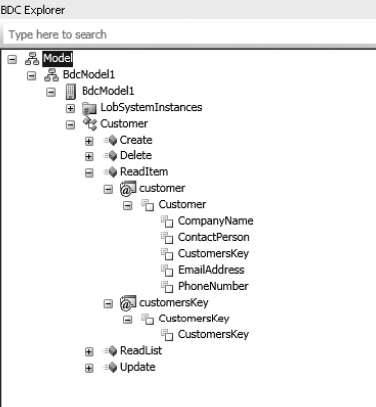
Figure 14-55. All type descriptors configured
At this point, the other methods available need to be created the same as the ReadItem (Specific Finder) method. These are the methods that support the BDC operations that are the CRUD operations. To do this, repeat the steps in this section for each of the following methods: ReadList, Create, Update, and Delete. Also counting the ReadItem method, a total of five methods should be defined for the entity named Customer. It is, however, much easier to create the last four methods, as the type descriptors of the return parameters are automatically defined the same way as with the ReadItem method. The BDC Designer automatically applies type descriptors defined in the other methods of an entity and copies them to the newly created methods.
With the required type descriptors in place for the methods, the LOB system–qualified type name of the type descriptor Customer should be defined. This is done by selecting the Customer type descriptor in the BDC Explorer panel. In the Properties panel, its value should be changed from System.String to BdcCustomer.Customer, BdcModel1. This is now the underlying data type of the data structure that the Customer type descriptor returns.
Adding Code-Behind to Access External Data Source
To implement the logic required for performing the actual CRUD operations, the method body of the methods in the CustomerService.cs code file should be changed to match the code in Listing 14-4.
Listing 14-4. Implementation of CRUD Operations in the BDC Method Instances
public static Customer ReadItem(string customersKey)

 {

     CustomerDataContext context = new CustomerDataContext();

     Customer cust = context.Customers.Single(c => c.CustomerKey == customersKey);

     return cust;

 }


 public static Customer Create(Customer newCustomer)

 {

     CustomerDataContext context = new CustomerDataContext();

     context.Customers.InsertOnSubmit(newCustomer); context.SubmitChanges();

     Customer cust= context.Customers.Single(c => c.CustomerKey ==newCustomer.CustomerKey);

     return cust;

 }


 public static void Delete(string customersKey)

 {

     CustomerDataContext context = new CustomerDataContext();

     Customer cust = context.Customers.Single(c => c.CustomerKey == customersKey);

     context.Customers.DeleteOnSubmit(cust);

     context.SubmitChanges();

 }


 public static IEnumerable<Customer> ReadList()

 {

     CustomerDataContext context = new CustomerDataContext();

     IEnumerable<Customer> custList = context.Customers;

     return custList;

 }


 public static void Update(Customer customer)

 {

     CustomerDataContext context = new CustomerDataContext();

     Customer cust = context.Customers.Single(c => c.CustomerKey == customer.CustomerKey);

     cust.CustomerKey = customer.CustomerKey;

     cust.CompanyName = customer.CompanyName;

     cust.ContactPerson = customer.ContactPerson;

     cust.EmailAddress = customer.EmailAddress;

     cust.PhoneNumber = customer.PhoneNumber;

     context.SubmitChanges();

}
Adding Security Trimming to .NET Connectors
Being able to do security trimming is important in many corporations. This can be a challenge, especially if the LOB data system uses custom security descriptors. Extending the database .NET connector described in the previous section will show how this can be accomplished. Here we will assume one particular form of security descriptor, but in reality it could be in any format that supports mapping between the user context and the descriptor.
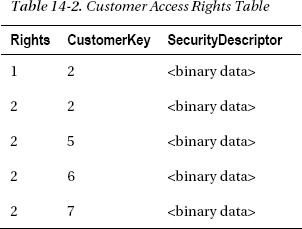
First a rights table must be added to the model to support security trimming. Here we have created a CustomerAccessRights table containing the SecurityDescriptor, Rights, and CustomerKey. The SecurityDescriptor is a binary unique value for a particular user. Rights will contain a simple numeric schema representing user rights to a particular row. It also contains creation rights.
- Read Allowed
- Read / Write / Update / Delete Allowed
No Entry means the user has no rights to this data row represented by the CustomerKey. In a production environment, a different and more fine-grained access rights mapping might be desired, but this should give a good idea about how to implement security trimming that allows multiple users with different access to the same data rows. Given the customer table contains this information, we can create a CustomerAccessRights table containing the security mappings. The SecurityDescriptor should be based on the same method used by the model to trim security. In this example, it is the GetSecurityDescriptor() method displayed in Tables 14-1 and 14-2.
To add the CustomerAccessRights table to the model, add a new LINQ to SQL Classes item to the project and name it CustomerAccessRights. In the Server Explorer, add a connection to the Customers database if it does not already exist. Then drag the CustomerAccessRights table, and drop it on the CustomerAccessRights.dbml design surface.
Next the required method for computing the SecurityDescriptor is added as in Listing 14-5. This method can be added to the CustomerService.cs class that also contains the Customer methods. This method computes a security descriptor in the form of a byte array.
Listing 14-5. Implementation of Method for Getting a Security Descriptor
static Byte[] GetSecurityDescriptor(string domain, string username)

 {

     NTAccount acc = new NTAccount(domain, username);

     SecurityIdentifier sid = (SecurityIdentifier)acc.Translate(typeof(SecurityIdentifier));

     CommonSecurityDescriptor sd = new CommonSecurityDescriptor(false, false,

          ControlFlags.None, sid, null, null, null);


     sd.SetDiscretionaryAclProtection(true, false);


     //Deny access to everyone

     SecurityIdentifier everyone = new SecurityIdentifier(WellKnownSidType.WorldSid, null);

     sd.DiscretionaryAcl.RemoveAccess( AccessControlType.Allow, everyone,

           unchecked((int)0xffffffffL), InheritanceFlags.None, PropagationFlags.None);


     //Grant full access to specified user

     sd.DiscretionaryAcl.AddAccess( AccessControlType.Allow, sid,

           unchecked((int)0xffffffffL), InheritanceFlags.None, PropagationFlags.None);


      byte[] secDes = new Byte[sd.BinaryLength];

      sd.GetBinaryForm(secDes, 0);


      return secDes;


 }
Having the Rights table and the security descriptor method in place, the next step is to modify the Customers methods for updating, reading, etc., such that they are trimmed based on the security descriptor. Here (Listing 14-6) the Reader methods are updated to apply security trimming during search.
Listing 14-6. Adding Security Trimming to the BDC Method Instances
public static IEnumerable<Customer> ReadList()

 {

    CustomerDataContext context = new CustomerDataContext();

    CustomerAccessRightsDataContext accessContext = new CustomerAccessRightsDataContext();


    List<Customer> tempCustList = new List<Customer>();

    foreach(Customer customer in context.Customers)

    {

       CustomerAccessRight custAccess = accessContext.CustomerAccessRights.SingleOrDefault(

             c => c.CustomerKey == customer.CustomerKey  && c.SecurityDescriptor.ToArray()

             == GetSecurityDescriptor(Environment.UserDomainName,Environment.UserName));


       if(custAccess.Rights > 0)
tempCustList.Add(customer);
}
IEnumerable<Customer> custList = tempCustList;
return custList;
}
public static Customer ReadItem(string customersKey)
{
CustomerDataContext context = new CustomerDataContext();
Customer cust = context.Customers.Single(c => c.CustomerKey == customersKey);
CustomerAccessRightsDataContext accessContext = new CustomerAccessRightsDataContext();
CustomerAccessRight custAccess = accessContext.CustomerAccessRights.SingleOrDefault(
c => c.CustomerKey == cust.CustomerKey && c.SecurityDescriptor.ToArray()
== GetSecurityDescriptor(Environment.UserDomainName, Environment.UserName));
if (custAccess.Rights > 0)
return cust;
else
return null;
}
Using this methodology as a baseline, it is possible to create simple security trimming. When doing security trimming, performance of the trimming mechanism is relevant. Different caching mechanics can be applied with success to increase performance. Also other security descriptor implementations that better fit specific requirements can be implemented using this example as a template for how to approach the topic. Microsoft does provide some resources on this topic.3
Summary
The goal of this chapter was to provide insight into the new Business Connectivity Services framework offered in SharePoint 2010. BCS is in itself an extensive framework out of the box, spanning not only SharePoint but also Outlook, InfoPath, and other Office applications.
One of the powerful capabilities of BCS is its relative ease in creating complex security configurations using the Secure Store Service or programming in Visual Studio 2010. This was much more difficult to accomplish with the Business Data Catalog in SharePoint 2007.
Hands-on examples of how to create and integrate BCS in the organization should encourage the reader to do further exploration of the capabilities. Finally an example of how easy it can be to code a .NET Assembly Connector for exposing an external content type from a data source not supported out of the box should also encourage IT professionals in the organization to view BCS as an opportunity as opposed to the much more difficult and expensive solutions of yesteryear's SharePoint 2007 BDC.