
C H A P T E R 18
Public-Facing SharePoint Sites
“Can we use SharePoint for our public-facing site? What benefit is there for us if we do?”
These are questions I get all the time in the field, usually coming from customers who have already had some level of exposure to SharePoint. Organizations have been adopting SharePoint and it's been spreading throughout their business areas, gaining a lot of traction with users. People like what it is doing for them, so the progression to looking at it for public-facing web content is a fairly natural one.
Having said that, the decision to use SharePoint for a public-facing site is one that is usually met with a lot more scrutiny from a business. An organization's public web site is very important to them; it's how a very large portion of people will get their first impression of the organization—and that first impression may be the difference between them looking further in to your business and potentially becoming a client, or simply moving on to the next web site their search engine has returned to them. There is a lot riding on a public-facing sites so the decision to use SharePoint, or any other technology, will need to be a well thought out one. The measure of success will ultimately be around how well the site is able to deliver real value for the organization, be it through gaining customers, increasing exposure, improving access to information, or any combination of these and other factors.
Using SharePoint on the Internet is not a new concept. Microsoft knows that the product is used this way and they have a licensing model that supports this. In fact, organizations such as Ferrari, AMD, and the United Nations have public-facing sites that are running on SharePoint (see Figure 18-1). SharePoint is used across many different industries including health, technology, education, and government; it's also used for sites based in countries all around the globe. There are literally thousands of sites that are driven by SharePoint and the number continues to grow every day.
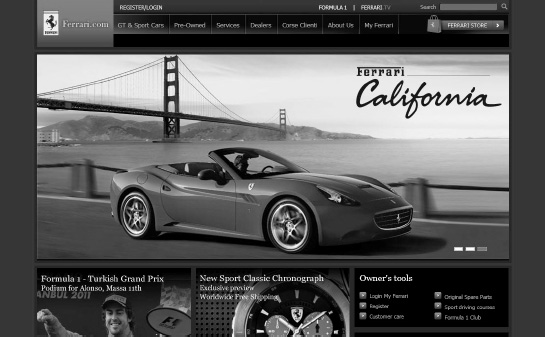
Figure 18-1. The Ferrari web site runs on SharePoint technology
What to Expect From This Chapter
I could easily fill a whole book with all the topics that could be covered when discussing how to do a public-facing site with SharePoint. Alas, I have only one chapter, so I will cover some high level concepts that I have found to be keys to success when delivering these kinds of sites with SharePoint.
Ideally, after reading this chapter you will have a good idea of the potential hurdles and issues you may need to address when you start a project to build a public-facing site. With that information in mind, you can dive deeper and make sure you are armed with all the information you need to provide a successful web site project with SharePoint.
Getting Started
When an organization comes to me to talk about using SharePoint on the Internet, one of the first questions I will get is “Who else is doing it?” Organizations will often spend time looking for similar businesses and organizations that are also using SharePoint for their public-facing sites, which is a perfectly valid thing to do. People naturally feel safer knowing that what they are doing has already been done by someone else, and adoption of SharePoint for Internet sites is no exception. Luckily, there is a fantastic resource to help you find other SharePoint sites: www.WssDemo.com. Run by Ian Morrish of Microsoft, its sole purpose is to list all of the public-facing web sites running on SharePoint. You're able to view lists and sort and filter by industry, country, the version of SharePoint, and even a rating that scores the site on its quality. There is an excellent Pivot View of all the sites in the list at www.wssdemo.com/livepivot/. It's well worth a look before you begin any public-facing SharePoint venture.
Why SharePoint?
When kicking off a project to build a public-facing web site, people will often have a lot of great ideas for content and design, but the decision about what technology to use to deliver the content is sometimes left up in the air. Will you use a content management system of some sort, or will you have a solution custom built? What current solutions meet your requirements? How much do these systems cost, both up front and longer term? To help make the decision to use SharePoint for a public-facing site, you will need to understand what makes it a good choice for your organization.
As mentioned, many organizations are using SharePoint internally for a range of uses. This internal use is often a driver for using the same technology for public web sites. When an organization invests in implementing SharePoint, a wide range of elements are put in place alongside SharePoint that help make sure it's successful. Hardware and infrastructure; disaster recovery plans; internal skills relating to administration, development, and end user training are just some of the examples of how organizations invest around the SharePoint platform, and this existing investment can translate out to a reduced investment when it comes to using the same SharePoint technology for the public site.
Leveraging Existing Infrastructure
Hardware and infrastructure requirements will always be included in an assessment of a solution to use for your site, and organizations that are already using SharePoint may find that they don't need to provision as much to get their public site up and running. An example here is a business that already has extranet sites set up. If a SharePoint farm has already been provisioned for external use, it might be possible that this same farm could be reused and extended a little to accommodate a public-facing web site (this would require that the extranet farm was purchased with the SharePoint for Internet sites license, however). In this case, common services may be shared across the farm (such as managed metadata, Visio services, and even user profiles) which will mean you don't end up duplicating the resources required to run these services on a second farm.
Even if an existing farm can't be reused, there are still potential benefits to be had around infrastructure if SharePoint is used. Your organization may have existing SQL servers that are capable of providing database functionality to a new farm, again translating to less hardware required for the new farm. Other hardware and software investments relating to your existing SharePoint deployment may also be used for your new farm, including monitoring tools like Systems Centre Operations Manager (SCOM) or other third party products that relate to SharePoint infrastructure. When comparing SharePoint to other platforms for your public site, it's important that more than just the direct requirements of the software be taken into consideration. This can be one of the reasons that SharePoint can start to look like a more attractive option for the public site.
Acknowledging Existing Skill Sets
Another area of heavy investment is training. From the staff managing the infrastructure through to the end users working with the system every day, there is a range of training and skills that are necessary to ensure success of a SharePoint project, this it's likely that a much smaller investment is needed to reuse the platform for a public site. Conversely, using a different application to drive the public site would mean introducing a whole new second range of skills specific to the other system, which will cost money and time to implement.
Moreover, existing infrastructure skills related to SharePoint can also be reused. Having the skills within your organization to maintain and manage your SharePoint farms can be critical to keeping your environments running smoothly and supporting a quick turnaround when things go wrong. Using SharePoint for the public site as well as internally means the same skills will apply to how it can be managed and monitored, even if configurations between farms are different.
Some organizations also have in-house development expertise and can create their own customizations for SharePoint. There is a bit of a learning curve to get up to speed in effectively creating custom code for SharePoint, and organizations will often invest in their people by sending them on training courses. Being able to use these skills for a public web site as well as internal development means a greater return on the organization's investment in training.
The last element that is not to be overlooked is end user training. This is very important, particularly in a large organization with a wide range of content authors. The reality is that having to learn one system is far easier than learning two. So if you have already made an investment in training your organization to use SharePoint for internal content, your staff will be able to adapt quite easily when using the public web site to publish content. This will mean less effort to produce training materials, less information for users to remember about how to create and manage content, and no need to have your help desk or support areas deal with users on two separate systems.
Content is King
Now that you have made the decision to use SharePoint as the platform for your public-facing site and you're happy with your technology choice, you are free to focus on what will make up your site: content. Your choice of technology will always have some effect on how you plan to implement your content (not as much on the content itself) and SharePoint is no exception. By utilizing the features that SharePoint provides relating to web content management (WCM), you can deliver a compelling web presence that makes it easy to author content, manage, and maintain. Features such as workflow, search, content types, and metadata are common features that relate to how content is maintained, so appropriate planning around how to take advantage of these features is key to taking advantage of your investment in SharePoint.
Workflows
One of the great features that SharePoint offers is a powerful workflow engine integrated into the platform, Based on Windows Workflow Foundation in .NET 3.5, it allows you to execute and track various processes against the content you put in to your SharePoint site, such as individual pages or documents. The most common example of workflow in a SharePoint WCM-based site is an approval workflow. SharePoint provides a basic version of out of the box, as shown in Figure 18-2; you can also create customized processes using SharePoint Designer 2010 or Visual Studio 2010.
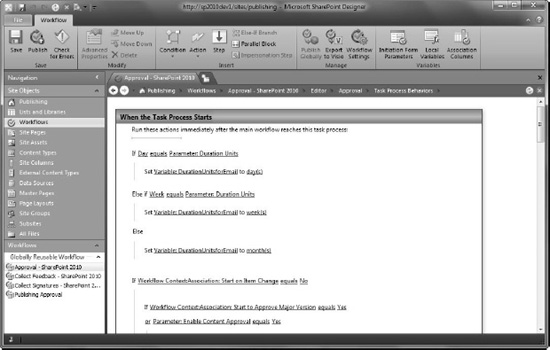
Figure 18-2. The workflow designer in SharePoint Designer 2010
The goal of the approval workflow is simple: to get an appropriate person to say that the content is approved before it goes to the general public. Nothing too complicated there. The reason this is such a useful concept for a public-facing site, though, is when you start to have the discussion around distributed content authoring. What this means is that you can begin to introduce people who normally wouldn't be responsible for the web site to editing content on the site—such as allowing specific sections or branches within the organization the rights to manage their own content. While these business areas will almost always have a solid grasp on their business and the information that needs to be conveyed through the site, they may not know how to write for the web, design standards for the site, web accessibility standards, etc. Having a good approval process in place here will help ensure that the content that hits the web site meets all of your organizational standards—and still allows you the flexibility to distribute the content authoring beyond the central team responsible for the web site.
To ensure the success of distributed authoring, appropriate thought will need to go in to planning your content approval process. Not only will you need to ask questions about who will be editing which sections of your site, but you need to know who will be approving the content also. Will there be one central team who approves it? Will managers from each section approve the content for their parts of the web site? Will you combine the two and have managers approve content and then have a web content team approve the web-specific elements of the page like accessibility and other elements? There is no one-size-fits-all approach; the answers to these questions will vary from organization to organization. What is important is that you ask the questions and document the process so you know exactly what you are implementing and why you are implementing it.
Of course, workflow can be used for much more than content approval. Other common uses in the WCM space include managing scheduled reviews of content, approving removal of content from the site, or gathering feedback on a specific piece of content on the site.
Content Types and Metadata
Content types in SharePoint allow you to identify various types of content and what metadata you associate with your content. Quite often you will see many custom content types in use within your internal SharePoint sites. There are plenty of good reasons to adopt content types in a public-facing SharePoint site (or any SharePoint WCM site) as well. By using content types appropriately, you can better categorize your content and make it easier to work with for both internal users as well as the general public.
When you provision a WCM site (which are the site templates that incorporate the publishing features; the publishing portal is an example of one of these), SharePoint provisions a number of content types that are designed to allow you to work with web-page–style content; these are the enterprise wiki page, article page, and welcome page. Each of these content types inherits from the System Page content type, which SharePoint identifies as a content page.
When planning content types for a public-facing site, you will always need to plan for your web content pages to inherit from the system page content type. From there you can add whatever other information you would like to see on the screen. Where this information appears on the page is determined through the use of page layouts, so the two of these are very closely linked. I'll discuss page layouts in more detail later in the chapter.
Reusable Content
A frequent requirement of content management systems is the ability to easily and quickly update pieces of content across the site. SharePoint allows you to do this through a feature called reusable content. This allows content authors to create pieces of text (or HTML) that can be inserted into content pages without the authors needing to retype them, as shown in Figure 18-3. This is important to be aware of and something to include in your user training as it will make maintaining content simpler, especially across a large site.
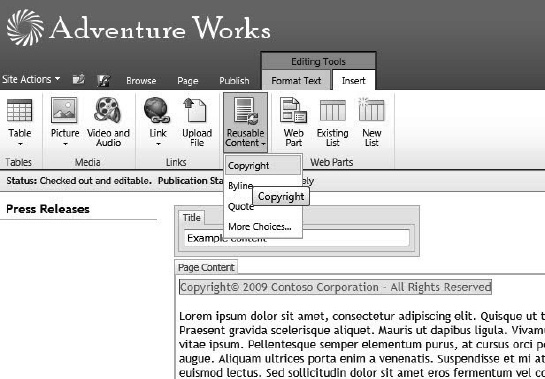
Figure 18-3. Inserting reusable content into a publishing page of a SharePoint 2010 site
All reusable content is stored in a list at the root of your site collection, and you are given options to control how it is used, such as if the item should appear in the drop-down menu on the ribbon and if the content should be in HTML or plain text. The more important piece of metadata here is a field called Automatic Update. When a piece of content has this option selected, you are able to make changes to the item in the list and have the change reflected across the entire site wherever it was inserted. If this option is not selected, changing the item will only affect future uses of the content.
This Automatic Update option is what really drives the need to plan for how reusable content will be implemented across your publishing site. Being able to insert text, such as the name of your company, an address, or a disclaimer message, is a great use of reusable content that should be automatically updated. There are also examples of things that you may not want to see updated, such as specific copyright or other legal notices; this type of content may need to be inserted from a predefined piece of text to get wording right, but once on the page it should not be changed.
Having the ability to automatically update sections of content across the entire site collection is incredibly powerful and can be a massive time saver (especially on a large site). For this reason, planning what items should be in this list is of key importance. The second element is ensuring that the content authors all know about this option and are actually using it. If an author manually types in a piece of text that is driven from the list, it won't be included in any automatic updates.
Maintaining an Image
Your public-facing site says a lot about your organization, so the look of the end result is important. From my own experience, this is one of the biggest concerns businesses have about using SharePoint for their public sites—they don't want it to look like SharePoint and often are convinced that this isn't easily possible. Hopefully, you have looked at www.WssDemo.com after I mentioned it earlier and you know that this isn't the case!
Style Guide Ideas
When discussing the look and feel of your public site, one thing often gets overlooked is a good style guide. Traditionally a style guide covers things like fonts, colors, location of content on specific types of pages, etc. A style guide for SharePoint should also cover what page layouts are required (including what content type they will be linked to), what elements are included on the page, and any CSS specific elements within the page layout. It should also include master page details including layout, what controls are on the page, and key style components. The goal as far as these elements go is to give a good overview of how the design is implemented in SharePoint, so that when someone needs to make changes to it later there is a solid guide as to how it was put together the first time around.
You will also want to cover things such as colors for text and backgrounds, which fonts will be used and where. The key for this as far as a SharePoint-specific site is concerned is that you don't just use plain text and headings. You need to consider SharePoint specific elements as well, such as headers on Web Parts, fonts and colors in out-of-the-box controls like date pickers and list views, just to name a few.
Driving Content Rules Through Page Layouts
One of the best things about page layouts is not just the predefined templates for where content should go on a page, but the incredible level of control over what the content should look like based on where on the page you put it (see Figure 18-4). Say you have a page layout with your main content area in a column down the right hand side. Its background color is different than the background color for special notes. In the main content area, it's okay for authors to use any formatting that is appropriate for delivering the information on the page, but in that side column you only want plain text with minimal formatting. This can be achieved by customizing the page layout.
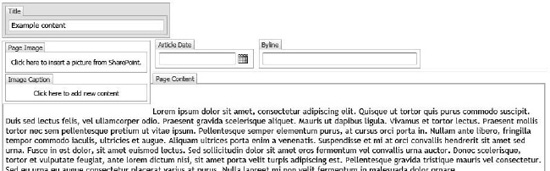
Figure 18-4. An example of a page layout that collects serveral pieces of metadata along with the main content of the page
When you are editing a page layout in SharePoint designer, you can right-click on any rich HTML area where your users can enter text and select Properties. This will bring up a window that will display a wide range of options about what can and can't be done within that specific HTML area. The lengthy list of options includes controlling what the user can do with fonts (sizes, types, bold and italic, colors, etc.); whether content such as images, tables, or hyperlinks (both internal and external) can be added; and whether specific HTML elements (such as headings or lists) can be used in the area. This is an incredibly powerful feature when you start to look at design integrity and it should not be overlooked. You can lock areas through the page layouts, which means that have complete control over what your public audience sees.
You can further protect the integrity of your designs by controlling what page layouts are available to users in the first place. This will prevent them from simply selecting another layout and doing whatever they want with it. Site administrators have the option to select which page layouts can be used within a particular site. This becomes useful when you begin to plan out where your page layouts should be used within your site. For example, you might have some page layouts that are used for news pages and you can change the settings to only allow these layouts in the news sub site. You might then have a page layout for product information pages; again, you can limit those to use in that section of the site only. These options can be set manually or they can be set in the web template that is used to create the site, which ensures that new sites will follow the rules you have defined for your content.
Seeing the control you can implement within your page layouts and your site settings, you can probably now see why it is important that these SharePoint-specific elements are recorded in your style guide. The style guide should be the first and last stop for anything to do with what your web site looks like. When put together well, it makes a fantastic document to use as a reference later on, especially when you are introducing new authors to the site.
Attracting Attention from the World Wide Web
The ultimate goal of your public-facing site is to get people to come to it and use it. In the case of intranet and extranet solutions built on top of SharePoint, this is a given—users will know where your site is because it's part of their job to go there to get information, submit forms, share documents, etc. For your public-facing site, though, things are very different. The people you want to come to your site might not even know you exist, let alone that you have a web site. So how do your users find you in the first place? In a very large number of cases, the answer is simple: search engines.
Search engines such as Bing and Google are constantly crawling the Internet for content to add to their indexes, and from search engines like these users will find all sorts of public-facing content every minute of every day. This raises the discussion of search engine optimization (SEO) and what you can do with your SharePoint sites to give them the best chance of being discovered by users who are searching. There are many, many books on search engine optimization, so I cover only a few general points and how they can be implemented within SharePoint.
One of the first things to look at when preparing any public-facing site for SEO is how the site looks in a plain text view. This is important because this is exactly how your site is seen by search engines; this is why your HTML markup is important. A great way to do this is with a text-only browser such as Lynx (http://lynx.isc.org/). This will allow you to see the text on your page and how it appears structurally based on elements such as headings and lists. This sort of view will help you understand how a search engine will treat your content (things such as the order items appear in, if text is a heading, what images appear as based on their alt tags and other markup, etc.) and as such, what will be placed in the index.
When planning your master pages and page layouts in a SharePoint site, it is always a good idea to create some test pages to run through this sort of treatment to ensure the markup that is going to be containing all the content in your site is being interpreted correctly. This also helps highlight the importance of correct use of HTML when preparing your content. If your page has invalid markup, it may not be interpreted correctly, which may cause problems with how your page is indexed. Having correct markup also helps make your page more generally accessible to anyone who is trying to view your site (such as a visually impaired person who relies on a text-to-speech engine such as Jaws to read your content to them).
There are other things you can do to help direct a search engine crawler around your web site, such as putting robots.txt and SiteMap.xml files into your sites root directory. Robots.txt is a list of paths that you want to tell search crawlers not to index; this is very useful if you have a section of your site that is archived and not designed to be found by external searches (usually because you want the external searches to only refer to the current content rather than the archived content). SiteMap.xml is a way to list all of the pages on your site and provide additional information such as when the page was last modified, how important the page is, and how frequently the page is updated. Both of these files play a critical role in giving external crawlers the best possible information about your site, so you will want to include them in your SharePoint site.
There are a few ways you can go about inserting these files. You could just open SharePoint Designer to the root site collection in a web application and simply upload the files to the site (as the files need to exist outside of a document library, you need to use SharePoint Designer to get them in the right place). This is fine, and the crawlers will see them and act on them, but you will find yourself with the problem of keeping them up to date, especially if your site is larger and its structure changes a fair bit. Fortunately, the SharePoint community has some great ideas on how to resolve this; a couple of the better solutions I have found were published by Waldek Mastykarz on his blog. He has created solutions to help dynamically generate these files and they are well worth a look; see http://blog.mastykarz.nl/generating-robots-txt-files-mavention-robots-txt/ and http://blog.mastykarz.nl/mavention-xml-sitemap-sharepoint-2010-server/.
Helping Your Users Find Their Content
External search engines are just one entry path to your web site. There's one other very important search engine you need to worry about: your own! While external search engines can help users find content on your site, having a site specific-search engine is just as important. Also, SharePoint offers various navigation controls that provide other ways for your users to navigate around your site.
Customizing the Search Experience
Having your internal search engine provide effective results to your users is a great way to improve the chances of your users finding content on your site. Adding things such as search scopes and advanced search pages will also improve the standard search functionality, but there are other ways you can take advantage of your search indexes. Through the APIs you can query data in the search indexes and take advantage of what SharePoint knows about your content to improve the user experience while browsing your site.
Search Scopes
There are numerous ways you can use search to improve the user experience on your site beyond simply indexing your content and providing a search box. The first option to look at for extending this functionality is to provide search scopes to accompany your search box. A search scope is a way of allowing someone to search for a subset of content in the index, which is defined by creating a set of rules to control what content gets included in the scope and what is excluded. Some examples of how you could use scopes include having one to search just products on your site or just recent news and announcements. You might have a scope for recently published content, for archived content, for a specific department's content, or even for documents rather than web pages (see Figure 18-5).

Figure 18-5. The search scope drop-down
The rules for search scopes allow you to include or exclude content from a scope based on three types of rules: URLs (all content at a specific path in the site), metadata (all content where property X = Y) or all content (include everything and then filter out with an exclude rule). Looking at these rule types you can start to see why things such as information architecture are just as important for a public SharePoint site as they are for an internal one. Having an appropriate site structure will let you make use of the URL-based rules, and appropriate content types and metadata will let you get the most from the metadata rules. In fact, you can even create a rule to filter based purely on content type, which is great for something like news pages. You might have a news page layout and content type that is used all over your site, with each area having their own news announcements that get rolled up and displayed at the top level site. You could search all the news items by simply creating a scope for ContentType = ‘News Page’. This sort of thing can make finding content much easier for your end users and your content authors alike.
Advanced Searches
Offering an advanced search page is a great way to provide power users of your site the ability to easily find content they want, especially if you have a large site. SharePoint provides an advanced search Web Part that can easily be inserted on a page (see Figure 18-6). But to really add value to your search experience, some consideration needs to go into how the advanced search will be used and what your users will be likely to look for on your site.
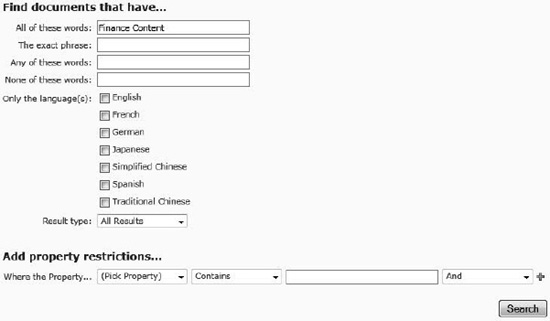
Figure 18-6. The standard advanced search Web Part
The advanced search Web Part lets you control what options the user is presented with when they browse to the page. The text boxes (all words, exact phrase, any words, none of these words), inclusion of scopes, languages, file types, and specific properties are all controlled through the Web Part Properties window.
Properties for the advanced search Web Part are primarily driven through an XML document stored in the Web Part properties. This XML is broken up into a few key sections that control what info is displayed on the screen. There are several sections of this XML that control the appearance of the advanced search Web Part, including what languages are shown, what properties are available to refine the searches, and what document formats users can search for.
Programmatically Working with Search
An often overlooked element of SharePoint's search service is the ability to access it programmatically. When a custom Web Part is created it will often need to query a large amount of data in a site, which can take up a lot of resources and time. The same data could possibly be retrieved from the search index, resulting in much lower resource usage and quicker results. The tradeoff here is that the data returned is not “live” as such and will only be as current as your search index.
The main benefit to taking this approach for querying data is performance. Due to the way that SharePoint stores and works with your data, querying across a wide scope (such as an entire site collection or perhaps even multiple site collections) can be a very resource-intensive task that will take some time to complete. Placing code like this on a public-facing site that could potentially be hit by many users at the same time could cause big performance problems for you. By choosing to query the search index instead of the live data, results can be returned much quicker, which will help ensure your farm doesn't have performance issues trying to deliver this type of content.
Assembling a call to the search service application in SharePoint 2010 is an incredibly simple task. The following code demonstrates this:
var proxy = (SearchServiceApplicationProxy)

SearchServiceApplicationProxy.GetProxy(SPServiceContext.GetContext(SPContext.Current.Site));

var query = new KeywordQuery(proxy)

{

        ResultsProvider = Microsoft.Office.Server.Search.Query.SearchProvider.Default,

        QueryText = “My Search Terms”

};

query.ResultTypes |= ResultType.RelevantResults;

var searchResults = query.Execute();
The process here is to first get the SearchServiceApplicationProxy object. (All service applications will allow you to interact with them through a proxy. The proxy will determine which service application instance your code should interact with based on the associations of the current web application). Once you have the proxy object, it's simply a matter of creating a KeywordQuery object. This allows you to define the settings for your query, including the results provider type and the actual query itself. Once the settings are defined, just call the Execute method and then parse the result set (which is a ResultTableCollection object, which can easily be loaded into a DataTable and then parsed).
Navigation Options for SharePoint Sites
It may sound incredibly obvious but having reliable and simple navigation on your public site is an incredibly important factor to its success. If users find your site difficult to use, they will quickly move on. For this reason, it's important that you know your options for navigation on your SharePoint site so that you can choose the ones that will best suit your site.
Main (Global) Navigation
The most obvious place to start with navigation is the main navigation menu that runs across the top of the default master page in SharePoint 2010. This is referred to as the global navigation menu. It is generally used to provide a consistent menu across your entire site, so it will have the same content no matter where you are within the site. When looking at a master page for your SharePoint 2010 site, the global navigation menu appears inside the <asp:ContentPlaceHolder> element with an ID value of PlaceHolderHorizontalNav.
Quick Launch Navigation
The quick launch navigation is the common name given to the list of links that runs down the left side of the standard SharePoint 2010 master page. The key differentiator between these links and the global navigation used across the top of the master page is that the quick launch links will usually be specific to the part of the site you are currently browsing in. For example, while in the Products section of your site you might see links related to products appear in the quick launch, but the global navigation will still show exactly the same set of links as it would anywhere in the site.
This is important to know as it can play a key factor in how you plan your navigation controls on the site. Having the global navigation provides a good overview of the structure of your site, and the quick launch allows users to quickly dive deeper into your content based on the pages they chose from the global navigation. It provides a simple way to drill down to content without necessarily having to put everything into the top navigation (which can easily become overly cluttered if not planned appropriately).
Table of Contents Web Part
The table of contents Web Part is another great example of how navigation can be provided on a SharePoint site. The best way to describe what this Web Part does is to think of it like a site map of sorts. It can display all of your sites and sub sites in a list that your users can browse through. This is a great thing to have on a public site for two reasons. First, it's a dynamic site map that users can browse to find content. Second, search engines like it. These crawlers will essentially start at the home page in your site and will look at every page that is linked to from there. Having a site map page that links to large portions of your site will help ensure that search crawlers find your pages and index them. This way you know that the pages on the site map are not likely to become orphaned or lost from your site due to someone inadvertently changing navigation settings or removing links.
Breadcrumbs
Breadcrumbs let users know what part of your site they are currently looking at and allow them to browse back up the hierarchy. Breadcrumbs usually look something like Home > sub site 1 > sub site 2 > my page, with each of the individual sites mentioned being a hyperlink back to those sites. SharePoint has a couple of ways of implementing this sort of link trail, and there is one on most standard master pages.
If you look at one of the standard SharePoint master pages, just to the right of the site actions menu, you will see a small folder icon; if selected it will show you the breadcrumb for the page you are currently viewing. The control is the <SharePoint:PopoutMenu> control, which includes the <asp:ContentPlaceHolder> for the PlaceHolderTitleBreadcrumb element.
Within these controls is the ListSiteMapPath control, which is what will actually display the breadcrumb inside the small popup window that appears when the folder icon is selected. It has a range of settings that can control how it is displayed. It is worth noting that the appearance of the control here is different between the standard v4.master page and the nightandday.master page that the publishing sites will use by default. The standard one shows a hierarchy that runs over multiple lines, indenting at each level, while the nightandday.master page shows it in a single line separated by a > character. The other difference is that the control v4.master will also show you what current library or list you are within, whereas the nightandday.master version will just show you which site you are currently in (see Figure 18-7). This difference is controlled through the SiteMapProviders setting and is something that needs to be considered when implementing breadcrumb (and all navigation) controls.
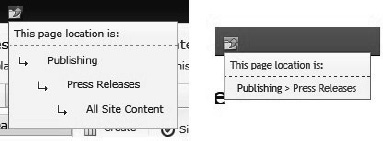
Figure 18-7. Tthe breadcrumb navigation control from the v4.master file is on the left and the breadcrumb navigation control from the nightandday.master file is on the right.
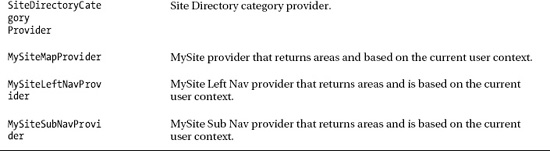
Navigation Providers
Navigation options are more than just the navigation controls themselves; they're the properties for specifying data sources. These tell SharePoint where it should look specifically to get the data it needs to render a specific navigation control. Therefore it's important to understand the differences between the various options as this may help you get the data you want out of a control that doesn't show it the way you like by default. All of the options for providers are all listed in the web.config file and in Table 18-1.
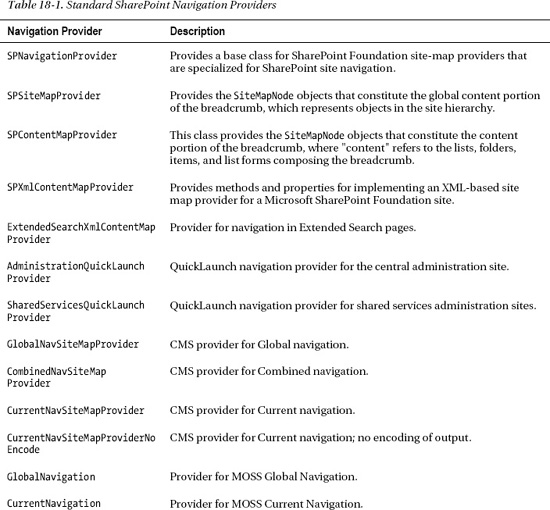
The default master pages in SharePoint use various combinations of these to create various navigation elements on the page. The SPNavigationProvider is used as a default navigation provider that is overridden through the use of delegate controls in specific types of sites. The CurrentNavigation provider is used to drive the left navigation, and GlobalNavigation is used in publishing sites as the default for the global navigation menu. When I spoke about breadcrumbs previously, the difference between the look of the two different master pages was based on two different settings for the data sources.
What to Tell the Developers
Developing for SharePoint has always required that developers learn a little more than they would for a typical ASP.NET project, and a lot of the same hurdles that need to be jumped will also be present in a public-facing site. This is where the line gets drawn between content, configuration, and development.
What to Look for in a Developer
Most people who have worked on SharePoint specific projects will tell you that you really do need developers with SharePoint-specific development skills. This is quite true and valid for most SharePoint projects, but when you start to talk about working with public-facing web sites you will generally need a bit more as just “general SharePoint development” skills won't cut it for a high quality public-facing site.
Working on a public-facing SharePoint site is a very different project than most standard internal SharePoint projects. Developers need to be more aware of how to develop for the Web rather than taking the approach of “let's just make it work,” which is common on internal projects.
On an internal project you know your users, you know their browsers (usually), and you know what operating systems they are running. This makes development much easier as bugs that fall outside of that scope can easily be written off. This is not the case with a public site, and developers need to be prepared to work through issues such as using HTML, CSS, and JavaScript across platforms plus load times and performance on expected connection speeds.
Also developers (and the technical architects) need to plan how version control will be handled. When you're working on an internal environment, you will probably know when new releases will occur, but this isn't the case with a public-facing web site. Developers need to consider the fact that any downtime on a public web site is time that potential customers are not able to interact with the business. You should have an appropriate infrastructure in place to support a minimal or no down time scenario when deploying solutions.
Separating Content From Development
SharePoint by its very nature allows for non-technical users to create mash-up– style applications by easily adding Web Parts to pages and configuring the settings to suit their needs. Creating dashboards is a great example of this. In an intranet or team-based collaborative environment, this is a great way to deliver functionality without having to roll through a full development cycle. When it comes to a public-facing site, however, there should be more scrutiny over how these types of changes are rolled out.
Looking back to what was said earlier in this chapter about the importance of a public-facing site, this is a big reason for why this line around exactly what is content on your site and what isn't needs to be drawn. This site could be the front door to your entire business; any problems with the site it can reflect on your organization. Therefore, when you are adding functionality to the site, there needs to be appropriate levels of planning to ensure that it won't adversely affect the site or cause errors for users as they browse. There is a very good reason most change control processes involve one or more pre-production environments to test and validate any type of solution before letting it go live. This is to ensure the stability of the environment after the change, that no other functionality is affected by the change, that the change can be rolled back if need be, etc.
Likewise, in many SharePoint deployments, any edits a user makes will exist solely in the production-related environments, with snapshots of content taken back to pre-production environments as often as required to ensure that when testing is done, it's done with a close image of what the current site looks like.
To apply a change management process to the site, there must be a clear separation between what is treated as content and what requires a configuration change or development process. You need to understand what is okay for a content author to do directly to the production site because it's content, and what will require appropriate documentation and testing through the pre-production environments.
There are plenty of scenarios where this line is easy to draw. When a user edits the text of a page or inserts an image, this is clearly to be treated as content; likewise a change to a custom developed control will to go through a testing process before being deployed to production. But what about scenarios that aren't so clear cut? What happens when a user wants to change the configuration of Web Parts on a page? When a user wants to change templates for new sites? When master pages or page layouts need to change? When workflows need to be modified? Or when search settings needing to be modified? These are all things that can be driven through the browser when a user has appropriate permissions; therefore you need to know what should and shouldn't be handled through the browser as content, and what should go through a change process.
Considerations for what Needs Change Control
One of the key differentiators for assessing what is content and what is not is documentation. When a user updates the text on a specific page, there is likely to be no documentation about that change (outside of a simple approval workflow process). However, if a developer is writing a new control that will be embedded into pages on the site, there should be some documentation about this change. What does the control do? How is it deployed and retracted? What impact does it have on existing functionality? How was it written and what would a new developer need to know to pick up the code and make changes later?
One of the reasons that you do this type of documentation for your changes is to meet the requirements of an organization's disaster recovery plan. In the event that a SharePoint farm has to be rebuilt from nothing due to catastrophic failure, any custom solutions that are deployed to the server will need to be redeployed to the new environment, and there will need to be appropriate instruction on how to do this. Another example could be that a component needs to be changed and the original developer has left the company. The new developer will need documentation to be able to quickly pick up on the existing solution and make the required changes.
Now consider those elements in regards to things that a user could change through the browser. What if the farm is lost and needed to be rebuilt. Would the Web Part customizations restore correctly or would settings need to be adjusted to account for changing internal IDs of various elements? What if a content author put together a complex set of Web Parts on a page and paired that up with some SharePoint Designer-based workflows, only to move on six months later? Would the next content author understand what was done so they could continue to maintain the site? The answers might vary based on your users and your individual backup/restore processes but the reality is that you might not know. This is why it is important to identify functionality that is added to the site instead of just content that is added to the site, and then include it in an appropriate application lifecycle management process.
Playing Nice in the Sandbox
Sandbox solutions are a new concept for SharePoint 2010. Basically they allow a site collection administrator to upload a solution (WSP package) to their site and allow it to run. This empowers users to upload their own solutions to the site without having to involve IT staff. Given what I have just been saying around having a clear line between content that is managed through the browser and custom development, the whole concept of sandbox solutions raises some interesting issues.
Sandbox solutions are a great concept for anyone who is working in a hosted environment where you might not have control over the server to deploy traditional farm solutions. You get the ability to just upload them through the browser, turn them on, and off you go. This improved flexibility does come with some pretty big tradeoffs, though. A sandbox solution is limited to a very small list of elements that can be deployed through features, and all code is executed in a separate process to the main SharePoint processes, which has more limitations on what can be done. (For example, a sandbox solution can't connect to a web service from the server; anything involving web services must be run from the client side through either JavaScript or Silverlight).
Now that you have this new ability to deploy solutions this way, care needs to be taken to ensure that your plans about content and development remain separated but intact. This does not necessarily mean that you should rule out the use of sandbox solutions at all. (In fact, where possible all custom development should be targeted to the sandbox so that if it ever needed to run in a sandbox environment it could.) It does mean that a decision needs to be made about whether or not you will allow sandbox solutions and who will be responsible for them. You also need to decide whether a sandbox solution will require some sort of change control process. For example, a sandbox solution might not need the full process required of a traditional deployment, but it might have an approval workflow for just the production environment so that there is some record of who wanted the solution, why it was put in as a sandbox solution, and where it originated from. Everything that will run within the sandbox process should also run well as a farm solution, so if someone wants to deny approval to a solution packaged as a sandbox solution, it could be handled as a farm solution and deployed as such.
One of the biggest problems with sandbox solutions in a public-facing SharePoint site is the limitations around the API for custom development. In a SharePoint WCM site, there is a set of functionality specific to the content management features of SharePoint and this library can't be used in the sandbox. This means that if you want to work with the SharePoint site-specific features in code, you with either be blocked or you will need to implement a number of workarounds that may not meet your initial requirements exactly. In many cases, this limitation is a show stopper for sandbox solutions.
Once sandbox solutions are deployed, they must be monitored. Administrators are able to set limits on what resources a solution can consume before it is effectively shut down, so these should be set appropriately to ensure that non–administrator-approved code can't cause undue performance problems for the rest of the farm. Coming back to the fact that internal and external SharePoint sites are different, shutting down an intranet might be an appropriate way to deal with the situation, but if it's your public-facing site and it suddenly shuts down because you have hit a resource quota limit, then you are without your site (or at least a subset of its functionality). Depending on your business requirements, this might be something that can be managed, but more often than not this is another show stopper for public-facing sites and sandbox solutions.
The bottom line is that sandbox solutions can provide a great way to push solutions in as a user-based action, but appropriate planning and thought needs to be done before this allowed (if at all). Decisions need to be made as to whether the improved flexibility in deployment is worth the increased risk of downtime and the limitations put on developers. If you have a good style guide and a plan for your corporate image, there may actually be very little need to have this increased flexibility. Everything going onto the site should be approved from both a design and technical perspective, thus you can safely avoid dealing with sandbox solutions all together.
What about SharePoint Designer?
SharePoint Designer is another tool that needs to be accounted for in a plan for a public-facing SharePoint site. SharePoint Designer is a free download, so unless the PCs in your organization prevent users from installing it, it's possible that a user could get access to your sites with this tool and you wouldn't know about it.
Luckily, SharePoint 2010 provides some options to limit access to sites through SharePoint Designer; these should be factored into a plan for a public site. Through central administration it's possible to disallow access to SharePoint Designer all together, or to just prevent users from changing the URL structure, editing master pages and page layouts, or from detaching pages from the site definition.
Impact of Editing Content with SharePoint Designer
One of the options for restricting SharePoint Designer access is to prevent pages from being detached from the site definition. This is a process commonly referred to as un-ghosting the page (with the page being referred to as ghosted before that point). While a page is ghosted, any requests to load the page will result in the page being retrieved from SharePoint's cache, which is created when the application pool is loaded; this makes it load very quick. When a page is modified through SharePoint Designer, it will un-ghost the page, resulting in a copy of the page being stored in the content database for the web application, which will impact the load time slightly.
The bigger issue with un-ghosting of content is how changes to the file in the site definition are handled. When site definitions and web templates are deployed via a WSP package, SharePoint deploys the files to the file system and loads them in to a cache when the application pool is loaded. Let's assume that someone modifies one of these pages through SharePoint Designer for a specific web application while leaving it as-is for a second web application. Now when the WSP package is updated and the page is changed, the second web application will see the changes immediately as it is still ghosted and referring to the cache, but the first web application, which un-ghosted the page, will still be referring to its own version that is now in the content database. This means that if files that are part of a site definition are modified through SharePoint Designer, it can impact any upgrade processes for these solutions. For this reason, it is important to limit what SharePoint Designer can do in a production environment, as well as who can use it.
The Accessibility Argument
Customers always ask, “How accessible is SharePoint?” Government agencies, in particular, often need to meet levels-of-accessibility requirements for their sites to ensure that as many citizens as possible can access their content. Rules such as those specified by the section 508 legislation in the United States and the Web Content Accessibility Guidelines (WCAG) written by the World Wide Web Consortium (W3C) are often used to mark a measurable level of accessibility.
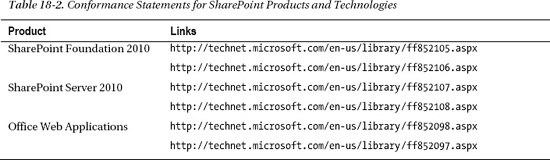
When SharePoint 2010 was released, Microsoft made many improvements to accessibility and claimed it was W3C WCAG 2.0 Level AA compliant out of the box. For those who are unfamiliar with the work of the W3C, they have published two major releases of their guidelines (more commonly referred to as WCAG); these are rules that specify what needs to be done for a site to be classed as levels A, AA and AAA for accessibility. The AA rating was a bit of a big deal, as anyone who had worked with SharePoint 2007 for public-facing sites may have run into trouble meeting the rules specified in the WCAG documentation. To back up this claim, Microsoft released a number of conformance statements that relate to its products, shown in Table 18-2.
The most important thing to remember when discussing the W3C guidelines is that they are just guidelines—and as such are open to a very wide level of interpretation. Some groups out there interpret the rules differently than Microsoft. There is no W3C validator to ensure that content meets the guidelines; the validators and tools that exist in the marketplace for this purpose are all based on a specific group or organization's interpretation of the guidelines. For this reason, you can take a SharePoint site and run it through a number of different validators; you'll find that it's level AA complaint in some, while it fails some tests in others.
It is also important to mention that Microsoft make the claim of level AA accessibility for a completely out-of-the-box deployment. The second you customize anything (such as master pages, Web Parts, style sheets, web content etc.) the compliance statement no longer applies; you are on your own to ensure that you continue to meet these guidelines. This is important for your developers to understand as they need to ensure custom components meet the guidelines (if satisfying this requirement is important to your business). Moreover, your end users need to be trained on how to create accessible content for the web. Earlier in the chapter I made the claim that content is what makes up a SharePoint site, it is why people head to your site, and as such, it needs to be accessible. There are a number of mistakes that users can make when writing content for the web that make it less accessible to end users who are using assistive technologies; these sorts of things need to be kept in mind during the content creation and approval process.
There is also an argument to be made as to how much value comes from meeting these types of guidelines in the first place. Yes, if you are a government body you may be legally required to do so based on the legislation in your country. I have seen many cases where people thought they followed the guidelines (coming back to the point around interpretation) and ended up with a site that was still difficult to navigate with a screen reader. In other words, the guidelines are a good place to start for making content accessible, but there is certainly no guarantee that ticking all of those boxes will translate to a perfectly accessible site.
If you are really serious about delivering accessibility to people with disabilities and you're not just looking to tick a box with your site, I recommend finding an organization in your country that deals with assisting people with disabilities and engage them for their input. In Australia, this would be an organization such as Vision Australia; I'm sure there are similar groups all over the world. These groups are often staffed by people with disabilities, and they can sit down with you and work through your site to provide you with feedback that is directly relevant to your site and the assistive technologies in question. This will give you a far more practical set of tasks to implement on your site to make it accessible, as opposed to you taking your best guess at interpreting the guidelines.
Summary
In this chapter I have covered some of the reasons you would use SharePoint for a public site, as well as some of the elements that have helped me ensure success with these types of projects. If you make sure that your plans for a public site cover all of the topics I've mentioned in this chapter, you will have an effective and easy-to-maintain site. Remember that content is king. In reality, the very large majority of what SharePoint is made up of is just content—so with a well-designed SharePoint deployment behind you, you are helping to ensure that the content of your site will always be at its best. I hope this chapter has helped. All the best for your projects.