
C H A P T E R 19
Claims-Based Authentication in SharePoint 2010
This chapter is indented to give the reader an overview of the new claims-based authentication method available in SharePoint 2010. The claims world beyond SharePoint is large and varied. This chapter will not teach you everything there is to know about dealing with claims in SharePoint. This chapter will discuss when to use claims authentication, some of the most common steps to implementing it, and how to avoid some of the common pitfalls with working with claims. While not every possible scenario is covered, it should serve as a good foundation to help you avoid some of the common pitfalls.
Topics covered:
Understanding Claims in SharePoint 2010
Implementing SAML token-authentication in SharePoint 2010
Installing Active Directory Federation Services 2.0
Configuring Your Federation Server
Configure SharePoint 2010 for Claims Authentication
Enabling claims in your SharePoint Web Application
Understanding Claims in SharePoint 2010
In order to understand how claims work in SharePoint 2010, you must first understand how security works in SharePoint in general. When a user logs in to SharePoint, they can utilize several different authentication mechanisms. However, SharePoint essentially only sees two:classic mode and claims mode.
Classic mode is the legacy Windows authentication option based on an individual's Active Directory identity using NTLM or Kerberos. This is your first and best option when working in a pure Windows environment.
However, in many environments, classic mode may not be a viable option. This could be for a plethora of reasons, and I will discuss some of the determining factors on when to use classic mode versusclaims mode later in this chapter. For starters, Table 19-1 looks at how SharePoint categorizes each of the different authentication methods.
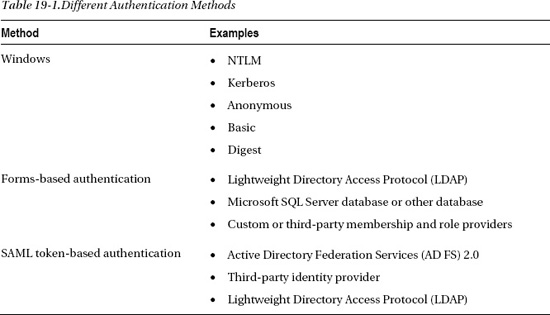
If you're familiar with SharePoint 2007 authentication options, you will notice a new one: SAML token-based authentication. This is where claims come in to play. SharePoint 2010 utilizes the Window Identity Foundation (WIF) framework to implement claims aware applications (http://msdn.microsoft.com/en-us/security/aa570351.aspx).
WIF supports a variety of standards such as WS-Federation, WS-Trust, and the SAML protocol. This is the first dirty little secret about claims in SharePoint 2010. At the time of this writing, SharePoint 2010 only supports SAML 1.1. Thus, while this is a limiting factor (as SAML 2.0 is the latest standard), it's important to understand it when looking at your options for claims providers. Be sure they support (provide) SAML 1.1 tokens. As a side note, WIF is also the framework utilized for identity management in the cloud. So, if you are interested in learning more about cloud computing, particularly in the identity management space, WIF is a great place to start. And experience with SAML tokens in SharePoint will be helpful.
There are some important terms to understand when dealing with claims-based authentication, as they are sometimes confused. A SAML token is essentially a cookie added to your browser that validates your identity and contains claims. Claims can be a variety of things from just your username or e-mail to specific information such as the organization to which you belong. This is where the real power of SAML token authentications (a.k.a. claims-based authentication) comes in to play. Assuming your claims provider sends additional information along, you can take advantage of that information for security trimming, customized branding, etc. This will require close coordination with the claims provider to determine what is available when planning your application.
Deciding When to Use SAML Token-Based Authentication
Today there are a plethora of authentication options available in both the enterprise and on the Internet. SharePoint (like other Microsoft products) would prefer you use classic (Windows) authentication. However, you may choose to go with claims authentication for business or technical reasons. Some reasons to consider using SAML token-based authentication include the following:
- Your Active Directoy environment is inadequate (missing trusts or serving non-Windows users).
- You already have a claim provider in place and wish to take advantage of it.
- You will be working with partners external to your organization (or other third-party identity providers).
- You have custom identity requirements that can't easily be addressed in Active Directory.
The industry is obviously moving towards claims, so the day may come when your enterprise may require that your application be claims aware (much like Kerberos has been in the past). The information in this chapter can help you meet that requirement.
Implementing SAML Token-Authentication in SharePoint 2010
If you are spearheading the first SAML token-authentication project for your company (which is often the case with SharePoint), you may find the entire process frustrating. Unlike classic authentication, which is well known and easily understood, SAML token-authentication requires a great deal of communication between your team and the remote team providing the token.
The first thing you will need to do is identify the Security Token Service (STS) you wish to use. Active Directory Federation Services (AD FS) 2.0 is the most commonly used STS in Windows environments and will be the STS I will use throughout this chapter.
There are essentially two sides to any STS relationship: the identity provider and the relying party. The identity provider issues tokens that can contain one or more claims. As mentioned earlier, claims can be a number of different things from name to telephone number to the organization to which you belong. It's up to the identity provider to determine what information they want to expose as a claim. The relying party is the other side of the exchange. For the purposes of this chapter, it's a SharePoint 2010 web application.
The steps required to implement SAML token-based authentication are as follows:
- The identity provider creates and exports a token-signing certificate. This certificate is known as the Import Trust Certificate. You will need to copy this certificate into your SharePoint 2010 farm.
- Coordinate with the identity provider to identify the identity claim. The identity claim is the unique identifier for the user. This is often a user name or e-mail address. You will need it later when mapping claims in SharePoint.
- Define additional claims to be mapped. If you don't specifically map a claim, it will be ignored and thus won't be available for reference in code. I highly recommend mapping all the claims available even if you're not planning to use them. Better to have it and ignore it, than to need it later and have to re-configure your STS.
- Import the token-signing certificate (created in step 1) using the SP-PowerShell utility. This will create a new authentication provider within SharePoint. There are actually several steps to this process, and this is where most people get in to trouble. I will discuss this process in detail later in the chapter. For now, it is important to understand that this is where you specify the identity claim and other claims you plan to use in SharePoint. In addition, you create a realm. Realms are ways to associate a SAML token-based authentication provider with a SharePoint web application. Thus, you can have a single provider associated with several SharePoint web applications simply by creating additional realms.
- Add an entry to the STS to associate the relying party and the identity provider. This is essentially a URI entry, so it can be done before the SharePoint web application is created. Note that when you do create the web application (in the next step), it must match the URI entered in the STS.
- Create a new SharePoint web application. The new authentication provider you created in the previous steps will appear as an option in the drop-down menu when you check claims mode in Central Administration. If it doesn't, you made a mistake.
SharePoint will only allow one token-signing certificate to be assigned to a farm, and keep in mind this certificate is generated by the identity provider. This is where AD FS comes in handy. If you put AD FS between the organization you are trying to work with and your SharePoint farm, from SharePoint's perspective AD FS is the identity provider (and thus providing a token-signing certificate). The nice thing is that AD FS can also establish relationships with other identity providers, thereby allowing SharePoint to interact with multiple identity providers while only requiring one token-signing certificate (from AD FS). In effect, you are shifting identity management to AD FS. It doesn't matter where the person is coming from, as long as they have a valid token.
If you worked with the SSO provider in SharePoint 2007, you should recognize how much of a quantum leap this is for external identity management in SharePoint 2010. Gone are the days of web application extensions for user mapping and mucking with your web.config files. A couple of PowerShell commands and a check box and you're in business!
Well, at least that's what it looks like from SharePoint's perspective. As you will see, enabling SAML token-based authentication in SharePoint is relatively easy. Building out the infrastructure to support claims aware applications is where the real work is.
![]() Note The People Picker (when adding a new user) can't search or validate a user from the SPTrustedClaimProvider class (your identity provider). This is important to understand because it will appear as though the user has been validated when, in fact, it's just the people picker blindly accepting the user (because it can't search to validate). In order to provide that kind of functionality, you will need to create a custom claims provider that implements search and name resolution. Information about how to do this is available on TechNet at
Note The People Picker (when adding a new user) can't search or validate a user from the SPTrustedClaimProvider class (your identity provider). This is important to understand because it will appear as though the user has been validated when, in fact, it's just the people picker blindly accepting the user (because it can't search to validate). In order to provide that kind of functionality, you will need to create a custom claims provider that implements search and name resolution. Information about how to do this is available on TechNet at http://technet.microsoft.com/en-us/library/gg602072.aspx. The good news is if you do create a custom claims provider, you can use any claim you want (such as a phone number), so you're not just limited to user name.
Before You Attempt to Install AD FS
Before attempting to install AD FS, there are a few things you need to do first.
- Acquire appropriate certificates.
- Ensure the AD FS Server is visible.
Certificates Required for Operating an AD FS Server
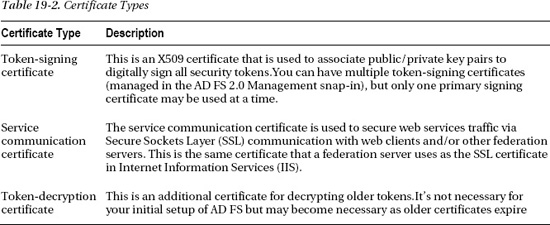
There are essentially two certificates necessary to operate an AD FS environment.Table 19-2 describes the certificate types.
For specific information about about using SSL certificates, see IIS 7.0: Configuring Secure Sockets Layer in IIS 7.0 (http://go.microsoft.com/fwlink/?LinkID=108544) and IIS 7.0: Configuring Server Certificates in IIS 7.0 (http://go.microsoft.com/fwlink/?LinkID=108545).
AD FS 2.0 uses the Secure Hash Algorithm (SHA) for digital signatures.SHA 1 or SHA 256 are both supported. I highly recommend using SHA 256 as it is much more secure and most modern software supports it. However, if you are communicating with older systems, be aware that SHA 1 is supported but other hash methods are not supported. You can switch the hash algorithm you are using in the Advanced tab when you set up your partnerships.
Also, while AD FS 2.0 will support self-signed certificates, this is not recommended (except maybe in a development environment). Using self-signed certificates in a production environment could potentially allow a malicious user in an account partner organization to take control of federated servers in a resource partner organization. For self-signed certificates to work, they must be added to the trusted root certificate store of another federation server, which can leave that server open to attack.
Assuming you took my advice and requested certificates from a Certificate Authority (CA) appropriate to your needs (public or private), the next thing you need to do is store those certificates in the appropriate certificate store.You have the following two options here:
- Import the certificates to the personal store using the Certificates MMC snap-in.
- Import the service communication (SSL) certificate with the IIS Manager snap-in and assign it to the default web site.
Understanding Token-Signing Certificates
Token-signing certificates are used to sign the SAML tokens your AD FS server will be issuing to SharePoint. This is the most important piece of your AD FS infrastructure. It is used by partner organizations to ensure that tokens received are from a valid source and that they haven't been modified.
Token-signing certificates utilize a Public Key Infrastructure (PKI) to validate the sender and the contents. Each certificate contains a cryptographic private key and public key. A security token is signed using the private key. When a partnership is established in AD FS, the public key is used to validate the authenticity of the encrypted token.
Since each token is digitally signed by the account partner, the resource partner can verify that it was indeed issued by the account partner. Digital signatures are validated by the public key portion of a partner's token-signing certificate. Once the signature is verified, the resource federation server generates its own security token for its organization and signs it. Once the web server receives a valid token (signed by the resource federation server), it allows the appropriate access to the client.
During the setup process for AD FS 2.0 you will be asked for a token-signing certificate. You may be tempted to use the same certificate you used for the service communication certificate (SSL). Don't do it! This is against PKI best practices. If the private key is compromised for either use, your entire system is compromised.
Understanding Service Communication Certificates
Service communication certificates are used to ensure the federation server's identity to a client. This is similar to an SSL certificate and is set up in much the same way. For service communication certificates to work, they must meet the following criteria:
- The certificate must include the server authentication enhanced key usage (EKU) extension.
- The certificate revocation lists (CRLs) must be accessible for all the certificates in the PKI chain, and the root CA must be trusted by the clients.
- Most important: The subject name used in the service communication certificate must match the Federation Service name in the properties of the Federation Service. If you set your properties wrong, you will not be able to establish a trust with anybody.
Installing Active Directory Federation Services 2.0
The first step in installing Active Directory Federation Services (AD FS) 2.0 is downloading it. A common misconception about AD FS 2.0 is that it is built in to the operating system as was AD FS 1.X. While future versions of Windows will likely have it, as of the time of this writing, you still need to download it. The download is available from Microsoft at http://go.microsoft.com/fwlink/?LinkId=151338.
![]() Note This section not intended to be a comprehensive guide to installing and configuring AD FS. Federation Services is an entire book unto itself. My intent here is a quick overview of the components involved in AD FS to give you some context for when you are building a lab or production environment. If you want a deep dive in AD FS, a good place to start is the AD FS 2.0 deployment guide on TechNet at
Note This section not intended to be a comprehensive guide to installing and configuring AD FS. Federation Services is an entire book unto itself. My intent here is a quick overview of the components involved in AD FS to give you some context for when you are building a lab or production environment. If you want a deep dive in AD FS, a good place to start is the AD FS 2.0 deployment guide on TechNet at http://technet.microsoft.com/en-us/library/adfs2-deployment-guide(WS.10).aspx.
Another caveat of AD FS is that it can't be installed on the same server as SharePoint. This is because SharePoint can run its own Secure Token Service (STS) and certain SharePoint Services may use components of the STS in the background. AD FS running on the same box could create a conflict. Thus, it is not a supported configuration.
The installation is pretty straightforward. Specific steps are available at http://technet.microsoft.com/en-us/library/dd807096(WS.10).aspx.
![]() Note There is a pretty long list of prerequisites that need to be installed for AD FS 2.0 to work properly. As always, it's best to ensure your server is fully patched before attempting to install new software to make sure there are no prerequisite problems. The AD FS 2.0 installer will check for these prerequisites, and download and install them if needed. This, of course, infers that your Federation Server has access to the Internet.
Note There is a pretty long list of prerequisites that need to be installed for AD FS 2.0 to work properly. As always, it's best to ensure your server is fully patched before attempting to install new software to make sure there are no prerequisite problems. The AD FS 2.0 installer will check for these prerequisites, and download and install them if needed. This, of course, infers that your Federation Server has access to the Internet.
Configuring Your Federation Server
Once you have installed AD FS 2.0, the next thing you will need to do is configure it. The most common way to get to the configuration wizard is through the Start menu (Start ![]() Administrative Tools
Administrative Tools ![]() AD FS 2.0 Management) and then click on the AD FS 2.0 Federation Server Configuration Wizard link on the Overview page or Actions pane. Another option is to go to the executable itself (located in the folder you choose to install it in), which is
AD FS 2.0 Management) and then click on the AD FS 2.0 Federation Server Configuration Wizard link on the Overview page or Actions pane. Another option is to go to the executable itself (located in the folder you choose to install it in), which is C:Program FilesActive Directory Federation Services 2.0FsConfigWizard.exe by default.
At this point you have a couple of decisions to make. The first is if you want to operate a standalone server or a federation server farm. There are a variety of reasons to choose a farm. One important thing to note is if you choose to install as a standalone server, the NETWORK SERVICE account will automatically be chosen for you. This can be nice in a lab environment, as the NETWORK SERVICE account already has a Service Principle Name (SPN) established within Active Directory. However, using the NETWORK SERVICE account is not a recommended practice for use in production as it may open up your federation server to attack. In addition, if you ever do want to scale your AD FS implementation from a standalone instance to a farm, you will need a service account anyway.
The next step in configuring you AD FS server is choosing your Federation Service name and ensuring it is associated to the right SSL certificate. By default, this is the SSL certificate assigned to the default website, assuming a certificate has been assigned at all. If a certificate has not been assigned, then a list of available certificates is generated from amongst the certificates in the personal certificates store.
Once you have established the service account and certificate, the next thing you will need to do is configure your AD FS configuration database. If the install program detects an already existing configuration database, it will delete it. You will be prompted, but be careful as there is no way (though the installer) to save an existing database. It will delete it.
If you are creating or adding a federation server to a farm, there are some additional steps asking if the server will be the primary server (or where the primary server is if you're adding a new server to the farm).
In any case, the last steps are the Ready to Apply Settings page and the results page. However, you're not quite done yet. All the wizard really does is create a configuration database, and in the case of a farm, establish the relationships between federation servers in the farm.
Once you complete the configuration wizard, you still need to add a few certificates to your AD FS infrastructure before you can begin to utilize it. The first certificate to add is your token-signing certificate.
![]() Note You may have noticed the Token-Decrypting and Service Communications certificate options in the certificates node. By default, these two certificates use the SSL certificate assigned in IIS. This is the place to go if you need to change them for some reason.
Note You may have noticed the Token-Decrypting and Service Communications certificate options in the certificates node. By default, these two certificates use the SSL certificate assigned in IIS. This is the place to go if you need to change them for some reason.
Adding a Token-signing Certificate
To add a token-signing certificate, follow these steps.
- Choose StartäAll ProgramsäAdministrative Tools ä AD FS 2.0 Management.
- In the console tree, double-click Service, and then click Certificates.
- In the Actions pane (to the right), click the Add Token-Signing Certificate link.
- In the Browse for Certificate file dialog box, navigate to the certificate file that you want to add, select the certificate file, and then click Open.
You should now see your certificate listed under the token-signing certificates node.
Understanding Identity Providers (AD FS Account Partners)
Now that you have AD FS installed and your certificates are set up, you need to establish an identity provider trust. In AD FS this is call the account partner. This is the organization providing the authentication you will use in your SharePoint environment. There are essentially three types of account partner trusts you can establish in AD FS.
- Provide your own Active Directory users with access to your own claims-aware application.
- Provide your Active Directory users with access to other organizations' applications.
- Provide users in another organization access to your claims-aware application.
In the first case above, you may be thinking, “Why would I ever want to use AD FS to provide access to my own users?” Think about scenarios involving applications that sit on your perimeter, such as an expense reporting system where users may be inside or outside of the corporate firewall. With an ADFS implementation, it doesn't matter where you are authenticated from; once you have a token, you're good to go. So from the application perspective, you only need to deal with one authentication mechanism.
The second case is the first case where you are truly crossing organizational lines. In this scenario you have users on your Active Directory implementation that wish to access resources on another organization's infrastructure. In this case, you are using AD FS to provide authentication information to a claims-aware application at the remote organization. Essentially you are passing their Active Directory identity via a token.
The third case is what you will most likely see with your SharePoint implementation. It's the scenario where you have another identity provider generating a token to AD FS that you can use in SharePoint for identity management. While the first case may apply to SharePoint also, this is where you must use AD FS. The first case is a preference, but you can still use classic mode (Windows) authentication if you want to.
Keep in mind that AD FS is not just about federating with other Active Directory implementations. In the second and third cases mentioned previously, either the party providing the authentication token or the party accepting the token may not be Active Directory implementations. AD FS can manage identities from a variety of sources. “AD” may be in the name, but the real beauty of AD FS is its ability to federate with non-Active Directory implementations.
Once you know the scenario, the next thing to think about is which design is best for your particular case. Microsoft has two categories for Single-Sign-On (SSO): a Federated Web SSO Design or just a Web (without the Federated qualifier) SSO Design. The difference between Federated Web SSO and Web SSO is essentially if you have a configured “federated” trust between two distinct organizations, then it's a Federated Web SSO. If the users are coming in as individual users from a credential store (Active Directory, LDAP, or SQL), and you are using AD FS to generate a token, then it's a Web SSO. When looking for additional documentation, just keep in mind the difference between Federated Web SSO and just Web SSO is that there is a federated trust between two distinct organizations.
Adding a Claims Provider Trust Manually
You may get lucky and work with a mature claims provider that can provide you with metadata to import your trust relationship information. But most likely you will have to create the trust manually. To do that, take the following steps:
- Choose StartäAll ProgramsäAdministrative Tools ä AD FS 2.0 Management.
- Expand the AD FS 2.0Trust Relationships node, and right-click Claims Provider Trusts, and then click Add Claims Provider Trust. This will open the Add Claims Provider Trust Wizard.
- On the Welcome page, click Start.
- On the Select Data Source page, click “Enter claims provider trust data manually,” and then click Next, as shown in Figure 19-1. (This is where you could also import a provided configuration file.)
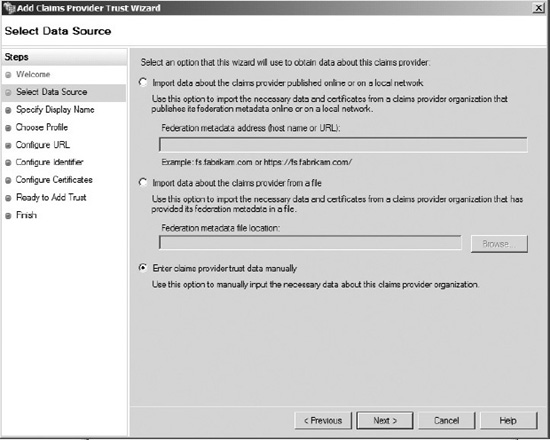
Figure 19-1. Entering the data source
- On the Specify Display Name page, type a name appropriate to your organization, as shown in Figure 19-2. Under Notes type a description for this claims provider trust, and then click Next.
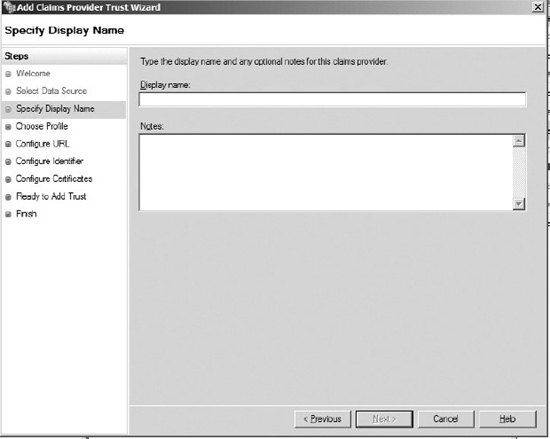
Figure 19-2. Entering the display name and any important notes
- On the Choose Profile page, choose the AD FS profile you will be importing from, as shown in Figure 19-3.
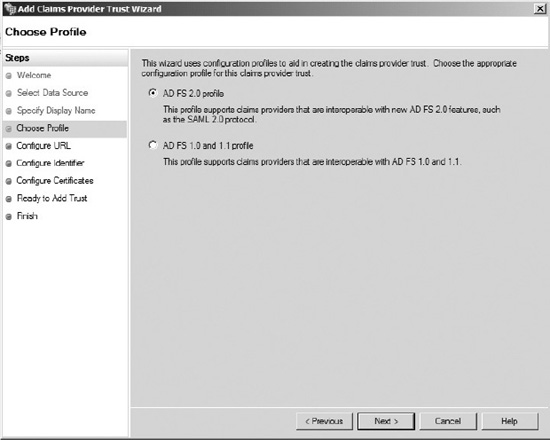
Figure 19-3. Pick one of the two choices for AD FS profile.
 Note SharePoint requires a AD FS 2.0 profile on the other end, but for this section it is the profile you are getting the identity from, so it can be AD FS 1.1.
At this point the next steps you take diverge a little bit depending on if you choose to import an AD FS 1.1 profile or AD FS 2.0 profile. The wizard will ask for specific information regarding the implementation you choose to import. This is information you should be able to get from the identity provider.
- If you choose AD FS 2.0 profile, you will be taken to the Configure URL page where you will be shown a couple of checkboxes, as shown in Figure 19-4.
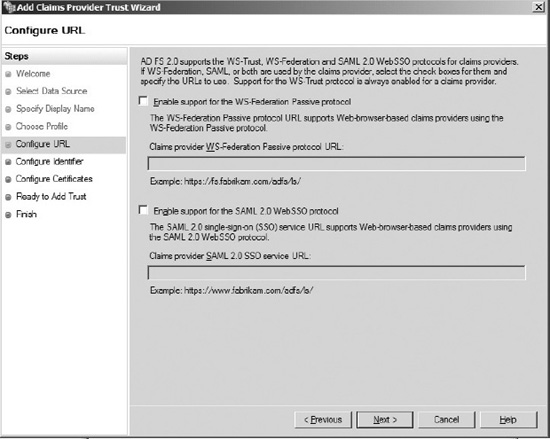
Figure 19-4. Two options for AD FS 2.0
- Enable support for the WS-Federation Passive protocol: This is if your account partner supports the WS-* protocols (usually a Microsoft tool).
- Enable support for the SAML 2.0 Web SSO protocol: For other vendors supporting the SAML SSO protocol.
- If you choose AD FS 1.0 and 1.1 profile, your only option is WS-Federation Passive protocol, as you can see in Figure 19-5.
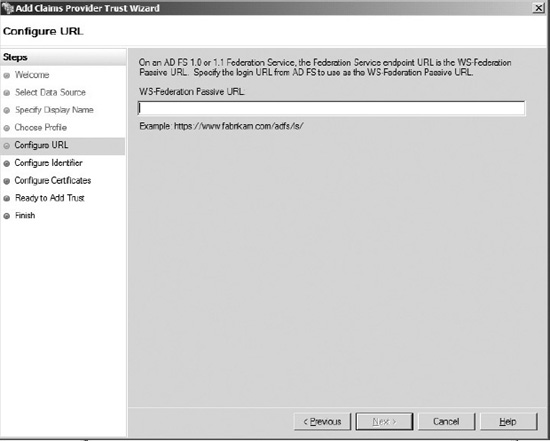
Figure 19-5. Only one option is available for AD FS 1.0 and 1.1
- On the Configure Identifier page, under Claims provider trust identifier, type the appropriate identifier, and then click Next.
- On the Configure Certificates page, click Add to locate a certificate file (that you got from the identity provider) and add it to the list of certificates, and then click Next.
- On the Ready to Add Trust page, click Next.
- On the Finish page, click Close. This action automatically displays the Edit Claim Rules dialog box.
Understanding Claims Rules in AD FS
Claims rules are at the very heart of what AD FS is about. This is where the real work is done. Up to this point you have essentially established certificate-based trusts between account partners and relying partners. Now you need to apply logic to the claims (attributes) that are passed between the partners. You can actually setup claims rules on either end of the communication. Say, for example, an organization is publishing a claim of Social Security Number. (No one should be dumb enough to publish information like that, but let's say they are.) If you control your AD FS environment, you have a few options.
- Filter the claim to something less specific (e.g. the last four digits) either at the account partner integration point or relying partner integration point.
- Allow the claim through.
- Block the claim either at the account partner integration point or relying partner integration point.
You can see the power of claims now. Perhaps you could make a rule for just accounting personnel (based on an organization claim) or only managers. Depending on what claims are published, you may be able to do some very powerful stuff before the tokens even get to SharePoint (assuming you have access to the AD FS environment). Table 19-3 is a list of the claims available to you in AD FS 2.0.
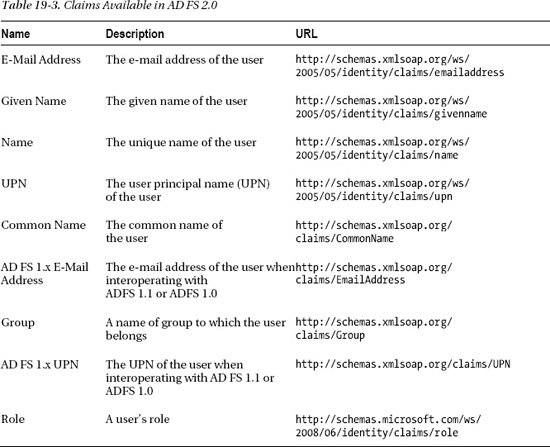
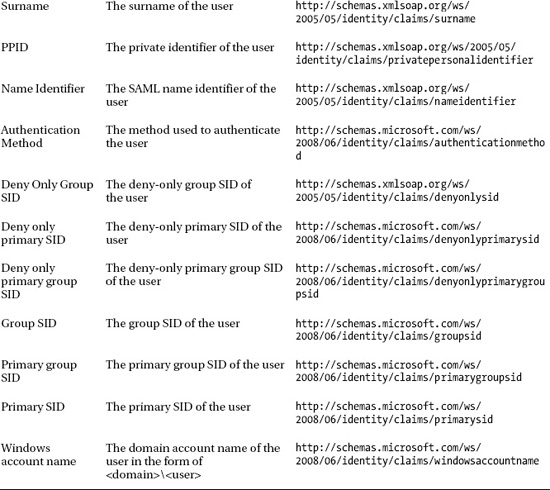
As you can see, there are quite a few options. Most organizations are not going to use or publish every one of these claim types. In fact, in my experience, most organizations generate very few claims. Some of this is because people don't fully understand the power of claims. Some of it is because they are fearful of publishing too much information.
A best practice when providing claims is to publish as much information as possible. This where claims can become a very powerful alternative to other authentication methods. The more information you publish about your users within the claim, the more dynamic of a solution your trusted partners can create. Break out of the User ID and Password paradigm. With claims you can do MUCH more than just authenticate people. Also, keep in mind this information is not going out to anybody; it's going only to trusted partners.
For each claim you want to let through, follow these steps:
- Click on Add Rule.
- In the Claim rule template drop-down, choose Transform an Incoming Claim (as shown in Figure 19-6), and click Next.
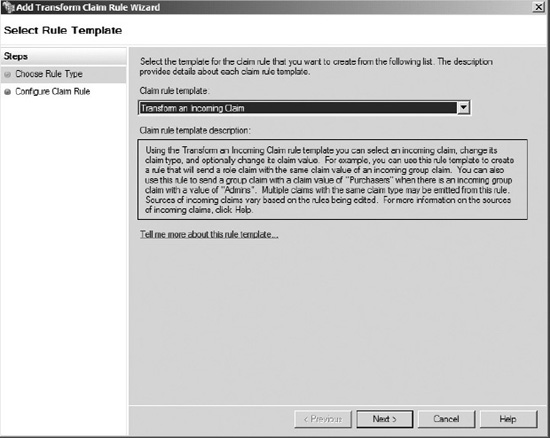
Figure 19-6. Selecting to transform an incoming claim
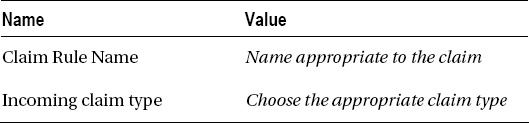
- Enter the following values in the Add Transform Claim Rule wizard shown in Figure 19-7:
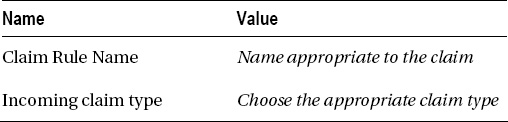
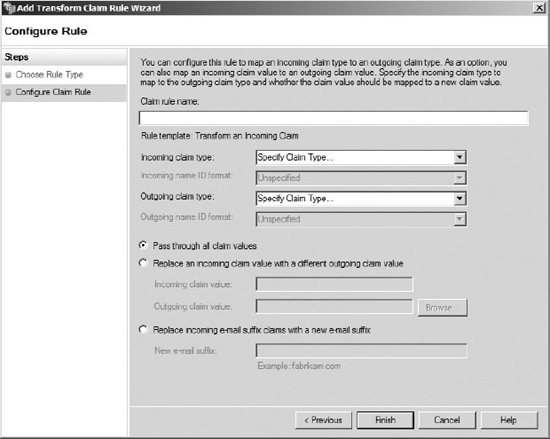
Figure 19-7. Entering the claim rule name and type
- Check on the Pass through all claim valuesradio button, and then click Finish.
Repeat these steps as necessary to add all the claim types available.
Configuring AD FS Relying Party
The other half of an AD FS configuration is adding the Relying Party trust. This is where you will add your SharePoint environment. Much like adding an Account Partner, the steps are relatively trivial; it's understanding them that is more complex.
Steps to add a Relying Party Trust, follow these steps:
- Choose StartäAll ProgramsäAdministrative Tools ä AD FS 2.0 Management.
- Open the AD FS 2.0Trust Relationships node, right-click Relying Party Trusts, and then click Add Relying Party Trust. This will openAdd Relying Party Trust Wizard.
- On the Welcome page, click Start.
- On the Select Data Source page, click “Enter data about the relying party manually,” and then click Next. Unfortunately SharePoint doesn't publish a relying party metadata document for consumption by AD FS 2.0. It would be great if they did. It would make our lives much easier. As a result, when setting up SharePoint you need to choose the option to Enter Relying Party Data Manually.
- On the Specify Display Name page, type a name appropriate to your organization. Under Notes, type a description for this claims provider trust, and then click Next.
- On the Choose Profile page, choose AD FS 2.0 profile and click Next. SharePoint 2010 expects an AD FS 2.0 profile. If you choose the AD FS 1.1 profile, SharePoint won't be able to recognize the SAML token, and all the configuration of AD FS you have done up to this point will be for naught.
- On the Configure Certificate page, click Next. This is for decryption certificates, which you don't need on an initial setup.
- On the Configure URL page, click Next. You won't need either of these options to work with SharePoint.
- On the Configure Identifiers page, in the Relying Part trust identifier text box, enter the URL of your SharePoint website, click Add, and then click Next.
- On the Choose Issuance Authorization Rules page, select “Permit all users to access this relying party,” and then click Next, as shown in Figure 19-8. This doesn't override SharePoint's permission sets. It is simply whether AD FS users are authenticated through by default or not.
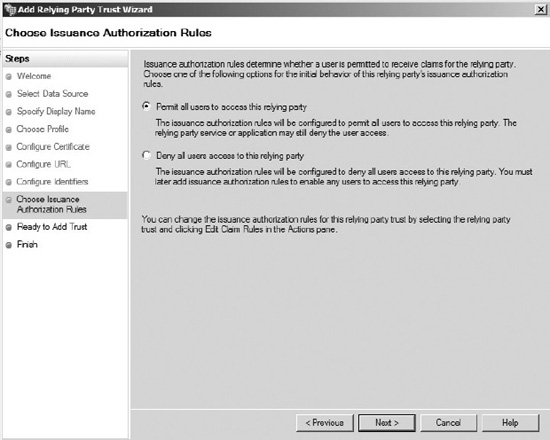
Figure 19-8. Creating issuance authorization rules
- On the Ready to Add Trust page, review the settings, and then click Next.
- On the Finish page, click Close. This action automatically opens the Edit Claim Rules wizard.
This is the point where you may want to add some filtering to your claims. However, most of the time, you will probably just let everything through.
- Click on Add Rule.
- In the Claim rule template drop-down, choose Pass Through or Filter an Incoming Claim, and click Next.
- Enter the following values in the Add Transform Claim Rule Wizard:
- Check on the “Pass through all claim values”radio button, and then click Finish.
Repeat these steps as necessary to add all the claim types available.
Configuring SharePoint 2010 for Claims Authentication
Now that you (finally) have the AD FS environment setup and the necessary trusts established, the next step is to configure SharePoint to accept the SAML token you will be receiving from AD FS. One trend you may have noticed in other Microsoft products is the move towards PowerShell for scripting administrative tasks. The SharePoint team has joined that party. If you have managed to avoid learning PowerShell through the years (as I have), the time has come to bite the bullet. With regard to configuring your SharePoint Server for claims authentication, PowerShell is your only option. There is no GUI for configuring the SPTrustedClaimProvider class. This point of confusion for some people because they see a checkbox when creating a new SharePoint web application and think that is all they need to do—and they quickly find out that it's more complicated than that. Furthermore, there is no migration path in to claims (from 2007 OR 2010). You either start in claims or you don't. Thus, if you're looking to upgrade some kind of single sign-on solution from SharePoint 2007 to 2010 and you want to go to claims, you will quickly discover you are in trouble.
To open SharePoint PowerShell navigate to Start![]() Microsoft SharePoint 2010 Products
Microsoft SharePoint 2010 Products![]() SharePoint 2010 Management Shell. The following sections are executed in the SharePoint Management Shell (PowerShell) command window.
SharePoint 2010 Management Shell. The following sections are executed in the SharePoint Management Shell (PowerShell) command window.
Adding the Token-Signing Certificate to SharePoint
The first thing you need to do to establish the claims trust is to add the token-signing certificate to the SharePoint certificate store. If you are in a PKI environment, you will need to add a certificate from each Certificate Authority (CA) in the certificate chain until you get to the root CA. A common mistake is to add just the certificate from the closest CA (and not map to the root CA).
For each certificate in your certificate chain, starting with the one you are sending to the AD FS server, execute the following command in SharePoint Management Shelll:
$root = New-Object System.Security.Cryptography.X509Certificates.X509Certificate2

("Location of your .cer file")

New-SPTrustedRootAuthority -Name "Token Signing Certificate Name" -Certificate $root
Adding a Trusted Identity Provider to SharePoint
The next thing you need to do is add the claim mappings to SharePoint. This is yet another opportunity to limit the claims that will be available to you. However, you can't filter claims here. Note that the following commands need to be executed in the same PowerShell window; you are essentially creating a list of variables and then referencing the variables in a final command at the end. While it is possible to just run a single giant command, I find it easier to work with variables.
For each claim you wish to bring in from AD FS, execute the following commands in SharePoint Powershell:
$Claim1 = New-SPClaimTypeMapping -IncomingClaimType "URL of the claim type you are mapping"

 -IncomingClaimTypeDisplayName "Claim Type Display Name" -SameAsIncoming
Example:
$Claim1 = New-SPClaimTypeMapping -IncomingClaimType "http://schemas.xmlsoap.org/

emailaddress" -IncomingClaimTypeDisplayName "v1EmailAddress" –SameAsIncoming
Repeat for each claim until you have all your claims mapped.
Once you have all your claims mapped, the next thing to do is create a new SPTrustedIdentityTokenIssuer. This is essentially the mapping that SharePoint uses to accept SAML tokens. It has the following list of required fields. If you wish to know more about all the options you can see them at http://msdn.microsoft.com/en-us/library/ff607628.aspx
- ClaimsMappings:Used to map claims on the SAML token to SharePoint.
- Description:Description of the new identity provider.
- Identifier Claim:Specifies which claim type will be used as a unique identity in SharePoint
- Name:The name of the new identity provider.
- Realm:This is essentially the web application you are mapping the claims to (written as a URL).
- SignInUrl:The sign-in URL your users will need to be redirected to if they don't have a SAML token.
Ok, time to put it all together.
$ap = New-SPTrustedIdentityTokenIssuer -Name "The name you want displayed to users"

 -Description "Description for the Identity provider” -Realm “URL for your SharePoint

Web Application -ImportTrustCertificate $cert -ClaimsMappings $Claim1, $Claim2 etc

-SignInUrl "Your sign-in URL"-IdentifierClaim $Claim1.InputClaimType
Example:
$ap = New-SPTrustedIdentityTokenIssuer -Name "My SSO" -Description "My ADFSv2 Federated

 Identity" -Realm “http://SomeURL.com” -ImportTrustCertificate $cert –ClaimsMappings

 $Claim1, Claim2 –SignInUrl “https://SomeURL.com/adfs/ls” signinurl –IdentifierClaim

 $Claim1.InputClaimType
Enabling Claims in Your SharePoint Web Application
Now that you have established a trust identifier, the last thing you need to do is enable claims authentication in your web application. To do this, go to the Central Administration site for your SharePoint Farm and take the following steps:
- Choose Manage Web Applications, and then choose the web application from the list you wish to make claims aware.
- On the ribbon, click on the Authentication Providers button.
- Choose the appropriate zone for your web application.
- Scroll down to the Authentication Types section. Uncheck Integrated Windows Authentication if it is checked (default).
- Check Trusted Identity Provider, and then check the name of your identity provider below.
You can now add site collections to your web application with users that are authenticated based on claims. This also implies that your site collection administrators must use claims authentication.
Congratulations! You have created a claims aware web application in SharePoint 2010!
Validating Your Claims are Working
The last step in any project such as this is to test it. All you need to do is open a web browser and browse to your web application. You should see the sign-in page you are using (or a generic one if you are using Active Directory) prompting you for credentials. Once you enter a valid credential set, you should be redirected to the home page of your root site collection.
Chapter Summary
You now have the tools you need to implement claims authentication in SharePoint. While specific implementations can vary widely, the fundamentals presented in this chapter remain the same. The first thing you need to do is determine if claims authentication is the right solution for your particular project. Once the decision is made, the next thing you need to do is establish a trust with an identity provider (by exchanging certificates). The typical implementation for this is to use Active Directory Federation Services; however, anything that can provide a valid SAML token could be utilized. Once the trust is established, you just need to make a few configuration changes to SharePoint and you're on your way.
Claims authentication provides a whole new paradiam for how identity management can be utilized within SharePoint (or any other claims-aware application). Consider the scenario where your application natively supports role-based access control based on a department claim type, so as users change departments, their access changes automagically. Such capabilities are why claims have received rapid industry adoption. The skills you learn in this chapter will carry you a long way into the future. Good luck!