
C H A P T E R 8
Extending SharePoint Using Event Receivers
This chapter covers techniques to extend SharePoint 2010 functionality using event receivers. It starts with a discussion of common business scenarios for event receivers. It also describes situations where you may want to avoid using event receivers. You will then learn the core architecture of event receivers, their types, and categories. Various approaches to develop, deploy and register event receivers are covered with hands-on exercises. Later parts of chapter covers areas like common issues with event receivers and how to avoid them. Throughout the chapter best practices are highlighted while working with custom event receivers.
This chapter assumes that you are already familiar with SharePoint 2010 development using Visual Studio 2010 Tools for SharePoint 2010. Event receivers have been a part of SharePoint since the earlier versions; they have gone through many changes and enhancements to reach SharePoint 2010, and they will definitely be part of v.Next of SharePoint.
This chapter includes
- Common business scenarios for event receivers
- Event receivers architecture
- Developing event receivers
- Various approaches to registering event receiver
- Common issues and fixes for event receivers
- Cancelling events and redirecting users to error pages
- Event receivers best practices
Event receivers provide developers an ability to execute custom code against various events that occur during the life cycle of various SharePoint objects including SPSite, SPWeb, SPList, SPListItem, and SPContentType. For example, when you add a new List to a SharePoint site, ListAdding and ListAdded events are triggered. Similarly, when you create a new item in a list or upload a new document to a document library, ItemAdding and ItemAdded event are fired by SharePoint.
To better understand the usage of event receivers you need to look into various business scenarios where they provide great help to developers and help them meet business requirements. Of course, it’s not possible to cover every possible scenario in which you can utilize event receivers but you will get an idea where event receivers can be good fit.
Common Business Scenarios for Event Receivers
The following are a few of the business scenarios where event receivers are helpful.
Auditing
The need to provide granular control for auditing is considered mandatory for many organizations. This is particularly important for organizations that follow standards like SAS 70, CMMI, etc. Consider a financial institute running their corporate portal on SharePoint 2010 with a need to ensure that they can keep track of who made what changes to their Global Financial Forecast List and when those changes took place. This includes but is not limited to tracking the adding, updating, and deleting of columns to the Global Financial Forecast List. These same requirements may also extend to individual list items. Event receivers provide a convenient way to track a broad range of changes including add, edit, and delete operations to a SharePoint list or items to the list. Better yet, you can log all these changes and then compile them into reports to present to auditors for compliance reviews as required.
Validations
Often you need to perform custom validations against business requirements/rules before data can be saved to SharePoint. For example, consider implementing an organizational policy that restricts users from uploading documents to certain document libraries after the regular business hours of 9 a.m. to 5 p.m. EST. Similarly, you may want to limit deletion of items during certain time intervals even if user has the permissions to do so. In both cases, you can use event receivers to perform these validations; if validation fails, you can cancel the operation that user is performing and display custom message(s) to the user or even redirect them to custom error pages.
Notifications
Organizations usually generates different kind of notifications (e.g. e-mail, SMS, entry to an Announcements List in SharePoint, etc.) to inform their users for various events and activities. When the source of these notifications is an object in SharePoint, event receivers can be used to easily send these notifications. Consider a SharePoint Tasks List named “Volunteer Tasks” within organization's corporate SharePoint portal that provides a place for managers to post tasks related to volunteer opportunities that exist throughout the organization. As items are added to the Tasks List and they go through various status changes throughout the life cycle of the task, notifications need to be sent to managers and designated employees in the form of e-mails.
Upon successful completion of a task within the Volunteer Tasks List, a new announcement is added to the Announcements List explaining the nature of the task. All of this can be easily achieved by implementing item-level event receivers for Tasks List and then using custom code within the event receivers to send e-mail notifications and add the items to Announcements list.
When Not to Use Event Receivers
Event receivers execute code on the server side. This makes them ideal candidates for many scenarios, as you learned in previous section. However, there are occasions when they might add an unnecessary burden to the server by consuming its resources in an inefficient manner. The following are some of the scenarios when event receivers may not be an ideal fit and it would be better to look for an alternative solution:
- Using event receivers to perform long-running and processor-intensive tasks that will consume extensive resources on the server. For example, using
ItemAddedevent on a document library to execute code that converts an uploaded file from a MS Word document to a PDF. Activites like these are better suited for custom batch jobs, Windows services, or SharePoint timer jobs bcause you need to control when to start/stop them and as a result, you can minimize the possibility of degrading server performance. - Executing validation logic inside event receivers, which can easily be done on the client side. For example, checking for valid date formats or e-mail addresses are good tasks for client-side validation. With SharePoint 2010 you now have the ability to use column-level validations to perform various client-side validations. This feature is available out of box (OOB), so it's easy to explore the possibilities of client-side validations.
- Implementing workflow-like process logic inside event receivers instead of using SharePoint Workflows. Simply put, event receivers are not meant for long-running processes especially when they require interaction with multiple users or machines. For these scenarios you should use SharePoint workflows or start them using event recievers. SharePoint 2010 provides excellent support in developing both no-code to full-code workflow solutions by using SharePoint Designer 2010 and Microsoft Visual Studio 2010, respectively.
Event Receivers Architecture
The architecture of event receivers is comprised of two major pieces—the first being the event receiver base class with virtual methods that SharePoint provides. You inherit your custom event receiver from one of these base classes, then override virtual methods in your custom event receivers. The second piece is the deployment and registration of custom event receivers. The following sections discuss both of them.
Event receiver base class: SharePoint provides various base classes for implementing custom event recievers. These base clases contains virtual methods that you override to implement your custom event recievers. These base classes include
SPWebEventReceiver,SPListEventReiver,SPItemEventReceiver,SPWorkflowEventReceiver,SPFeatureReceiver, andSPEmailEventReceiver. The root of all of the SharePoint base event classes is SPEventReceiverBase with the exception ofSPFeatureReceiverandSPEmailEventReceiver. Figure 8-1 shows this relationship.
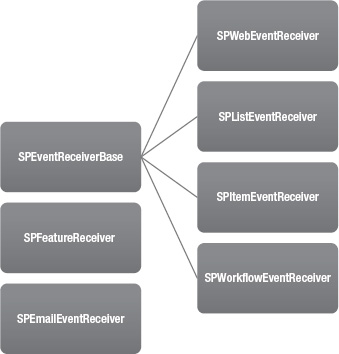
Figure 8-1. SharePoint event receivers base class structure
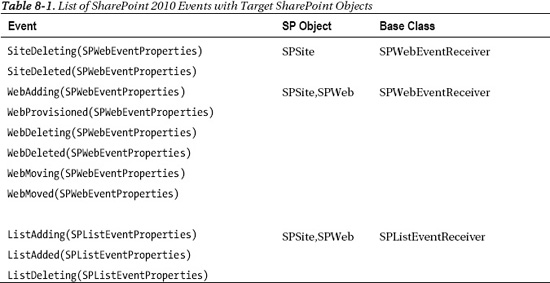
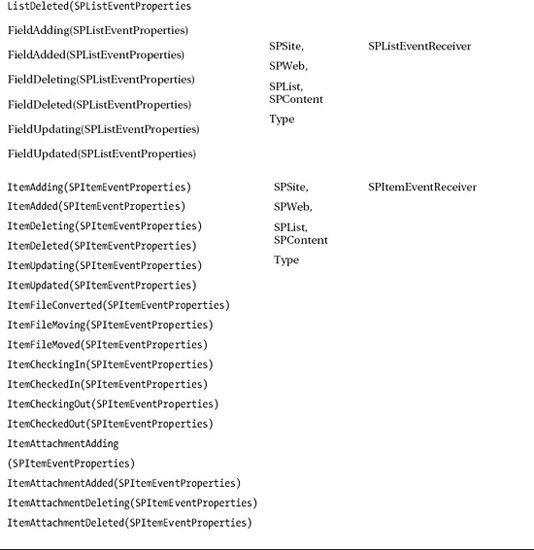
Table 8-1 lists the event receivers that are avialable for various SharePoint objects along with their base class.
Event receiver deployment and registration: Custom event receivers first need to be deployed and registered into the SharePoint environment before they can be executed by SharePoint. This can be done either declaratively by using SharePoint Features or programmatically using SharePoint 2010 Server Side Object Model (OM). It is recommended that you should use a declarative approach to register event receivers as it provides ease of management and more flexibility to perform updates. However, as declarative approach provides only the subset of registration options, it's not always possible to use it; in those cases, you should revert to code-based registration. The deployment process essentially deploys artifacts like the event receiver assembly and other related artifacts into the SharePoint environment. Deployment should always be done using SharePoint Solutions in the form of a WSP file because that is the only way to ensure that it is done uniformly throughout the SharePoint farm. It also provides a consistent way to remove artifacts from the SharePoint farm.
Synchronous and Asynchronous Events
SharePoint 2010 divides event receivers into two broad categories: synchronous and asynchronous events. Synchronous events provide developers an opportunity to act on the event and ability change the outcome of it (such as canceling the event). On the other hand, asynchronous events help developers react to an event that just happened and lets them send notifications or perform any post processing related to the event. The next sections cover synchronous and asynchronous events in detail.
Synchronous
Synchronous events (also known as before events) are triggered as a result of actions that are performed against SharePoint objects like SPSite, SPWeb, SPList, SPContentType, etc. These events get executed before data is committed to the SharePoint content database. This very nature of synchronous events presents developers with an opportunity to perform various preprocessing tasks inside these events (e.g. ensure that a newly created list follows certain naming conventions). It also provides them with the ability to cancel these events if required, which in turns terminates the action and nothing will be committed to content database. SharePoint traditionally follows a naming scheme to represent these events by ending them with ing, like the ItemAdding event which represents addition of new item to the list or a library.
Synchronous events run in the same process and thread that triggers the event; usually it's same thread in which the SharePoint UI is running (e.g. when the user creates new item in the Tasks list using SharePoint UI) but this can easily be a different process (e.g. when you programmatically create new item in the Task list using Windows console application or through Windows service). You must avoid using complex time-consuming processing logic inside synchronous events as they block the execution of the current request thread until the event receiver completes its execution. This essentially means that your UI will be help up in rendering.
Asynchronous Events
Asynchronous events (also known as after events) are triggered for SharePoint objects like SPSite, SPWeb, SPList, SPContentType, etc. after the action (e.g. creation of new list or deletion of a file from document library) has been committed to the SharePoint content database. As SharePoint already has updated the content database, you can't cancel these events but you can use them for post-processing tasks, such as sending notifications to users informing them about a new task list that just got created. SharePoint traditionally follows a naming scheme to represent these events by ending them with ed, like the ListAdded event that represents the addition of a new list/library to the site.
All asynchronous events by default run on a background thread, which means that they never block the UI thread and the user always retains control. Sometimes you will want to change this behavior, mainly because you want to update the UI with pieces of information that you processed during the execution of an asynchronous event receiver; for that the user should wait until the event receiver finishes its execution. To address this scenario SharePoint 2010 allows you to alter the default behavior of asynchronous events and make them run as if they are synchronous events by updating the synchronization property of event receiver to synchronous.
Developing Custom Event Receivers
In this section you will address a business scenario by developing, deploying, and testing a custom event receiver using Microsoft Visual Studio 2010, which provides specific project templates for SharePoint 2010. One such template is specifically for creating SharePoint 2010 event receivers.
In order to perform steps in this section and others you will need to have SharePoint 2010 locally install on your machine. This is because Visual Studio 2010 only makes SharePoint 2010 project templates available if you have SharePoint 2010 locally installed on the same machine. Discussing the details of how to setup up SharePoint 2010 for development is out of scope for this chapter, but you can download a SharePoint 2010 Information Worker Demo and Evaluation Virtual Machine from www.microsoft.com/download/en/details.aspx?id=21099. This virtual machine contains SharePoint 2010 along with Visual Studio 2010. Also you can download and use the SharePoint 2010 Easy Setup Script from www.microsoft.com/download/en/details.aspx?id=23415 to quickly create a SharePoint 2010 development environment.
Consider a business scenario where your company has SharePoint contacts list named “Employees” that contains contact details of all employees. As a new employee joins the company, a new contact item is created for that employee. This item contains details like employee full name, e-mail, and home and business phone numbers. When an employee joins the company there is a need to automatically post a welcome greeting on a SharePoint Announcements list to let all other employees know about their new colleague. You have decided to meet this requirement by implementing a custom event receiver. You will capture the ItemAdded event for the employees list and execute custom code inside it to create the new announcement with a greeting message. The following is the walkthrough for this scenario:
- Start Microsoft Visual Studio 2010 with administrative privileges.
- Create a new project in Visual Studio by clicking File
 New Project.
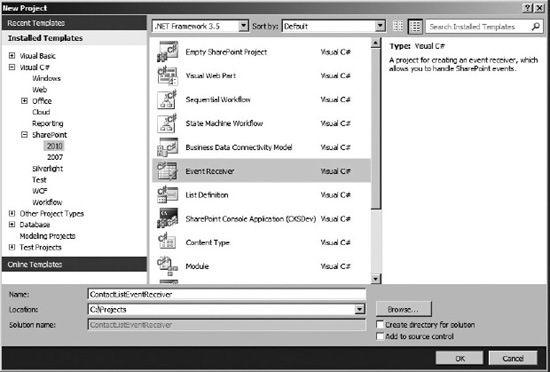
 - In the New Project dialog box, expand Visual C# in the Installed Templates box, expand SharePoint, and select 2010. From the list of templates, select Event Receiver.
- Type ContactListEventReceiver for the Name, as shown in Figure 8-2. Click OK.
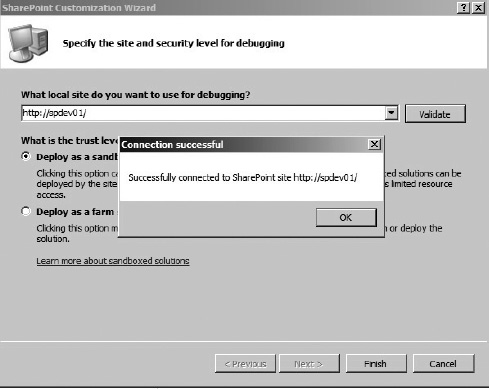
- Type http[s]://<<SiteCollectionUrl>> for the local site combo box. Click Validate. Wait for Connection Successful message box to appear. Make sure you replace the http[s]<<SiteCollectionUrl>> with the actual URL of your site collection, such as
http://spdev01orhttp://contoso(seeFigure 8-3).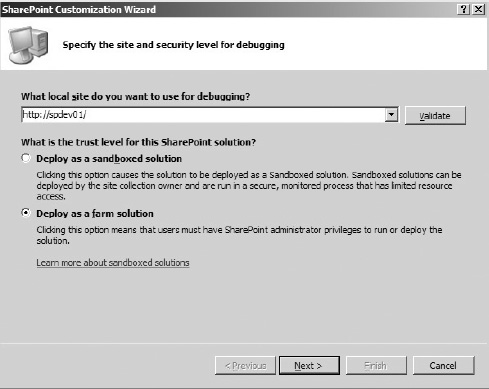
- Choose Deploy as a farm solution. Click Next.
 Note With SharePoint 2010 you can write code that can be deployed as a sandbox solution rather than farm solution. The major difference between farm and sandbox solutions is that of scope. Sandbox solutions put a number of constrains on your code but provide better manageability and security. For example, with sandbox solutions you are limited to accessing objects below the site collection level (e.g. lists, sub sites, etc.). Also, your code can't run under FullTrust, and certain SharePoint Server Side Object Model classes are not available, such as Microsoft.SharePoint.SPSecurity. Microsoft Visual Studio 2010 will disable the sandbox solution choice if that option isn't available for the particular event receiver. However, it's recommended that you choose between Sandbox and Farm solutions based on your actual business requirements rather than simply because of ease of deployment or management.
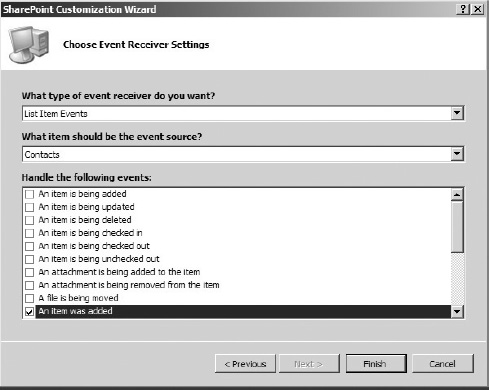
 - For the type of event, select List Item Events.
- Select Contacts from the event source drop-down.
- Select the check box “An item was added” from the events list box. Click Finish, as shown in Figure 8-4).
- Your should now see the Event Receiver Solution along with the ContactListEventReceiver Project, as shown in Figure 8-5.
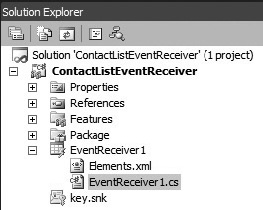
Figure 8-5. ContactListEventReceiver Solution Explorer view
- Locate EventReciever1 folder and rename it as ContactEvents.
- Locate
EventReceiver1.csinside ContactEvents folder and rename it toCustomEvents.cs, as shown in Figure 8-6.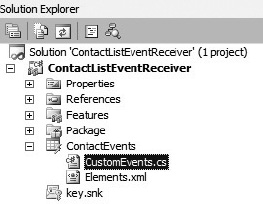
- Open the
CustomEvents.csfile from ContactEvents folder. Notice that a stub for an ItemAdding method is already implemented for you. - Rename the namespace to ContactListEventReceiver (see Figure 8-7).
- Rename the class name to
CustomEvents.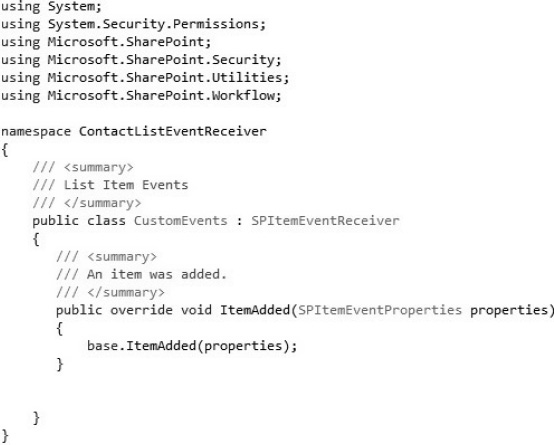
Figure 8-7. CustomEvents class
- Inside the CustomEvents class, replace the existing code with Listing 8-1.
Listing 8-1. The ItemAdded Event
public override void ItemAdded(SPItemEventProperties properties)

       {

           SPList announcementsList = properties.Web.GetList("/Lists/Announcements") as

SPList;

           if (null != announcementsList)

           {

               SPListItem contactItem = properties.ListItem;

               SPListItem newItem = announcementsList.Items.Add();

               newItem[SPBuiltInFieldId.Title] = string.Format("Please welcome {0} on board,

you can reach {1} at {2}", contactItem["FullName"],


contactItem["FirstName"],contactItem["Email"]);

               newItem.Update();

           }

       }
The code first gets the Announcements list using the
GetListmethod ofSPListclass, and then it adds a new item to it by calling theAddmethod on the Items collection. Next, it sets the Title column to the welcome message using column values from newly added Contact item. Notice that as the Contact item is already added to the SharePoint you can easily access all of its columns along with the values. Finally, theUpdatemethod is called on the announcement item so all the changes get committed to the content database. - Open
Elements.xmllocated inside ContactLists folder. - Inside the
Elements.xmlfile, replace the markup with code in Listing 8-2.Listing 8-2. Elements.xml File for ContactListItemAdded Event
<?xml version="1.0" encoding="utf-8"?>

<Elements xmlns="http://schemas.microsoft.com/sharepoint/">

  <Receivers ListUrl="/Lists/Employees">

      <Receiver>

        <Name>ContactListItemAddedEvent</Name>

        <Type>ItemAdded</Type>

        <Assembly>$SharePoint.Project.AssemblyFullName$</Assembly>

        <Class>ContactListEventReceiver.CustomEvents</Class>

        <SequenceNumber>10000</SequenceNumber>

      </Receiver>

  </Receivers>

</Elements>
The
Elements.xmlfile contains the information that will be used to deploy and register the event receiver. You will learn more about deployment and registration of event receivers in a later section. For now, Visual Studio will take care of deployment; you don't have to worry about it. Tip Visual Studio 2010 provides replaceable parameters (also known as tokens) that are used to provide values for SharePoint solution items whose actual values are not known at design time. In the Listing 8-2, rather than hard-coding the assembly name inside the Elements.xmlfile, the$SharePoint.Project.AssemblyFullName$token is used. It will be replaced by the actual name of your fully qualified assembly as Visual Studio creates the SharePoint Solution file (WSP) as part of deployment process. You can learn more about replaceable parameters fromhttp://msdn.microsoft.com/en-us/library/ee231545.aspx. - Expand the Features folder and rename Feature1 to ContactEventFeature.
- Double click ContactEventFeature and enter the following information (see Figure 8-8):
Title: Contact List Custom Event Receiver Activation
Description: This feature deploy ContactListItemAddedEvent Event Receiver

Figure 8-8. ContactEventFeature title and description
- Right click the Project and select Properties. In the Build tab, set the Platform target to x64 (see Figure 8-9).
- Press F5 inside Visual Studio, which will deploy the event receiver and enable debugging.
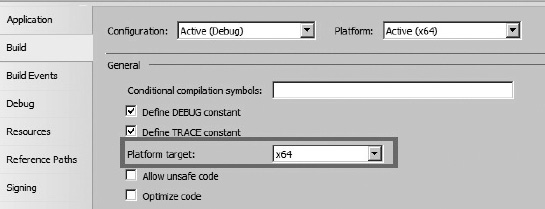
Figure 8-9. Changing project target platform to x64
- Visual Studio will automatically open the SharePoint Portal default page.
- To test your event receiver, you will first create a new contact list and then add a new item to it.
- From the Site Actions menu, select View All Site Content.
- Click Create. This will open up a dialog box. Select contact list from the list of installed items.
- Type Employees for the name of the contacts list, as shown in Figure 8-10. Click Create.
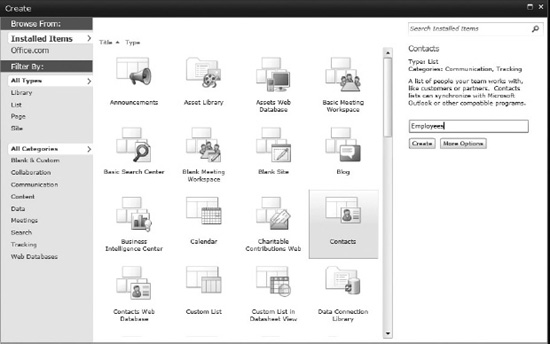
Figure 8-10. Creating the employees list
- In the Quick Launch menu on the left, click Employees.
- To add a new item, click on the Add new item link.
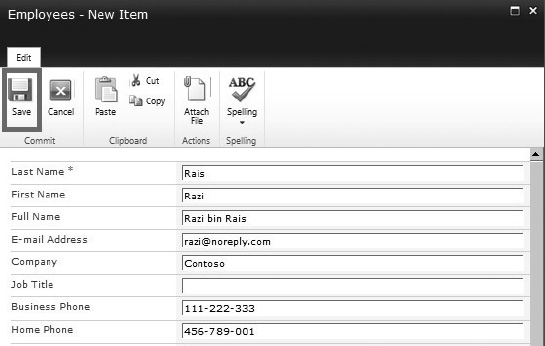
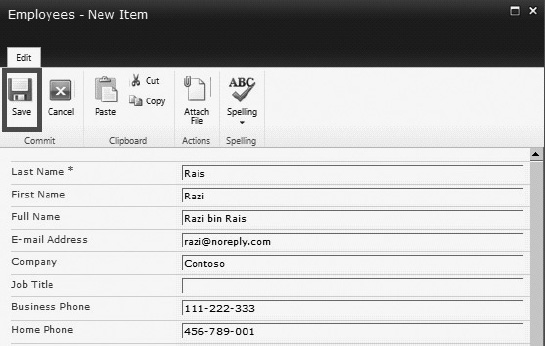
- On New Item dialog, enter values for Last Name, First Name, Full Name and E-mail Address, Business Phone and Home Phone columns (see Figure 8-11). Click Save.
- You should see new contact being added to the Employees list, as shown in Figure 8-12.

Figure 8-12. New contact item in Employee list
- In the Quick Launch menu on the left, click All Site Content.
- On the All Site Content page, locate and click on the Announcements list.
- You should see a new announcement item already added to the list, displaying the welcome message, as shown in Figure 8-13.
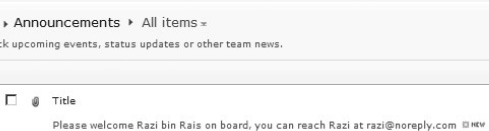
Figure 8-13. New announcement created through an event receiver
Feature Receivers
Feature receivers provide developers with an opportunity to execute code as a feature goes through different stages. The following is the list of feature event receivers:
- FeatureActivated
- FeatureDeactivating
- FeatureInstalled
- FeatureUninstalling
- FeatureUpgrading
As features are the cornerstone of SharePoint application architecture, by using feature receivers you can easily address a broad set of requirements without introducing unnecessary complexity. The following are some of the common scenarios for feature receivers:
- SharePoint delegate control functionality uses feature receivers to enable or disable the usage of a particular delegate control.
- Feature receivers enjoy the benefits of feature versioning and upgrades, making them easier to maintain and providing administrators a consistent mechanism to manage them throughout a SharePoint farm.
- Feature receivers provide an elegant way to register event receivers using code. As features can easily be activated and deactivated using the user interface, well-trained site admins can simply activate and deactivate them as needed. There is a step-by-step walkthrough later in this chapter that shows how to activate an event receiver using feature receivers.
- As features can be scoped at SharePoint farm, Web Application, site, and web level, you can use feature receivers to react and perform customizations on all four levels in a consistent manner.
Using the ReceiverData Property
The SPEventPropertiesBase class provides the ReceiverData property, which allows you to populate it with a string value with a maximum size of 256 characters and to later read it inside your event receiver. Despite the character limit, this approach provides an easy way to store the data that you need to access within event receivers.
The Elements.xml file in Listing 8-3 shows how to declaratively set the ReceiverData property. Notice that the name of actual element is Data rather than ReceiverData.
Listing 8-3. Elements.xml File with <Data> Element
<?xml version="1.0" encoding="utf-8"?>

<Elements xmlns="http://schemas.microsoft.com/sharepoint/">

  <Receivers ListTemplateId="100">

      <Receiver>

        <Name>ItemAddingEventReceiver</Name>

        <Type>ItemAdding</Type>

        <Assembly>$SharePoint.Project.AssemblyFullName$</Assembly>
        <Class>EventReceivers.Examples</Class>

        <Data>Your custom values goes here</Data>

        <SequenceNumber>10000</SequenceNumber>

      </Receiver>

  </Receivers>

</Elements>
The code in Listing 8-4 shows how to access the Data property within the event receiver.
Listing 8-4. Accessing Data Element Inside the Event Receiver
         public override void ItemUpdating(SPItemEventProperties properties)

       {

           string data = properties.ReceiverData;


       }
Although the default limit of the Data property in Elements.xml is 256 characters, there is an easy workaround to go beyond that limit. Rather than putting your actual data inside the Data property, you put it inside an external file (e.g. within an XML file) and then put the file path inside Data property. For example, you can create a new XML file called Security.xml and place it inside the feature folder that will be used to register the event receiver (registration of event receivers is covered in later section). Now, update the Data element within the Elements.xml file (see Listing 8-3) with following value:
<Data>{YourFeatureName}Security.xml</Data>


Please replace {YourFeatureName} with the name of the folder that contains the feature.
![]() Tip Visual Studio 2010 provides replaceable parameters (also known as tokens). These are used to provide values for SharePoint solution items whose actual values are not known at design time. For example, rather than hard coding your feature name inside the
Tip Visual Studio 2010 provides replaceable parameters (also known as tokens). These are used to provide values for SharePoint solution items whose actual values are not known at design time. For example, rather than hard coding your feature name inside the Elements.xml file you can use $SharePoint.Feature.DeploymentPath$ token, which will be replaced by the actual name of the folder that contains the feature within SharePoint solution package (WSP file). The Data element will contain following value:
<Data>$SharePoint.Feature.DeploymentPath$Security.xml</Data>
You can learn more about replaceable parameters from http://msdn.microsoft.com/en-us/library/ee231545.aspx.
Finally you can access the Security.xml file inside the event receiver as shown in Listing 8-5.
Listing 8-5. Accessing Security.xml File Inside the Event Receiver
  public override void ItemUpdating(SPItemEventProperties properties)

       {

           string filePath = string.Format(@"{0}{1}", SPUtility.GetGenericSetupPath(@"TEMPLATEFEATURES"), properties.ReceiverData);


           System.Xml.Linq.XDocument xmlDoc = System.Xml.Linq.XDocument.Load(filePath);


       }
Avoiding Event Recursion
When working with event receivers, there is always a chance that your code will trigger the same event again. If you don't address this issue properly you will end up with an event recursion or infinite looping of same event, which will eventually exhaust the application pool memory that SharePoint allocates for a SharePoint Web Application. As a result, the application pool will be recycled, which from an end user perspective looks like poor performance from SharePoint.
A simple way to avoid this is by using a Boolean property called EventFiringEnabled which is exposed by the SPEventProperties base class and is available within event receivers.
You should approach this issue as follows:
- Set EventFiringEnabled property to false before you update the current item inside the event receiver.
- Perform the desired updates, for example calling
properties.Item.Update()on current item. - Set EventFiringEnabled property to true again after you perform all the updates on the current item (see Listing 8-6).
Listing 8-6. How to Avoid Event Recursion
  public override void ItemUpdating(SPItemEventProperties properties)

       {

           try

           {

               EventFiringEnabled = false;

               //Perform required updates

               properties.ListItem.Update(); //Call Update method

           }

           catch

           {

             //Implement exception handling logic

           }

           finally

           {
               EventFiringEnabled = true;

           }


       }
Using the UpdateOverwriteVersion() Method
When you update a list item inside a synchronous event using the Update method of SPListItem class, it creates a new version of the same item as part of updates rather than simply updating the current item. To avoid this behavior, you should always use the UpdateOverwriteVersion method of the SPListItem class instead—this way you will always get the expected results.
Event Receivers and the Document Library
When you upload or create a new document within a document library, you end up getting more event receivers fired by SharePoint than expected. The events and the sequence in which they get triggered are as follows:
- ItemAdding
- ItemAdded
- ItemUpdating
- ItemUpdated
- ItemCheckingIn
- ItemCheckedIn
It is important to understand the logic behind this behavior. Actually it's rather simple: as you upload a document to a document library using the SharePoint user interface, you are presented with a dialog box that lets you choose the document(s) to be uploaded to the document library. After you select a document and click on the OK button, SharePoint triggers the ItemAdding event followed by the ItemAdded event. At this point, the document is already added to the document library (or to the content database, to be exact). However, additional data associated with the column(s) has yet to be filled in. Next, SharePoint automatically makes the document checked out to the current user and display the Edit Properties dialog box so you can fill in the column(s) with data as required. As you click on the OK button, the ItemUpdating event gets fired, followed by ItemUpdated event. Finally the ItemCheckingIn and ItemCheckedIn events are triggered. SharePoint doesn't give developers the option to capture ItemCheckingOut and ItemCheckedOut events because any changes to document within these events are not allowed.
If you try to upload multiple documents using the SharePoint upload dialog box, SharePoint will only trigger the ItemAdding and ItemAdded events and the entire set of documents will be checked out to the current user. Also SharePoint will not display the Edit Properties dialog box and you will miss an opportunity to fill in the values for the columns (even mandatory columns). You can, however, check in the uploaded document inside ItemAdded event. Listing 8-7 shows how to check in a document inside the ItemAdded event.
Listing 8-7. Check-in a Document inside the ItemAdded Event
public override void ItemAdded(SPItemEventProperties properties)


{

        try {


                EventFiringEnabled = false;


                if (properties.ListItem.File.CheckOutType != SPFile.SPCheckOutType.None) {


                        properties.ListItem.File.CheckIn(string.Empty);


                }


        } catch (Exception ex) {


                //Handle exception here


        } finally {


                EventFiringEnabled = true;


        }

}
Deploying/Registering Event Receivers
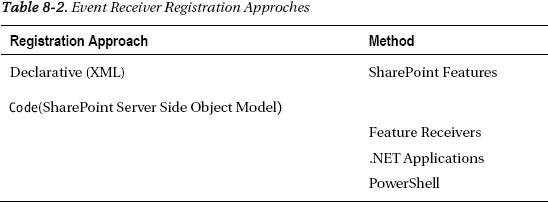
Once you complete the development of a custom event receiver, there are various ways to deploy it to the SharePoint environment. Regardless of the method you choose, the underlying .NET assembly containing the code of your custom event receiver needs to be deployed into the Global Assembly Cache (GAC). Once the underlying assembly is deployed to the GAC, you need to register the event receiver. You can register your event receiver either declaratively or programmatically/using code. Table 8-2 shows various approaches.
![]() Tip You should never deploy event receivers to SharePoint Web Application's _app_bin directory (<<Drive>>:inetpub...\_app_bin) as this may lead to situations where your event receiver may never get executed. This happens because of the way the .NET assembly loader performs the probing to locate an assembly; it will first perform a lookup in Global Assembly Cache (GAC), and then look in the Bin folder under the current working directory. But SharePoint uses services like OWSTIMER.EXE, which is a Windows Service and doesn't reside in SharePoint Web Application _app_bin directory, so the .NET assembly loader will fail to load the event receiver assembly. As a result, your custom event receiver will never be executed. Even though you may able to put the event receiver assembly into the path which does get probed by the .NET Assembly Loader, it's not a best practice and GAC is the only place to deploy your event receivers.
Tip You should never deploy event receivers to SharePoint Web Application's _app_bin directory (<<Drive>>:inetpub...\_app_bin) as this may lead to situations where your event receiver may never get executed. This happens because of the way the .NET assembly loader performs the probing to locate an assembly; it will first perform a lookup in Global Assembly Cache (GAC), and then look in the Bin folder under the current working directory. But SharePoint uses services like OWSTIMER.EXE, which is a Windows Service and doesn't reside in SharePoint Web Application _app_bin directory, so the .NET assembly loader will fail to load the event receiver assembly. As a result, your custom event receiver will never be executed. Even though you may able to put the event receiver assembly into the path which does get probed by the .NET Assembly Loader, it's not a best practice and GAC is the only place to deploy your event receivers.
Registering Event Receivers: Declarative Approach
SharePoint Features provides easy to register event receivers. The Feature contains an Elements.xml file that stores information related to the event receiver including, but not limited to, underlying event receiver name, assembly details, the List/Library Template ID (e.g. Document Library has ID of 101), or server relative URL to List/Library.
![]() Note The SharePoint 2010 user interface doesn't provide any means to view registered event receivers. In real world projects, you will need this information to troubleshoot issues with event receivers, especially for those that are registered to SharePoint lists/library. You can download the SPEventReceiverListing solution from
Note The SharePoint 2010 user interface doesn't provide any means to view registered event receivers. In real world projects, you will need this information to troubleshoot issues with event receivers, especially for those that are registered to SharePoint lists/library. You can download the SPEventReceiverListing solution from http://speventreceiverslist.codeplex.com. It provides you with a complete list of registered event receivers for any SharePoint list or library using the SharePoint UI. Alternatively, you can use the PowerShell script file DisplayListRegisteredEvents.ps1, which is available as part of this chapter's download, to display the complete list of event receivers associated with the SharePoint list. You can easily tweak the script to make it work against a SharePoint site.
Registering Event Receivers to Specific List
This approach allows you to register event receiver to a specific list/library using a SharePoint Feature. Listing 8-8 shows the Elements.xml file, which is used for registration of an ItemUpdated event to a SharePoint list called SalesEvents. Pay special attention to the ListUrl attribute, which contains a server-relative URL to SalesEvents List. Also note that the Class and Assembly elements must match the name of the SalesEvents class and its fully qualified assembly name. The SequenceNumber element is used by SharePoint to queue the event receivers for execution in case there are multiple event receivers of same type (i.e. ItemUpdated) registered for same SharePoint object (i.e. SalesEvents List). SharePoint will execute the event receiver with lowest sequence number first and so on. You will learn more about how to use the sequence number later in this chapter.
Listing 8-8. Event Receiver Registration to SalesEvents List
<Elements xmlns="http://schemas.microsoft.com/sharepoint/">


       <Receivers ListUrl=“Lists/SalesEvents">


             <Receiver>


                     <Name>SalesEvents</Name>


                     <Type>ItemUpdated</Type>


                     <SequenceNumber>10001</SequenceNumber>


                     <Assembly>SalesEventReceivers, Version=1.0.0.0, Culture=neutral,


PublicKeyToken=3e1c9874674bk912m</Assembly


         <Class>SalesEventReceivers.CustomEvents </Class>


           </Receiver>


     </Receivers>


</Elements>
Registering Event Receivers Based on List Type
You used this approach to register an event receiver to all SharePoint Lists or Libraries based on their type (e.g. all document libraries or all contacts lists). The feature in Listing 8-9 registers the event receiver named DocumentUploadPolicy for the ItemAdding event on every document library. The ListTemplateId attribute takes the ID of List Template (for example, ListTemplateId of 101 denotes a document library).
Listing 8-9. Event Receiver Registration to All Document Libraries
<Elements xmlns="http://schemas.microsoft.com/sharepoint/">

       <Receivers  ListTemplateId =”101”>

             <Receiver>

                     <Name>DocumentUploadPolicy</Name>

                     <Type>ItemAdding</Type>

                     <SequenceNumber>10001</SequenceNumber>

                     <Assembly>DocumentUpload Policies, Version=1.0.0.0, Culture=neutral,

PublicKeyToken=1k1c9424674b99lo</Assembly

         <Class>DocumentUpload Policies.CustomEvents</Class>

           </Receiver>

     </Receivers>

</Elements>
![]() Note The ListTemplateId and ListUrl attributes are mutually exclusive, so you can't use both of them at the same time to register your event receiver.
Note The ListTemplateId and ListUrl attributes are mutually exclusive, so you can't use both of them at the same time to register your event receiver.
Scope
By default when you deploy an event receiver declaratively using a Feature that is scoped at site collection level, the event receiver will be available to all sub sites too. If you want to override this behavior and limit the scope of the event receiver to only the top-level root site within the site collection, then you must use the Scope attribute within the Receivers element and set it to Web as shown below
<Receivers Scope=“Web”>
Event receivers that do not work at site collection level cannot be scoped to that level. For example SPEmailEventReceiver cannot be scoped at site collection level, and cannot be scoped to that level.
Sequence Number
You can register multiple event receiver assemblies against same type of event (such as ItemAdded) for a same SharePoint object (such as Employees List). In this situation, the SequenceNumber property enables you to control the execution order among multiple event receivers. SharePoint will first execute the event receiver with lowest sequence number and so on. As a best practice, use sequence number above 10,000 to avoid conflict with SharePoint OOB event receivers, which usually have sequence number below 10,000.
Registering Event Receivers: The Code-Based Approach
You can register custom event receivers programmatically using SharePoint Server Side Object Model (OM). The SPEventReceiverDefinitionCollection provides access to a collection of all the event receivers registered for particular SharePoint object. You can use the EventReceivers property to access this collection. You then call the Add method on this collection to add new event receiver to it. The Add method of the SPEventReceiverDefinitionCollection class has four overloads. You will use different overloads throughout this section. For more information on the Add method, please visit http://msdn.microsoft.com/en-us/library/microsoft.sharepoint.speventreceiverdefinitioncollection.add.aspx.
The Listing 8-10 shows how to register event receiver using a minimal set of information. Notice that the assembly name and the class name for the event receiver are passed as parameters. In this case, the Add method is used with the overload that takes a type of event (ItemDeleted), assembly name, and class name to register the event receiver.
The details like class name and assembly name are passed to the RegisterItemDeletedEvent method as parameters; you can easily use the same method to register different event receivers for other lists. It's not difficult to create a more generic method that can do the event registration for you, but as you will learn later in this section, there are better approaches for doing this.
Listing 8-10. Using Add Method of SPEventReceiverDefinitionCollection
private void RegisterItemDeletedEvent(SPList eventList, string className, assemblyName)

{


SPEventReceiverDefinitionCollection receivers = eventList.EventReceivers;

receivers.Add(SPEventReceiverType.ItemDeleted, assemblyName, className);


 }
A better way to address event registration is to use feature receivers; this way you can register/de-register the event receiver based on the feature activation/deactivation. You can still use the SharePoint Server Object Model to perform the actual registration or de-registration, but this approach is much more flexible compared to developing a custom application because features are much easier to deploy, manage, and upgrade. Also, site admins can activate/deactivate features using the SharePoint UI so there is no learning curve involve for them; you can simply provide the name of the feature to activate/deactivate to register/de-register an event receiver.
The following exercise demonstrates how to create a feature receiver to perform event receiver registration. You will use the event receiver that you created earlier in the “Developing Custom Event Receivers” section.
- Start Visual Studio 2010 with administrative privileges.
- Create a new project in Visual Studio by clicking File New Project.
- In the New Project dialog box, expand Visual C# in the Installed templates box, expand SharePoint, and select 2010. From the list of templates, select Empty SharePoint Project.
- Type ContactsEventFeatureReceiver for the name, as shown in Figure 8-14, and click OK.
- Type http[s]://<<SiteCollectionUrl>> for the local site combo box. Make sure you replace the http[s]<<SiteCollectionUrl>> with the actual URL of your site collection (for example
http://spdev01orhttp://contoso).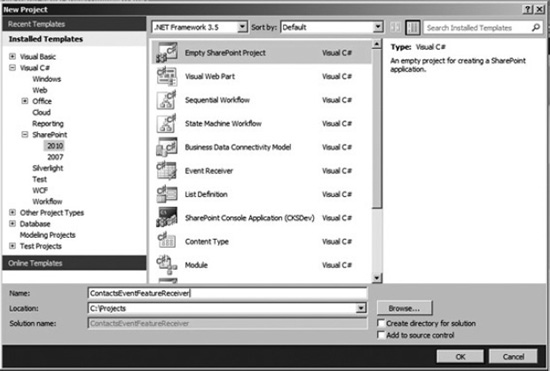
Figure 8-14. Creating the ContactsEventFeatureReceiver project
- Click Validate. Wait for Connection Successful message box shown in Figure 8-15 to appear.
- Choose Deploy as a farm solution and then click Finish.
- Right-click on Features folder and select Add Feature
- Locate Feature1 folder and rename it to ContactsListRegFeature.
- Double-click ContactsListRegFeature and enter the following information (see Figure 8-16):
Title: Contacts List Registration Feature
Description: This feature has associated feature receiver, which performs event receiver registration.
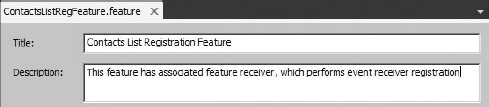
Figure 8-16. Setting the title and description
- Right-click the BulkListOperationsFeature folder and select Add Feature Receiver, as shown in Figure 8-17.
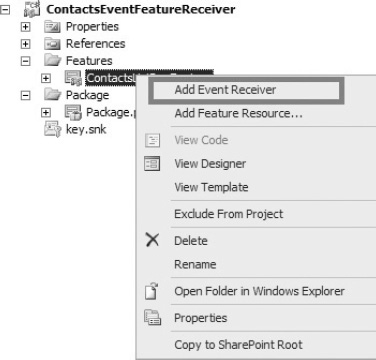
Figure 8-17. Adding a feature receiver
- Open the
ContactsListRegFeature.EventReceiver.csfile from ContactsListRegFeature.feature folder. Notice that a number of common Feature Receiver events have been written for you but all of these events are commented out. You can keep or delete them. - Replace the
ContactsListRegFeatureEventReceiverclass with the code in Listing 8-11.Listing 8-11. Register and De-Register an Event Receiver
public class ContactsListRegFeatureEventReceiver : SPFeatureReceiver

    {

        Guid receiverId = new Guid("539BC7C2-9637-4233-B664-DC0C1DE12095");

        public override void FeatureActivated(SPFeatureReceiverProperties properties)

        {


            SPWeb web = properties.Feature.Parent as SPWeb;

            SPList empContactsList = web.GetList("/Lists/Employees") as SPList;


            if (null != empContactsList)

            {
                if (!empContactsList.EventReceivers.EventReceiverDefinitionExist(receiverId))

                {

                    SPEventReceiverDefinition def = empContactsList.EventReceivers.Add(receiverId);

                    def.Type = SPEventReceiverType.ItemAdded;

                    def.Name = "ContactListItemAddedEvent";

                    def.Assembly = "ContactListEventReceiver, Version=1.0.0.0, Culture=neutral, PublicKeyToken=c8b8250ecc14bbae";

                    def.Class = "ContactListEventReceiver.CustomEvents";

                    def.SequenceNumber = 10000;

                    def.Update();

                    empContactsList.Update();

                }

            }


        }


     public override void FeatureDeactivating(SPFeatureReceiverProperties properties)

        {

            SPWeb web = properties.Feature.Parent as SPWeb;


            SPList empContactsList = web.GetList("/Lists/Employees") as SPList;


            if (null != empContactsList)

            {

                if ( empContactsList.EventReceivers.Count>0 &&

                       empContactsList.EventReceivers.EventReceiverDefinitionExist(receiverId) )

                {

                    empContactsList.EventReceivers[receiverId].Delete();

                    empContactsList.Update();

                }

            }

        }

} - Expand the Package folder and double click Package.package.
- In the Package.package window, click Advanced (see Figure 8-18).
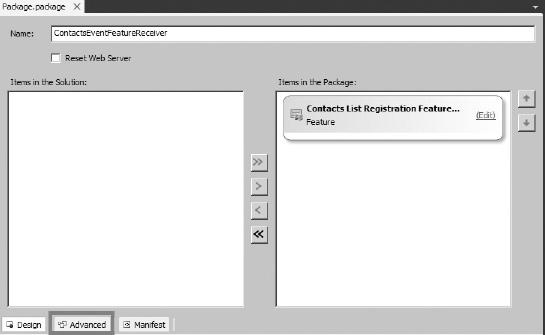
- Click Add and select Add Existing Assembly, as shown in Figure 8-19.

Figure 8-19. Adding an existing assembly
- In the Add Existing Assembly window, set the Source Path to the file location of
ContactListEventReceiver.dll(see Figure 8-20). Click OK.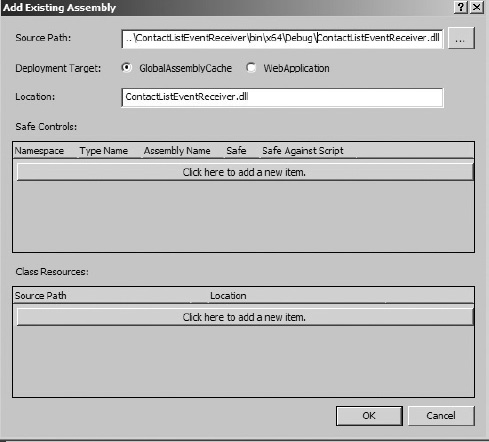
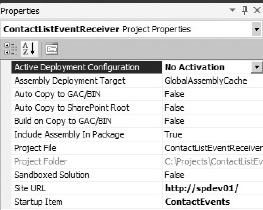
- In Solution Explorer, click the ContactsEventFeatureReceiver project and press F4. This will open up the Properties window.
- Change the Active Deployment Config property to No Activation, as shown in Figure 8-21.
- Press F5 inside Visual Studio. This will deploy the feature event receiver and enable debugging.
- Visual Studio will automatically open the SharePoint Portal default page.
- From the Site Actions menu, select Site Actions Site Settings.
- Click the Manage site feature located under Site Actions section (this is different from the Site Action menu). This will open the Manage Features page.
- Locate the Contacts List Registration feature shown in Figure 8-22 and click Activate.

Figure 8-22. Activate Contacts List Registration feature
- In the Quick Launch menu on the left, click Employees. Delete all existing contacts.
- To add a new item, click on Add new item link.
- In the New Item dialog, enter values for Last Name, First Name, Full Name and E-mail Address, Business Phone and Home Phone columns (see Figure 8-23). Click Save.
- You should see new contact in the Employees list (see Figure 8-24).

- In the Quick Launch menu on the left, click All Site Content.
- On All Site Content page, locate and click on the Announcements list.
- You should see new announcement item already added to the list, displaying the welcome message (see Figure 8-25).

Figure 8-25. New announcement
- To un-register the event receiver, browse to Manage Site Features page using steps 22 and 23.
- Locate the Contacts List Registration Feature and click Deactivate, as shown in Figure 8-26.

Figure 8-26. Deactivate Contacts List Registration Feature
- If you perform steps 25 through 31 to create a new item inside Employees contact list, you will notice that no new greeting message is posted to the announcement list this time. This is because the event receiver isn't registered to the Employees contact list any more. You can re-register it by following steps 22 through 24.
Using the PowerShell Approach
You can use a PowerShell script to register event receivers. PowerShell scripts still use the SharePoint Server Side Object Model, but you will end up with a script file you can easily edit using Notepad or the PowerShell ISE (Integrated Scripting Environment) and execute again without the need to compile it.
![]() Note With SharePoint 2010 you can use PowerShell remotely. This provides great flexibility to execute script remotely. For more details on this topic, visit
Note With SharePoint 2010 you can use PowerShell remotely. This provides great flexibility to execute script remotely. For more details on this topic, visit http://blogs.msdn.com/b/opal/archive/2010/03/07/sharepoint-2010-with-windows-powershell-remoting-step-by-step.aspx.
The following exercise shows you how to use a PowerShell script to register ContactListEventReceiver to Employees Contact List. You created this event receiver in the “Developing Custom Event Receivers” section. Make sure that you have ContactListEventReceiver assembly already deployed in GAC as PowerShell.
- Open the notepad by clicking Start All Programs Accessories Notepad.
- Inside Notepad, copy the script as shown in Listing 8-12.
Listing 8-12. Registering an Event Reciever to a SharePoint List using PowerShell
##################################################################################

# RegisterEventReceiverToList.ps1

##################################################################################

# Objective:- To register an event receiver to SharePoint List through PowerShell #script

#

# Usage:- RegisterEventReceiverToList.ps1 http://siteUrl  webUrl Listname

#

# Example:- RegisterEventReceiverToList.ps1 "http://spdev01/" "/" "Employees"

#

# This script should always run on the SharePoint WFE server with Site #Administrator rights with proper #rights


# Begin script
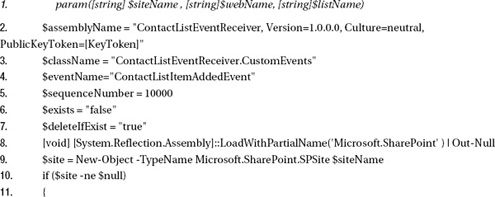

This Script takes three command line arguments to gather the site collection URL, the sub-site URL (relative to site collection), and the name of the SharePoint list to which you will register the event receiver.
Lines 2 through 5 declare variables to store key pieces of information related to ContactListEventReceiver event receiver, including a fully qualified assembly name, class name, event name, and sequence number. Your PublicKeyToken for the assembly will be different (unless you are using same assembly which is part of code downloads for this chapter), so change [KeyToken] accordingly. Line 6 and 7 define variables that are used later in the script to perform conditional deletion and registration of event receiver.
Lines 9 through 20 declare and initialize SharePoint objects SPSite, SPWeb, and SPList. SPEventReceiverDefinitionCollection is used to hold all event receivers that are registered for SPList; the variable $eventReceivers is used to hold this collection.
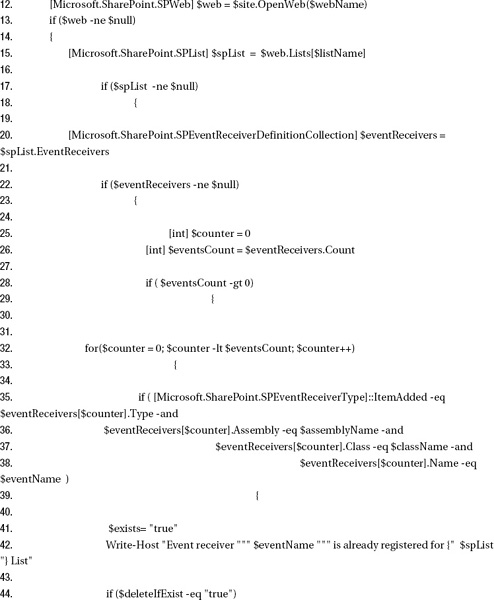
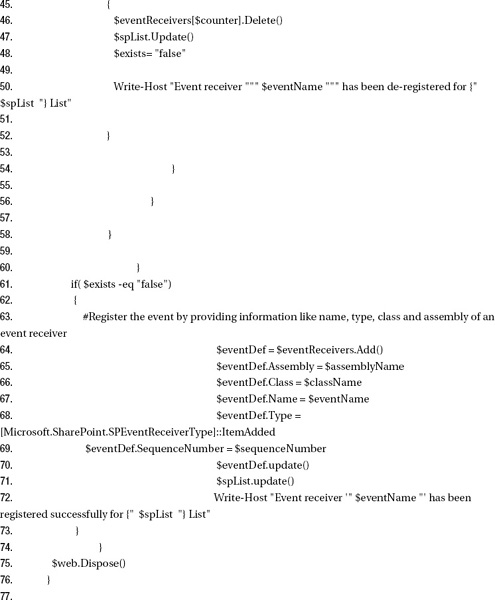
Lines 22 through 60 perform two major tasks. First, the script loops through all event receivers in the $eventReceivers collection and checks whether ContactListEventReceiver is already registered. If it is, then it sets value of $exists to “true,” meaning that you will skip the event receiver registration later to avoid duplicate registration for the same event receiver. As $deleteIfExist is set to “true” by default, the script will delete the existing ContactListEventReceiver for the collection and then call the Update method on the $spList object to commit this change to SharePoint. At this point it sets $exists to “false” because it has already deleted the existing ContactListEventReceiver event receiver and new registration can be done.
Lines 61 through 73 essentially register the ContactListEventReceiver to the list. First you check the current value of $exists, which needs to be “false,” meaning that the ContactListEventReceiver is not already registered to the list. The registration process itself is rather simple. It starts by calling the Add method on $eventReceivers collection which returns fresh event receiver definition of type SPEventReceiverDefinition which is stored in $eventDef. Next, set the $eventDef properties Assembly, Class, Name, and SequenceNumber with the values stored in $assemblyName, $className, $eventName and $sequenceNumber. Also notice how the Type property of $eventDef is set to [Microsoft.SharePoint.SPEventReceiverType]::ItemAdded.
Finally, a call is made to update methods of both $eventDef and $spList objects. This ensures that all the changes are committed to SharePoint.
As a best practice, the script disposes of both SPWeb and SPSite objects at the end of script once they are no longer required.
- Save the file by clicking File Save inside the Notepad.
- In the Save dialog, type
RegisterEvent.ps1for file name and select All Files(*.*) from Save as type drop-down. - Note the location of the
RegisterEventReceiverForList.ps1file. - Close Notepad.
- To execute the script, open the SharePoint 2010 Management Shell by clicking Start All Programs Microsoft SharePoint 2010 Products SharePoint 2010 Management Shell.
- Inside the SharePoint 2010 Management Shell, type the following command, replacing the [Path] with the actual path of
RegisterEventReceiverForList.ps1file which you created in step 5:[Path] RegisterEventReceiverForList.ps1 “http://spdev01” “/” “Employees”
- Press Enter.
- The script should run and the console should display the output of “Event receiver ContactListItemAddedEvent has been registered successfully for Employees List”.
Cancelling Asynchronous Events
You can cancel asynchronous event and display relevant error message(s) to the users. When event processing is cancelled, nothing is committed to the content database. You cancel the event by setting Cancel property of event receiver properties parameter to true. It's a good practice to set the ErrorMessage property of the same parameter with an informative message that provides the user better understanding behind event cancellation. Listing 8-13 shows how to cancel ListAdding event for the SharePoint Tasks List; it also set the error message for the user (see Figure 8-27).
Listing 8-13. Cancelling ListAdding Event
public override void ListAdding(SPListEventProperties properties)

       {

           //Tasks List Template Id is 107

           if (properties.TemplateId == 107)

           {

               properties.Cancel = true;

               properties.ErrorMessage = "Adding new Tasks list is not allowed";

           }

       }
If you try to create a new Tasks list you get the error message as shown in Figure 8-27.
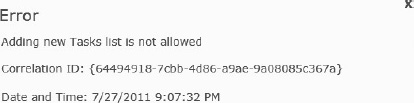
Figure 8-27. Event Cancellation with Error Message
Although this approach works for cancelling events and displaying error message(s) to the user, there will be times when you need to display custom error page rather than just a plain error message. The next section covers how to do that.
Redirection to Custom Pages
With SharePoint 2010, as part of event cancellation you can now redirect users to a custom page; this can be a SharePoint site page within the same site collection that raises the event or you can use a SharePoint application page. This cancellation approach has various benefits: first, it allows you to provide users with a consistent UI rather than simply displaying a text message with correlation ID, which some users may even find annoying. Second, this approach helps you cater advance scenarios where you need to redirect the user to an existing page based on your business requirements. For example, consider a scenario where you have a requirement to ensure that users can't create new task in the Tasks list that starts on designated public holiday(s). Your business already has entry for public holidays within the Announcements list and you are required to redirect the user to the Announcements list when you cancel the event. Listing 8-14 shows the code that implements the ItemAdding event for the Task list to address this requirement.
Listing 8-14. Cancelling ItemAdding Event with Redirection
public override void ItemAdding(SPItemEventProperties properties)

       {


           if ( null != properties.AfterProperties["StartDate"])

           {

                DateTime taskStartDate = DateTime.Parse(properties.AfterProperties["StartDate"] as string).ToUniversalTime();


               if ( IsPublicHoliday(taskStartDate) )

               {

                   properties.Status = SPEventReceiverStatus.CancelWithRedirectUrl;

                   string url = string.Format("{0}/Lists/{1}/AllItems.aspx",

                                                            properties.Web.Url, "Announcements");

                 properties.RedirectUrl = url;

               }

           }


       }


        private bool IsPublicHoliday(DateTime taskStartDate)

        {

         //To keep this example short only single public holiday date is used

         //but you can also store dates externally in SharePoint Calendar

            List<DateTime> publicHolidayDates = new List<DateTime> {new DateTime(2012, 1, 1)};


return publicHolidayDates.Any(d => d.Day == taskStartDate.Day &&

d.Month == taskStartDate.Month && d.Year == taskStartDate.Year);


        }

Inside the ItemAdding event receiver you can use AfterProperties collection to access the

value of StartDate column which contains the Task start date. SharePoint stores dates in UTC
format so you parse the Date to DateTime and use the ToUniversalTime method to keep the UTC

format. The IsPublicHoliday is just a handy utility method that takes the DateTime object and

compares it with the list of holiday dates that are defined in the publicHolidayDates

collection. It contains only a single date (i.e. 1/1/2012) to keep this sample easy to read

but you can extend this method to get dates from sources like SharePoint List (e.g. Calender

List) or some other external source like a web service. Finally, it compares the dates using

LINQ and returns a Boolean value as a result. If the task start date turns out to be a public

holiday, you cancel the event by setting Status property of the properties parameter to

SPEventReceiverStatus.CancelWithRedirectUrl. Setting the status property will cancel the event

and the user will be redirected to an error page which you set next using the RedirectUrl

property of properties parameter. You also construct the redirect URL by using

properties.Web.Url which gives the server a relative URL and then appends it with the URL to

the AllItems.aspx page of the Announcements list. The redirection needs to be done using a

server-relative URL, meaning that you can't redirect user to a non–server-relative URL like

www.msn.com.
After you register this event using any of the registration methods described in the previous sections, you can test it by out creating a new Task item and using a start date of “1/1/2012,” which is used as a designated public holiday inside the event receiver.
SharePoint executes the ItemAdding event receiver for the Task List; it will cancel the event and you will be redirected to the AllItems.aspx page of the Announcements list, which contains an entry for Public Holidays, as shown in Figure 8-28. If you don't have an entry in the default Announcements list, you should create one and test the event receiver again.
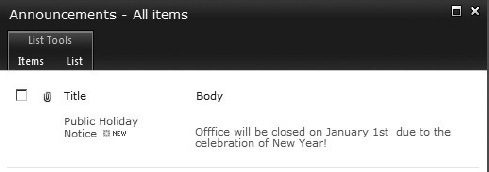
Figure 8-28. Redirection to Announcements List
In this example, you redirected the user to the Allitems.aspx page but you can easily use the same technique with the SharePoint application pages that reside under _layouts folder within the SharePoint 14 Hive (C:Program FilesCommon FilesMicrosoft SharedWeb Server Extensions14TEMPLATELAYOUTS).
Generally it's a good practice to use site pages rather than application pages for displaying error messages mainly because of extra work involve in creating and deploying application pages. Also, as site pages can be deployed as part of a sandbox solution, they give you more flexibility in terms of their deployment. A good example where you should use custom site pages not custom SharePoint application pages is when you are targeting deployment for SharePoint Online (which is part of Office 365), which only supports sandbox solutions.
But consider a situation where you have to implement an organizational policy to block uploading of files to all SharePoint libraries throughout the SharePoint farm after regular office hours. You also want to use a standard error page throughout your SharePoint farm which displays the details of organizational policies. In this particular case, you can use a SharePoint application page as error page because it will minimize the deployment workload and can be updated and maintained from a single location.
In the previous example you used the SPEventReceiverStatus enumeration to cancel the event and redirect user to custom error page. The complete set of SPEventReceiverStatus enumeration values are described next.
CancelWithError
The event is cancelled and the error page is displayed but no redirection to a custom error custom page will take place.
CancelWithNoError
The event is cancelled silently and no error message is displayed.
CancelWithRedirectUrl
The event is cancelled but redirection to custom error page can be done by setting RedirectUrl property of the event receiver parameter to a server-relative URL.
Continue
The event is allowed to continue and is not cancelled.
Summary
As SharePoint 2010 grows rapidly, developers need to leverage event receivers more than ever before to tackle wide range of business scenarios. In this chapter you gained understanding of business scenarios where event receivers are the right fit and where they may be burden to your SharePoint environment.
You also learned about event receiver architecture and categories to help you grasp the core working model of an event receiver, along with their behavior patterns. Tools like Microsoft Visual Studio 2010 provide great flexibility to develop and quickly deploy and test your event receivers locally. However various approaches are available as you register your event receivers into production environment. Microsoft PowerShell can be used intrinsically to register and perform other administrative operations on event receivers.
Event receivers are important but only one part of the big SharePoint 2010 product and that's why maintaining best practices throughout development, deployment, and registration is absolute essential. Poor performance from a single event receiver can severely impact the whole SharePoint Farm. Also, knowledge about common mistakes and known issues related to event receivers helps you identify potential bugs earlier in your development lifecycle—before they become part of final release and then you have to fix them though software patches.
With this knowledge of event receivers under your belt, you can now sit through team meetings more confidently. You now have important arsenal to battle complex business requirements as they come your way.