
C H A P T E R 12
SharePoint Solution Deployment
This chapter will focus on best practices for deploying your SharePoint 2010 customizations developed with Visual Studio 2010 SharePoint 2010 tools. This chapter does not provide an introduction to the Visual Studio 2010 SharePoint 2010 tools that automate much of the work to create features and solutions (WSP files). It is assumed you already know what SharePoint features and solutions are, and that you have a good hands-on working knowledge of how to create these in Visual Studio 2010. Rather, this chapter will demonstrate some best practices that will encourage you to carefully plan out the structure of your Visual Studio solutions, SharePoint features, and SharePoint solutions. Here are some of the best practices that will be covered in this chapter:
- Think deployment first! Plan your Visual Studio Solution, SharePoint solution, and SharePoint feature strategy carefully.
- Plan to maintain your application with feature versioning and feature upgrading.
- Define your feature and solution activation dependencies.
- Automate the provisioning of your solutions and features with PowerShell.
- Defined lists should be backed with schema defined in content types.
- Sign all of your Visual Studio projects with the same Strong Name Key (SNK) file
- Feature Stapling is a great way to enhance out of the box site definitions.
Observations from the Field
In my experience of reviewing probably hundreds of developed customizations for SharePoint (both the 2007 and 2010 versions), the packaging and then deployment of SharePoint solutions consistently seems to be an afterthought. That is, something that had to be done at the end of the project in order to move the customizations out of development and on to Testing and/or Production environments. Not Surprisingly, planning out the strategy and structure for features and solutions is almost never done.
Please see if some of the following deployment experiences and observations apply to you:
- The “big bang” deployment: All of the features are packaged into a single WSP file and deployed to the farm. This will definitely work for an initial deployment, but have you felt the pain of deploying updates, patches, and enhancements?
- Visual Studio and SharePoint Designer mix: While some features such as Web Parts are deployed as solutions, many others were created “in browser” or with SharePoint Designer. How do you deploy site columns, content types, list creations, data population, and workflows that were not done via Visual Studio (and therefore not packaged as features/solutions)?
- Manual deployment: Many steps to get an application running on a “clean server” are manual. Manual changes to the web configuration, and a variety of required content migrations using an export/import tool or PowerShell extensions.
- Lack of deployment automation: You have a 100-page deployment guide because of the number of manual and tedious steps to get an application running on a clean server. There is little scripting in evidence to help automate the steps and reduce the effort to deploy an application.
- Actually, there is no real deployment: This is a new application anyway, and you are just planning on backing up and restoring the content database from development to production. But how are you going to maintain the customizations moving forward?
Example Overview
In order to demonstrate typical considerations for designing SharePoint features and solutions, a simple but useful example has been created. The example, when fully deployed, will provide a “footer links” Web Part that can be placed at the bottom of your master page. Footer links are the links you might typically see at the bottom of your web site page such as Contact Us, Privacy Statement, and Site Map. The Web Part will read entries from a footer links list so that it will be easy for the web master to maintain the footer links on the site. The “schema” for the footer links is defined as a content type with corresponding site columns. The content type is then attached to the list where the footer links are created. There is a feature stapler to ensure the Footer Links feature and Web Part are available automatically when a team site is provisioned.
This example contains a typical core pattern of customization to formulate the best practice recommendations, all managed in Visual Studio 2010 SharePoint 2010 tools.
- Defined schema (site columns and content types).
- Lists provisioned with attached content types.
- A Web Part that performs a content query against the content type.
I am presuming you have available a local development environment or access to a SharePoint environment. Go to Central Administration and create a site collection. In my case, I have created a site collection at http://intranet.theopenhighway.net/sites/Apress.
Open the Visual Studio solution provided for this chapter, FooterLinks.sln. Figure 12-1 shows what the solution looks like when open.
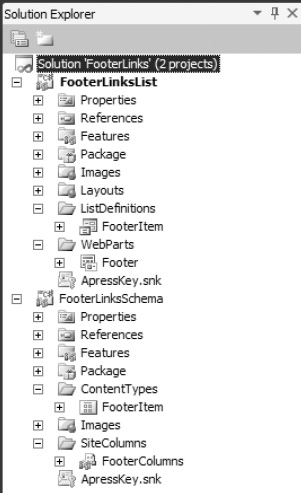
Figure 12-1. The Footer Links Visual Studio solution
Click on each of the projects in the solution—FooterLinksList and FooterLinksSchema—and change the site URL property (in the Properties window) so it matches the site collection you just created. Save the changes. Right click on the FooterLinksSchema project and choose Deploy. Once the deployment succeeds (view the Output window to verify), right click on the FooterLinksList project and select Deploy. Once the deployment succeeds, view the Output window to verify.
![]() Tip Generate a key file unique for your application and use the key file in all of your Visual Studio projects. Note the
Tip Generate a key file unique for your application and use the key file in all of your Visual Studio projects. Note the APressKey.snk file in the above projects. This will ensure the public key token for all of your DLLs will be the same.
Figure 12-2 shows a view of the Footer Link site collection features activated.

Figure 12-2. Site collection features for Footer Links
Figure 12-3 shows a view of the Footer Link site feature activated.
Figure 12-3. Site feature for Footer Links
![]() Tip (Well, this is more of a pet peeve than a tip.) Notice that I have set the ImageURL property for my feature and included an image as the icon for the feature. This is a professional touch that makes your features stand out, and I suggest you take the time to mark your features with your company logo or whatever else might be appropriate for the project.
Tip (Well, this is more of a pet peeve than a tip.) Notice that I have set the ImageURL property for my feature and included an image as the icon for the feature. This is a professional touch that makes your features stand out, and I suggest you take the time to mark your features with your company logo or whatever else might be appropriate for the project.
Figure 12-4 shows a view of the defined site columns in the Site Column Gallery.

Figure 12-4. Site Column gallery
Figure 12-5 shows a view of the defined content type in the Content Type Gallery.

Figure 12-5. Content Type gallery
Figure 12-6 shows a view of the Footer links list settings; note the content type.
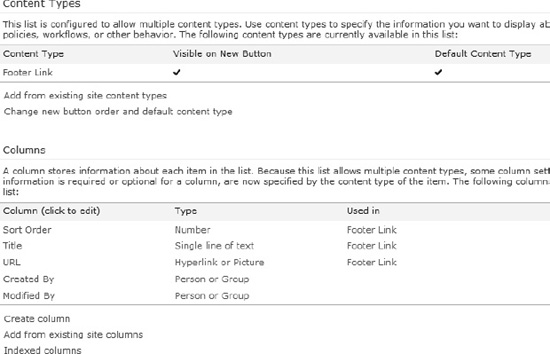
Figure 12-6. Footer Links list settings
Figure 12-7 shows an example of some footer link list entries.
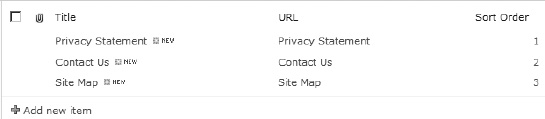
Figure 12-7. Sample Footer Link list entries
Figure 12-8 shows an example of the footer links Web Part in use on a master page. Note that the red box was a deliberate image highlight to point out the footer links near the bottom of the page.
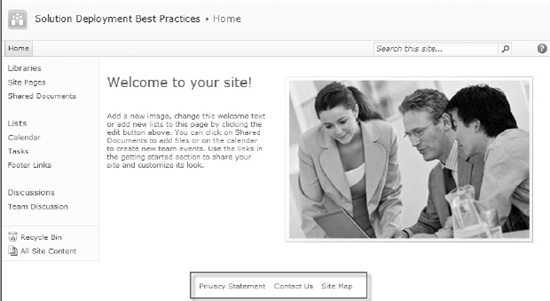
Figure 12-8. Footer Links control on the master page
Feature Best Practices
Using Features
It should be an assumption at this point in time that one, would, of course deploy their SharePoint items (content types, Web Parts, list schemas, or whatever) through the use of features. These features would be appropriately scoped at the farm, web application, site collection (site) or site (web) level according to the type of SharePoint item. The SharePoint 2010 tools for managing features and associated properties are absolutely fantastic. Figure 12-9 offers a quick look at the Feature Designer for the Footer Links Web Part.
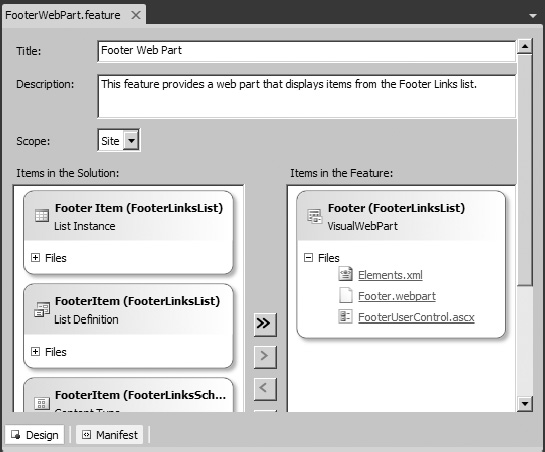
Figure 12-9. The Feature Designer for the Footer Web Part feature
Figure 12-10 shows the Properties window for the feature. I have set the image URL (as mentioned in my pet peeve/tip earlier) and set the feature version to 1.0.0.0. I will also discuss other important properties, such as the Receiver Assembly/Class and the Upgrade Actions Receiver Assembly/Class.
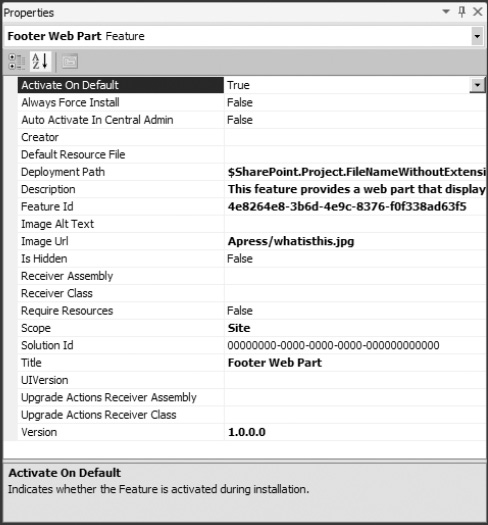
Figure 12-10. The Properties window for the Footer Web Part feature
![]() Tip Most importantly, set the initial version of your feature to 1.0.0.0. The usefulness of feature versions will be discussed later in this chapter.
Tip Most importantly, set the initial version of your feature to 1.0.0.0. The usefulness of feature versions will be discussed later in this chapter.
The property that is Deployment Path is exactly as follows:
$SharePoint.Project.FileNameWithoutExtension$_$SharePoint.Feature.FileNameWithoutExtension$
I tend not to like the project_feature naming format, but this is just a preference. I have left it as the default in this chapter example but normally would change it to the last half, namely:
$SharePoint.Feature.FileNameWithoutExtension$
Feature Receivers
Feature receivers are code that (typically) runs as you press the Activate and Deactivate buttons on a feature. Well, the code will run regardless of how the feature is activated or deactivated (such as PowerShell), but it is easier if you can visualize it that way. Feature receivers can handle any initialization or clean up task. In this example, for the Footer Links list feature, you must (in code) set the Allow Management of Content Types setting on the Footer Links list. Now the footer content type will display properly in the Footer Links list settings, and when you create a new item, you get new Footer item. Upon deactivate, you have made the choice to completely remove the footer links list form the site (i.e. delete it). Listing 12-1 shows the feature receiver code you have in place.
Listing 12-1. The Feature Receiver Code
public class FooterItemListEventReceiver : SPFeatureReceiver

{

    public override void FeatureActivated(SPFeatureReceiverProperties properties)

    {

        SPWeb site = properties.Feature.Parent as SPWeb;


        // Enable Management of Content Types for Footer Links list

        SPList listFooterLinks = site.Lists["Footer Links"];

        listFooterLinks.ContentTypesEnabled = true;

        listFooterLinks.Update();

    }


    public override void FeatureDeactivating(SPFeatureReceiverProperties properties)

    {

        SPWeb site = properties.Feature.Parent as SPWeb;

        if (site != null)

        {

            SPList list = site.Lists.TryGetList("Footer Links");

            if (list != null)

            {

                list.Delete();

            }

        }

    }

}
![]() Tip If you provision lists with attached content types, always include a feature receiver that sets “Allow Management of Content Types.” If you examine the feature properties after adding a feature receiver, you will note the Receiver Assembly and Receiver Class properties have been automatically set.
Tip If you provision lists with attached content types, always include a feature receiver that sets “Allow Management of Content Types.” If you examine the feature properties after adding a feature receiver, you will note the Receiver Assembly and Receiver Class properties have been automatically set.
Feature Activation Dependencies
Feature activation dependencies prevent, as the name implies, activation of a given feature if the dependent feature has not been activated on the site/site collection. In your example, bad things would happen if the Footer Links list were provisioned while the underlying content types and site columns were not there. Since the schema is in one feature and the list provisioning in another feature, this requires that the schema feature be present and activated before you can activate the list provisioning feature. Without activation dependencies, nothing at all would prevent you from doing these bad things. Open up the Feature Designer for the Footer Item List feature. Scroll to the bottom if necessary. Expand the Feature Activation Dependencies section. Click the Add button, and select the Footer Links Schema feature. The result will look as shown in Figure 12-11.

Figure 12-11. A defined feature activation dependency
To see feature activation in action, redeploy all of the SharePoint solutions, but don’t activate any of the features (or, simply deactivate all of the features if they already are deployed). Now, go the example site and go to Site Actions ![]() Site Settings
Site Settings ![]() Site features. You should see the text shown in Figure 12-12, where the Footer Item List feature is not currently activated.
Site features. You should see the text shown in Figure 12-12, where the Footer Item List feature is not currently activated.
Figure 12-12. The Footer Item list feature is ready to be activated.
The following feature activation dependency is in place: Footer Item List site features depends on Footer Links Schema site collection feature. Attempting to activate the Footer Item List feature results in the message shown in Figure 12-13.
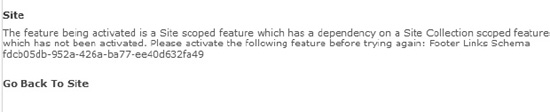
Figure 12-13. The feature activation dependency has not been met.
Limitations
Unfortunately, you can’t define all the dependencies that you would like. For example, say you would like to have the following activation dependency: “Footer Web Part site collection feature depends on Footer Item List site feature.” However, you can’t define an activation dependency on a feature of a lower scope (i.e., the site collection feature depends on the site feature). It makes sense, because you don’t want your Web Part to be available if the Footer Item List is not available. You can actually go into Visual Studio and declare the activation dependency in the Footer Web Part feature, as shown in Figure 12-14.

Figure 12-14. Attempting to define footer Web Part dependency
You can package and deploy the solution and then attempt to activate Footer Web Part, as shown in Figure 12-15.

Figure 12-15. The Footer Web Part feature wating to be activated.
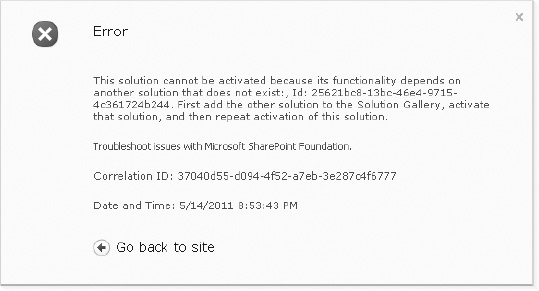
But you will receive the error message shown in Figure 12-16.

Figure 12-16. Error message for invalid feature activation dependency
Also, nothing will prevent the deactivation of dependent features. If all of the Footer features are currently activated, you can deactivate the Footer Links Schema feature without complaint from SharePoint. Finally, if you decide to have some of your features be hidden, then you can’t define activation dependencies on them.
Ok, it is not perfect. But as a best practice, you should declare as many valid activation dependencies as possible!
Feature Stapling
Feature stapling allows you to attach (or, I guess, “staple”) a feature to a site definition. Put another way, it lets you add your own feature to an existing site definition without having to alter the site definition in any way. That is especially good news when it is an out-of-the-box site definition such as team site. In your case, any time a team site is created, the footer links Web Part (and associated footer links list and content type) are automatically available for use.
For this example, a separate Visual Studio solution was created with a separate feature, so as not to interfere with the coming upgrade example. You can open the sample solution, build it, and deploy it. The structure of the solution is quite simple—just a web application scoped feature and one Elements.xml file, as shown in Figure 12-17.
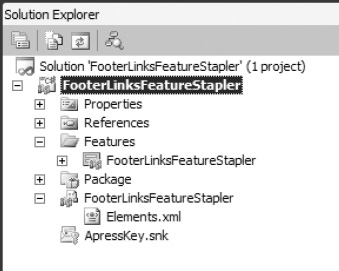
Figure 12-17. Structure of Feature Staple solution
The Elements XML file is also quite simple. It contains the ID of the feature you want to staple, and you must give the ID of the site template you want to attach the feature to. As an example, STS#0 is the team site definition and STS#1 is the blank site definition. You have chosen to staple the footer links features to the team site definition consisting of three features: Schema, List, and Web Part, as shown in Figure 12-18.
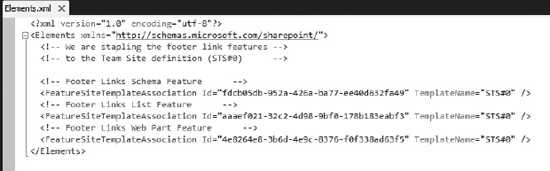
Figure 12-18. Elements.xml showing Feature staple to Team Site definition.
To see this feature deployed, go to Central Administration ![]() Application Management
Application Management ![]() Manage Web Applications. Click on the web application you are using for this chapter (in my case, The Open Highway), and click on the Manage Features button in the ribbon. You will see the Footer Links Feature Staple activated in the list, as shown in Figure 12-19.
Manage Web Applications. Click on the web application you are using for this chapter (in my case, The Open Highway), and click on the Manage Features button in the ribbon. You will see the Footer Links Feature Staple activated in the list, as shown in Figure 12-19.
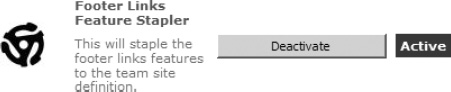
Figure 12-19. Elements.xml showing Feature staple to Team Site definition.
So when does the magic happen?!? Use Central Administration to create a new site collection of whatever name you wish and choose the Team Site template. When the site is created, follow the link note that the footer links list has been defined. Note that in Figure 12-20 I took the additional step to add a sample value and the Footer Web Part, quite inappropriately, near the top of the page. ![]()
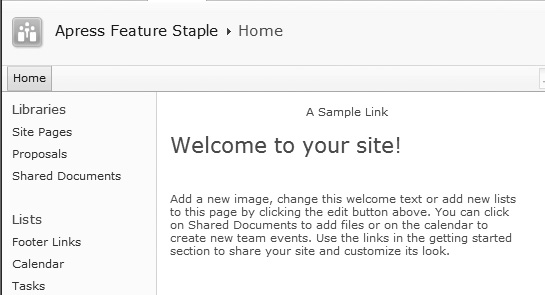
Figure 12-20. Team Site with Footer Link Features activated upon site creation
![]() Tip A feature staple is a fast and easy way of customizing out-of-the-box site definitions within a given web application so that it is provisioned and even branded exactly as you want it to be.
Tip A feature staple is a fast and easy way of customizing out-of-the-box site definitions within a given web application so that it is provisioned and even branded exactly as you want it to be.
SharePoint Solution Best Practices
Provisioning with PowerShell
In order to fully understand the provisioning of SharePoint solutions, you must understand the solution lifecycle from the perspective of the PowerShell commands that operate on it. Let’s first assume that the SharePoint solution has never been deployed to the farm. Starting with the FooterLinksSchema solution, the first PowerShell command to execute is Add-SPSolution. This simply adds the WSP file to the solution store of the Central Administration configuration database, and nothing more. The next command to execute is Install-SPSolution. This physically pushes the files within the WSP to the SharePoint root folder of all the servers in the farm and takes other specified actions (add entries to web.config, deploy DLLs to global assembly cache, etc.). The features you have deployed will now be available according to the specified feature scope.
Now let’s assume you have made some significant changes to the SharePoint solution or otherwise need to fully re-deploy the contents. You would have created an updated WSP file. With the PowerShell command Uninstall-SPSolution, you are physically retracting (deleting) all of the files from all the SharePoint servers in the Farm as well as reversing other specified actions (such as removing deployed DLLs). The features previously deployed are now no longer available. Next, with the PowerShell command Remove-SPSolution, delete the WSP file from the solution store in the Central Administration database. Now you repeat the Add-SPSolution and Install-SPSolution but with the updated WSP file.
So now any full solution deployment can be done via the script in Listing 12-2 (included along with sample code for this chapter).
Listing 12-2. Script for Full Solution Deployment
Add-PSSnapin Microsoft.SharePoint.Powershell -ErrorAction SilentlyContinue


$WebApp = "http://intranet.theopenhighway.net"

$Path = "C:ProjectsApressDeploymentFooterLinksList.wsp"

$SolutionPackage  = "FooterLinksList.wsp"


$solution = Get-SPSolution | where-object {$_.Name -eq $SolutionPackage}

if ($Solution -ne $null) {

  if($Solution.Deployed -eq $true) {

    Write-Host "Retracting Solution from the Farm..."

    Uninstall-SPSolution -Identity $SolutionPackage -Local -Confirm:$false

-WebApplication $WebApp

    Write-Host "Solution retracted."

    Write-Host

  }

  Write-Host "Deleting Solution from solution store..."

  Remove-SPSolution -Identity $SolutionPackage -Confirm:$false

  Write-Host "Solution deleted."

  Write-Host

}


Write-Host "Adding Solution to solution store..."

Add-SPSolution -LiteralPath $Path

Write-Host "Solution added."

Write-Host
Write-Host "Deploying Solution to the Farm..."

Install-SPSolution -Identity $SolutionPackage -Local -GACDeployment

-WebApplication $WebApp

Write-Host "Deployment complete."


Write-Host

Write-Host "Script has completed. Press Enter to continue."

Read-Host
![]() Note If the solution file contains any web application dependent items, such as Web Parts, you must add a “-WebApplication” parameter to both Install-SPSolution and Uninstall-SPSolution along with the URL of the web application. This will deploy the solution to a specified web application. You can optionally deploy to all defined web applications with the parameter “-AllWebApplications”.
Note If the solution file contains any web application dependent items, such as Web Parts, you must add a “-WebApplication” parameter to both Install-SPSolution and Uninstall-SPSolution along with the URL of the web application. This will deploy the solution to a specified web application. You can optionally deploy to all defined web applications with the parameter “-AllWebApplications”.
![]() Tip If you run your SharePoint PowerShell scripts via the SharePoint 2010 Management Shell (available via Program Files
Tip If you run your SharePoint PowerShell scripts via the SharePoint 2010 Management Shell (available via Program Files ![]() Microsoft SharePoint 2010 Products), then you don’t require the Add-PSSnapIn command, as the cmdlets for SharePoint will already have been automatically loaded.
Microsoft SharePoint 2010 Products), then you don’t require the Add-PSSnapIn command, as the cmdlets for SharePoint will already have been automatically loaded.
Activation Dependencies
SharePoint solution activation dependencies work in a similar fashion to feature activation dependencies. However, they are just slightly misleadingly named when deployed to the farm (the terminology is geared towards sandboxed solutions in the Solutions gallery). It acts like more of a deployment dependency in this scenario. That is, say you have Solution B that has its activation dependency set on Solution A. Solution A is not deployed to the farm. The attempt to deploy Solution B will result in an error.
In your example, the FooterLinksList solution is dependent upon the FooterLinksSchema solution. This makes sense, because you won’t be able to provision a footer links list instance if the corresponding site columns and content types have not been deployed. So your first check point will be to ensure the FooterLinksSchema solution has been deployed to the Farm.
To add the activation dependency, expand the Package node in the FooterLinksList project and double-click on package.package to bring up the package designer. Click on the Manifest tab. Unlike adding feature activation dependencies, there is no convenient way of adding the solution activation dependency. You must edit the Manifest.xml file manually. Expand the Edit Options section and click Open in XML Editor, and you will see the code shown in Figure 12-21.
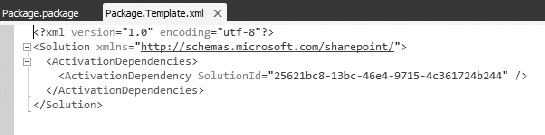
Figure 12-21. Solution activation dependency manually defined
![]() Tip Always set solution activation dependencies for your SharePoint solution packages (WSP files) to avoid potential deployment errors.
Tip Always set solution activation dependencies for your SharePoint solution packages (WSP files) to avoid potential deployment errors.
To trigger the solution activation dependency, uninstall and remove both solutions (FooterLinksList and FooterLinksSchema) using PowerShell. Add the FooterLinksList solution using PowerShell. Go to Central Administration ![]() System Settings
System Settings ![]() Manage Farm Solutions. Click on
Manage Farm Solutions. Click on footerlinkslist.wsp. You should see the information shown in Figure 12-22.
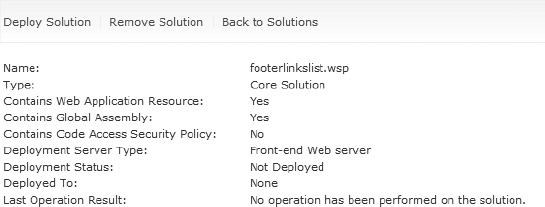
Figure 12-22. Footer Link List solution details in Central Administraiton
Click Deploy Solution and accept the deployment option defaults on the following screen and click OK. You will see the error screen shown in Figure 12-23 stating that the dependent solution (FooterLinksSchema) has not been activated (i.e. deployed).
As an exercise, recreate this situation, deploy the FooterLinksSchema solution, and then come back and verify you can also deploy the FooterLinksList solution.
The Right Number of SharePoint Solutions
In this context, I am referring to SharePoint Solution (WSP) files, not a Visual Studio 2010 solution (SLN) file. In fact, please go right ahead and have one Visual Studio 2010 SLN file for your project if that makes sense for you. However, the current limitation with the SharePoint 2010 Visual Studio 2010 tools is that a Visual Studio project equals exactly one “Package” definition, which in turn means one WSP file. Each Visual Studio Project/SharePoint Package can contain one or more SharePoint Features, and each feature can consist of one or more items.
So what is the right number of SharePoint solutions? I can state with certainty that for your set of planned customizations the wrong answer is “one.” It seems temptingly simple to go for one big package of features—after all, this is all brand new functionality, right? Or maybe you have otherwise not had to think about the deployment, so one big package does the job of getting the customizations “out there” at the end of the project.
I would prefer, if you are in doubt, that you define a new Visual Studio Project/SharePoint solution file rather than adding to your existing one. It is certainly more feasible to consider consolidating features into WSP files rather than to break apart a monolith. Here are some considerations for when to split out SharePoint features into new SharePoint solution files:
- Partition your solutions with feature scope in mind: For example, farm- and web application-scoped features have a tendency to be isolated, although mixing feature scopes in a SharePoint solution may still make packaging sense (if they have more in common with Site and Site Collection scoped features).
- Partition your solutions with reusability in mind: What features may other sites and site collections take advantage of independent of others?
- Partition your solutions with maintainability in mind: Consider now that features will require bug fixes and enhancements in isolation of one another. How can you minimize the impact of a solution upgrade or redeployment on other deployed features/solutions?
- Partition your solutions along activation dependency lines, both solution and feature: Draw out a map of the full feature and solution activation dependencies, both logical and those you can physically define. You will find this may drive your solution structure.
- Always put the definition of “schema” (site columns and content types) into its own solution at minimum: Consider reusability of sub-groups of the schema for further solution splitting.
- Always provision list instances in a separate solution from the schema: You may consider put related items with the list instance, such as a Web Part that specifically queries the list.
- Particular types of SharePoint items have a tendency to be grouped together: You may consider grouping specific types of SharePoint items together in a solution, such as workflow templates. A previous example was site columns and content types. Again, if this makes sense for you!
Figure 12-24 shows the structure and content of this chapter’s example code, with the two solutions and three features defined. The arrow between the two solution files depicts the activation dependency between them, and the arrows between the features depict the feature activation dependencies that are logically in place.
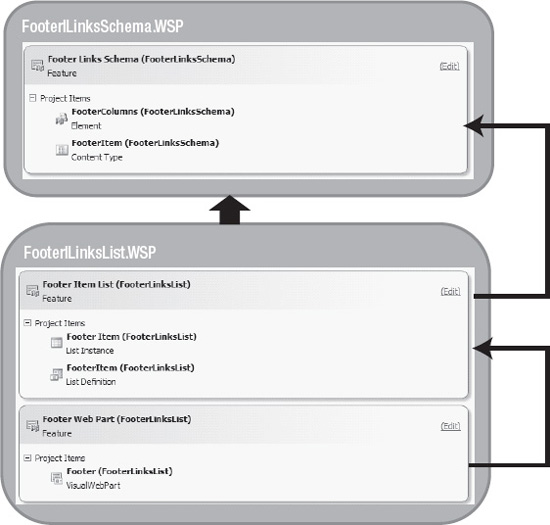
Figure 12-24. Solution and feature dependencies depicted
Note that the only activation dependency you can’t physically define is the one between the footer Web Part and the footer item list. See the previous section on feature activation dependencies on why this is not possible.
![]() Note I don’t mean to imply that in this scenario you couldn’t have one Visual Studio solution file containing all three of these projects. Two of the projects could each have a package with the contents outlined above. So, yes, I have taken some liberties with this very simple example for the purposes of highlighting the possible best practices that more likely would be applied to a much larger customization project.
Note I don’t mean to imply that in this scenario you couldn’t have one Visual Studio solution file containing all three of these projects. Two of the projects could each have a package with the contents outlined above. So, yes, I have taken some liberties with this very simple example for the purposes of highlighting the possible best practices that more likely would be applied to a much larger customization project.
![]() Tip Draw out and think carefully about your SharePoint solutions and what features they will contain. Also define as many physical solution activation dependencies and feature activation dependencies as possible.
Tip Draw out and think carefully about your SharePoint solutions and what features they will contain. Also define as many physical solution activation dependencies and feature activation dependencies as possible.
Upgrading Features and Solutions
As a developer, you will be providing updates to your SharePoint solution (WSP) files. Perhaps you are deploying enhancements or bug fixes to the Testing or Production environments. Different versions of your solution are likely currently running in each of those environments. The latest version will be in Development, a lower version in Testing, and current release (oldest) version in Production. Historically, this has been difficult to manage!
One choice would be to rip and replace the WSP using the full deployment lifecycle cmdlets for SPSolution: Remove and Uninstall the old WSP, then Add and Install the new WSP. This is often too drastic, quite unnecessary, and can lead to unpredictable results as you may not know exactly what might happen in your feature receiver code. Also, you may have a chain of dependent features. Obviously, things can get complicated quickly.
SharePoint 2010 has the cmdlet Update-SPSolution, which is the preferred and recommended way to push out an updated WSP to the farm. Caveat: I will add “when it is valid to do so.” “Update” means you have some new elements or updated code for the GAC—not completely different or additional features! You will know when you have crossed the boundary because the update solution will fail. If you have a WSP that is already deployed to several environments and not easy to rip and replace, then I recommend that you put your new features into a new and separate WSP as they will be easier to deploy and manage.
We have had this ability to update a solution even in SharePoint 2007 (via an STSADM command), so this has been around for a while. There is a common misconception that it performs the same set of commands as rip and replace. It does not; key, for example, is the fact that feature receiver activate/deactivate code will not be fired.
What does the Update Solution do? It simply pushes out new and updated files from the WSP (primarily) into the SharePoint root folder (i.e. out to the SharePoint web front ends). It’s perfectly fine on its own if you are simply updating files, such as newly compiled DLLs (to GAC), ASCX files (to control templates directory), new element files, updated feature.xml, images, application pages (to layouts directory), etc.
Update Solution is categorically not useless, as prevailing wisdom might indicate. In fact it is, and has been, extraordinarily useful and many time painless for deploying updated WSPs. However, I will certainly agree that it is often times not sufficient to only deploy new/updated files. Let’s imagine there was no feature receiver nor Activate and Deactivate methods for us to insert custom code on our initial (and full) deployment. We could push the files out to the web server, but would have no means of custom initialization or clean up. Those were precisely the limitation we had in SharePoint 2007 with update solution, where we had to follow up the WSP update with custom script or C# (console app) code, and maybe run through a list and update some data related to the changes.
You probably have already heard many times by now about the new upgrade capability for features. This can either be in the form of a new declarative UpgradeActions section for the Feature.xml file or the new imperative FeatureUpgrading method in the feature receiver. In the remainder of this section, you will learn that Update Solution and Upgrade Solutions are separate steps. You will explore the mechanics of each and the process for accomplishing the upgrades.
Getting Ready for the Walkthrough
Please define a second site collection. In my case I have called it http://intranet.theopenhighway.net/sites/Apress2. If you are following along with the changes, please do not activate any of this chapter’s sample features or even deploy the updated solutions (which will happen if you press F5 in Visual Studio, for example).
![]() Tip Create a snapshot of your virtual machine before running the actual upgrade commands. This way, you can easily go back to the machine state before the upgrade in case you wish to explore the upgrade in more detail or try the upgrade scenario again.
Tip Create a snapshot of your virtual machine before running the actual upgrade commands. This way, you can easily go back to the machine state before the upgrade in case you wish to explore the upgrade in more detail or try the upgrade scenario again.
You will be able to compare the first site collection against the second, where I will demonstrate that the feature version running in a particular site collection can in fact be different from the installed version!
Version 1.1 Changes
Open up the Version 1.1 of the Visual Studio solution for this Chapter, FooterLinksV2.sln. You can follow along as I detail the changes made to version 1 of the solution.
You have created Version 1.1 at the request of the client, who has stated that there are too many Footer Link entries in the list. They don’t want to delete any entries, but they want a means of managing which ones are displayed. You have decided to add an Is Active flag (a Boolean) to the schema to indicate which items are displayed. This requires numerous small changes through your projects and features.
- First, start by updating the version number property of all of your features to 1.1.0.0 (as all will be affected by changes in the scenario). Version 1.1 is the “right” upgrade, given the nature of the changes. Expand the feature folder of each project. Double-click on each feature to expose the properties. Figure 12-25 shows a sample of changing FooterLinksSchema feature to Version 1.1.
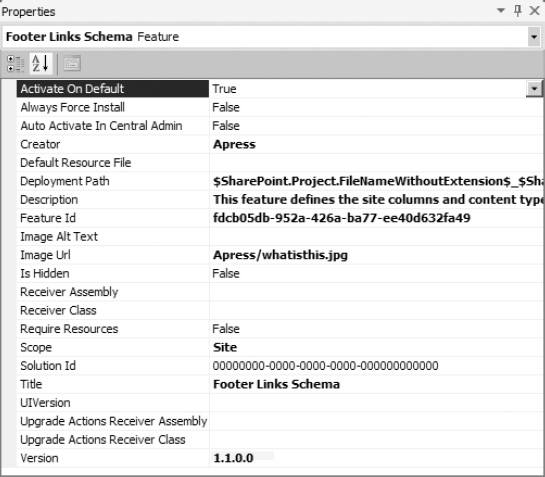
Figure 12-25. Changing Feature Version to 1.1
 Tip Only increment the feature version if there has been a change. Always increment the feature version number if there is a change! Remember to make the appropriate change increment. The four-part build number is Major.Minor.Build.Revision. The Major.Minor version is typically the product version. For instance, SharePoint 2010 is version 14.0 (at time of release). Tip Only publish a major feature version if there have been very significant changes to the software. Use of this number is ultimately up to the author. Sometimes it’s used to designate the release number of the software. You might typically increment the build of software (such as 1.0.1, 1.0.2, etc) until you have a patch or point release, at which point it becomes 1.1.
 - Why the sideline discussions on versioning and the importance of the four-part number? You will see shortly that you have further control over your upgrades. You are able to trigger a v2v (the default), which upgrades from one product version to another (deals with Major.Minor version number changes), or trigger a b2b upgrade, which upgrades from one build to another (deals with Build.Revision version changes). In the real world, I have never seen anyone get this serious and detailed about their versioning and upgrade strategy for Features. This is an advanced note you will likely never use, but nevertheless keep in mind that this possibility is there if you need it!
- In the FooterLinksSchema project, under Footer Columns (in SiteColumns folder) add an additional XML file,
Elements2.xml. Ensure the Deployment Type property is set to ElementManifest, as shown in Figure 12-26.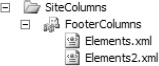
Figure 12-26. Footer Columns SharePoint item
- In the
Elements2.xmlfile, define a new site column that will be named Is Active. You will see shortly why you are putting this site column in a separate XML file versus adding to theElements.xmlfile containing the Sort Order column. Ensure the GUID is unique!<?xml version="1.0" encoding="utf-8"?>
<Elements xmlns="http://schemas.microsoft.com/sharepoint/">
<Field ID="{BB8EB2D5-3A68-4607-88F4-8338DACBD8E4}"
Group="Apress Columns"
Type="Boolean"
Name="IsActive"
DisplayName="Is Active"
ShowInDisplayForm="TRUE"
ShowInNewForm="TRUE"
ShowInEditForm="TRUE" />
</Elements> - In the FooterLinksSchema project, edit the
Elements.xmlfile that is under the FooterItem content type (under the content types folder), as shown in Figure 12-27.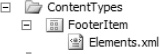
Figure 12-27. Edit the Elements.xml file
- In the
Elements.xmlfile, using the GUID from the previous step, add the FieldRef to the content type, immediately below SortOrder.<FieldRef ID="{BB8EB2D5-3A68-4607-88F4-8338DACBD8E4}" Name="IsActive" /> - In the FooterLinksList project, edit the
Schema.xmlfor the FooterItem list definition (under the ListDefinitions folder). Add the FieldRef to the ContentTypes section (created in step 3). Add the Field to the Fields section (created in step 2). - In the FooterLinksList project, edit the codebehind for the user control for the footer Web Part (under the Web Parts folder). Modify the footer links list query to include checking for the active flag:
<Where>

    <Eq>

        <FieldRef Name=""IsActive"" />

        <Value Type=""Integer"">1</Value>

    </Eq>

</Where>

<OrderBy>

    <FieldRef Name=""SortOrder"" Ascending=""True"" />

</OrderBy>
Tip Alright! Yes, this is a CAML (Collaborative Application Markup Language) query. Clearly this should be a new and shiny SP LINQ query, but for sake of this example, I didn’t want to introduce the dependency to run spmetal.exeto generate thedatacontextclass (or to download and use the Visual Studio 2010 Power Toys).So that takes care of the coding changes required to implement the new Is Active flag. Now you need to put in some changes that will drive an upgrade process from Version 1.0 to 1.1.
- Double-click on the FooterLinksSchema feature in the FooterLinksSchema project to bring up the feature designer. Click on the Manifest tab. Expand the Edit Options section. Add the UpgradeActions section shown in Figure 12-28—but you will want to do so using the Open in XML Editor option!
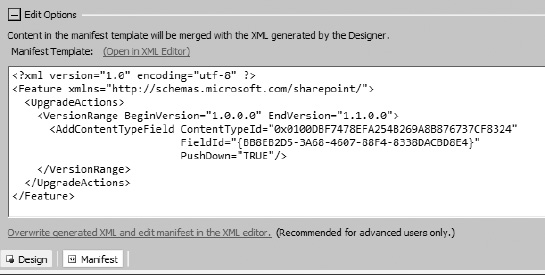
Figure 12-28. Manually adding Upgrade Actions to FooterLinksSchema feature
- The UpgradeActions section in the
Feature.xmlfile is new to SharePoint 2010. It allows you to specify actions to take as you upgrade from one specific version to another. Note the BeginVersion and EndVersion are actually optional; if not specified, the UpgradeActions would apply to any upgrade. Best practice? Be explicit about your upgrade actions by using version number ranges. - The first upgrade action is to add a field to an existing content type. The field ID specified is for the IsActive flag. Put another way, the IsActive flag field is the difference between the schema for the Version 1.0 of the Footer Item content type and Version 1.1. The PushDown attribute updates all instances of the content type in the site. Remember, there is the definition of the Content Type at the site collection level—but the Footer Links list has a literal copy of the content type and this copy must also be updated.
- The existing list will now have the IsActive flag, but all current values will be false. According to the logic in your revised Web Part query, all the footer links will disappear! The solution is to make sure you run through all the entries on the current footer links list and update the IsActive value to true. Double-click on the FooterItemList feature in the FooterLinksList project to bring up the feature designer. Click on the Manifest tab. Expand the Edit Options section. Add the following UpgradeActions section, but do so using the Open in XML Editor option, as shown in Figure 12-29.
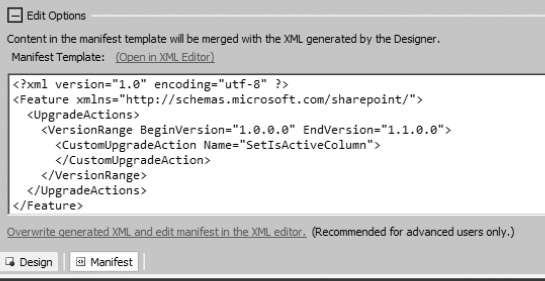
Figure 12-29. Manually adding Upgrade Actions to FooterLinksList feature
- One other example that Upgrade Actions provides is the ability to trigger a FeatureUpgrading method in a Feature Receiver (this, too, is new to SharePoint 2010), by specifying a Custom Upgrade Action. There is only one specified here, but note I can have multiple nodes of Custom Upgrade Action. The
FeatureUpgradingmethod would be called for each node, passing in the name and an optional subset of parameters (there are no parameters in this example). Let’s first view theFeatureUpgradingmethod and then I will describe how this works. - Open up the
FooterItemList.FeatureEventReceiver.csfile. Add the following code. You can see that the guts of this goes through the Footer Links list and update each item IsActive column to true.public override void FeatureUpgrading(SPFeatureReceiverProperties
props, string upgradeActionName,
System.Collections.Generic.IDictionary<string, string> parameters)
{
SPWeb site = props.Feature.Parent as SPWeb;
if (site != null)
{
// determine which custom upgrade action is executing
switch (upgradeActionName)
{
case "SetIsActiveColumn":
// See if the Footer Links List exists
SPList list = site.Lists.TryGetList("Footer Links");
if (list != null)
{
// Set the new IsActive Flag for each item on
// the current list
SPListItemCollection items = list.Items;
foreach (SPListItem listItem in items)
{
listItem["IsActive"] = true;
listItem.Update();
}
}
break;
default:
// exit if unknown feature action
break;
}
}
} - So each call made to
FeatureUpgradingfrom each CustomUpgradeAction in theFeature.xmlwill pass in the string “upgradeActionName”. In your case, the value will be SetIsActiveColumn. The best practice is demonstrated here where you use a switch statement to process values for the action name, and a default break in case an unknown value makes its way in so it will exit cleanly. - You can also see that you will be passed a dictionary collection of parameters, if they were specified in the CustomUpgradeAction. Again, I’m not requiring parameters for this upgrade example.
- There’s just one last very important setting to make! This setting is easy to overlook. Double-click on FooterItemList.Feature to expose the properties. Note that the Upgrade Actions Receiver assembly and the Upgrade Actions Receiver class will initially be blank. You can copy them exactly from the respective properties, Receiver Assembly and Receiver Class. Don’t forget to double check that the version is set to 1.1.0.0, as shown in Figure 12-30.
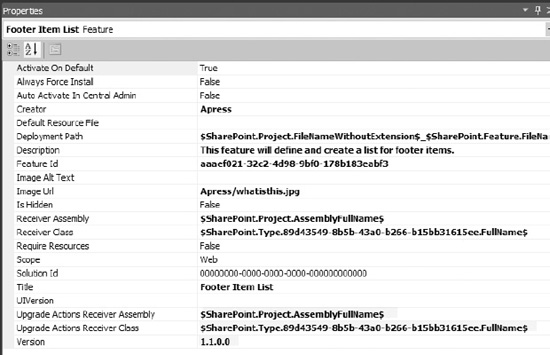
Figure 12-30. Setting Upgrade Actions properties
- Wow! That was as much work as the actual upgrades you made to your code. Now you can build and package the new SharePoint solution (WSP) files for Footer Links schema and Footer Links list (but, again, don’t deploy them at this time).
Solution Updating
I have provided a Query Features PowerShell script that does a Get-SPFeature versus QueryFeature. This script compares the installed version versus the version currently running in the various sites. For now (before the upgrade), we still have version 1.0.0.0 installed and running for our three features in the Apress site, as shown here:
Feature: FooterLinksSchema_FooterLinksSchema

=======================================================================

The following version is the INSTALLED Version:  1.0.0.0

Version  1.0.0.0  is currently RUNNING in site at
http://intranet.theopenhighway.net/sites/apress
Feature: FooterLinksList_FooterItemList

=======================================================================

The following version is the INSTALLED Version:  1.0.0.0

Version  1.0.0.0  is currently RUNNING in site at

  http://intranet.theopenhighway.net/sites/apress


Feature: FooterLinksList_FooterWebPart

=======================================================================

The following version is the INSTALLED Version:  1.0.0.0

Version  1.0.0.0  is currently RUNNING in site at  http://intranet.theopenhighway.net/sites/apress
There is another script provided that will take the new solution files and perform the PowerShell command Update-SPSolution; this will physically push the new files out to the SharePoint Root folder.
With these commands executed, let’s verify that the files were in fact pushed out. Go to the SharePoint Root folder in your virtual machine (located at C:Program FilesCommon FilesMicrosoft SharedWeb Server Extensions14). Go to the Template/Features folder and find the feature beginning with the name FooterListSchema (either by name or sort directory descending by date). In the FooterItem sub directory, you can verify the newly created Elements2.xml is there (as shown in Figure 12-31).
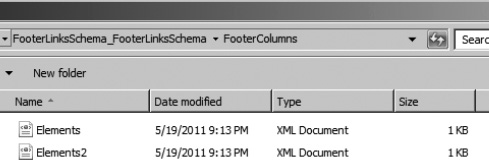
Figure 12-31. Examining the deployed Feature files
Open up the Feature.xml file. Note that the version number is now 1.1.0.0, as shown in Figure 12-32.
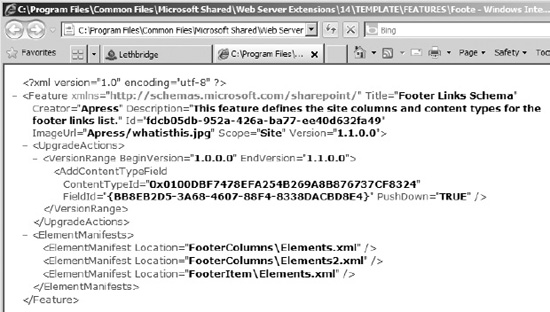
Figure 12-32. Confirming deployed Feature.xml is at Version 1.1.0.0
Go to the Apress2 site created in the Getting Ready section (in my case http://intranet.theopenhighway.net/sites/Apress2). Manually activate the Footer Links Schema feature at the site collection level. Then activate the Footer Item List feature at the site level and finally come back to activate the Footer Web Part feature at the site collection level.
If you re-run the Query Features PowerShell script again, you now see the following:
Feature: FooterLinksSchema_FooterLinksSchema

=======================================================================

The following version is the INSTALLED Version:  1.1.0.0

Version  1.0.0.0  is currently RUNNING in site at

  http://intranet.theopenhighway.net/sites/apress

Version  1.1.0.0  is currently RUNNING in site at

  http://intranet.theopenhighway.net/sites/apress2


Feature: FooterLinksList_FooterItemList

=======================================================================

The following version is the INSTALLED Version:  1.1.0.0

Version  1.0.0.0  is currently RUNNING in site at

  http://intranet.theopenhighway.net/sites/apress

Version  1.1.0.0  is currently RUNNING in site at

  http://intranet.theopenhighway.net/sites/apress2


Feature: FooterLinksList_FooterWebPart

=======================================================================

The following version is the INSTALLED Version:  1.1.0.0

Version  1.0.0.0  is currently RUNNING in site at
  http://intranet.theopenhighway.net/sites/apress

Version  1.1.0.0  is currently RUNNING in site at

  http://intranet.theopenhighway.net/sites/apress2
I think that is pretty amazing—that you can actually have multiple versions of a feature running simultaneously in different site collections of the same web application.
Feature Upgrading
According to the Query Features PowerShell script, you are at the point where you have Version 1.1 of your features deployed, the Apress site has version 1.0 of the features running, and the Apress2 site has version 1.1 of the features running. What remains to be done is to upgrade the sites running the older version of the features. With the upgrade code, I hope that you can see you are targeting the differences in functionality between version 1.0 and version 1.1. These differences are as follows:
- Define an additional site column called Is Active.
- Update the content type to include this new site column, and push down this change (which means update all references to the content type to include the new site column definition). In your case, the Footer Link content type attached to your Footer Link List will be updated.
- Update the list schema.
- Update the query in the Web Part to include the Is Active flag.
- Run an update on existing items in the Footer Link list to set the Is Active flag to true.
I have provided a full script to upgrade each of the features to Version 1.1. Here are the key lines of the script:
features = $webApp.QueryFeatures($FeatureId, $true)

foreach($feature in $features){

  $feature.Upgrade($true)

}
QueryFeatures with the true parameter will retrieve all features in the current web application that are scoped to site or web and have a specific needsUpgrade state. And then, in an anti-climactic fashion, the $feature.Uprade will perform all of the upgrade actions as listed.
If you re-run the Query Features PowerShell script again, you now see the following:
Feature: FooterLinksSchema_FooterLinksSchema

==========================================================================

The following version is the INSTALLED Version:  1.1.0.0

Version  1.1.0.0  is currently RUNNING in site at

  http://intranet.theopenhighway.net/sites/apress

Version  1.1.0.0  is currently RUNNING in site at

  http://intranet.theopenhighway.net/sites/apress2


Feature: FooterLinksList_FooterItemList

==========================================================================

The following version is the INSTALLED Version:  1.1.0.0

Version  1.1.0.0  is currently RUNNING in site at
  http://intranet.theopenhighway.net/sites/apress

Version  1.1.0.0  is currently RUNNING in site at

  http://intranet.theopenhighway.net/sites/apress2


Feature: FooterLinksList_FooterWebPart

==========================================================================

The following version is the INSTALLED Version:  1.1.0.0

Version  1.1.0.0  is currently RUNNING in site at

  http://intranet.theopenhighway.net/sites/apress

Version  1.1.0.0  is currently RUNNING in site at

  http://intranet.theopenhighway.net/sites/apress2
Now everything is running at version 1.1. Success! As a quick verification, in the original Apress site, look at the list settings for Footer Links, as shown in Figure 12-33. Note the IsActive field appears; it has been pushed down from the content type update.
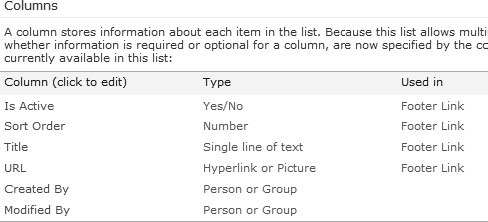
Figure 12-33. Footer Links list settings
Edit any of the items in the list and note that the IsActive flag is set, verifying that your FeatureUpgrading code ran (see Figure 12-34).
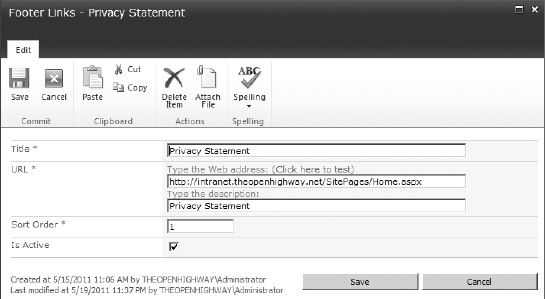
Figure 12-34. Confirming that the Feature Upgrading code has run
Upgrading with PSCONFIG.EXE
The command line upgrade for SharePoint (psconfig.exe) offers one advantage over upgrading with PowerShell Feature.Upgrade and that is the ability to control which upgrades are performed. If, after Update-SPSolution, you run the following command line:
psconfig -cmd upgrade -inplace b2b
It will trigger the upgrade for version 1.0.0.1 to 1.0.0.2, but not 1.1.0.0. That is, it will make any change in the last two places of the x.x.x.x format version number. If you run the following command line:
psconfig -cmd upgrade -inplace v2v
It will trigger the version upgrade from 1.0.0.0 to 1.1.0.0, as in our example. That is, it will make any change in the first two places of the x.x.x.x format version number.
Again, I haven’t run across this requirement in practice, but it’s there if you need it!
Summary
Have you “been there” regarding my scenarios of observations from the field? If you haven’t, I am clearly recommending that you don’t “go there.” Perhaps you now see why this is the case in so many situations. SharePoint solutions, features, packaging, versions, and dependencies require much thought and advance planning. I hope I have shown that taking the time to do so is a great investment. I hope, too, that you have a solid understanding of the mechanics involved—invaluable for the troubleshooting days ahead. If you keep one main thought in mind—and that is the maintenance and upgrading of features in the future—then you will create a great structure with which to work. I encourage you to think beyond simply the first deployment.