
C H A P T E R 9
Touch Points–Integrating SharePoint 2010 and ASP.NET
“Ignorance is like a delicate fruit; touch it and the bloom is gone.”
Oscar Wilde
In this section of the book, we will delve into strategies and approaches for integrating ASP.NET applications and SharePoint 2010 solutions. In our previous chapters, we have built some of the core fundamentals of understanding for the SharePoint 2010 product from a development standpoint. We will build upon these concepts and fundamentals in the final three chapters to put together a solid fundamental approach to using SharePoint 2010 as a development platform and planning out and executing on approaches to SharePoint 2010 living and functioning in a full suite of ASP.NET-focused web sites and products.
As we have seen in previous chapters, SharePoint 2010 is a relatively complex product. We have barely scratched the surface with what we have covered in the feature set and makeup of SharePoint 2010. We have seen that SharePoint is an ASP.NET-based product in itself, and makes use of many of the advances in the ASP.NET platform over the years in its makeup and construct. In this chapter, we will explain the thinking behind touch points and their help in organizing your approach to blended SharePoint 2010 and ASP.NET development. We will define integration factors behind these, present example business scenarios, and talk about impact upon your organization depending upon the touch-point approach that you select. Then we will cover low touch-point solutions, which include concepts of branding and customization of SharePoint 2010 and ASP.NET sites, talk about Publishing Layouts in SharePoint 2010, and discuss modifications to navigation in blended solutions.
Integration Factors
When we start to get into the process of integrating ASP.NET and SharePoint 2010, there are many factors to consider, and some of the top factors among them are really not software-related, but more related to the company doing the integrating and the makeup of the individuals, departments, and interactions among those companies. This may sound like a radical concept at this point in the book after spending so much time building up the technical aspects of the SharePoint 2010 product, but it is a good time to come up for air, get in our mental hot-air balloons, and take a ride back up to the 10,000-foot level where we can take a look at the countryside.
From a sheer business effectiveness standpoint, technical solutions are really of no more value than the value they provide end users to do their jobs. IT in general is a service industry. What this means is that in designing software, architecting solutions, and putting together plans for ongoing solutions, this concept must be in the forefront of our minds. How does my solution help the particular end user of my product? How does my solution help the business perspective of my end users' corporations? If we have a clear answer, then this is great. However, if the answer remains somewhat murky, then it is time to go back and examine what we are trying to accomplish with our solution.
The timeframe in which we are doing our architecture planning is absolutely the appropriate time to do this. Once we have decided upon an approach, set up servers and operating systems, installed SharePoint 2010, set up our development and test environments, and have our teams working on our projects appropriately blended, we have too large of a vested interest in traveling back to this level and re-examining things. And if our approach is flawed, then that flaw will typically carry through all the way to the end of the solution being delivered. Teams and organizations, once they set upon a path typically have a high level of difficulty backing up and going at a problem from a different approach. The best time to set the approach is right at the beginning. This is the time during which the approach and the methods we are most vital to the outcome of the solution and project. This is the time during which the top-level architects, strategists, and corporate sponsors should be involved. A lot of the beginning of this message is addressed to these individuals in an organization.
So, because I am taking the time to address this group of people, let me try to endeavor to help you clarify your business needs and approach to blended SharePoint 2010 and ASP.NET solutions. What is a good reason for doing this? What types of problems can I solve? How can I help my end users? Perhaps you already have a good idea about this, perhaps not.
With some of my work in developing this book, I have presented these concepts at a number of different .NET user groups, SharePoint user groups, and SharePoint conferences. I have carried out numerous discussions with members of the SharePoint community and the .NET development community, have talked over aspects of this with top-level individuals in both of these areas, including SharePoint product team members, Microsoft field consultants, MVPs, and MCMs in SharePoint and ASP.NET. Also, in giving presentations on this topic, I have been involved in numerous discussions with concerned IT professionals talking over their specific business environments and what they are hoping to accomplish with their approach and solutions. I have also coached teams of people working on these types of projects.
What I will present emerging from all of this and these sessions are some examples of business scenarios where both ASP.NET and SharePoint present a clear business solution that provides good end-user value. After that, I will discuss some aspects of IT organizations and cultures and how approaches may differ depending on these factors and variables.
The end goal we are trying to get to with this approach is a little bit like a popular advertising commercial for a tasty product that mixes peanut butter and chocolate. The advertisement in a number of its forms has two people walking around, one eating a chocolate bar, and another eating from a jar of peanut butter. They collide into each other and fall down, and in the ensuing conversation, one person says to the other, “You've got peanut butter on my chocolate”. The other responds, “No, you've got your chocolate in my peanut butter”. Then both of them taste the resulting mix and come up with smiles on their face.
This is the experience that I envision for all of you. You may be coming from different backgrounds in ASP.NET development, SharePoint development, and administration. You may be the leader of a team of developers looking for some help in navigating unfamiliar waters. You may be a corporate CIO with a technical background looking for the right resource and approach to point your smart and capable team at. From all aspects, my vision for you is to have your peanut butter and chocolate and the same smile on your faces that those individuals in the commercial had. The smile originating from coming up with a unique and wonderful solution that is a mixture of SharePoint and ASP.NET and brings to our world software that brings us more mastery over our world and business environment.
Example Business Scenarios
In discussions with various individuals, there are a number of example cases and types of cases of business problems to solve and scenarios that in my estimation are solution categories. These categories all present markings of solutions that are absolutely going to require a combined SharePoint 2010 and ASP.NET approach to organization, planning, and implementation.
Corporate Internet and Service Portals
This type of scenario is one that is a more generic solution for a corporate presence. SharePoint 2010, with its publishing feature set, offers a great option for a corporate Internet presence. There are many features there such as publishing workflows, great templates and designs, and other aspects of SharePoint 2010 that make it fantastic for corporate Internets.
Yet the reality remains that there are many times it may not represent the best solution to use SharePoint 2010 for the main corporate Internet site. These reasons could be as simple as there is a great deal of effort already invested into the current corporate web site, and replacing it is not the primary goal. The web site has an established brand, sections, and functionality. Other reasons could include some such as the corporate Internet site that exists is not an ASP.NET site, but built with one of the other available web technologies out there, such as Java or PHP.
In this solution, SharePoint 2010 is coming to the table on the services side. With rich content-management features, and excellent document management features, SharePoint is an excellent candidate for a services portal. You can offer users all of the rich access to features of SharePoint 2010 as part of the services your company offers. And you can retain the investment in your current Internet presence and web site. Both of these elements need to exist in your current environment, perhaps using the same hardware and IT personnel to maintain and enhance them.
Existing ASP.NET Product
This scenario is one in which either your company or your division has an existing investment in a relatively complex ASP.NET product. The product has a fairly large number of pages, can do complex calculations, ties to many different external systems, and has a complex database involved.
New requirements for the product, or just a general realization, lead you to the fact that document management is a feature that would add a tremendous amount of value to the product. Technical documents, diagrams, pictures, Microsoft Office documents such as contracts, blueprints, contractual reporting, and other similar things are vital parts of the overall business process that your product is involved with. Perhaps your product could offer the generation of and storage of reports in a document library. Perhaps the offering of a lifecycle of documents that involve built-in versioning and workflow approvals routing is vital to your product.
Perhaps your product could benefit from some of the portal capabilities of SharePoint 2010, in that the product could offer the ability to expand using SharePoint 2010 team sites to spin out multiple department-level implementations of your product and solution.
Perhaps your product could benefit from some of the social networking capabilities of SharePoint 2010, incorporating rich internal networking and content capabilities. You might want to incorporate internal blogging as part of your blended solution.
New Blended Solution
This scenario is one where there is no existing investment in either SharePoint 2010 or ASP.NET. However, in evaluating the options for developing the solution, it is seen that SharePoint 2010 offers a rich development platform to build upon that could reduce your time to market for the solution.
Expanding Your Corporate Portal
In this scenario, you have an existing investment in SharePoint, perhaps are just upgrading to SharePoint 2010, and your portal has a large number of departmental users involved. You want to roll out new ASP.NET features and solutions to all of your existing users quickly and in an environment with which they are already familiar. You plan to leverage SharePoint 2010 as your solution delivery platform, and want to deploy your solution in a fashion that will present low impact to your existing environment, but rich features for your solutions.
Talking to SharePoint
In this scenario, you have a new or existing product. The large majority of your customer install base uses SharePoint. You want to develop features on your product or present a solution that allows your existing software to talk to SharePoint and interact with SharePoint data.
![]() Note These example business scenarios just represent a few of the possible types of use cases or scenarios that could arise. There are many more scenarios that are not represented here—you may find that your scenario is close to one of these, a combination of a couple of these, or a completely different one altogether. The purpose of the examples is to point out a few major categories of scenarios where blended SharePoint 2010 and ASP.NET solutions could make sense or provide business advantages.
Note These example business scenarios just represent a few of the possible types of use cases or scenarios that could arise. There are many more scenarios that are not represented here—you may find that your scenario is close to one of these, a combination of a couple of these, or a completely different one altogether. The purpose of the examples is to point out a few major categories of scenarios where blended SharePoint 2010 and ASP.NET solutions could make sense or provide business advantages.
Organizational Factors
In addition to constraints in presenting solutions to end users, the reality of developing solutions, staffing projects, and working toward common goals is that you can only develop solutions with what you have, not with what you do not have.
How this comes into play in selecting approaches with blended SharePoint 2010 and ASP.NET solutions is that you need to take into account the makeup of the organization that you currently have to do this with. You can also do this by taking into account the organization that you will see after staffing it with where you want to go.
Where does this matter? In what way, shape, or form does this have anything to do with software development?
Organizational Examples
Take a couple of the business scenarios explained previously as examples. Perhaps your company has an existing ASP.NET product. Your company may not have SharePoint currently, or may currently have a limited SharePoint portal for internal use. What does that organization look like? You probably will have a development team that can range in size from one individual to a few hundred that is involved with the development of your product. You may have another team that manages your SharePoint site. Here, the largest amount of current investment will impact and contribute toward the approach you want to take. The choices you make will most likely be easier to implement if they have a lesser amount of impact on your existing ASP.NET development team, as opposed to ramping up SharePoint expertise in-house or through outside engagements.
In another example, perhaps you have a large investment in a corporate SharePoint portal, including an architect and a team of SharePoint administrators and developers. In this scenario, you have a completely different makeup of organizational interaction, corporate culture, and politics. The choices you make will be easier to implement if you do not do things that will jeopardize your current SharePoint environment and farm. (Of course, the choice to not jeopardize your SharePoint farm is never a bad one.)
SharePoint-Centric Organizations
In evaluating your organization for potential solution approaches, it is important to be cognizant of the current blend of your organization's personnel and culture. If your organization already uses SharePoint to a large extent—if SharePoint team sites are widely used across all organizations, if your corporate Internet presence consists completely of a SharePoint publishing site, or the number of personnel dedicated to the SharePoint side of your IT outnumbers the .NET development side of your company—then your organization can be looked at from a SharePoint-centric viewpoint. It is highly likely in this type of organization that the solutions you will be developing will be SharePoint-centric, and with that comes a particular approach. Some of the questions that you can ask yourself and your leadership to identify a SharePoint-centric organization are as follows:
- What is the ratio of dedicated SharePoint personnel to dedicated .NET development personnel in my company? >1, = 1, <1 ?
- What is the ratio of the dedicated SharePoint hardware to dedicated .NET production hardware? >1, =1, <1?
- Is the scope of the SharePoint farm that we will be dealing with in our solution much greater than the solution itself?
- What is the makeup of the current or envisioned user base of your proposed solution?
Touch Points
In my presentations, discussions, and reflection upon many of the different concepts that we have introduced in the beginning of this chapter, the concept of touch points was one that emerged in my thinking. This concept is not a new or unique one in general, but may be when it is applied to the SharePoint 2010 and ASP.NET world. A touch point is simply a way to describe the interaction between two systems. Where two systems touch, there is a “touch point”.
In thinking through blending ASP.NET and SharePoint solutions, this term is not meant to be literal or quantitative in that we go and count up the numerous individual points where the solution touches and report them. I am simply using them in more of an adjective format, where the level of interaction and integration is described. Low touch point describes a lower level of interaction and integration, Moderate Touch point” a higher level, and high touch point describes solutions that represent about the highest level of integration possible without going to an exclusive one-way-or-the-other solution.
There is nothing magical about touch points or nothing special about describing them in the fashion that I am doing so. They have simply become of use to me in helping to organize people's thoughts and approaches to SharePoint 2010 and ASP.NET solution development. So in that, they are of use in helping to describe your architectural approach and solution philosophy.
If you are striving toward a low touch-point solution, this means that your guiding thoughts and philosophies are going to steer toward your ASP.NET solution and your SharePoint 2010 farm being largely separate entities, running on their own processes (not necessarily hardware), being self-contained, and having a relatively lower amount of areas that they integrate. The rest of Chapter 8, after our introduction to touch points will cover this scenario.
If you choose a medium touch-point' approach, this means that there is a medium or moderate amount of integration between your ASP.NET solution and your SharePoint solution. Here, you may have portions of your SharePoint side mixed in with ASP.NET, and portions of your ASP.NET solution mixed in with your SharePoint. Our chapters on the Client Object Model and Business Connectivity Services represented ways that you can accomplish some of that. Chapter 9 will also highlight ways to blend solutions with the medium touch-point approach, as well as introduce some cutting-edge blended approaches with the use of Azure and advanced JavaScript techniques.
![]() Tip Choosing an approach with respect to touch points does not make an invisible wall come up in your architecture approach or meetings that will force you into doing one specific thing only, or to never include any element of another solution type in your approach. It is simply a guiding principle overall. As a guiding principle, it is designed to help you navigate producing your solution with an organized approach as well as help you navigate your organization and business makeup. It will help in communications across the team and to stakeholders.
Tip Choosing an approach with respect to touch points does not make an invisible wall come up in your architecture approach or meetings that will force you into doing one specific thing only, or to never include any element of another solution type in your approach. It is simply a guiding principle overall. As a guiding principle, it is designed to help you navigate producing your solution with an organized approach as well as help you navigate your organization and business makeup. It will help in communications across the team and to stakeholders.
Choosing a high touch-point solution means that there is a high level of integration that SharePoint 2010 and ASP.NET have, and that the decisions you make ongoing will most likely have to include evaluating the impact on most environments. We will introduce specific examples and considerations in Chapter 10 for this approach.
Over the course of these last three chapters, we will highlight what makes up the particular touch point and examples of what selecting that approach and philosophy entails and how to do it.
Low Touch Point
What is a low touch-point solution approach and philosophy? In explaining this, one key concept to consider is the relative level of complexity of your two different environments. SharePoint 2010 is a very deep and complex product, and it runs in an environment that is tuned for SharePoint. There is performance optimization that comes into play in the interaction between the SharePoint 2010 product, IIS, and the databases. Many ASP.NET applications also have complex elements to them.
So what is the easiest way to integrate the two? Don't.
That, of course, is the simple answer. The more complex answer is contained in all of the content throughout the rest of this chapter. In this philosophy and approach, each of your environments runs on its own. SharePoint 2010 runs self-contained in its own little world and farm, and your ASP.NET application does as well.
![]() Tip This does not mean necessarily that you need to duplicate or use different hardware to implement a low touch-point solution. There are many options here—SharePoint Web Front-End (WFE) servers can support having other IIS web sites on them. Defining different users that run your IIS Application Pools is a great way to contain impact across systems. SharePoint database servers can have other databases on them; however, it violates a best-practice rule to place other SQL Server databases on the same instance of SQL Server that SharePoint 2010 resides on. So, in this case, if you are using the same SQL Server, define separate instances to house your SharePoint 2010 and other SQL Server databases. Another option that is becoming more and more viable every year is to utilize virtualization for your environments. Microsoft server operating systems such as Windows 2008 Server R2 offer the Hyper-V role for virtualization, and there are other vendors such as VMWare that offer capable virtualization offerings. Virtualization offers many benefits in managing server environments that are worth examining, but a little beyond the scope of this book.
Tip This does not mean necessarily that you need to duplicate or use different hardware to implement a low touch-point solution. There are many options here—SharePoint Web Front-End (WFE) servers can support having other IIS web sites on them. Defining different users that run your IIS Application Pools is a great way to contain impact across systems. SharePoint database servers can have other databases on them; however, it violates a best-practice rule to place other SQL Server databases on the same instance of SQL Server that SharePoint 2010 resides on. So, in this case, if you are using the same SQL Server, define separate instances to house your SharePoint 2010 and other SQL Server databases. Another option that is becoming more and more viable every year is to utilize virtualization for your environments. Microsoft server operating systems such as Windows 2008 Server R2 offer the Hyper-V role for virtualization, and there are other vendors such as VMWare that offer capable virtualization offerings. Virtualization offers many benefits in managing server environments that are worth examining, but a little beyond the scope of this book.
Housing or wrapping ASP.NET solutions within the SharePoint environment can offer increased risk to a SharePoint farm. This is not to say that it is wrong or not recommended, it is just as we move up the scale on integration methods, the higher the touch point, the more it exposes potential risk.
Pros
The pros to implementing a low touch-point solution are as follows:
- Performance maintained in SharePoint farms and ASP.NET applications with no cross-application implications.
- No constraints to ASP.NET application development.
- No additional development training necessary for ASP.NET team.
- Least amount of customization development work.
- SharePoint 2010 farm remains largely intact.
Cons
The cons to implementing a low touch-point solution are as follows:
- Branding is more complex and performed for both the SharePoint 2010 farm as well as the ASP.NET application.
- Authentication and Authorization (AuthN/AuthZ) must be customized to duplicate across platforms.
- Navigation is not seamless—need to plan out user experience navigating through the areas of the two sites.
- Navigation may need customization work.
These are a few of the high-level pros and cons of choosing a low touch-point solution. Now, besides the reasons for choosing to implement low touch-point solutions, we will highlight ways to make them work in your environment.
A blended solution is a solution that presents the front of two applications functioning together. One of the primary ways to accomplish this is through branding. Branding is creating a unified look and user interface for both your SharePoint 2010 and ASP.NET applications. Branding specifically in low touch-point solutions can present to the end user a unified interface that provides common functionality throughout the solutions.
Branding SharePoint Solutions
In this chapter, we will present examples of how to brand a SharePoint 2010 application in a few different ways. We will also cover high-level basics of branding an ASP.NET application. The way in which we will present this is by taking a common HTML template with images, colors, and fonts, such as one that you can purchase commercially on the Internet and utilize in your designs. We will take this design and apply it both to an ASP.NET master page for use in your ASP.NET application, as well as applying it to your SharePoint 2010 environment.
Prior to this example, we'll discuss some of the different options for modifying the user interface in SharePoint 2010, including some of the new functionality built into SharePoint 2010 for branding. Some of what is built in to SharePoint 2010 will depend on which version of the product that you are utilizing. All SharePoint 2010 products, including the free SharePoint Foundation 2010, offer the ability to customize or brand SharePoint. However, there are features within the Standard and Enterprise versions of SharePoint 2010 that offer enhanced abilities in the branding area. The SharePoint Server Publishing Features offers enhanced abilities for branding in SharePoint 2010.
Branding Possibilities, Features, and Tools
There are a number of possibilities when we start to discuss branding a SharePoint site. From an initial perspective, SharePoint has built-in capabilities for changing certain things with respect to the brand, such as colors or font sizes.
Much as we are organizing our overall approach to SharePoint 2010 and ASP.NET blended architecture, we will also present branding options in a similar fashion, using low, medium, and high levels of branding effort.
Low-Effort Branding
The lowest effort to brand your SharePoint 2010 is to utilize some of the built-in themes that come with SharePoint 2010. From any site, you can navigate to Site Settings from the Quick Launch menu, and select Site Themes. You will be presented with the ability to select color themes and palettes from the available installed themes in SharePoint 2010. The window to select these is shown in Figure 9–1.
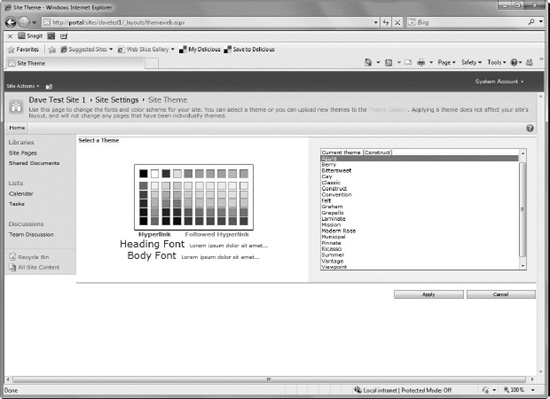
Figure 9–1. Branding with Site Themes
Figure 9–1 shows what is available from SharePoint Foundation 2010. If you are using either the Standard or Enterprise products, the built-in themes also allow you to customize colors and fonts in a particular installed theme, as shown in Figure 9–2.
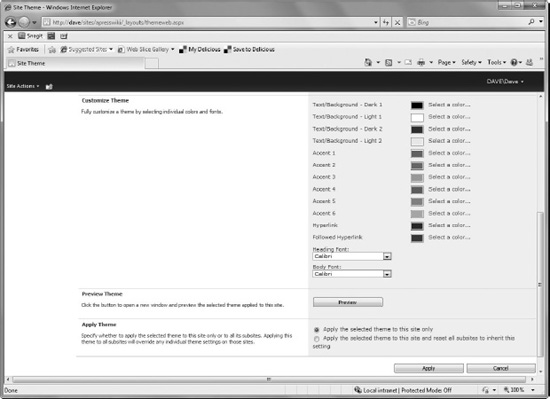
Figure 9–2. Customizable themes—SharePoint Server 2010—Standard and Enterprise
Medium-Effort Branding
Traveling up the scale of effort, the next level of branding control you could take over a SharePoint 2010 site would be to design and import your own theme file. SharePoint supports themes that are created in PowerPoint 2010 for use in SharePoint.
![]() Tip For detailed instructions on how to create a PowerPoint theme and save it, please refer to the Microsoft Office 2010 documentation article here:
Tip For detailed instructions on how to create a PowerPoint theme and save it, please refer to the Microsoft Office 2010 documentation article here:
http://office.microsoft.com/en-us/powerpoint-help/customize-and-save-a-theme-in-powerpoint-2010-HA010338409.aspx
Themes are a new feature in SharePoint 2010 and they are created after the OpenXML format specification. They consist of a packaged zipped file with a .thmx extension. When you create your theme in PowerPoint 2010 and save it, it will be a .thmx file extension. From here, you may import it into SharePoint 2010 to the Theme Gallery, which should make it available to select along with the default built-in themes that ship with SharePoint 2010. The built-in themes in the Theme Gallery are physically stored on the SharePoint server in the following directory:
C:Program FilesCommon FilesMicrosoft SharedWeb Server Extensions14TEMPLATEGLOBALLists hemes
To add a new theme to the default ones on your site, navigate to the Site Settings page as shown in Figure 9–1. You will see a link to the Theme Gallery Library. You can scroll down to the bottom of the installed themes and select Add New Item to upload your created theme to your site. After this, you are able to select your customized theme to apply to your SharePoint 2010 site.
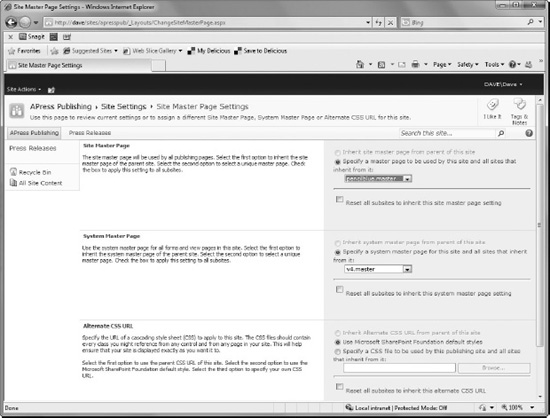
Another option for a medium level of effort in branding your SharePoint 2010 solution would be to make changes to the existing CSS in SharePoint. For a publishing site, you are able to specify an alternate CSS file to use in place of the built-in CSS that SharePoint 2010 installs by default. You can select this file along with the Master Pages setting in Site Settings in your SharePoint 2010 site. It is near the bottom of the screen, as shown in Figure 9–3.
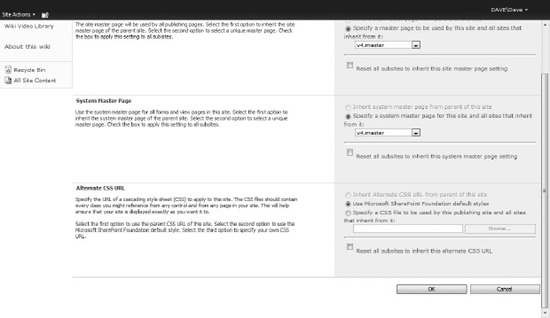
Figure 9–3. Alternate CSS selection in Site Settings ![]() Master Pages
Master Pages
High-Effort Branding
If modifying the look and feel of your standard SharePoint 2010 chrome is not enough, then we will need to get in to a high-effort custom branding solution, with defining the brand for a custom master Page, and possible page layouts and content types.
If your SharePoint solution is of the type that will be published to the Internet, or that is public-facing, you may want to take advantage of SharePoint 2010 Publishing Features. If not, you will still customize a SharePoint 2010 Master Page.
SharePoint Server 2010 Publishing Features
Publishing as a term in SharePoint means the authoring and deployment of branded items such as CSS and images, content, custom assemblies, and configuration files across a Microsoft SharePoint Server 2010 farm. SharePoint Server 2010 Publishing consists of two separate features—the SharePoint Server Publishing Infrastructure feature and the SharePoint Server Publishing feature. The SharePoint Server Publishing Infrastructure feature provides publishing functionality at the site collection level, and the SharePoint Server Publishing feature provides publishing functionality at the site level. The subset of features and functionality of each feature supports the goal of publishing as part of a Web content management solution.
Publishing features come into play in SharePoint 2010 as a design for web content management. Adding or turning on the publishing features in SharePoint 2010 automatically provisions a number of internal components for use in web content management. These components include specific site columns, content types, page layouts, master pages, and lists. Publishing features also changes the way in which the site operates in a number of ways. It applies work flows for publishing content, limits provisioning of subsites to conform to a publishing context, and creates several publishing-specific permissions groups to deal with content management.
One key thing that happens on a site is that a Pages library is created for web content, and this is set up as a document library with versioning and permissions set up. There are two types of publishing sites—the Publishing Portal, and the Enterprise Wiki.
- The Publishing Portal is set up basically ready to be exposed as an external Internet web site. It contains by default a Press Releases site, and a custom brand out-of-the-box. The intent is a head start to help define areas of web content that are specific for exposing to the Internet.
- The Enterprise Wiki, on the other hand, is geared more toward a corporate intranet application with the capability for end users to rapidly modify content in place and create more pages, areas, and links to pages with little restriction.
Publishing sites use customizable page layouts that help to organize the content and how it is displayed in the site. Page layouts can include default layouts such as an image on the left-hand side of the content area and text on the right, or can include columns for content. Page layouts are based upon a content type, which include specific site columns for content. We will discuss publishing layouts later on in the chapter after we define a branded master page to house the layout.
Working With a Brand
We will start out our branding example from what typically would be a real-world example of implementing a template across an ASP.NET application and a SharePoint 2010 site. The first thing that is typically shown to a customer from a web design company is a representative mockup image that represents the interaction between the web designer and the customer. After the customer approves of the direction of the initial mockup, then the designers take the mockup and cut it up into images, CSS, HTML, and possibly JavaScript files. We have an example of this in Chapter 8's downloadable source code. The example consists of an HTML page, CSS scripts, images, and a JavaScript file. The mockup page.html looks like Figure 9–4 in a browser, and the files that make up the web designer deliverable are shown in Figure 9–5.
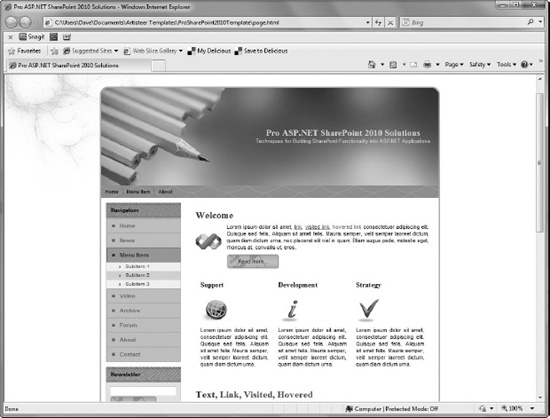
Figure 9–4. Initial mockup of branding web design
The design has a pencil yellow and blue theme, and a navigation menu at the left as well as the top of the header. There is a main content area in the center. We are mainly concerned with the look and feel of the UI, as opposed to implementing the exact menu items or working in the design.
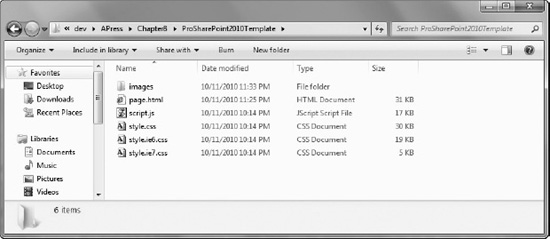
Figure 9–5. Branding files included in initial web design
Now that we have received our branding files from our web design company, we are ready to get started. All of the design is contained in one HTML file.
Branding the ASP.NET Application
To apply our brand that is created in one page.html file and controlled by the CSS files style.css and browser-specific versions, we will transfer this brand over to ASP.NET. To do this, we will utilize master pages in ASP.NET, and we will build the sections of the header, the menus, and the sidebar in .ascx controls to place in content placeholders on the Master page. The articles and blocks we will add a little more code to so that they can be reused more than once on the page. The resulting files in our project appear as in Figure 9–6.
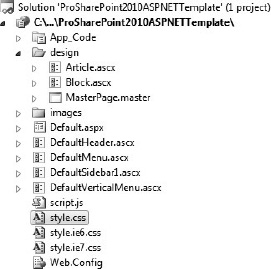
Figure 9–6. ASP.NET branded application
As you can see, we have preserved the images folder just as it was presented to us by the designer, as well as the CSS style sheets. The other components we have broken out so as to best use the built-in feature of master pages in ASP.NET. We are taking the external surrounding elements of our page.html file supplied by the designers and incorporating it into an ASP.NET master page.
The bulk of the approach that I took to brand the ASP.NET application was to take sections that represent certain areas of the layout, and wrap their inner <div> tags with a ContentPlaceHolder.
For example, following is the CSS and HTML surrounding the menu content:
<div class="art-nav">

                         <div class="l"></div>

                         <div class="r"></div>

                         <ul class="art-menu">

                                 <li>

                                         <a href="#" class="active"><span class="l"></span><span class="r"></span><span class="t">Home</span></a>

                                </li>

                                <li>

                                         <a href="#"><span class="l"></span><span class="r"></span><span class="t">Menu Item</span></a>

                                        <ul>

                                                <li><a href="#">Menu Subitem 1</a>

                                                        <ul>


                                                                <li><a href="#">Menu Subitem 1.1</a></li>


                                                                <li><a href="#">Menu Subitem 1.2</a></li>


                                                                <li><a href="#">Menu Subitem 1.3</a></li>

                                                        </ul>

                                                </li>

                                                <li><a href="#">Menu Subitem 2</a></li>

                                                <li><a href="#">Menu Subitem 3</a></li>

                                        </ul>

                                 </li>

                                 <li>

                                        <a href="#"><span class="l"></span><span

class="r"></span><span class="t">About</span></a>

                                </li>

                            </ul>

                </div>
Here in Visual Studio 2010 we add a ContentPlaceHolder that will be populated by the DefaultMenu user control.
<div class="art-nav">

        <div class="l"></div>

        <div class="r"></div>

        <asp:contentplaceholder id="MenuContentPlaceHolder" runat="server"></asp:contentplaceholder>

</div>
![]() Note We will not cover in-depth each aspect of how we migrated the brand from the HTML file to the ASP.NET template solution. However, the complete source for both solutions—the HTML page as well as the ASP.NET application are available for download in the code that is associated with this book.
Note We will not cover in-depth each aspect of how we migrated the brand from the HTML file to the ASP.NET template solution. However, the complete source for both solutions—the HTML page as well as the ASP.NET application are available for download in the code that is associated with this book.
Branding in SharePoint Designer Example
Next, we will highlight the steps to go through to create a brand in SharePoint Designer 2010.
- Open up Designer, and connect to the Site Collection where we will modify the master page. In this example, we will want to take advantage of the publishing features to get the most use out of our master page. We will also want to define a page layout that will allow us to lay out sections of the page similar to the design delivered to us.
- Select the Master Pages left-hand link and you will see a window similar to Figure 9–7.
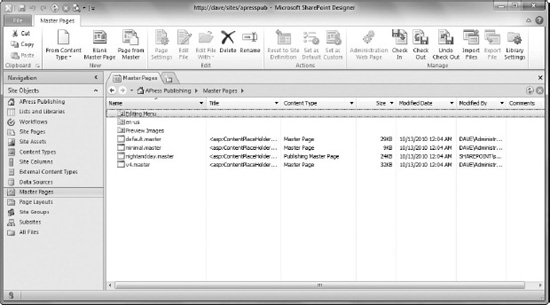
Figure 9–7. SharePoint Designer and Publishing Site Master Pages
- We will select the nightandday.master Publishing Master Page to modify and apply to the site.
- Right -lick nightandday.master, copy it, and paste it in the same library. We will call the corresponding master page pencilblue.master.
- Once you have renamed the master page, right-click, check it out, and edit it in Advanced mode. You will be in a page editor that looks like Figure 9–8.
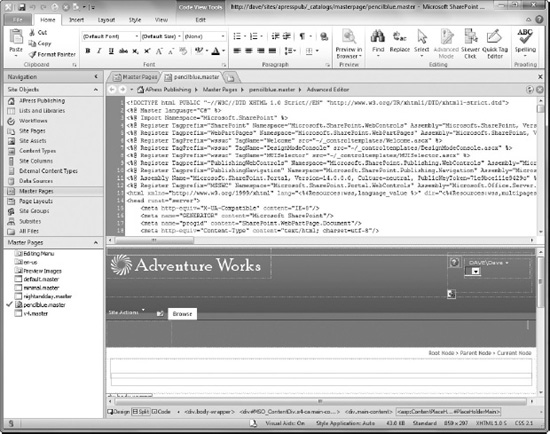
Figure 9–8. Editing a publishing master page
- To proceed from this point, we will need to choose an approach to our modifications. There are basically two schools of thought as to how to tackle modifying master pages. One school approaches this from the perspective of taking the existing master page provided by Microsoft and modifying it until it meets your needs. The other school of thought is to use a bare-bones type of master page that has the minimal elements in it to allow SharePoint 2010 to remain functional. We will do the latter and use the master pages developed by Randy Drisgill found on Codeplex at
http://startermasterpages.codeplex.com. Download them and extract them to somewhere convenient. Tip In SharePoint 2007, these pages were called minimal master pages. However, since then, Microsoft has included in the master page lineup in the main SharePoint 2010 product a master page named minimal.master, which has very little chrome on it and is used in scenarios requiring almost no external wrapper functionality.
 - The page we will be using from this project is _starter_publishing.master. If you are modifying a team site, you would instead use the _starter_foundation.master. When you download this file, you can right-click it and edit it directly in SharePoint Designer. To get to the start point, delete all the content in pencilblue.master, and cut and paste the content from _starter_publishing.master into it. You will then get a pop-up window seen in Figure 9–9.
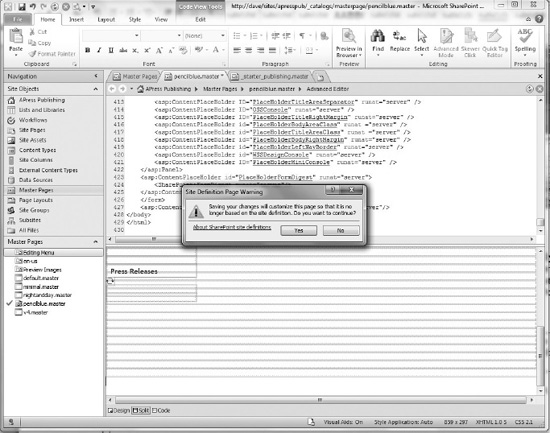
Figure 9–9. SharePoint Designer starter master page and page warning
This warning illustrates the difference between the design work we are doing now with SharePoint Designer, and the finished work that we can deploy to our web site. Customizing the page will make it depart from the page that is stored on the file system, and the page modifications will be stored in the database, as opposed to directly on the file system. It is not recommended to keep your master pages in this state, as it adds overhead to performance on every page. Instead, in a later section of the chapter, we will see how to take the work we have completed here and package a solution up for deployment to your production environment. Packaging a master page up as a solution will ensure that a non-customized page and all the artifacts it references, such as images, CSS files, and JavaScript, are deployed to the file system on your server, as opposed to remaining customized in a database.
![]() Tip If all the talk about production environments is causing you to ask yourself “what does he mean by production environment?”, please take a few steps backward, log off of your production environment, and start to see what you need to do to ensure that you are not editing live sites directly in your production environment with SharePoint Designer. At the very least, you can create a new Site Collection for you to hack up with designer change experiments to spare your end users the agony.
Tip If all the talk about production environments is causing you to ask yourself “what does he mean by production environment?”, please take a few steps backward, log off of your production environment, and start to see what you need to do to ensure that you are not editing live sites directly in your production environment with SharePoint Designer. At the very least, you can create a new Site Collection for you to hack up with designer change experiments to spare your end users the agony.
At the time of this writing, there are a few corrections to be made to the _starter_publishing.master page to get it to work correctly.
Lines 6 through 8 in the page appear as follows:
<%@ Register TagPrefix="wssuc" TagName="Welcome" src="_controltemplates/Welcome.ascx" %>

<%@ Register TagPrefix="wssuc" TagName="DesignModeConsole" src="_controltemplates/DesignModeConsole.ascx" %>

<%@ Register TagPrefix="wssuc" TagName="MUISelector" src="_controltemplates/MUISelector.ascx" %>
On my publishing site, this was throwing an error when applied. I needed to add a ~/ before the _controltemplates statement in each of these lines to correct this. The corrected lines appear as follows:
<%@ Register TagPrefix="wssuc" TagName="Welcome" src="~/_controltemplates/Welcome.ascx" %>

<%@ Register TagPrefix="wssuc" TagName="DesignModeConsole" src="~/_controltemplates/DesignModeConsole.ascx" %>

<%@ Register TagPrefix="wssuc" TagName="MUISelector" src="~/_controltemplates/MUISelector.ascx" %>
Also, on line 383, the SiteLogo currently does not exist in a freshly installed publishing site:
<SharePoint:SiteLogoImage LogoImageUrl="/Style Library/sitename/logo.png" runat="server"/>
You can either correct that by uploading a graphic to the Style Library that does exist, or just change it back to the original Night and Day logo to start by making it the following:
<SharePoint:SiteLogoImage LogoImageUrl="<% $SPUrl:~sitecollection/Style Library/Images/nd_logo.png %>" runat="server"/>
Without the nightandday.css file, this will just show up blank for now, but without an image error.
Next, we will go ahead and check in, publish, approve our changes, and apply the starter master page to our publishing site. This will show the iterative steps necessary to continue to develop your branding solution for low touch-point solutions.
- Navigate back to your Master Page list view, right-click pencilblue.master, and select Check-in. You will see the pop-up screen shown in Figure 9–10.
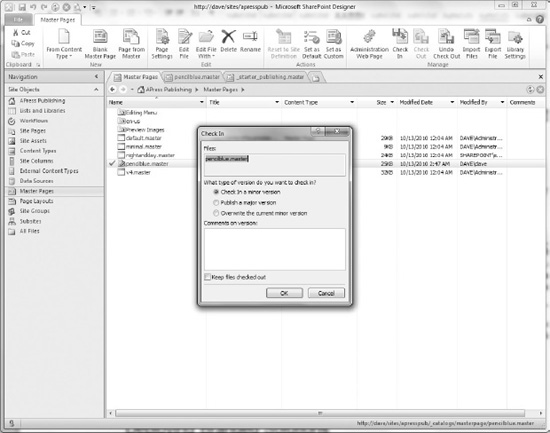
- The options available are either “Check in a minor version,” which will save your work in the content database but now allow you to apply it to a site or “Publish a major version.” Publishing a major version also brings up the screen in Figure 9–11 to allow you to approve the changes. This will allow you to apply the master page to your site collection.
- TIP Versioning in document libraries in SharePoint, such as the Pages library, is set by default to use major and minor versions. For an extranet publishing site, you need to select “Publish a major version” to get the approval workflows going and get your page published out so it is visible to the public.

- Clicking Yes will take you out of SharePoint Designer and directly to your SharePoint 2010 site's master page gallery, where you can select the page approval status and approve it, as in Figure 9–12.
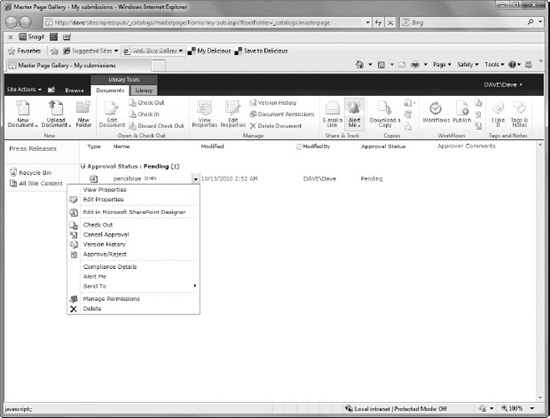
Figure 9–12. Approving a publishing page change
- There is one more screen after selecting Approve/Reject that will allow you to select the Approve radio button and apply it.
- After this, you can select Site Settings from the top-left navigation menu, and from there select Master page as shown in Figures 9–13 and 9–14.
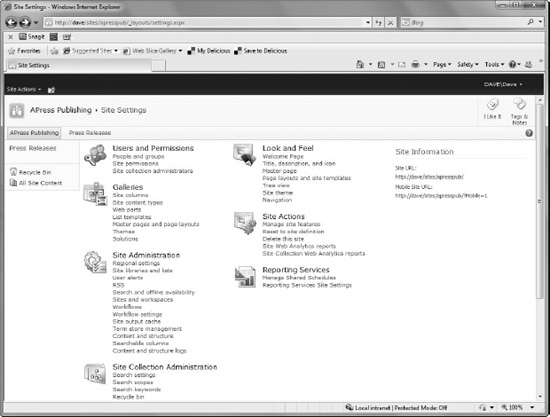
Figure 9–13. Site Settings
- From here, select the Master Page link under the Look and Feel topic.
Now we have a working starter master page in our publishing site that looks like Figure 9–15.
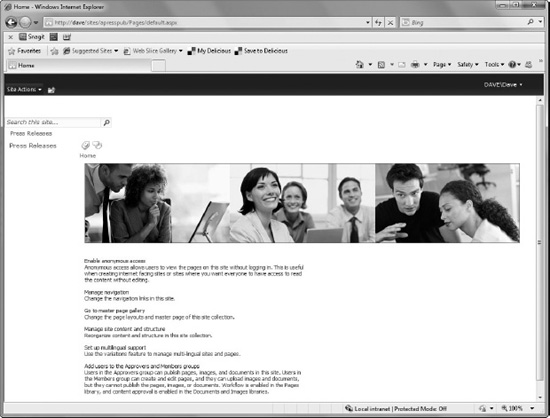
Figure 9–15. Publishing site with starter master page applied
![]() Tip In addition to using Central Administration, you can use PowerShell to set your Master Page. A sample script is included in the downloads for this chapter and is called UpdateMaster.ps1.
Tip In addition to using Central Administration, you can use PowerShell to set your Master Page. A sample script is included in the downloads for this chapter and is called UpdateMaster.ps1.
From here, we will start to work with the master page in SharePoint Designer to apply the brand. We won't go through every step of branding the page, but just get started to get an idea about some of the process and the tools necessary. The final master page is available as part of the code downloads for the book.
Most of the work of branding will be to take the elements on the HTML page that we obtained from the designer and work them into the SharePoint master page. There are a few tricks to certain elements of SharePoint, but branding and design is an iterative process that changes the page a few small steps at a time, then we will publish the page and look at it on the SharePoint site.
![]() Tip Because SharePoint master pages can be complex, it really is not recommended to do all your work at once and then deploy it. Doing that will typically result in a page error, which takes time to track down, and you probably will end up taking out at least portions of your changes to ensure that it will display. The best way to approach branding a master page is to start out with the starter master page as we have here, then change the file a little bit at a time, publishing it at every step and examining the results. When we finish this iterative process, we will package it up for deployment in a solution package with Visual Studio 2010. The final solution package is included in the code downloads for the book.
Tip Because SharePoint master pages can be complex, it really is not recommended to do all your work at once and then deploy it. Doing that will typically result in a page error, which takes time to track down, and you probably will end up taking out at least portions of your changes to ensure that it will display. The best way to approach branding a master page is to start out with the starter master page as we have here, then change the file a little bit at a time, publishing it at every step and examining the results. When we finish this iterative process, we will package it up for deployment in a solution package with Visual Studio 2010. The final solution package is included in the code downloads for the book.
Actually, the first step in branding a master page is we will need to upload the images, scripts, and CSS files provided by our design company to SharePoint.
Cut all of the images from the Images folder, and paste them into the Images folder under the Style Library in SharePoint 2010. You will see the result as in Figure 9–16.
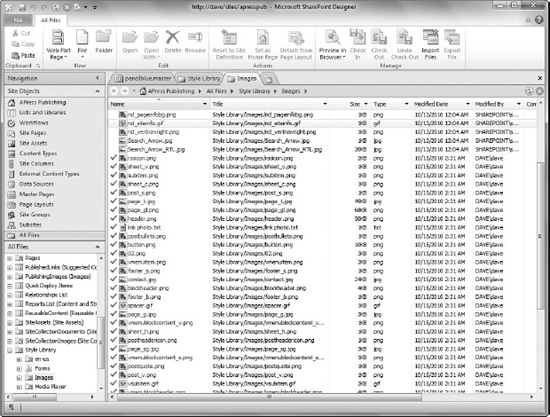
Figure 9–16. Loading images into the Style Library
We will do this similarly with the CSS files and JavaScript. Load the CSS files into the Style Library Core Styles. We are also renaming the files to have pencilblue as the first part, as shown in Figure 9–17.

Figure 9–17. Style Library folder for CSS files
The final version of the PencilBlue.master master page from SharePoint Designer 2010 will be in the downloads section and will be called PenciBlueSPD.master to distinguish it from the one that is included in the Visual Studio Project.
After the brand is applied to SharePoint 2010, the site will look somewhat like Figure 9–18.
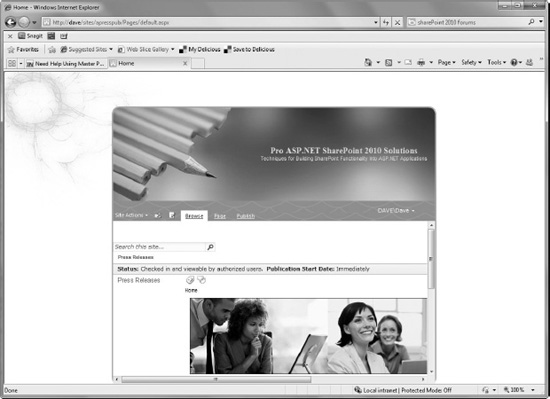
Figure 9–18. Branded SharePoint site
![]() Note With a fixed-width design like this, you will need to adjust your content so that it fits into the space that is available.
Note With a fixed-width design like this, you will need to adjust your content so that it fits into the space that is available.
Next, we will delve into packaging and deploying your branding solution.
Deploying Branded Solutions
While we are working with SharePoint Designer 2010 in developing our master page, we will not want to be editing master pages directly on our production SharePoint sites. To handle the packaging and deployment of our SharePoint 2010 brand, we will utilize Visual Studio 2010.
- First, start up Visual Studio 2010 and select the Empty SharePoint Project, as shown in Fig 9–19.

Figure 9–19. SharePoint branding solution—Empty SharePoint Project.
- Next, we will add a starter master page. I like to use the template that goes along with the CKSDev Toolkit. This is the Community Kit for SharePoint Development, which you can find on CodePlex here:
Tip The CKSDev Toolkit provides a number of additional project and item templates besides the ones that come out-of-the-box with SharePoint 2010, including a SharePoint 2010 Console application that is great for doing management types of tasks and testing out the SharePoint 2010 objects and libraries. Also included are a number of different helpful item templates, like a Basic Site Page, a Fluent UI Visual Web Part, the Starter Master Page we will be using, a Blank Site Template, a number of items around Custom Actions and Groups, a Delegate Control, a Full Trust Proxy, and a SPMetal Definition that will help you wire up your LINQ to SharePoint 2010 in an automated fashion.
- Add a New Item using the Starter Master Page, as shown in Figure 9–20.
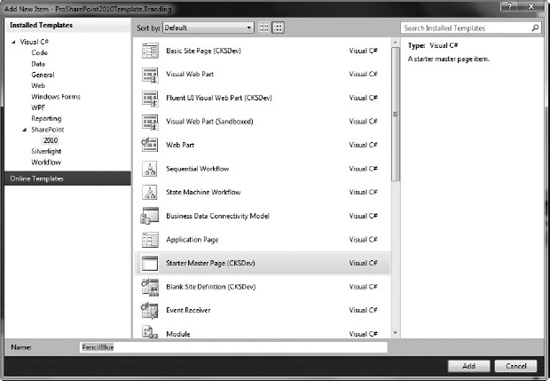
Figure 9–20. Add a Starter Master Page
- The Project Item template for the Starter Master Page is very helpful in that it not only adds the page, but a Module for deploying it. All of this is automatically added to your Feature setup. Rename your Feature something that you will be able to recognize if you are looking at it in a Site Administration or Central Administration web site, like ProSPBranding. Your entire project will look like Figure 9–21 after you are done with this.
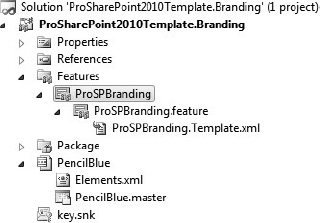
Figure 9–21. SharePoint 2010 branding project
- There is one thing that we will have to change in the Elements.xml file so that our master page will be seen by SharePoint 2010 as a master page, show up in the SharePoint 2010 library, and work correctly with the version 4 UI of SharePoint 2010. Add the following line to the File XML node in Elements.xml:
<Property Name="UIVersion" Value="4" /> - Next, we will need to change a little where we will deploy our images, CSS files, and JavaScript files. While storing these items in the Style Library for a site is fine for working with developing brands, and is indeed much easier than storing the items on the file system, for our SharePoint farm, we do want our files to be out there on the file system in a non-customized page. We will utilize the Layouts and Images directories on our SharePoint farm to store these artifacts. Right-click your project, select the Add menu, then select Add, as shown in Figure 9–22.
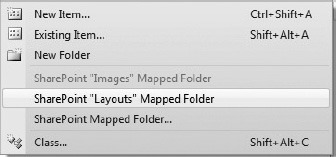
Figure 9–22. Add SharePoint Images and Layouts Mapped Folders
Tip Since your master page and related artifacts such as images, CSS, and JavaScript files are typically utilized throughout Site Collections, they are accessed very frequently. As such, storing these artifacts in the content database by way of using the Styles Library is not recommended as a best practice. Artifacts in the content database, and a master page stored there especially, are stored as a customization and will affect performance negatively for highly trafficked artifacts such as a master page. Storing these pages on the file system will help all of your pages using the brand be rendered uncustomized, which is the best practice for performance purposes. - After you have completed this, your project appears as shown in Figure 9–23. Note that Visual Studio automatically adds a folder under the main layouts and images directories for your project, so that any artifacts that you add there are kept separate from the SharePoint 2010 product artifacts. Note in Figure 9–23 the Images and Layouts directories added to your project. Copy all of the image files you are using to the Images directory under your project folder, and copy the CSS and JavaScript files you are using to the Layouts directory under your project folder.
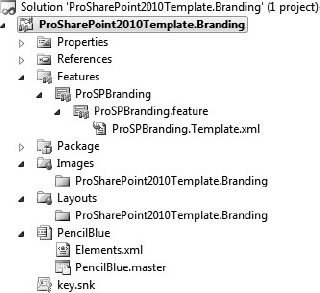
Figure 9–23. SharePoint Branding Project with Mapped Layouts and Images
Tip Sometimes questions related to internationalization come up when discussing branding. While it is important to utilize resources in our SharePoint 2010 development that support internationalization, when we are discussing branding, for the most part we will either be utilizing one global branding solution for multiple international language sites, including SharePoint 2010 Variations, or we will be developing a custom brand for different languages that may contain images in different languages or to impact different cultures. For this reason, we do not need to be as concerned with aligning our solutions under the language and regional settings in SharePoint 2010 (such as artificially creating en-us folders or 1033 folders underneath the layouts or images folders). It will be sufficient to name our project so that when it is deployed as a .wsp solution, we will know what it is. - Now cut and paste your Master Page from your SharePoint Designer 2010 editor directly into the page in your Visual Studio project. You will need to edit your CSS file and do a global Find and Replace to change the references to all of your images from where you have them stored in the Style Library on your development branding site to where they will be located on your production server. This will look something like Figure 9–24.
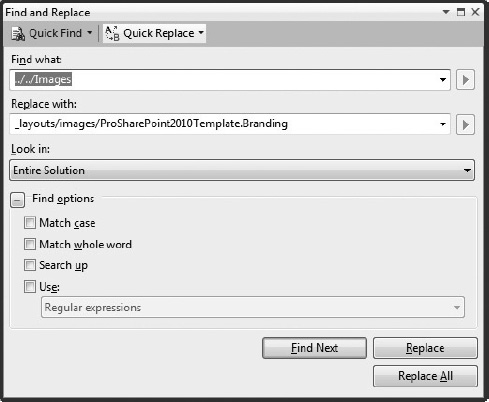
Figure 9–24. Replacing image references in your CSS files
- After this, you are ready to deploy your solution to a Site Collection and use your new master page. You can deploy directly to your local environment, but to deploy to your production environment, change the Solution Configuration of your Visual Studio 2010 project to Release, then build your product. Select Package from the Build menu in Visual Studio 2010, as shown in Figure 9–25.
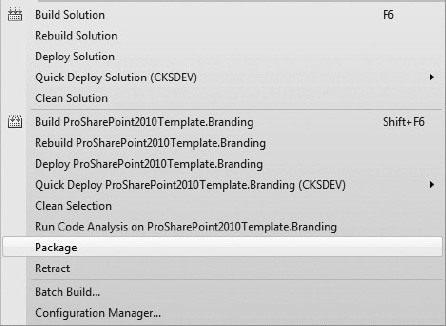
Figure 9–25. Package build in VS2010
- When your feature is deployed to your production environment, you will be able to see it in Site Settings
 Features. It will look similar to Figure 9–26.
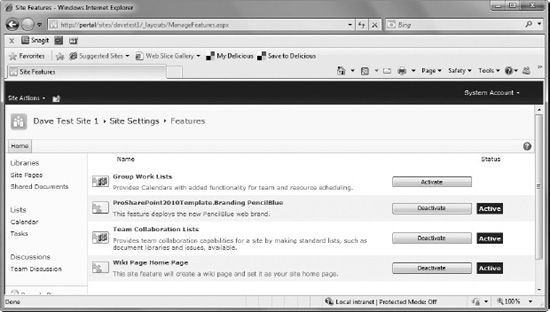
Figure 9–26. Branding feature deployed
Now that we have looked into branding with master pages and packaging a branding solution for deployment to production web sites, the next step is to discuss publishing page layouts, which are utilized in conjunction with SharePoint 2010 Publishing Features.
Publishing Layouts
In beginning to highlight what publishing page layouts are, we will start with the reminder that everything in SharePoint is a list. How does this matter? Well, page layouts sit on master pages. Page layouts are based upon content types. Content types in SharePoint are implemented in lists. So the basic way to define a page layout is by constructing content types from site columns that are either currently in SharePoint or need to be added.
A page layout will have areas that you can place content from a particular content type. Page layouts can contain web-part zones add web parts into, as well as field controls.
All of this information about publishing page layouts contains a few different layers, so it may be helpful to walk through a simple example.
One default page layout is Article Left, which is based upon the Article page layout. Article Left contains an area for an image layout on the left-hand side, and an area for content on the right-hand side. There are many built-in publishing layouts contained in the SharePoint 2010 product that may be fine for you to use directly out-of-the-box. If they are not, you can modify publishing layouts in SharePoint Designer 2010, as shown in Figure 9–27. The built-in publishing layout ArticleLeft.aspx is shown in Figure 9–27.
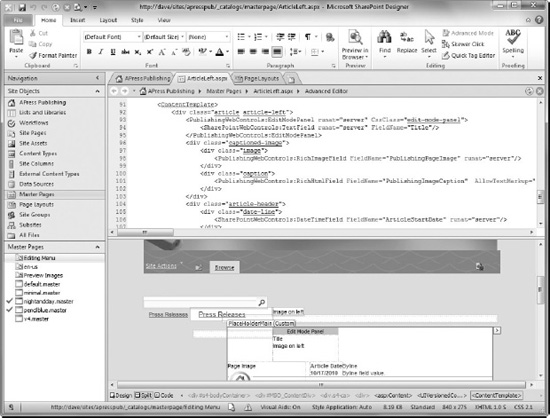
Figure 9–27. Page layout ArticleLeft.aspx
![]() Tip Don't let all the SharePoint terms confuse you. Publishing page layouts simply will define different areas of display for information. When you edit the page, you are able to modify elements in each particular area. You as a solution provider will provide either the standard publishing layouts to use along with your master pages, or you will also define publishing layouts. End users can edit the published pages on your external facing web site and add content to them.
Tip Don't let all the SharePoint terms confuse you. Publishing page layouts simply will define different areas of display for information. When you edit the page, you are able to modify elements in each particular area. You as a solution provider will provide either the standard publishing layouts to use along with your master pages, or you will also define publishing layouts. End users can edit the published pages on your external facing web site and add content to them.
For example, the main page in our branded publishing page layout, when you edit the page content, appears as shown in Figure 9–28.
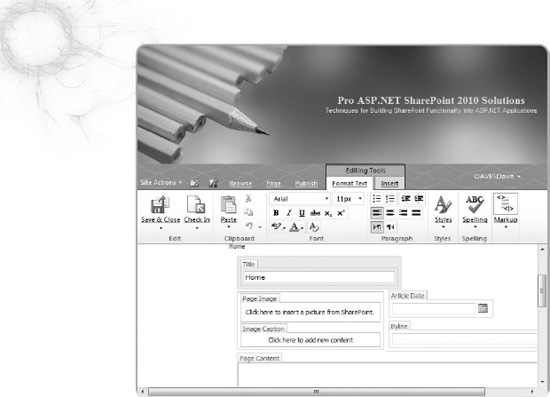
Figure 9–28. Home page showing page layout
As you can see, with all the content types and site columns in back of it, the page layout just presents simple areas to fill content in to the user, such as the title, a selectable image, an image caption, an article date and byline, and page content that is available to edit and includes quite a lot of options.
So when you define your master pages, if you have specific content layout needs on different pages, you may need to define a custom page layout for each page that will use the specifics. If the built-in page layouts will suffice, such as including an image and some content, you can use them.
You can customize page layouts in SharePoint Designer 2010 and packages similar to how we did the master pages in Visual Studio 2010.
Customizing SharePoint 2010 Navigation
SharePoint 2010 offers a number of ways that the user, an administrator, or you as an architect and developer, can customize navigation. SharePoint primarily works with navigation through two main sources:
- Customizing the Quick Launch—this is the left-hand side navigation that is present in most SharePoint sites.
- Customizing the Top Navigation Bar—this is the top navigation menu structure that is shown near the header in most SharePoint sites.
We will highlight how to customize the navigation in SharePoint 2010 so that it will be the most compatible with ASP.NET
Customizing Navigation Through the User Interface
You can update the Quick Launch by adding links and items through the user interface. You can select the Look and Feel section under Site Settings, then select the Quick Launch button. You will see the administrative interface built in to SharePoint 2010 for updating the Quick Launch, as shown in Figure 9–29.
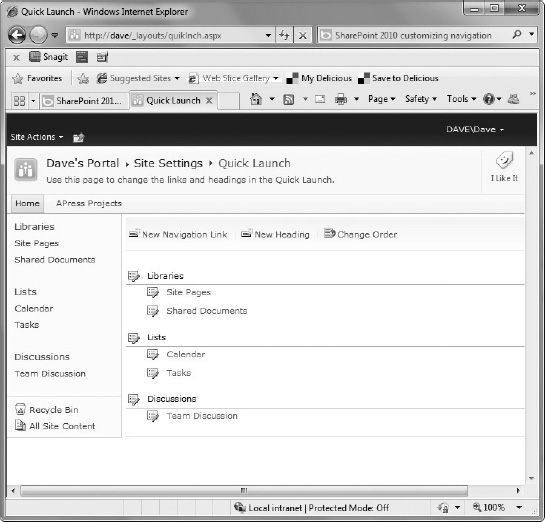
Figure 9–29. Modifying the Quick Launch
You can add new sections and new links to other areas into SharePoint 2010 directly through this interface—Figure 9–30 shows an example of adding a new group heading and two navigation links to a SharePoint Foundation 2010 site. You potentially could duplicate any external links to ASP.NET applications using this method. Figure 9–30 shows the updated links.

Figure 9–30. Custom headings and links added
Similarly, you can update the top navigation area using the user interface. you can add links as top navigation links, as shown in Figure 9–31.
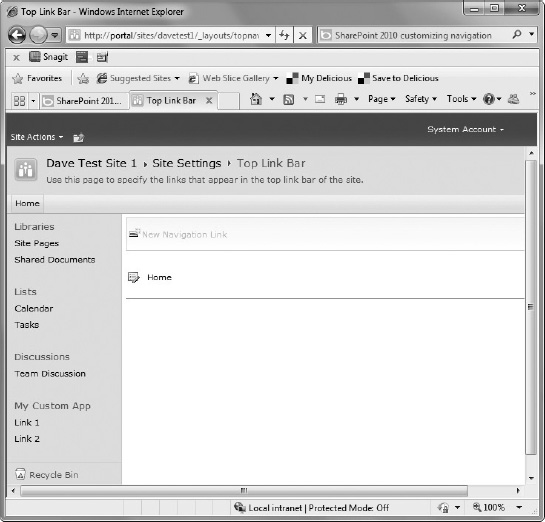
Figure 9–31. Adding links to the top link bar
As you can see, simply adding in navigation elements in addition to SharePoint's built-in navigation model can help to blend or integrate ASP.NET applications and SharePoint 2010. This, in addition to branding sites the same, can present a solid front-end experience to the users.
Adding Links Through the Object Model
Navigation in SharePoint 2010 is done through standard ASP.NET controls—the standard Menu control in System.Web.UI.Webcontrols (System.Web.dll) is used for the Quick Launch and the top navigation menus. As such, it is relatively easy to modify the menu selections through the SharePoint Object Model. Following is an example of code that will add a link to the left-hand Quick Nav menu:
SPSite siteCollection = SPControl.GetContextSite(Context);

SPWeb site = siteCollection.AllWebs["DavePub"];

SPWeb subSite = site.Webs["DavePubSub"];
SPNavigationNodeCollection nodes = subSite.Navigation.QuickLaunch;

SPNavigationNode navNode = new SPNavigationNode("Dave's Blog", "http://www.davemilner.com", true);

nodes.AddAsFirst(navNode);
Navigation Custom Data Sources
It is also possible to completely override the custom SharePoint 2010 menu system by replacing navigation with a custom data source. The scope of going through this example is a little beyond what we will cover in this chapter, but for more information please see the following MSDN article:
http://msdn.microsoft.com/en-us/library/ms432695.aspxThis will step you through what it would take to completely replace the Quick Launch area with a menu provider.
Summary
In this chapter, we have highlighted the approach to implementing professional SharePoint 2010 and ASP.NET applications in a blended environment using the low touch-point method. We have covered specifics by example of branding SharePoint 2010 and ASP.NET environments, have implemented a brand of the type delivered to us from a design company, and have covered many other features related to making the SharePoint UI as compatible to our ASP.NET application as we can. We have also highlighted organizational considerations for low touch-point solutions, and provided several examples of potential candidate solutions that could utilize the low touch-point approach.