
Chapter 3. Fun with Sprites
In the previous chapter, I mentioned that there was actually a lot happening behind the scenes of the simple blue-screen game you built. Let’s take a more in-depth look at that code and see what’s actually going on. To start, open the game project that you created in Chapter 2.
A Look Behind the Scenes
The program.cs file
is pretty straightforward. Your Main
method, which creates a new object of type Game1 and executes its Run method, is located in this file.
The real guts of your game lie in the Game1.cs file. The code for that file will look something like this:
using System;
using System.Collections.Generic;
using System.Linq;
using Microsoft.Xna.Framework;
using Microsoft.Xna.Framework.Audio;
using Microsoft.Xna.Framework.Content;
using Microsoft.Xna.Framework.GamerServices;
using Microsoft.Xna.Framework.Graphics;
using Microsoft.Xna.Framework.Input;
using Microsoft.Xna.Framework.Media;

namespace Collision
{
    /// <summary>
    /// This is the main type for your game
    /// </summary>
    public class Game1 : Microsoft.Xna.Framework.Game
    {
        GraphicsDeviceManager graphics;
        SpriteBatch spriteBatch;        public Game1()
        {
            graphics = new GraphicsDeviceManager(this);
            Content.RootDirectory = "Content";
        }

        /// <summary>
        /// Allows the game to perform any initialization it needs to before
        /// starting to run. This is where it can query for any required
        /// services and load any non-graphic-related content.  Calling
        /// base.Initialize will enumerate through any components
        /// and initialize them as well.
        /// </summary>
        protected override void Initialize()
        {
            // TODO: Add your initialization logic here

            base.Initialize();
        }

        /// <summary>
        /// LoadContent will be called once per game and is the place to load
        /// all of your content.
        /// </summary>
        protected override void LoadContent()
        {
            // Create a new SpriteBatch, which can be used to draw textures.
            spriteBatch = new SpriteBatch(GraphicsDevice);

            // TODO: use this.Content to load your game content here
        }

        /// <summary>
        /// UnloadContent will be called once per game and is the place to unload
        /// all content.
        /// </summary>
        protected override void UnloadContent()
        {
            // TODO: Unload any non-ContentManager content here
        }

        /// <summary>
        /// Allows the game to run logic such as updating the world,
        /// checking for collisions, gathering input, and playing audio.
        /// </summary>
        /// <param name="gameTime">Provides a snapshot of timing values.</param>
        protected override void Update(GameTime gameTime)
        {
            // Allows the game to exit
            if (GamePad.GetState(PlayerIndex.One).Buttons.Back == ButtonState.Pressed)
                this.Exit();

            // TODO: Add your update logic here

            base.Update(gameTime);
        }

        /// <summary>
        /// This is called when the game should draw itself.
        /// </summary>
        /// <param name="gameTime">Provides a snapshot of timing values.</param>
        protected override void Draw(GameTime gameTime)
        {
            GraphicsDevice.Clear(Color.CornflowerBlue);

            // TODO: Add your drawing code here

            base.Draw(gameTime);
        }
    }
}
In this code you’ll notice that a couple of class-level variables
are provided automatically, as well as a constructor for Game1 and five other methods. The first
class-level variable is of the type GraphicsDeviceManager. This is a very important object because it provides you,
as a developer, with a way to access the graphics device on your PC,
Xbox 360, or Windows Phone 7 device. The GraphicsDeviceManager object has a property
called GraphicsDevice that represents
the actual graphics device on your machine. Because that graphics device
object acts as a conduit between your XNA game and the graphics card on
your machine (or more accurately, the Graphics Processing
Unit, or GPU, on the graphics card), everything you do on the screen in
your XNA games will run through this object.
The second variable is an instance of the SpriteBatch class. This is the core object you’ll be using to draw sprites.
In computer graphics terms, a sprite is defined as
a 2D or 3D image that is integrated into a larger scene. 2D games
are made by drawing multiple sprites in a scene (player
sprites, enemy sprites, background sprites, etc.). You’ll be using this
concept and drawing sprites of your own throughout this chapter.
The Initialize method
is used to initialize variables and other objects
associated with your Game1 object.
Your graphics device object will be instantiated at this point and can
be used in the Initialize method to
help you initialize other objects that depend on its settings. You’ll
use this method to initialize score values and other such items in later
chapters in this book.
The LoadContent method
is called after the Initialize method, as well as any time the graphics content of the game needs to
be reloaded (e.g., if the graphics device is reset due to the player
changing the display settings, or something like that). The LoadContent method is where you will load all
graphics and other content required by your game, including
images, models, sounds, and so on. Again, as your current project
doesn’t really do anything exciting, there isn’t much happening in this
method.
After the LoadContent method
finishes, the Game1 object will enter
into something known as a game loop. Almost all
games use some form of game loop, regardless of whether they are written
in XNA. This is one area where game development differs from typical
application development, and for some developers it can take a bit of
getting used to.
Essentially, a game loop consists of a series of methods that are
called over and over until the game ends. In XNA, the game loop consists
of only two methods: Update and Draw. For now, you can think of the game loop in these terms:
all logic that affects the actual game play will be done in the Update or the Draw method. The Draw method is typically used, unsurprisingly,
to draw things. You should try to do as little as possible in the
Draw method other than draw your
scene. Everything else needed to run your game (which eventually will
involve moving objects, checking for collisions, updating scores,
checking for end-game logic, etc.) should take place in the Update method.
Game Development Versus Polling
Another key difference between game development and typical application development is the concept of polling versus registering for events. Many nongame applications are written solely for events driven by users. For example, if you were writing a widget-naming module for some system, you might build a screen that asks the user for the name of a widget and that has OK and Cancel buttons. Regardless of the language in which the application is written, typically it won’t do anything until the user presses the OK or the Cancel button. When the user hits either button, the system will fire an event that the application will catch. That is, the application will wake up and do something only when the user tells it to do so by sending it an event indicating that one of those buttons has been pressed.
In contrast, game development is driven by polling for events, rather than waiting to hear that an event has taken place. Instead of the system telling the game that the user has moved the mouse, for example, your game will have to ask the system whether the mouse has moved. In the meantime, the application is always performing actions, regardless of user input.
Let’s say you develop a game where a wizard named Jimmy (yes, there’s a big market for Jimmy the Wizard games…) tries to escape from the clutches of an evil pelican warlord (that’s right, pelican warlords—scary stuff!). You’ll have to account for user events such as the player moving Jimmy to the left or making Jimmy cast an antipelican wing-breaking spell. But rather than XNA telling you that the player has performed these actions via some event, you need to instead poll the input devices (mouse, keyboard, gamepad, etc.) to check for changes in input.
At the same time, regardless of whether the player has interacted with the system in any way, all kinds of things are happening that need to be maintained by the game. For example, maybe the enemy pelican warlord is chasing Jimmy. This will happen regardless of any event caused by the player, and the game will be responsible for constantly changing the position of that enemy object without subscribing to any event. That’s the main reason for having a game loop: it provides a way for a game to always be doing something, regardless of what the player is doing.
Of course, much more could be going on than just moving the enemy around the screen. What if the pelican warlord can throw some form of antiwizard bombs in the air? There might be 1, 2, 5, 50, or more bombs flying through the air that need to be moved constantly. You’d also have to constantly check to see whether those bombs hit anything and react accordingly. And what if the player never moves Jimmy, and the pelican warlord catches him? Something should happen in that situation. On top of that, maybe you’ve set a timer and Jimmy has to escape from the pelican warlord within three minutes. Now you also have some type of timer to keep track of, and some logic to perform if the timer expires or if Jimmy escapes before that happens. In game development, there is always something happening (usually a lot of things), and you’re constantly updating animations, moving objects, checking for collisions, updating scores, checking for end-of-game logic, and so on.
In the hypothetical widget-naming application, it would be
somewhat difficult to constantly check for some nonuser-generated event,
but in XNA development, the method for doing so is built into the
application architecture in the form of the game loop. All of these
tasks are handled within the Update
method of the game loop, and the scene is drawn in the Draw method of the game loop.
Tip
In reality, all applications are built with loops that function in similar ways to a game loop. Windows itself uses a messaging and events system that constantly loops and lets applications know when they need to repaint themselves and perform other functions. Access to these loops is hidden by default, however, because most applications don’t require access to such nonuser-driven events.
OK, let’s get back to the code we were looking at previously.
You’ll notice that in the Update
method there are a couple of lines of code that tell the game to exit
when the player presses the Back button on his gamepad:
if (GamePad.GetState(PlayerIndex.One).Buttons.Back ==
  ButtonState.Pressed)
    this.Exit(  );
This is how the game shuts down on the Xbox 360 or in Windows when an Xbox 360 controller is being used (otherwise, you can click the red X on the window to close it or use Alt-F4 to shut down the application).
As mentioned earlier, the Update method is where you update everything
to do with the game. You can update the positions of items on the
screen, scores, animation sequences and so on. You’d also check for user
input, detect collisions, and adjust any artificial intelligence (AI)
algorithms in your Update
method.
These changes to the game that are checked for and acted upon in
the Update method often correlate to
what is known as a game state. Game state is a very important concept; it’s a way for a
game to know what is currently happening in that game. Games typically
have several drastically different states, such as showing a splash
screen versus actual gameplay versus displaying end-game screens. There
may also be more subtle changes in state, such as the user receiving
some form of power-up that makes her invincible for a time or some other
change in the game behavior. Typically, you’ll modify game states in the
Update method and then use those
states in the Draw method to draw
different images, scenes, or other information connected to that
particular state.
The Draw method is where you
take all of the objects in your game and draw them on the screen itself,
using the graphics device object mentioned earlier. In your current
application, the only thing in the Draw method is a line of code that uses the
graphics device object to clear the display and set the color to
CornFlowerBlue (we’ll talk about that
in more depth momentarily).
Figure 3-1 shows the lifecycle of
an XNA game, complete with the Update
and Draw methods forming a game
loop.
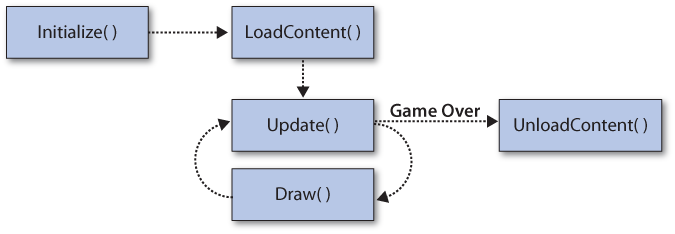
Notice that there are two possible outcomes from the Update method: either it will continue in the
game loop and the Draw method will be
called or, if the game is over, it will exit the game loop and the
UnloadContent method will be called. The game loop ends when you call the
Game class’s Exit method, just as your game does by default
when the user presses the Back button on the Xbox 360 controller. The
game will also exit the game loop if the player presses Alt-F4 or hits
the red X button to close down the game window.
Your game will typically have some kind of step between when the
game loop is exited and when the game ends. For example, if the evil
pelican warlord catches Jimmy the Wizard, it would be kind of lame if
the game just exited and the game window disappeared. In fact, most
users would consider this behavior a bug of some sort. Instead, you’ll
typically use some game state logic to cause your Draw call to render some type of game-over
screen in place of the gameplay scene. Then, after a certain amount of
time or when the player presses some key that you determine, the game
will actually exit. That may seem like a lot of work right now and may
be somewhat confusing, but don’t stress about it just yet. You’ll be
doing that sort of thing throughout this book, and soon you’ll
understand exactly how to make it happen.
Once the game exits the game loop, UnloadContent is called. This method is used
to unload any content loaded in the LoadContent method that requires special
unload handling. Typically, XNA (like .NET) will handle all your garbage
collection for you, but if you’ve modified memory in some object that
requires special handling, the UnloadContent method will allow you to take
care of that here.
Modifying Your Game
All right, enough talk. You’re itching to get into game development and ready to put something cool into your game. Let’s make it happen.
Take a look at your Draw
method. Currently, the method contains the following code:
protected override void Draw(GameTime gameTime)
{
    GraphicsDevice.Clear(Color.CornflowerBlue);

    // TODO: Add your drawing code here

    base.Draw(gameTime);
}
The first thing to notice here is the parameter that your Draw method receives. The parameter is of the
type GameTime and represents the time that has passed during the
execution of your game. Why do you need a variable keeping track of
time? Because computers do not all run at the same speed. This variable
helps you determine when animations and other events should happen based
on actual game time rather than processor speed. The gameTime variable will be used throughout this
book to gauge things such as framerate, animations, sounds, and other
effects. The same parameter is also passed into the Update method, because many of the functions
that control those effects need to be performed in the Update method rather than the Draw method.
At the end of the method, you call the Game1 object’s base Draw method, which is essential in order to get cascading calls to
Draw methods in GameComponents and other objects. That might
not make sense to you now, but be assured that you want the base.Draw call in the code, and you should not
remove it.
Finally, let’s look at the call to Clear using the GraphicsDevice property of the graphics object. Again, this property
represents the actual graphics device on your PC, Xbox 360, or Windows
Phone 7 device and allows you to draw different objects on the
screen.
The Clear method here actually
erases everything on the screen and covers the screen with the color
specified (in this case, CornFlowerBlue). Change the color to something
like Color.Red and run your game by
selecting Debug→Start Debugging. You’ll
see the same window as before, but now the background color in the
window will be red.
Remember when I mentioned that the boring blue screen was actually doing quite a bit behind the scenes? This is what I was talking about. While you see a boring blue (or now, red) screen, XNA is working its tail off to give that screen to you. It’s running through its game loop 60 times per second, erasing everything on the screen and painting it red.
In addition, it’s also calling the Update method 60 times per second and checking
to see whether the Back button on a connected Xbox 360 controller has
been pressed. That may not seem like a lot, but XNA is really
cruising—and the best part about it is that the game is all set up and
ready for you to customize.
So, if the game loop is running at 60 times per second and calling
both Update and Draw, why do you want to clear the screen
every single time? Although it may sound inefficient to clear the screen
and redraw the entire scene and all objects for each new frame, it is
far more efficient to do that than the alternative, which would be to
try to keep track of everything that moves in a scene from one frame to
the next, draw the moved items in their new locations, and draw whatever
was behind the object previously in the location from which the object
has moved. If you were to remove the Clear call, XNA would not erase the screen
before drawing each frame, and will create some unexpected
results.
Adding a Sprite to Your Project
All right, I said no more talk, and this time I’m serious. Let’s get to it. Your project thus far has been fairly boring. Now, let’s draw an image on the screen in your game.
All graphics, sounds, effects, and other items are loaded in XNA through something called the content pipeline. Essentially, the content pipeline takes things such as .jpg files, .bmp files, .png files, and other formats, and converts them during compilation to an internal format that’s friendly to XNA. It also does similar things with other types of resources, such as sound files, 3D models, fonts, etc., which will be explored later in this book. A great benefit of the XNA Framework is that it takes a lot of the guesswork out of importing different file types. If you put an image file into your game and the content pipeline is able to recognize it during compilation, you don’t have to worry about the format of the image. (We’ll talk more about the content pipeline in later chapters.)
Download the source code for this chapter and place it somewhere on your PC’s hard drive. You’ll need to do this so that you can access the images that you’ll be adding to your project throughout the rest of this chapter.
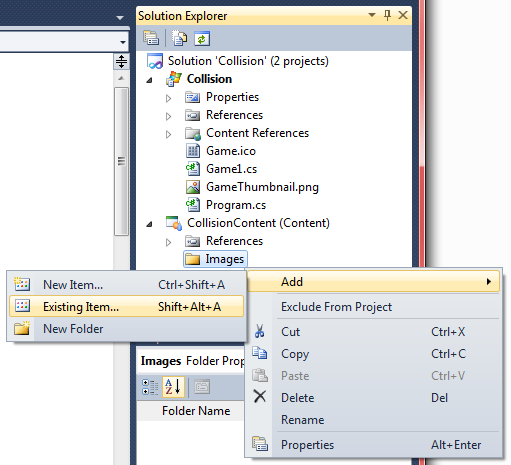
Open Visual Studio’s Solution Explorer and take a look at your solution. You’ll see two projects within your solution: a solution named Collision and one named CollisionContent. All resources you use in your game (images, sounds, models, etc.) should be added to your solution in the project named CollisionContent. Because I’m an organization junkie, I recommend creating a subfolder within the CollisionContent project for each content type (images, sounds, etc.) and adding each resource to the appropriate folder. To begin, create a new folder within the CollisionContent project by right-clicking that project and selecting Add→New Folder. Name the new folder Images. Next, right-click the CollisionContentImages folder in Solution Explorer and select Add→Existing Item (see Figure 3-2).
In the file search dialog that opens, navigate to the logo.png file within the source code you downloaded for this chapter. The file will be located in the BasicSpriteCollisionCollisionContentImages folder. Once you’ve selected an image file, you’ll see that item within the ContentImages folder in your Solution Explorer. It will also have been copied to your own <Solution>CollisionContentImages directory on your hard drive.
Building your solution at this point (click Debug→Build Solution) will cause the content pipeline to attempt to compile the image file you just added. If you have no build errors, this means the content pipeline recognized the format of the image and was able to convert it to an XNA internal format, and XNA is ready to load and use your image.
The content pipeline uses an asset name to access content resources. Another way of verifying that your image file is recognized by the content pipeline is to view the properties on the newly added item by right-clicking the item in Solution Explorer and selecting Properties, as shown in Figure 3-3.
As you can see in Figure 3-3,
the default asset name of the logo.png file that
you added is logo, or the name of the
file without the extension. By default, all asset names will be the name
of the file the asset represents without the file extension.
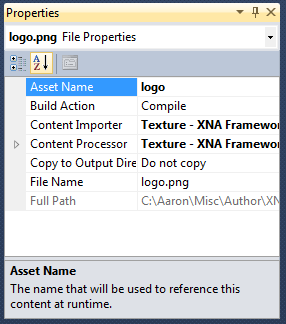
If you see the Asset Name
property in the Properties window, you’ll know that the content pipeline
recognized your image. While you can change the asset names for your
resources, the asset names in your project need to be unique. However,
asset names need to be unique only within each content folder. This is
another benefit of using subfolders within the
CollisionContent project to organize resources—you
can have multiple resources with the same asset name, as long as they
are in different folders under the CollisionContent
project. This may sound like a bad idea that will only complicate
things, but it’s actually pretty common and very helpful. For example,
you may have a font, an effect file, and an image that are all used for
an explosion, and it would actually makes things less complicated if you
could name them all “Explosion” while keeping them in separate
directories dedicated to resources of their respective types.
In Figure 3-3, you may also
have noticed two properties below Asset
Name: Content Importer and
Content Processor. The fact that
these properties exist and that they are set to Texture - XNA Framework is another sign that
the content pipeline has recognized the image that you’ve added to the
project; they are marked as ready to be processed by the content
pipeline as texture objects. A texture in computer
graphics refers to a 2D image that will typically be applied to a
surface of some object. We’ll be doing exactly that with some image
files when we get to the 3D section of this book, but for now we’ll be
drawing these textures directly onto the screen in a 2D game.
Loading and Drawing Your Sprite
Now that you have an image loaded into your solution that is recognized by the content pipeline, you’re ready to draw it on the screen. But before you can access them in code, resources need to be loaded from the content pipeline into variables that you can use to manipulate them.
The default object used to store an image is Texture2D. Go ahead and add a Texture2D variable to your game in the
Game1.cs file near the variable declarations for
your GraphicsDeviceManager and
SpriteBatch:
Texture2D texture;
Now you’ll need to load the actual image file into your Texture2D variable. To access data from the
content pipeline, you use the Content
property of the Game class. This
property is of the type ContentManager and provides access to all
objects loaded in the content pipeline. The ContentManager class has a Load method that will let you load content
into different XNA object formats.
As mentioned previously, all loading of graphics, sounds, and
other content resources should be done within the LoadContent method. Add the following line to the LoadContent method:
texture = Content.Load<Texture2D>(@"Images/logo");
The parameter passed into the Content.Load method is the path to the image
file, starting with the Content node in Solution
Explorer. When used in relation to strings, the @ symbol causes the string that follows to be
interpreted literally, with escape sequences ignored. So, the following
two lines of code will create the exact same string:
string str1 = @"imageslogo";
string str2 = "images\logo";
Notice also in the Content.Load
call that the parameter used represents the asset name of the resource,
rather than the filename.
The Load method of the ContentManager
class is a generic method that requires a type parameter
indicating which type of variable you want to access. In this case, you
are dealing with an image and are expecting a Texture2D object to be returned.
Your image file is now loaded into the variable texture and is ready for you to use. All
drawing in XNA should be done within the Draw method, so add these three lines to your
Draw method, after the Clear call:
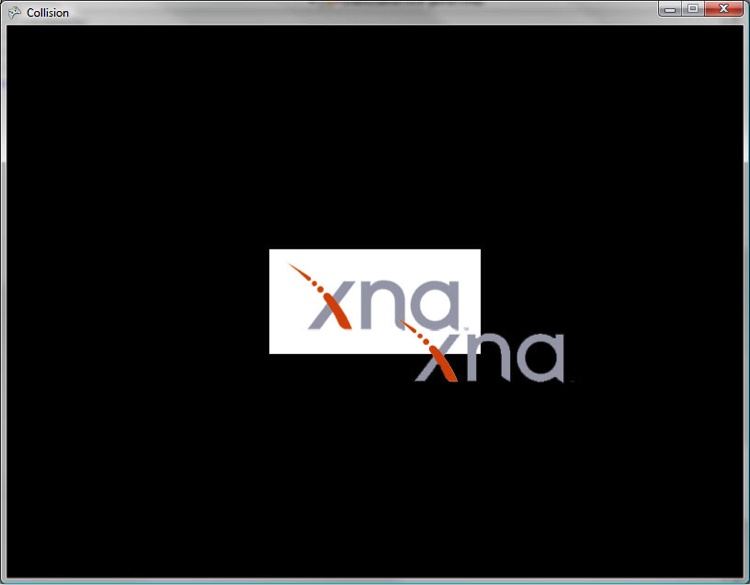
spriteBatch.Begin(  );
spriteBatch.Draw(texture, Vector2.Zero, Color.White);
spriteBatch.End(  );
These three lines of code will draw the image you added to your project in the upper-left corner of the screen. Run your game by selecting Debug→Start Debugging, and you should see something similar to Figure 3-4.
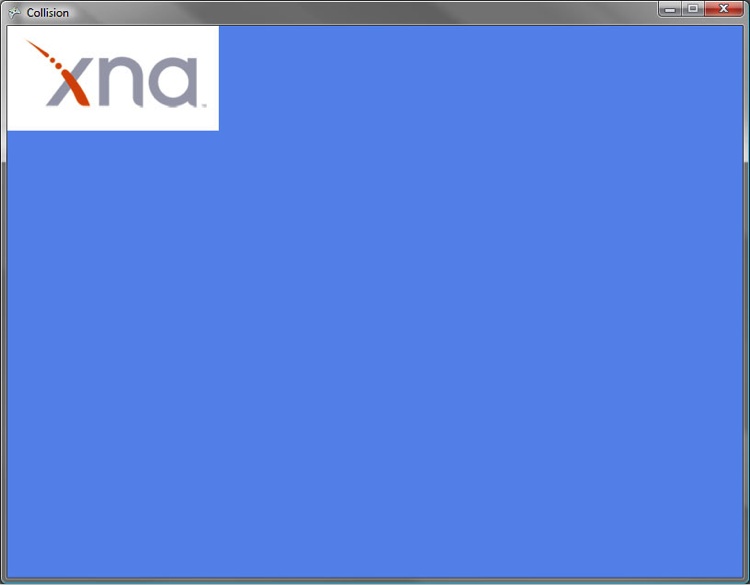
Let’s take a look at these three lines of code. The first thing to
note is that all three lines use an object called spriteBatch, which is of the type SpriteBatch. This variable is defined in your
project when you first create it and is instantiated in the LoadContent method.
Basically, what’s happening here is that with the Begin and End calls from the SpriteBatch object, XNA is telling the
graphics device that it’s going to send it a sprite (or a 2D image). The
graphics device will be receiving large amounts of data throughout an
XNA game, and the data will be in different formats and types. Whenever
you send data to the graphics device, you need to let it know what type
of data it is so that it can process it correctly. Therefore, you can’t
just call SpriteBatch.Draw anytime
you want; you first need to let the graphics card know that sprite data
is being sent by calling SpriteBatch.Begin.
Your Draw call has three parameters, described in Table 3-1.
Parameter | Type | Description |
| The | |
| The position (in 2D coordinates) at which you want to begin drawing the image. The image is always drawn starting from the upper-left corner. | |
| The tinting color.
Specifying |
Try playing around with the parameters in the Draw call—specifically, with the position and
tint color parameters. In 2D, XNA uses the Vector2 struct to define coordinates. Vector2.Zero is a simplified way of specifying
a Vector2 with coordinates of 0 for X
and Y (i.e., it’s the same as saying new
Vector2(0,0)).
In 2D XNA games, the X, Y screen coordinate (0, 0) is the upper-left corner of the screen; coordinates move in positive X to the right and positive Y downward.
If you wanted to center your image in the game’s window, you’d
need to find the center of the window and then offset the
upper-left-corner coordinate appropriately. You can find the size of the
window by accessing the Window.ClientBounds property of the Game class. When
a game is run in Windows, Window.ClientBounds.X and Window.ClientBounds.Y
correspond to the upper-left coordinate of the game window,
whereas the Width and Height properties of Window.ClientBounds are always equal to the
width and height of the window. This is true if the game is running in
full-screen or windowed mode. On the Xbox 360 and Windows Phone 7, Window.ClientBounds.X
and Y are always 0, while the Width and Height properties of Window.ClientBounds are always equal to the
width and height of the display (because Windows Phone 7 and Xbox 360
games are always run in full-screen mode).
Dividing these properties’ values by 2 will give you the
coordinates for the center of the window. To center your image exactly
in the middle of the screen, you’d then need to offset that center
coordinate by half the width and height of the image. This is because
the position parameter passed to the Draw method does not represent the center of
the image to be drawn, but rather the upper-left corner of the image.
You can access the size of your image via the Texture2D variable that holds the image in
memory (in this case, texture). The
Texture2D variable has Width and Height properties that hold the size of the
image. Replace your Draw call with
the one here to see the image centered in the window:
spriteBatch.Draw(texture,
    new Vector2(
    (Window.ClientBounds.Width / 2) - (texture.Width / 2),
    (Window.ClientBounds.Height / 2) - (texture.Height / 2)),
    Color.White);
Transparency and Other Options
When drawing multiple sprites on the screen, you can (and
should, for speed reasons) draw as many of them as possible within one
SpriteBatch Begin and End block. In fact, typically you’ll want to
have one SpriteBatch object for your
game and draw all your 2D images within that block.
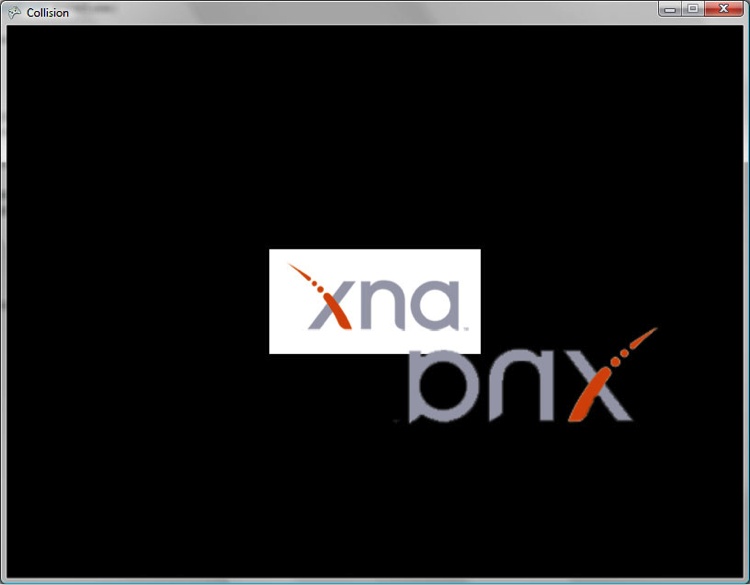
As you saw in Figure 3-4, the XNA logo that I used has a big, ugly white background that would probably look better if it were transparent.
There are two ways to render portions of images transparently: either the image file itself must have a transparent background, or the portion of the image that you want to be transparent must be solid magenta (255, 0, 255) because XNA will automatically render solid magenta as transparent. Transparency can be saved to certain file formats (such as .png) that make use of an alpha channel. These formats do not contain only RGB values; instead, each pixel has an additional alpha channel (the A in RGBA) that determines the transparency of the pixel.
If you have an image-editing tool at your disposal, you can use it to create a transparent background on an image of your choice. Paint.net is a great free image-editing tool that is actually written in .NET and is available at http://www.getpaint.net. For the rest of this example I’ll be using another XNA logo image file with a transparent background, which is provided with the source code for this section of the book. The file is named logo_trans.png.
Add the transparent XNA logo image to your project in the same way that you added the other image: by right-clicking the CollisionContentImages node in Solution Explorer, selecting Add→Existing Item, and navigating to the logo_trans.png file in the Chapter 3 BasicSprite source code. The file will be located within the BasicSpriteCollisionCollisionContentImages folder. Don’t remove the other XNA logo image from your project, as you’ll still be using it to experiment with drawing multiple images.
Once you’ve added the transparent logo to your project, add
another class-level Texture2D variable for the new
image:
Texture2D textureTransparent;
Note the asset name of the image file you added, and use it to
load the image into your newly added Texture2D variable. Remember that to load the
image into your Texture2D variable, you need to use the
content pipeline via Content.Load.
You should do so in the LoadContent
method, by adding the following line:
textureTransparent = Content.Load<Texture2D>(@"Images/logo_trans");
Now, copy the SpriteBatch.Draw
call that used your previous Texture2D variable and paste it on the next
line (right above the call to spriteBatch.End). Change the second SpriteBatch.Draw call to use the newly added
Texture2D variable (textureTransparent) and change its position
coordinate to start drawing in the center of the screen, so that the
images are staggered slightly.
Change the background color to Color.Black to make the transparent effect
stand out a bit more (do this by changing the color of the Clear call in the Draw method). Your Game1 class should now look something like
this:
using System;
using System.Collections.Generic;
using System.Linq;
using Microsoft.Xna.Framework;
using Microsoft.Xna.Framework.Audio;
using Microsoft.Xna.Framework.Content;
using Microsoft.Xna.Framework.GamerServices;
using Microsoft.Xna.Framework.Graphics;
using Microsoft.Xna.Framework.Input;
using Microsoft.Xna.Framework.Media;

namespace Collision
{
    /// <summary>
    /// This is the main type for your game
    /// </summary>
    public class Game1 : Microsoft.Xna.Framework.Game
    {
        GraphicsDeviceManager graphics;
        SpriteBatch spriteBatch;
        Texture2D texture;
        Texture2D textureTransparent;

        public Game1()
        {
            graphics = new GraphicsDeviceManager(this);
            Content.RootDirectory = "Content";
        }

        /// <summary>
        /// Allows the game to perform any initialization it needs to before
        /// starting to run. This is where it can query for any required services and
        /// load any non-graphic-related content.  Calling base.Initialize will
        /// enumerate through any components and initialize them as well.
        /// </summary>
        protected override void Initialize()
        {
            // TODO: Add your initialization logic here

            base.Initialize();
        }

        /// <summary>
        /// LoadContent will be called once per game and is the place to load
        /// all of your content.
        /// </summary>
        protected override void LoadContent()
        {
            // Create a new SpriteBatch, which can be used to draw textures.
            spriteBatch = new SpriteBatch(GraphicsDevice);

            texture = Content.Load<Texture2D>(@"Images/logo");
            textureTransparent = Content.Load<Texture2D>(@"Images/logo_trans");
        }

        /// <summary>
        /// UnloadContent will be called once per game and is the place to unload
        /// all content.
        /// </summary>
        protected override void UnloadContent()
        {
            // TODO: Unload any non-ContentManager content here
        }

        /// <summary>
        /// Allows the game to run logic such as updating the world,
        /// checking for collisions, gathering input, and playing audio.
        /// </summary>
        /// <param name="gameTime">Provides a snapshot of timing values.</param>
        protected override void Update(GameTime gameTime)
        {
            // Allows the game to exit
            if (GamePad.GetState(PlayerIndex.One).Buttons.Back == ButtonState.Pressed)
                this.Exit();

            // TODO: Add your update logic here

            base.Update(gameTime);
        }

        /// <summary>
        /// This is called when the game should draw itself.
        /// </summary>
        /// <param name="gameTime">Provides a snapshot of timing values.</param>
        protected override void Draw(GameTime gameTime)
        {
            GraphicsDevice.Clear(Color.CornflowerBlue);

            spriteBatch.Begin();

            spriteBatch.Draw(texture,
                new Vector2(
                (Window.ClientBounds.Width / 2) - (texture.Width / 2),
                (Window.ClientBounds.Height / 2) - (texture.Height / 2)),
                Color.White);

            spriteBatch.Draw(textureTransparent,
                new Vector2((
                    Window.ClientBounds.Width / 2),
                    (Window.ClientBounds.Height / 2)),
                Color.White);

            spriteBatch.End();

            base.Draw(gameTime);
        }
    }
}
Compile and run the game (Debug→Start Debugging), and you should see two images overlapping—one with a transparent background and one with the white block background—as shown in Figure 3-5.
There are a couple of other drawing options worth noting here.
First, you can easily flip images when you draw them and scale them larger or smaller by
using an overload of the SpriteBatch.Draw method. To experiment with these options, change the second
SpriteBatch.Draw call to the
following:
spriteBatch.Draw(textureTransparent,
    new Vector2(
    (Window.ClientBounds.Width / 2),
    (Window.ClientBounds.Height / 2)),
    null,
    Color.White,
    0,
    Vector2.Zero,
    1.5f,
    SpriteEffects.FlipHorizontally,
    0);
The parameters for this overload are listed in Table 3-2.
Parameter | Type | Description |
| The texture to be drawn. | |
| The coordinate for the upper-left corner of the drawn image. | |
| Allows you to draw only a
portion of the source image. Use | |
| The tinting color. | |
| Rotates the image. Use
| |
| Indicates an origin
around which to rotate. Use | |
| Scales the image. Use
| |
| Uses the | |
| Allows you to specify
which images are on top of other images. Use |
In this case, you modified the second Draw and applied a scale of 1.5f, which will render the image at 150% of
its original size (1.0f = 100% size).
You also used the SpriteEffect
SpriteEffects.FlipHorizontally to make the image render as
flipped in the horizontal direction. Compiling and running your project
with the newly modified SpriteBatch.Draw method will display the
second XNA logo reversed horizontally and slightly larger than the other
XNA logo (Figure 3-6).
Layer Depth
You may have noticed that the second XNA logo is drawn overlapping the original logo. By default, XNA will draw each image on top of any previously drawn image, but there are some things you can do to affect the order in which images appear on the screen. The ordering of these overlapping images is referred to as the Z order, or the layer depth, of the images.
You may not care at this point which XNA logo is on top, but
sometimes you’ll want a certain image to always be on top of other
images. For example, in most games, you’ll typically want to show the
moving characters on top of any background image. One way to do this is
to make sure that whatever image you want on top is always drawn last.
This method will work, but as the number of images you use in your game
increases, organizing and staggering your Draw calls to achieve the desired results will
become excruciatingly cumbersome.
Thankfully, XNA lets you specify a layer depth for each individual
image, which allows you to always place images in the right Z order. To
modify the layer depth, you need to convert both SpriteBatch.Draw method calls to the
overloaded method used in the previous example. Convert your first
Draw call to this overload as
follows:
spriteBatch.Draw(texture,
    new Vector2(
    (Window.ClientBounds.Width / 2) - (texture.Width / 2),
    (Window.ClientBounds.Height / 2) - (texture.Height / 2)),
    null,
    Color.White,
    0,
    Vector2.Zero,
    1,
    SpriteEffects.None,
    0);
This code will draw your first sprite exactly the same way as the
previous Draw call, as at this point
you aren’t passing anything to the extra parameters other than the
default values.
However, this particular overload of the Draw method accepts a value for the layer
depth of the image to be drawn as its final parameter. The layer depth
parameter is represented by a float value that must be between 0 and 1.
The value 0 corresponds to what XNA calls the front
of the Z order; the value 1 represents the back of
the Z order.
If you change the layer depth parameters and run the project as
is, you won’t see anything changing at this point. This is because you
still need to tell XNA that you want it to stagger the images according
to their layer depth properties. In order for XNA to recognize the images’ layer depth
properties, you need to add a parameter to the SpriteBatch.Begin method call by using one of the overloads for that
method.
Until now you’ve used an overload of SpriteBatch.Begin that requires no parameters,
but in order to use layer depth values to sort your images, you need to
use an overload of Begin that takes a
parameter of the type SpriteSortMode.
The best option here is an overload that requires two parameters, as
shown in Table 3-3.
Parameter type | Description |
Defines the sorting options of rendered sprites. There are five options:
| |
Determines how sprite colors are blended with background colors. There are four options:
|
Modify your SpriteBatch.Begin
method call to include both of these parameters. Set the first parameter
to SpriteSortMode.FrontToBack. This
option will draw sprites staggered in the order specified by their layer
depth properties in the Draw call,
with objects whose layer depth values are closer to the front (0) on top
of objects whose layer depth properties are closer to the back (1).
Because this is a floating-point value, you have a huge number of
possible layer depth values to deal with (any valid floating-point
number between 0.0 and 1.0). Next, because one of your images uses
transparency, set the second parameter to BlendState.AlphaBlend.
The last thing you need to do is change the final parameter of
each of the Draw calls to different
values, remembering that the values must be in the range 0–1 but can
include float values between 0 and 1. Given that your sort mode is
FrontToBack, the object that has the
smaller layer depth value will be drawn first. Leave the final parameter
of the first Draw call 0, and make the final parameter of the second
Draw call 1. At this point, your Draw method should look something like
this:
protected override void Draw(GameTime gameTime)
        {
            GraphicsDevice.Clear(Color.CornflowerBlue);

            spriteBatch.Begin(SpriteSortMode.FrontToBack, BlendState.AlphaBlend);

            spriteBatch.Draw(texture,
                new Vector2(
                (Window.ClientBounds.Width / 2) - (texture.Width / 2),
                (Window.ClientBounds.Height / 2) - (texture.Height / 2)),
                null,
                Color.White,
                0,
                Vector2.Zero,
                1,
                SpriteEffects.None,
                0);

            spriteBatch.Draw(textureTransparent,
                new Vector2(
                (Window.ClientBounds.Width / 2),
                (Window.ClientBounds.Height / 2)),
                null,
                Color.White,
                0,
                Vector2.Zero,
                1.5f,
                SpriteEffects.FlipHorizontally,
                1);

            spriteBatch.End();

            base.Draw(gameTime);
        }
Run the game at this point, and the transparent image will still
be on top of the nontransparent image. Next, switch the layer depth
values for each image (use 1 for the
first image drawn and 0 for the
second) and run it again. The transparent image will now display behind
the nontransparent image.
Go ahead and play around with different SpriteSortModes, BlendStates, and layer depth parameters to get
a feel for how they function in different scenarios.
Let’s Move
Drawing different sort modes and layer depths is fun and all, but it really isn’t all that exciting. Now, let’s make the two images that you’ve drawn move and bounce off the edges of the screen. To move the objects, you are going to need to change the positions at which they are drawn. Right now, they are both being drawn at constant positions, one with its upper-left corner at the exact center of the window and the other offset from the center so that the image itself is centered in the middle of the screen.
Tip
The code for this section of the chapter is available with the source code for the book under Chapter 3 and is titled MovingSprites.
To move something around the screen, you have to modify the
position of that object between frames. Therefore, the first thing you
need to do is start using a variable in place of the constant values
you’ve been using to specify the objects’ positions. Add two class-level
Vector2 variable definitions (called
pos1 and pos2) at the top of your class, and initialize
both objects to Vector2.Zero:
Vector2 pos1 = Vector2.Zero;
Vector2 pos2 = Vector2.Zero;
You’ll also need to have a speed variable for each object. This variable will be used to determine
how far you move each object between frames. Add two float variables (called speed1 and speed2) below the Vector2 variables you just added:
float speed1 = 2f;
float speed2 = 3f;
Now, change the position parameters in each Draw method to use pos1 and
pos2, respectively. Just to clean
things up, set the second Draw call’s
SpriteEffects parameter to SpriteEffects.None and change the scale
parameter (third from the end) from 1.5f to 1.
This will remove the scaling and horizontal flipping that you
implemented previously.
Your two Draw calls now should
look like this:
spriteBatch.Draw(texture,
    pos1,
    null,
    Color.White,
    0,
    Vector2.Zero,
    1,
    SpriteEffects.None,
    0);

spriteBatch.Draw(textureTransparent,
    pos2,
    null,
    Color.White,
    0,
    Vector2.Zero,
    1,
    SpriteEffects.None,
    1);
Compiling and running the project at this point will result in both sprites being drawn in the upper-left corner of the window, one on top of the other. Now all you have to do is get the objects to move.
While drawing is handled in the Draw method provided in your Game1 class, all updating of objects
(including position, speed, collision detection, artificial intelligence
algorithms, etc.) should take place in the Update method.
To update the position at which you draw the objects, you need to
modify the values of your position variables, pos1 and pos2. Add the following lines of code to your
Update method in the place of the
TODO comment line:
pos1.X += speed1;
if (pos1.X > Window.ClientBounds.Width - texture.Width ||
    pos1.X < 0)
    speed1 *= −1;

pos2.Y += speed2;
if (pos2.Y > Window.ClientBounds.Height - textureTransparent.Height ||
    pos2.Y < 0)
    speed2 *= −1;
There’s nothing too complicated going on here. You update the
X property of the pos1 Vector2 object by adding the value in the
variable speed1. The if statement that follows checks to see
whether the new position will result in placing the image off the right
or left edge of the screen. If it is determined that the image will be
drawn off the edge of the screen, the value of speed1 is multiplied by −1. The result of that
multiplication is that the image reverses direction. The same steps are
then taken with the other image, but in the vertical direction rather
than horizontally.
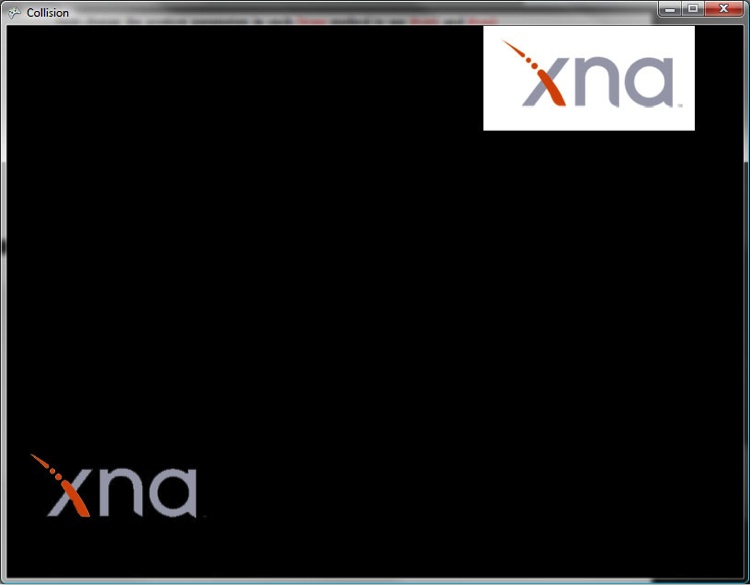
Compile and run the project now and you’ll see both images moving, one horizontally and the other vertically. Both images “bounce” and reverse direction when they run into the edges of the window, as shown in Figure 3-7.
Animation
As mesmerizing as it is to sit and watch moving, bouncing XNA logos, that’s not exactly the reason you’re reading this book. Let’s get to something a little more exciting by animating some sprites.
Tip
The code for this section of the chapter is available with the source code for the book under Chapter 3 and is titled AnimatedSprites.
As discussed earlier in this chapter, animation in 2D XNA games is done much like a cartoon flipbook. Animations are made up of a number of standalone images, and flipping through the images in a cycle causes them to appear animated.
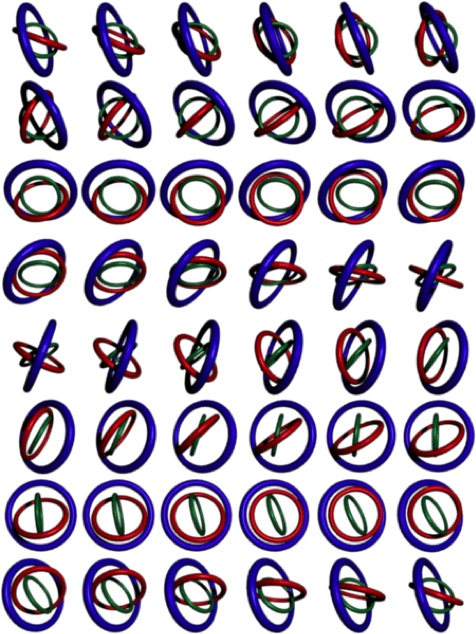
Typically, sprite animations are laid out in a single sheet, and you pull out individual images from that sheet and draw them on the screen in a specific order. These sheets are referred to as sprite sheets. An example of a sprite sheet is included in the source for this chapter, in the AnimatedSpritesAnimatedSpritesAnimatedSpritesContentImages folder. The sprite sheet is named threerings.png and is shown in Figure 3-8.
In each of the previous examples, you have drawn a sprite by
loading the image into a Texture2D
object and then drawing the entire image. With a sprite sheet, you need
to be able to load the entire sheet into a Texture2D object and then pull out individual
sprite frames to draw as you cycle through the animation. The overload
for SpriteBatch.Draw that you’ve used
in the past few examples has a parameter (the third in the list) that
allows you to specify a source rectangle, causing only that portion of
the source Texture2D object to be
drawn. Until now you’ve specified null for that parameter, which tells XNA to
draw the entire Texture2D
image.
To get started with the animation, create a new project (File→New→Project…). In the New Project window, select the Visual C#→XNA Game Studio 4.0 node on the left. On the right, select Windows Game (4.0) as the template for the project. Name the project AnimatedSprites.
Once you’ve created the project, add a subfolder to the AnimatedSpritesContent project in Solution Explorer by right-clicking the AnimatedSpritesContent project and selecting Add→New Folder. Name the folder Images. Next, you’ll need to add the image shown previously in Figure 3-8 to your project by right-clicking the new ContentImages folder in Solution Explorer and selecting Add→Existing Item…. Navigate to the threerings.png image from the previously downloaded Chapter 3 source code from this book (the image is located in the AnimatedSpritesAnimatedSpritesAnimatedSpritesContentImages folder).
Load the image into a Texture2D
object the same way you’ve done previously with other images. First, add
a class-level variable to your Game1
class:
Texture2D texture;
Then, add the following line of code to the LoadContent method of the Game1 class:
texture = Content.Load<Texture2D>(@"images hreerings");
Now that you have the image loaded into a Texture2D object, you can begin to figure out
how you are going to rotate through the images on the sheet. There are a few things that you’ll need to
know in order to create an algorithm that will cycle through each
image:
The height and width of each individual image (or frame) in the sprite sheet
The total number of rows and columns in the sprite sheet
An index indicating the current row and column of the image in the sprite sheet that should be drawn next
For this particular image, the size of each individual frame is 75 pixels in width × 75 pixels in height. There are six columns and eight rows, and you’ll start by drawing the first frame in the sequence. Go ahead and add some class-level variables to reflect this data:
Point frameSize = new Point(75, 75);
Point currentFrame = new Point(0, 0);
Point sheetSize = new Point(6, 8);
The Point struct works well for
each of these variables because they all require a datatype that can
represent a 2D coordinate (X and Y positions).
Now you’re ready to add your SpriteBatch.Draw call. You’ll use the same Draw call that you used in previous examples,
with one difference: instead of passing in null for the source rectangle in the third
parameter of the call, you have to build a source rectangle based on the
current frame and the frame size. This can be done with the following
code, which should be added to the Draw method of your Game1 class just before the call to base.Draw:
spriteBatch.Begin(SpriteSortMode.FrontToBack, BlendState.AlphaBlend);

spriteBatch.Draw(texture, Vector2.Zero,
    new Rectangle(currentFrame.X * frameSize.X,
        currentFrame.Y * frameSize.Y,
        frameSize.X,
        frameSize.Y),
    Color.White, 0, Vector2.Zero,
    1, SpriteEffects.None, 0);

spriteBatch.End();
If you’re confused about the logic used to create the source
rectangle, consider this: with a zero-based current frame—meaning
that you’re initializing your CurrentFrame variable to (0, 0) instead of (1,
1), or, in other words, that the upper-left image in your sprite sheet
will be referred to as (0, 0) rather than (1, 1)—the X coordinate of the
upper-left corner of the current frame will always be the current frame
index’s X value multiplied by the
width of each individual frame. Likewise, the Y coordinate of the
upper-left corner of the current frame will always be the current frame
index’s Y value multiplied by the
height of each individual frame.
The width and height values of the source rectangle are always the same, and you can use the frame size X and Y values to represent the width and height of the rectangle.
Next, change the background color to white by changing the color
passed to the GraphicsDevice.Clear method within the
Draw method of your Game1 class. Then, compile and run the
project. You should see the first sprite in the three rings sprite sheet
being drawn in the upper-left corner of the game window.
The sprite still isn’t animating, though, because you are
continuously drawing only the first image in the sheet. To get the image
to animate, you need to update the current frame index to cycle through
the images in the sheet. Where should you add the code to move the
current frame index from one frame to the next? Remember that you draw
in the Draw method, and you do
everything else in Update. So, add
the following code to your Update
method, before the base.Update
call:
++currentFrame.X;
if (currentFrame.X >= sheetSize.X)
{
    currentFrame.X = 0;
    ++currentFrame.Y;
    if (currentFrame.Y >= sheetSize.Y)
        currentFrame.Y = 0;
}
All this code does is increment the X property of the CurrentFrame object and then check to make
sure it isn’t greater than or equal to the number of frame columns. If
it is greater than the number of columns, it resets the X property to 0 and increments the Y value to draw the next row of sprites in the
sheet. Finally, if the Y value
exceeds the number of rows in the sheet, it resets Y to 0,
which starts the entire animation sequence over, starting with frame (0,
0).
Compile and run the project at this point and you should see your three rings image spinning in the upper-left corner of the window, as shown in Figure 3-9.

It’s about time you saw the fruits of your efforts in XNA. Although the spinning rings isn’t exactly the next great game, it does look really good, and you should be starting to get a sense of how easy XNA is to use and just how powerful it can be. As you can see, by cycling through images in a sprite sheet it becomes fairly straightforward to create any kind of animation that can be drawn in sprite sheet format.
Adjusting the Framerate
Although the three rings animation looks pretty decent when you run the project, there may be a time when your animation runs too quickly or too slowly and you want to change the speed at which it animates.
I mentioned the framerate earlier, but here’s a quick reminder: framerate generally refers to how many times per second a game redraws the entire scene. In XNA, the default is 60 frames per second (fps) for PC and Xbox360 games, and 30 fps for Windows Phone 7 games. Unless you’re running the current project on a very slow machine, you’re most likely seeing the three rings image project being drawn at 60 fps.
There is also a different type of framerate, related to individual animations. This framerate (often referred to as the animation speed) reflects the rate at which a given animation cycles through images in the sprite sheet. Right now, your animation speed for the three rings image is 60 fps because you are drawing a new image from the sprite sheet every time you redraw the scene (which is happening at 60 fps).
There are a few different ways you can change the animation speed
of your three rings animation. XNA’s Game class has a property called TargetElapsedTime that tells XNA how long to wait between calls to the
Game.Update method. Essentially, this
represents the amount of time between each frame being drawn. By
default, this is set to 1/60 of a second, which gives XNA the default 60
fps.
To change the framerate of your project, add the following line of
code at the end of the Game1
constructor:
TargetElapsedTime = new TimeSpan(0, 0, 0, 0, 50);
This tells XNA to call Game.Update only every 50 milliseconds, which
equates to a framerate of 20 fps.
Compile the game and run it, and you should see the same three rings
animation, but animating at a much slower speed. Experiment with
different values in the TimeSpan
constructor (for example, 1 millisecond) and see how fast the animation
cycles through the sprite sheet.
Ideally, you’ll want to keep the framerate at around 60 fps, which means you can typically leave the default framerate alone. Why is 60 frames per second the standard? This is the minimum refresh rate of a monitor or television set that won’t render as flickering when viewed by the human eye.
If you push the framerate too high, XNA can’t guarantee that you’ll have the kind of performance you’re expecting. The speed of the graphics card GPU, the speed of the computer’s processor, the number of resources you consume, and the speed of your code all go a long way toward determining whether your game will have that peak performance.
Luckily, XNA has provided a way to detect if your game is
suffering from performance issues. The GameTime object, which is passed in as a
parameter in both the Update and the
Draw methods, has a Boolean property
called IsRunningSlowly. You can check this property at any time within those
methods; if its value is true, XNA
isn’t able to keep up with the framerate you have specified. In this
case, XNA will actually skip Draw
calls in an effort to keep up with your intended speed. This probably
isn’t the effect that you desire in any game, so if this ever happens
you’ll probably want to warn the user that her machine is having a hard
time keeping up with your game.
Adjusting the Animation Speed
Although adjusting the framerate of the game itself does affect the three rings animation speed, it’s not the ideal way to do so. Why is that? When you change the framerate for the project, it will affect the animation speed of all images, including things such as the speed of moving objects and so on. If you wanted one image to animate at 60 fps and another to animate at 30 fps, you wouldn’t be able to accomplish that by adjusting the overall game’s framerate.
Remove the line you added in the previous section that set the
TargetElapsedTime member of the
Game1 class, and let’s try a
different route.
When adjusting a sprite’s animation speed, you typically want to do so for that sprite alone. This can be done by building in a way to move to the next frame in the sprite sheet only when a specified time has elapsed. To do this, add two class-level variables, which you’ll use to track the time between animation frames:
int timeSinceLastFrame = 0;
int millisecondsPerFrame = 50;
The timeSinceLastFrame variable
will be used to track how much time has passed since the
animation frame was changed. The millisecondsPerFrame variable will be used to specify how much time you want to wait
before moving the current frame index.
The actual cycling of animation frames happens in your Update method. So, the next step is to check the elapsed time between
animation frames and run the code that moves the current frame only if
the desired elapsed time has been reached. Modify the code you’ve added
to the Update method to include the
surrounding if statement shown here
(changes are in bold):
timeSinceLastFrame += gameTime.ElapsedGameTime.Milliseconds;
if (timeSinceLastFrame > millisecondsPerFrame)
{    timeSinceLastFrame −= millisecondsPerFrame;
    ++currentFrame.X;
    if (currentFrame.X >= sheetSize.X)
    {
        currentFrame.X = 0;
        ++currentFrame.Y;
        if (currentFrame.Y >= sheetSize.Y)
            currentFrame.Y = 0;
    }
}
As you can see here, you use the gameTime.ElapsedGameTime property to determine
how much time has passed since the previous frame change. This property
indicates how much time has passed since the previous call to Update. You add the Milliseconds property of that object to your
TimeSinceLastFrame variable. When the
value of that variable is greater than the number of milliseconds you
want to wait between frame changes, you enter the if statement, adjust the TimeSinceLastFrame variable by subtracting the
value in MillisecondsPerFrame, and
then change the animation frame.
Compile and run the project now, and you should see the three rings image animating slowly. The important thing to note here is that the animation speed of the three rings is running at a different framerate (20 fps) than the game itself (60 fps). With this method, you’re able to run any number of images at different framerates without sacrificing the framerate of your game as a whole.
What You Just Did
Good times are here to stay because you now know how to animate in 2D XNA at will! Let’s take a minute and review what you accomplished this chapter:
You investigated what happens behind the scenes in an XNA game, including the XNA program flow and the XNA game loop.
You drew your first sprite on the screen.
You learned a little bit about the content pipeline and its purpose.
You moved a sprite around the screen.
You played with sprite transparency, horizontal flipping, and other options.
You drew sprites in different Z orders based on the layer depth property.
You drew an animated sprite using a sprite sheet.
You adjusted the framerate of an XNA game.
You adjusted the individual animation speed of a sprite.
Summary
When you create a new XNA project, it has a game loop and program flow built in. The game loop consists of an
Update/Drawcycle, whereas the program flow adds steps at which the programmer can set game settings (Initialize), load graphics and sounds and other content (LoadContent), and perform special unload operations (UnloadContent).To draw an image on the screen, you need a
Texture2Dobject that will hold the image in memory. The content pipeline prepares the image at compile time by converting it to an internal XNA format. You then use aSpriteBatchobject to draw the object on the screen.All sprites must be drawn between a
SpriteBatch.Beginand aSpriteBatch.Endcall. These calls inform the graphics device that sprite information is being sent to the card. TheBeginmethod has several overloads that allow you to change the way transparency is handled and the way sprites are sorted.Animating sprites typically is done via a sprite sheet (a sheet containing multiple frames of sprite images drawn flipbook-style). Cycling through those images allows the sprite to appear animated.
The default framerate of an XNA game is 60 fps. Changing that value will affect sprite animations that do not use a separate timer to determine animation speed as well as the overall game speed.
To adjust the animation speed of an individual sprite, you can set a counter to keep track of the last time you changed frames and change frames only every X number of milliseconds.
There are only two kinds of pixels on a computer monitor: pixels that have tried to draw an animated sprite of Chuck Norris getting beaten up by a bad guy, and pixels that still work.
Test Your Knowledge: Quiz
What are the steps in an XNA game loop?
If you wanted to load a
Texture2Dobject, in which method should you do that?What line of code should you use to change the framerate of an XNA game to 20 fps?
What should you pass in as the parameter of
Content.Loadwhen loading aTexture2Dobject?Fact or fiction: the content pipeline will let you know at compile time if you add an image to your project that it cannot parse.
You’re drawing a sprite, and you want the background to be transparent. What steps do you need to take to draw it with a transparent background?
You have two sprites (A and B), and when they collide, you always want A to be drawn on top of B. What do you need to do?
What are the things you need to keep track of to cycle through a sprite sheet?
What was the first television series to command more than $1 million per minute for advertising?
Test Your Knowledge: Exercise
In this chapter, you built an example where two XNA logo images moved around the screen and bounced off the edges. Take the animated sprite example that you built at the end of this chapter, and make the animated sprite move and bounce in a similar fashion—but in this case, make the animated sprite move in both X and Y directions and bounce off of all four edges of the screen.