
Chapter 1: Getting Started

Introduction—The Sony SLT-A77: New Features
At the time of writing, the Sony SLT-A77 is the most advanced model in this company’s lineup of fixed mirror interchangeable lens cameras. It is an update of the discontinued Sony A33 and A55 and is one of the best Advanced Photo System type-C (APS-C) cameras for taking both high-resolution still photographs and high-quality movies (see Movies vs. Videos box below).
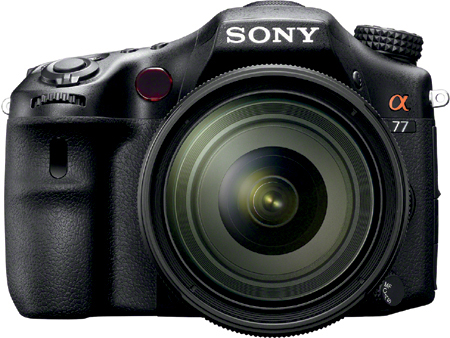
Figure 1-1: Sony A77 camera with 16-50 mm kit lens (Photograph courtesy of Sony)
Unlike a digital single lens reflex (DSLR) camera, which requires the mirror to be raised out of the optical light path to the sensor, the Sony A77 uses “translucent mirror technology” with the mirror fixed in position. SLT stands for “single-lens translucent,” which is Sony’s brand name for this technology. In essence, the translucent mirror is a beam splitter, diverting some of the light to the automatic focus detector and the majority of the light to the imaging sensor for real time viewing and recording of the subject. This combination of mirror and sensor allows for simultaneous focusing and movie recording. In addition, when taking still pictures and movies, the camera can focus extremely rapidly (figure 1-2). Among its unique features is a 24.3 megapixel sensor. At the time of writing, Sony is the only camera manufacturer selling an APS-C camera that can record at this high resolution.
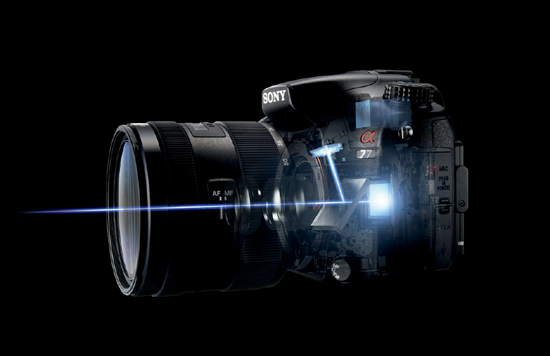
Figure 1-2: Light path through the Sony A77 (Photograph courtesy of Sony)
The absence of a hinged mirror provides several advantages. Perhaps the most obvious is automatic focusing when recording movies. While other DSLRs can do this, only Sony uses a high-speed phase detection system. Other cameras, assuming they automatically focus while recording movies, use the slower contrast detection method.
A second advantage is a high burst rate: the camera can rapidly fire multiple shots with a single press of the shutter button. Most cameras have a mirror that must be swung out of the light path to the sensor and then returned to its rest position to again direct light to the optical viewfinder. This cycle limits how fast the camera can be fired.
Finally, an underappreciated aspect of translucent mirror technology is the inclusion of an electronic first curtain shutter. Because of the fixed mirror design and this shutter, there is no mechanical movement for initiating exposure. This means that the camera is virtually vibration-free, an advantage for discriminating users who do not want to sacrifice sharpness because of camera movement.
Sony replaced the optical viewfinder with an electronic one. Early designs of the electronic viewfinder were inadequate: they lacked sharpness, and movement appeared to flicker when viewing rapidly moving objects. Now, the A77’s electronic viewfinder is sharp enough to be used for focusing, and subjects move smoothly across the screen. You can also see how settings affect the image before releasing the shutter.
The Sony 24.3 megapixel sensor works best at ISO 100, providing the greatest dynamic range and generating the least noise. The ISO can be reduced to 50 on bright days when you wish to use a long shutter speed to blur motion. Under lower light levels, the ISO can be increased to 1600, which provides an acceptable image. For surveillance work under extremely low lighting conditions, the ISO can be raised to a maximum of 16000. Because the A77 sensor’s high pixel density requires using smaller photosites, the generation of sensor noise is theoretically greater. However, with the improvement in sensor design, the Sony A77 generates good images at ISO 1600. For us, this is not a limitation since we rarely go above this setting. Previously, when working with the A33 and the A55, the ISO’s range was smaller, ranging from 100 to 12800, whereas the A77 has an expanded ISO range from 50 to 16000.
If you want one camera that can do an excellent job for still and movie work, this is the camera for you.
Using This Book
The Sony A77 works effectively for all users, regardless of their level of expertise. It can be used with automatic settings, so beginners can take pictures by simply pointing and shooting. As you become more proficient, you can alter the A77’s exposure and focus settings. Eventually, you can take full control by setting the camera to manual and disregarding its recommendations. This allows you to elevate your picture taking to a new level and create images that depict the mood and results you intend.
This book has chapters for the beginner, the intermediate, and the expert. Beginners can find helpful information in chapter 4, “Automatic Settings”; intermediate photographers can turn to chapter 6, “Taking Control of the Camera”; and expert photographers can refer to chapter 7, “Manual Operation of the Camera.” Regardless of your skill or interest level, this is an exciting camera to use.
At first, the abundance of commands and controls can make the Sony A77 confusing. The book starts with a description of the A77’s automatic functions, then goes on to semiautomatic functions, and then to manual functions. We describe the camera’s capabilities in simple terms to help you learn what the camera can do. We cover movie-making features, managing your still pictures and movies, and quick tips to help reduce errors and improve your use of the camera. In addition, we put it all together with some real-life scenarios, which is especially helpful for novice and intermediate users.
For the beginner, it makes sense to use the camera’s automatic modes. After gaining experience, you can start using commands to override the camera’s recommended settings. There are two fully automatic modes—Auto and Auto+— which make the camera a point-and-shoot instrument. The Auto option enables the camera to automatically adjust exposure and focus. The Auto+ option does the same thing, but goes further by attempting to identify the scene and set the aperture and shutter most appropriate for the subject. As in a point-and-shoot camera, you cannot override the camera’s exposure recommendation in Auto or Auto+ modes.
The Sony A77 uses advanced image processing techniques to improve pictures by firing multiple shots. At times, the camera will automatically take several shots and combine them to render one superior image from the aggregate in Auto+ mode. It is not always easy to determine which mode to use. Auto will record a technically good photograph, which is sharp and well exposed; but Auto+ may do a better job when it successfully identifies the scene and employs advance multiple exposure techniques to improve the image.
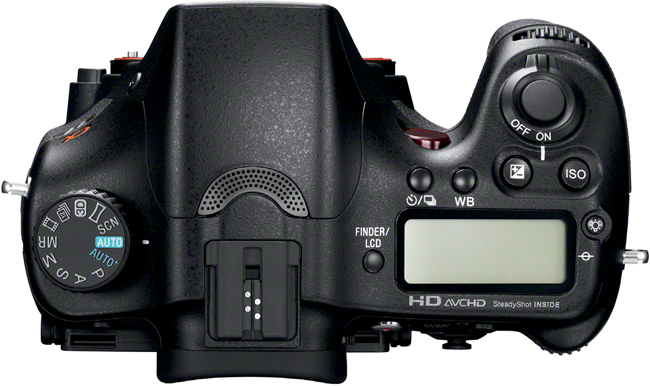
Figure 1-3a: Top of Sony A77 camera body (Photograph courtesy of Sony)
To get started, if you already have the fully-charged battery pack and memory card installed, turn on the camera and then switch on one of the automatic modes by moving the mode dial on the top right of the camera to AUTO or AUTO+ (figures 1-3 a–b). The Auto or Auto+ icon will display in the upper left corner of the LCD screen. All you need to do is find your subject, let the camera do its thing, and press the shutter button. It really is that simple.
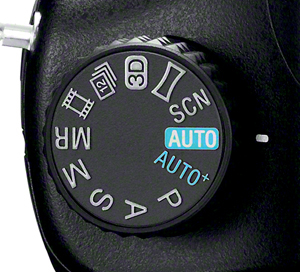
Figure 1-3b: Close-up of mode dial
Unfortunately, scene identification in the Auto+ mode can be imperfect. If the camera’s intelligent software fails to correctly identify the type of scene, it uses a generic setting that captures a technically good image—just not necessarily the best.
To obtain accurate scene recognition, you can take an active role by turning the mode dial away from AUTO or AUTO+ to the SCN icon. Once there, the LCD screen will present a list of eight predefined scene modes: Daytime portraits, Evening portraits, Sports action, Hand-held twilight, Landscapes, Sunsets (and sunrises), Night, and Macro (figure 1-4). Scroll through the list and select the one that best fits your photographic subject. This ensures that the camera can fine-tune the focusing, exposure, and light sensitivity according to your selection and produce an excellent quality picture.
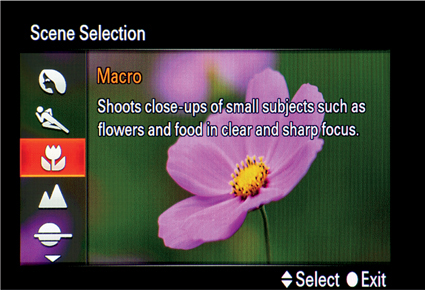
Figure 1-4: SCN predefined scene modes menu
The auto and predefined scene modes control the camera settings for you and require the least amount of input. Ultimately, you can take a step toward greater control by using semiautomatic settings (P, A, and S modes) where you select one exposure setting and the camera adjusts the rest automatically. For the most experienced users, the camera controls can be set manually (M mode), allowing you to rely on your experience and creativity to select the right settings. In this case, all of the camera menu and button controls are at your disposal. This gives you the opportunity to fully exercise your artistic creativity to capture unique images. Also, you can be confident when you set the white balance, shutter speed, or aperture that the camera will not override your settings.
Setting Up Your New Sony A77
When you take your camera out of the box, you will have the following components:
• Camera body: 23.4 effective megapixel Sony A77
• If purchased, one of the following lenses:
- SLT-A77K/A77VK
• DT18-55 mm zoom lens
• Front and rear lens cap
• Lens hood
- SLT-A77Q/A77VQ
• DT16-50 mm zoom lens
• Front and rear lens cap
• Lens hood
• Rechargeable NPFM500H “InfoLITHIUM” battery
• BC-VM10A battery charger
• Power cord (Not supplied in U.S. or Canada)
• Shoulder/neck strap
• Eyecup
• Battery case
• Body cap
• AV cable
• Accessory shoe cap
• CD-ROM featuring Image Data Converter and Picture Motion Browser (PMB)
• Camera manual
Make sure you have everything before assembling your new camera. It is very easy: fully charge your battery, attach the lens, and insert a memory card on which to store your pictures and movies. When you are done, you’re ready to start.
Battery
The supplied “InfoLITHIUM” lithium ion battery needs to be fully charged before use. It can be damaged if allowed to drain completely. Use Sony certified batteries only. Noncertified batteries will void your warranty and may ruin your camera.
A battery charger is supplied with your camera. For U.S. and Canadian battery chargers, unfold the prongs on the charger and plug it directly into an electrical socket. For cameras sold outside of the U.S. and Canada, use the supplied cable to plug the battery charger into an electrical socket and then insert the battery into the charger. The charge indicator light glows while charging and extinguishes when it is complete. If the light flashes, this indicates there is a problem such as a defective battery. Sony estimates it takes 175 minutes to fully charge a completely depleted battery. Future charges will take less time, since there should always be some residual charge within the battery.
How many shots can you take on a fully charged battery? Well, that depends on how you use the camera, how much time you leave the camera powered on between shots, and your combination of movies, panorama pictures, and still pictures. Sony estimates that you can record approximately 470 images using the viewfinder and 530 images using the LCD screen. This may seem like a lot of recording, but it isn’t. We can easily take this many pictures in one afternoon of photography. Keep in mind that if you are also recording movies, the number of images drops considerably.
Therefore, we recommend you get a second battery, keep it charged, and have it available in the event your camera’s battery runs low on power.
Memory Card
You need a memory card to use with this camera. Unlike some point-and-shoot consumer cameras, there is no internal memory for storing images, and the camera will not operate without a memory card! You may already have a compatible memory card from another camera, which you can use for your new Sony A77 as long as it is an SD, SDHC, or SDXC card. If it isn’t, you will have to purchase one. But what should you buy?
The A77 uses a Secure Digital (SD) memory card. These postage-stamp-sized cards come in many varieties, with various memory capacities and data transfer speeds. These cards are designated as SD, SDHC, or SDXC, which refer to the card’s maximum memory capacity. Don’t be too concerned about these designations as it is more important to know the memory capacity of the card (see the following “Memory Card” box) and its class rating.
At the time of writing, Sony sells an SDHC Class 10 card that holds 32 gigabytes (GB) of data for about $100. But you can opt for a 16 GB card (about $60) or an 8 GB card (about $40) instead. If you intend to record movies, you need to check the SD card’s speed rating. Cards are categorized as belonging to classes (2, 4, 6, 8 and 10); the higher the class, the faster the memory card can receive and record data. According to Sony, the Class 4 card is the minimum speed needed for recording movies in AVCHD format.
Instead of using an SD card, you may decide to use Sony’s Memory Stick. These are not as common as SD cards and are associated with Sony’s point-and-shoot cameras. The Memory Stick PRO-HG Duo records still pictures and movies. If you use the Memory Stick PRO Duo to record both stills and movies, make sure it is the Mark 2 version.
You can use any manufacturer’s SD, SDHC, or SDXC Class 4 or faster memory card of Class 4 or faster for both still pictures and movies. The size of the memory card you buy depends on how you will use the camera and how you plan to maintain the stored pictures and movies. If you plan to take a lot of movies, you will need a large amount of memory—at least 8 GB. If you are going to take mainly still photos, 4 GB should suffice.
At the end of each shooting day, we recommend you download the images from your camera to your computer. Once the files are downloaded, we erase the images on the card by using the camera commands to reformat. This allows you to start fresh the next day, minimizing the risk of running out of memory. It also enables you to use a smaller size memory card, thus saving money.
Although you can connect your camera to your computer with a cable and transfer the stored files directly, you can also download the files using a card reader. Remove the memory card from the camera and insert it into a card reader connected directly to your computer using a USB cable.
Many people keep several memory cards for those occasions when they will be doing a lot of recording and cannot download the contents to a computer. It’s important to note that memory cards can fail, and having a backup will ensure that you can resume shooting if your primary card fails. For our own photography, we tend to use 16 GB cards since they provide plenty of space to accommodate a day’s worth of shooting and movie recording.
Setting Up the Camera
Once the battery is fully charged, insert it by inverting the camera body and opening the battery compartment. On the bottom-right side of the camera, there is a recess with a raised triangle. Slide the triangle in the direction indicated to open the battery door. The battery has a printed arrow indicating how to slide it into the compartment. Also, the battery is ridged so you can insert it only one way. You will hear a solid click when it is properly seated. You can now close the battery cover. To remove the battery, open the compartment to expose a small blue lever that blocks the battery’s egress. Push the lever to the side, and the battery will pop out.
The memory card compartment is on the right side of the camera. To open it, slide the compartment door toward the back of the camera. When you insert the memory card, the end with the metallic reading bars goes in first. It will lock into position with a click. To remove it, push the top of the memory card inward to release the lock and the card will pop out for easy removal. If the memory card is defective or its contacts are dirty, a NO CARD message will be displayed on the LCD screen. If this occurs, remove the memory card and reinsert it. The message should go away. If it doesn’t, the card may be defective and will have to be replaced. Check Appendix B, “Common Error/Warning Messages and Resolutions,” for more information. To close the memory card compartment, reverse the process to slide the door back into place.

Figure 1-5: Attached lens, locked in position showing red alignment button
Next, attach the lens to the camera body. Remove the rear lens and camera body caps by turning them counterclockwise. Store both caps in a safe place for future use. Inserting the lens is a two-step process. There is a red bump at the base of the lens and a red dot on the rim of the camera body’s lens mount. Align these two indicators, insert the lens, and then rotate it clockwise until you feel and hear a click. The lens is now locked in position and ready to use (figure 1-5).
Last but not least, attach the camera shoulder/neck strap. The strap should always be secured to the camera and placed either around your neck or over your shoulder when you’re carrying or using the camera.
Protecting the Lens
There are several ways to protect your camera’s lens against damage. The first and most obvious is to keep the lens cap on when not using your camera.
The second is to put the lens hood on when you are shooting. This helps to keep errant objects from hitting the lens. Another benefit is that the hood increases image contrast by blocking light from the side of the lens and keeping it from entering the camera.
The third way to protect your camera’s lens is to use an ultraviolet (UV) filter. These threaded filters can be screwed onto the lens and serve as a clear optical lens cap. Sony sells these filters, but if you know the thread diameter of your lens, you can buy alternative brands from other retailers.
Using a UV filter as a lens protector is controversial. There are some who claim it’s a good idea, while others claim the protection is minimal and the filter degrades image quality. We find inexpensive, off-brand UV filters to be problematic, so we buy and use only high-quality filters made by a reputable manufacturers. Tiffen, Hoya, and B+W UV filters are good and do not degrade lens performance. You may be surprised by the filter’s expense, but considering it is optically precise disk of glass, the price for protecting your lens is reasonable. We routinely buy and mount high quality UV filters on our lenses. While there is a theoretical chance of losing some image sharpness, it’s so slight that we don’t notice it.
Protecting the LCD Screen
Although the Sony A77 LCD screen is made from a durable material, it can be scratched. This won’t affect the camera’s ability to take good pictures, but it can affect your ability to know when you have a great picture or when you need to improve the image’s focus. We recommend that you purchase an LCD screen protector. Sony offers them for the A77 at a nominal cost.
Viewing Menu Commands
You are now ready to turn on your camera. The ON/OFF power switch is on the top right side of the camera circling the shutter button (figure 1-6). Move the lever so the indicator matches up with the ON option.
The first time you turn on your new camera, you will be asked if you want to set the camera’s internal clock (see section 1.15). This information is recorded with each picture and movie. Before we cover setting the camera’s clock information, let’s first examine how to navigate through and set values for the camera’s extensive menu commands.
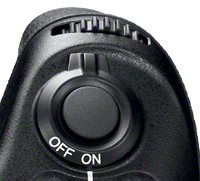
Figure 1-6: ON/OFF power switch on top of the camera
Menu Structure
The Sony A77 has an extensive list of commands. To access them, press the MENU button (figure 1-7) to display the camera’s menu. Although you can use the view-finder to navigate through the menu structure, it is easier to use the LCD screen, and we will describe menu navigation from this perspective.
Although all of the commands are constantly displayed, you may see some of them disabled (grayed out). This is sometimes controlled by the selected mode dial option. For example, the Panorama: Size command is enabled when the mode dial is on Sweep Panorama mode and disabled when using all other modes. In a couple of cases, some commands are dependent on other command settings; for example, the Peaking Color command is disabled unless you first set the Peaking Level command to [High], [Med], or [Low].
The camera’s menu may look complex at first, but it is actually set up very logically. The horizontal menu bar (figure 1-8) at the top depicts where you are within the menu structure. There are seven main menu options, each represented by an icon (table 1-1). Basically, these menu items deal with Still Shooting, Movie Shooting, Custom, Playback, Memory Card Tool, Clock Setup, and Setup.
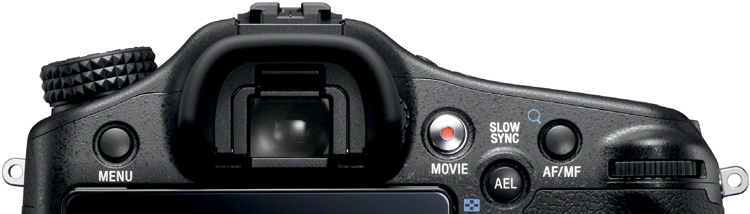
Figure 1-7: MENU button on the left above the LCD screen
Menu Name |
|
|
Still Shooting |
|
Movie Shooting |
|
Custom |
|
Playback |
|
Memory Card Tool |
|
Clock Setup |
|
Setup |
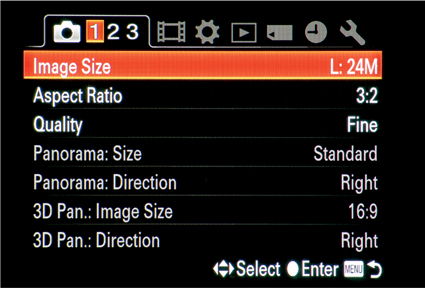
Figure 1-8: MENU screen with the main menu horizontal bar at the top. Here the option Image Size under Still Shooting is selected.
Each main menu option has a list of commands associated with it. Sony displays the commands as “pages.” Up to seven commands can be displayed on a single page. Additional commands are displayed on a following page. The numbers next to the main menu options represent the page numbers. As you move through the main menu bar, the commands change. Figure 1-8 shows there are three pages under the menu option Still Shooting, and the options on page 1 are displayed.
Each command has an assigned value that you change to control the camera’s operations. For now, we will only cover the menu structure and navigation basics. We will describe how to use specific commands as they arise throughout the book.
Menu Command Nomenclature
We refer to various Sony A77 camera commands throughout this book. To help you quickly locate them within the menu structure, we use the following notation:
MENU>main menu name (page #)>submenu command name >[value1], [value2]]
The “>” symbol separates menus and submenus, and the command’s menu page is found within parentheses. If the submenus have subordinate commands, they are separated by > until the command being discussed is reached. We include command values in brackets when they pertain to the subject being covered.
For example, we identify the AF w/shutter command location as follows:
MENU>Still Shooting Menu (3)>AF w/shutter
Figure 1-9(a–c) shows a series of screen shots starting from left to right: page 1 of Still Shooting (figure 1-9a); page 3 of Still Shooting with the AF w/shutter command highlighted (figure 1-9b); and the AF w/shutter command’s options displayed with the [On] value highlighted (figure 1-9c). Using our menu nomenclature, the AF w/shutter command and its options are displayed as:
MENU>Still Shooting Menu (3)>AF w/shutter>[On], [Off]
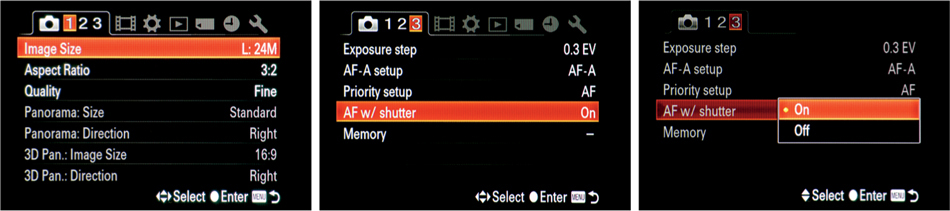
Figures 1-9(a–c): Main Menu flow to the AF w/shutter command
Menu Navigation
The camera utilizes a single button called the multi-selector (figure 1-10) to navigate through the camera’s commands, functions, and other settings. The multi-selector works in two ways: you use it to navigate through the menu by toggling left, right, up, or down, and you push it in to select a value. There are faint directional arrows imprinted around the button indicating these toggle directions. As you navigate through the menu, the camera’s menu position is indicated by the option being highlighted on the LCD screen.
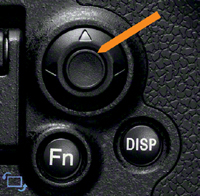
Figure 1-10: Multi-selector button surrounded by directional arrows
As an example, you press the multi-selector button to select a menu and then toggle the multi-selector up or down to scroll through the menu command’s available values. Note that the cursor skips over any disabled commands and subsequent values.
Navigating with the Front and Rear Control Dials
Using the multi-selector is not for everyone. Instead, you can use the front and rear control dials (figures 1-11 a–b) to navigate through the menu commands and their associated values. To activate the front and rear control dials as menu and command navigation tools, you have to view the menu structure in some capacity—either by pressing the MENU button, the Fn button, or some specific command button. Otherwise, the front and rear control dials change the value of the camera’s aperture opening or its shutter speed.
When the MENU button is pressed, use the rear control dial to cycle through the menu’s horizontal bar options. You can go in either direction by turning the dial left or right. Use the multi-selector button to select a specific menu option. Then you can rotate the front control dial to move up and down through the available commands. Press the multi-selector button to enter a command’s available values. The rear control dial allows you to exit the list of command values without selecting one and return to the command’s position in the menu.
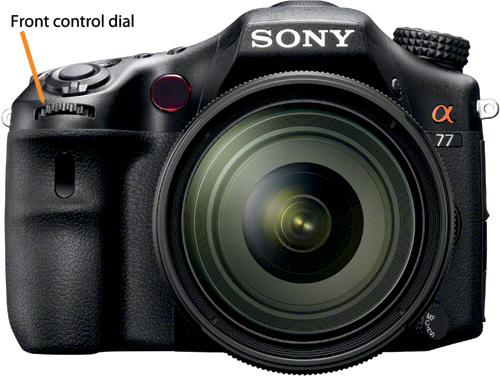
Figure 1-11a: Front control dial
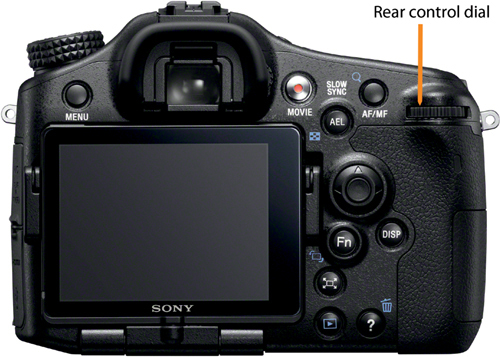
Figure 1-11b: Rear control dial
When you reach the end of viewing the menu structure, both the rear and front control dials allow you to cycle again through the list of menu pages and commands. But once you are viewing a specific command’s list of available values, you can only scroll up and down through it. When you arrive at the end of that list, you have to turn the front control dial in reverse to go back up through the list.
This is an area where practice will help you become familiar with the camera’s operations.
Recommendations for Menu Navigation
Spend some time exploring the main menu options. Use either the front and rear control dials or toggle the multi-selector to navigate through the menus, their commands, and the available values. Remember, press the multi-selector button to select a value. Experiment with moving in and out of commands and scrolling from page to page. A little practice now will help you find the navigation style best suited to you. We find using a combination of the front and rear control dials and toggling the multi-selector work well together. The dials enable you to move rapidly through the menu tree, while toggling the multi-selector provides more precision as you near the command you wish to activate.
Error Messages
The Sony A77 has a large number of self-explanatory information and error messages to help guide you through setting up and using the camera. There are also many error messages that need some additional information. See Appendix B for a list of these error messages and resolutions in alphabetical order.
Important Command Reset Capability
Sony has a single command to restore all of the A77’s settings to their default values. As you use the camera, you will set, change, and reset command options frequently. At times, the camera may get confused, or you may find the need to start over with the camera’s default values. Use the following command to reinitialize camera’s settings:
MENU>Setup (3)>Initialize>[Reset Default], [Rec mode reset], [Custom reset]
The Setup Menu’s Initialize command gives you three options to reset a group of commands back to their default values:
• Reset Default – Reset all of the Menu and Function commands to their default values.
• Rec mode reset – Reset Menu and Function commands for recording images to their default values.
• Custom reset – Reset only the Custom Menu command settings to their default values.
Note: Face Registration’s faces and priorities are deleted when either the [Reset Default] or [Custom reset] option is selected. However, if your camera commands stop working, you might need to select the [Reset Default] option and end up loosing your stored face registration face information. Once lost, face registration information cannot be regained. One has to photograph and register the subject’s face anew.
Fn Button
Not all of the camera’s functions are managed through the MENU button. Many of them are managed using the buttons on the top and back of the camera. One of them is the Fn button. Whereas the other buttons manage just one function, the Fn button controls up to 15. The functions are displayed in two columns—one on the extreme left and the other on the extreme right of the display screen (figure 1-12).
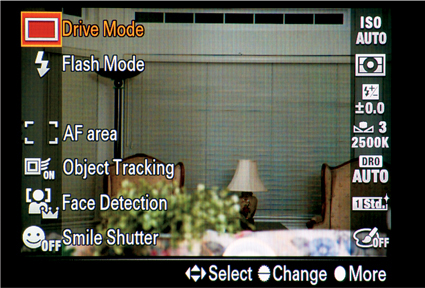
Figure 1-12: Fn button’s two columns of functions
When you press the Fn button, the resulting display varies depending on the setting of the mode dial. Tables 1-2 (a–b) show each of the mode dial options along with the functions displayed when the Fn button is pressed. Some of the functions will be displayed as disabled, while a few will not be displayed at all.
Mode Dial Setting |
Fn Button Menu Options |
||||||
SCN/Memory Recall* |
Drive Mode |
Flash Mode |
AF Area |
Object Tracking |
Face Detection |
Smile Shutter |
|
P |
|
E |
E |
E |
E |
E |
E |
A |
|
E |
E |
E |
E |
E |
E |
S |
|
E |
E |
E |
E |
E |
E |
M |
|
E |
E |
E |
E |
E |
E |
MR |
MR1 |
E |
E |
E |
E |
E |
E |
|
MR2 |
E |
E |
E |
E |
E |
E |
|
MR3 |
E |
E |
E |
E |
E |
E |
Movie |
|
E |
D |
E |
E |
E |
|
Continuous Advance Priority AE |
|
D |
E |
E |
D |
D |
D |
3D |
|
D |
D |
E |
D |
D |
D |
Panorama |
|
D |
D |
E |
D |
D |
D |
SCN |
Portrait |
E |
E |
E |
E |
E |
E |
|
Sports Action |
E |
E |
E |
E |
E |
E |
|
Macro |
E |
E |
E |
E |
E |
E |
|
Landscape |
E |
E |
E |
E |
E |
E |
|
Sunset |
E |
E |
E |
E |
E |
E |
|
Night Scene |
E |
D |
E |
E |
E |
E |
|
Hand-held Twilight |
D |
D |
E |
D |
E |
D |
|
Night Portrait |
E |
E |
E |
E |
E |
E |
AUTO |
|
E |
E |
|
E |
E |
E |
AUTO+ |
|
E |
E |
|
E |
E |
E |
* The selected SCN or Memory recall icon is displayed when mode dial is set to SCN or MR respectively |
|||||||
Table 1-2a: Fn button’s left column of functions. E = Enabled, D = Disabled, Grayed = Not listed
Fn Button Menu Options |
||||||||
SCN/Memory Recall* |
ISO |
Metering Mode |
Flash Comp |
White Balance |
DRO/Auto HDR |
Creative Style |
Picture Effect |
|
P |
|
E |
E |
E |
E |
E |
E |
E |
A |
|
E |
E |
E |
E |
E |
E |
E |
S |
|
E |
E |
E |
E |
E |
E |
E |
M |
|
E |
E |
E |
E |
E |
E |
E |
MR |
MR1 |
E |
E |
E |
E |
E |
E |
E |
|
MR2 |
E |
E |
E |
E |
E |
E |
E |
|
MR3 |
E |
E |
E |
E |
E |
E |
E |
Movie |
|
E |
E |
E |
E |
E |
E |
E |
Continuous Advance Priority AE |
|
E |
E |
E |
E |
E |
E |
E |
3D |
|
D |
E |
D |
E |
D |
E |
D |
Panorama |
|
D |
E |
D |
E |
D |
E |
D |
SCN |
Portrait |
|
|
|
|
|
|
|
|
Sports Action |
|
|
|
|
|
|
|
|
Macro |
|
|
|
|
|
|
|
|
Landscape |
|
|
|
|
|
|
|
|
Sunset |
|
|
|
|
|
|
|
|
Night Scene |
|
|
|
|
|
|
|
|
Hand-held Twilight |
|
|
|
|
|
|
|
|
Night Portrait |
|
|
|
|
|
|
|
AUTO |
|
|
|
|
|
|
|
|
AUTO+ |
|
|
|
|
|
|
|
|
* The selected SCN or Memory Recall Icon is displayed when mode dial is set to SCN or MR respectively |
||||||||
Table 1-2b: Fn button’s right column of functions. E = Enabled, D = Disabled, Grayed = Not listed
So what is the difference between the menu commands and the functions handled by the Fn button? First, they are not duplicates. The Fn button contains commonly used settings for individual pictures and movies, while the menu commands are generally set for a series of picture and movie-taking scenarios. For example, the Fn button allows you to manage object tracking, which pertains to the immediate image in your camera’s sights and not necessarily to the next picture you want to take. The MENU button manages commands such as AF w/shutter, which controls autofocus activation by pressing the shutter button. Most likely you will want to use this setting for taking several images throughout a photographic shoot.
Rather than covering each of the functions in this chapter, we will discuss them specifically throughout the book as we go. That way, their use will be more evident.
Fn Button Nomenclature
We use the same Menu nomenclature structure when referencing the path to an Fn button option, substituting right or left column for the page number:
Fn>function menu name (left/right column)>sub-function name>[value1], [value2]
For example, the path to the Fn button’s DRO/Auto HDR function is identified as follows:
Fn>DRO/Auto HDR (right)>HDR>[AUTO], [1.0EV], [2.0EV], [3.0EV], [4.0EV], [5.0EV], [6.0EV]

Figure 1-13(a-c): Fn button flow to the DRO/Auto HDR function
Figure 1-13(a–c) shows a series of screen shots illustrating this. From left to right: the Fn function displayed with DRO/Auto HDR highlighted (figure 1-13a); DRO/Auto HDR options displayed with AUTO value selected (figure 1-13b); [1.0EV] value selected by toggling the multi-selector to the right (figure 1-13c).
Fn Button Navigation
Navigating within the Fn button is a bit different from navigating through the Menu structure. Once you enter into a function’s structure, you can scroll through its available options. If there is a set of available values within an option, only the first value is displayed; there are arrows indicating the direction to toggle the multi-selector to view the other available values (figure 1-13c).
Press the multi-selector button to select a specific Fn function. Toggle the multi-selector to navigate through the functions and associated values. Press the multi-selector button again to select a function’s value.
In-Camera Guide Button
Everyone can use some extra help now and then. The In-Camera Guide button (figure 1-14) indicated with a ? works within the camera’s menu or function structure. Press this button, and a brief description of the currently highlighted menu or function will be displayed. Press the button again, and you will be returned to the current menu or function. Note that when reviewing images, the In-Camera Guide button doubles as a Delete button (indicated with a trash can icon on the body of the camera).
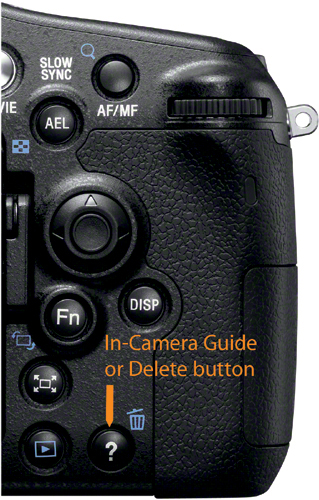
Figure 1-14: In-Camera Guide button
Cleaning the Sensor
When you change the camera’s lens, dust particles can enter the camera body and land on the sensor. On the recorded image, these can be seen as blurred shadows. You can help prevent this by removing and replacing the lens quickly. However, the entry of some dust is inevitable. The Sony A77 removes sensor dirt by shaking it off at high speed. Each time you turn off the camera, it automatically “cleans” the sensor with ultrasonic vibrations. There may be times when you feel an extra cleaning is needed. You can accomplish this either by turning the camera off and then back on, or you can execute the following command:
MENU>Setup Menu (2)>Cleaning Mode
While these cleanings shake the dust and debris off the sensor, some foreign particles are resistant to being removed. You can take them off by doing a manual cleaning. First, take off the camera lens and raise the translucent mirror. There is a V mark at the bottom of the frame surrounding the mirror. This is a lock lever. Carefully push it and lift the frame of the mirror up with your finger without actually touching the mirror. Use a manual bulb blower to clean the image sensor surface. It is best to hold the camera with the lens opening facing down so the dust particles can fall out of the camera.
Do not use a pressurized can of gas to blow out the camera’s interior as any dirt in the nozzle may be blown with enough force to damage the sensor. Also, if propellant is expelled, it can be difficult to remove from the sensor’s surface. Do not touch the image sensor or mirror with your fingers or the blower. After completion, lower the mirror frame back into place, again not touching the mirror surface. Ensure that the mirror is locked firmly into place and reattach the lens. Note that the camera will not be able to autofocus if the mirror is not firmly locked down. In addition, the camera will not shoot if the mirror is inadvertently left in the up position.
Do not attempt to clean the mirror. Liquids can mar its surface, and it is fragile. If there is a little dust on it, ignore it. Dust on the mirror will be out-of-focus and invisible to the sensor.
Setting the Area, Date, and Time
When you turn your camera on for the first time, the Set Area/Date/Time message is displayed. You can enter the information later, but it is easiest to do so when the message is first displayed. The date and time stamp is a great way to keep track of when a picture or movie was taken. Make sure you set the Area field to your location. If you have an A77 that lacks a GPS, when you cross time zones while travelling, use the camera’s world map to adjust the clock to the proper time zone.
Setting the Area, Date, and Time is easy. The camera displays two menu options: [Date/Time Setup] and [Area Setting]. Press the multi-selector button to select one of the options. Toggle the multi-selector right or left or use the front control dial to move through the command fields. To make your selection, toggle up or down or rotate the rear control dial to move through the available values.
If you decide to set the date and time information later, you can do so from the Clock Setup Menu. Execute the following steps:
• Select:
MENU>Clock Setup (1)>[Date/Time Setup]
• Toggle to select the menu’s values. Enter the current date and time information and press the multi-selector button to accept (figure 1-14).
• Select:
MENU>Clock Setup (1)>[Area Setting]
• Toggle to move across the world map’s available time zones.
• Stop on your current time zone and press the multi-selector button to accept.
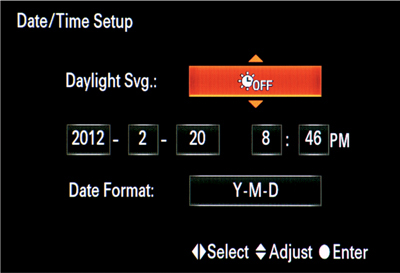
Figure 1-15: Date/Time Setup display screen with the clock’s date and time set
Dual Viewing System
The Sony A77 has two electronic displays: an electronic viewfinder with an eyepiece and the movable LCD screen on the back of the camera. Most digital camera users are familiar with the latter. Unlike some early electronic viewfinders, the A77’s finder is extremely sharp with a good refresh rate. It replaces the optical viewfinder on DSLRs. Thanks to translucent mirror technology, you can use this viewfinder when you record movies.
The electronic viewfinder and the LCD screen work sequentially. The viewfinder is enabled when the camera senses your face is close to the eyepiece. When you move your head away, the viewfinder turns off and the LCD screen turns on. This clever feature preserves battery life.
There are both advantages and drawbacks to each of the viewing displays. The Sony A77 has a few differences in how the camera settings are displayed versus what you see in the viewfinder or on the LCD screen. As you use the camera and become familiar with its settings and buttons, you will develop personal choices as to which viewing system works best for you. In chapter 3 we will cover details about the LCD screen and the viewfinder and how to display information on them.
Diopter Adjustment Dial
There is one more thing you need to know about the viewfinder: it has a magnifier that needs to be focused to match your vision. To the right of the eyepiece is a small wheel called the diopter adjustment dial (figure 1-16). Rotate the wheel back and forth until the objects in the viewfinder appear maximally sharp. If you share your camera with others, they must make sure that the viewfinder is in focus for their eyes. If you are nearsighted (myopic) and your photographer partner is farsighted (hyperopic), you will have to adjust this dial whenever the two of you use the camera. This dial ensures that the photographer, no matter if he is nearsighted or farsighted, will have a sharp image to view through the viewfinder.
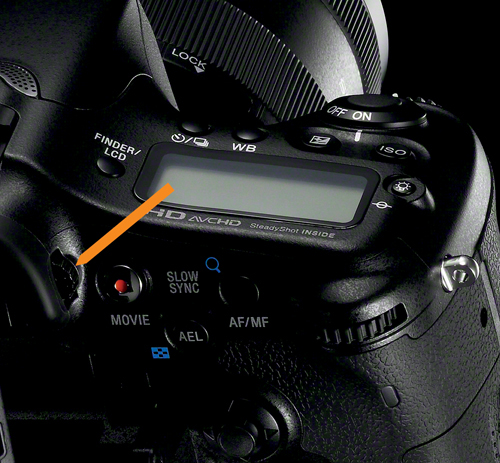
Figure 1-16: The diopter adjustment dial to the left of the viewfinder
Recommendations
We recommend that you use only Sony-certified batteries and appropriate memory cards to ensure high quality and equipment functionality. We also recommend that you always have a spare battery and memory card on hand.
Use an LCD screen protector and implement habits to protect your camera’s lens. Doing both equates to very inexpensive insurance against damaging your camera.
It’s best to set the camera’s clock when you first turn on the camera. This way, all of your future images will contain the date and time stamp.
As you might have already noticed, the Sony A77 is very complex. There are well over 100 commands and options, 15 individual functions, and multiple buttons, levers, and dials. Many of the components function differently depending on the mode settings. Basically, there is a lot to learn. As you progress through this book, we recommend that you take time to explore each of the components before using them to take pictures and movies. There are multiple ways to execute many of the camera’s functions. Through your exploration, you will develop your own personal style of using the camera—one that will help you capture the results you want with ease and panache.