
Chapter 8: Additional Features
Introduction
The Sony A77 has many exciting features that give you the opportunity to capture unique pictures. Normally, these techniques require downloading the images to a computer and then doing image processing, but you can carry out many of these processing techniques automatically within the Sony A77. We have discussed some of these techniques in earlier chapters, such as ISO’s Multi Frame Noise Reduction and Auto HDR functions.
In this chapter, we cover three remaining modes on the mode dial: Sweep Panorama, 3D Sweep Panorama, and Continuous Advance Priority AE. Each of these modes offers you an opportunity to capture a special image that would have been difficult and time-consuming with more conventional photographic methods.
We also cover another wonderful Sony A77 feature: retrieving GPS information. The A77 can be set up to capture GPS information and store it with still pictures recorded at the site. The camera’s software goes further by also correcting date and time information that may have changed due to entering a different time zone. So, when you return from trips where you see a new location every day, you don’t have to try to reconstruct which picture came from where. The saved GPS information does that for you when you view your images through Sony’s PMB software.
Panoramic Modes
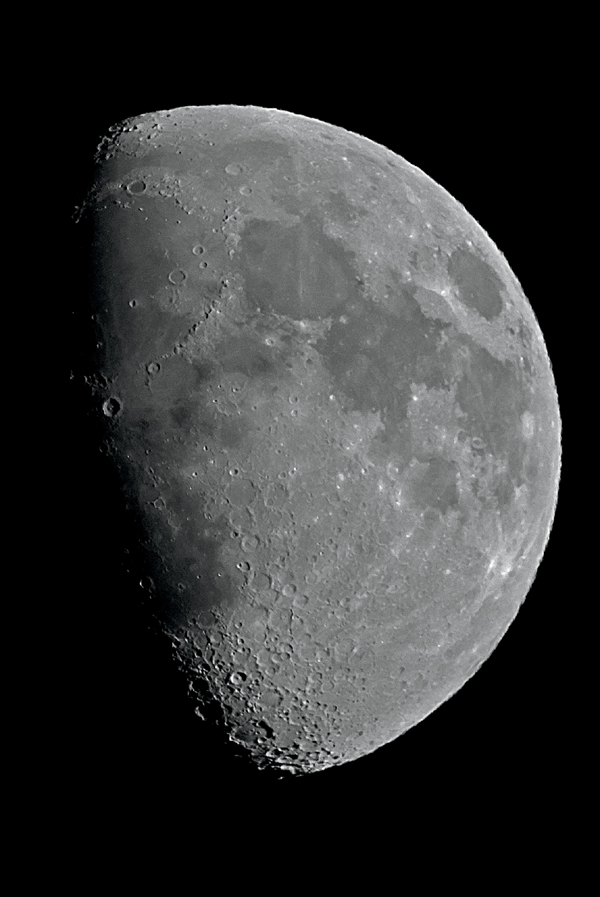
The Sony A77 uses two modes to build a wide view of a scene: Sweep Panorama (figure 8-1) and 3D Sweep Panorama. Just as the names indicate, both of these modes create panoramic pictures—one as regular 2D images and the other as 3D images that can be played back on compatible 3D HDTVs. In both cases, the recorded images are created in JPEG format; in addition, the 3D image has an additional MPO file used with the JPEG file to create the 3D effect on your HDTV.

Figure 8-1: Mode dial set to Sweep Panorama
In both modes, a panoramic picture is created by slowly and smoothly sweeping (or panning) a large area horizontally or vertically. The camera rapidly takes a series of shots as you sweep. Once this is completed, the camera stitches them together to form a panoramic image. But there are some conditions. The camera needs to be moved at a fairly constant rate—neither too fast nor too slow. You must also sweep on a level horizontal or vertical plane. This is an excellent opportunity to utilize the Level data display option discussed in chapter 3. Any substantial variation in the speed or level, and the camera will stop shooting and display an error message.
During the sweep, the shutter speed, ISO, and aperture is set on the basis of the available lighting. The camera will not use a shutter speed longer than 1/60 of a second. The camera applies the exposure setting at the beginning of the sweep and does not change it during the recording, so in extreme lighting conditions, the panorama may have areas that are under- or overexposed.
The camera does an excellent job of recording the individual shots and stitching them together. The software is very tolerant of small variations in the sweep rate and the level. Actually, you can get some very interesting results when you break the rules. For example, you can try changing the zoom setting while you are panning, which creates an interesting staircase-type pattern. You may also notice that if you take a panorama with moving objects, such as cars speeding along a road, you can capture the moving objects several times so they appear cloned in the final picture. It’s certainly worth experimenting with this mode.
The camera automatically saves the file as a JPEG with the quality set to JPEG [Fine]. If you previously had the quality set to another value, like [RAW], the camera will record the panorama in JPEG and when you exit Panorama modes it will revert back to the file quality previously set.
The camera also automatically determines the ISO, WB, focus, and exposure when framing the initial starting point. You do have the option of making adjustments, although ISO can only be adjusted through the Fn button and not through the ISO button on the top of the camera. You can assign the image’s metering mode and apply a Creative Style.
In either Panorama mode, you cannot use the flash, self-timer drive mode, any multiple exposure shooting mode, Picture Effect, Object Tracking, Face Detection, Smile Shutter, or DRO functionality.
You can magnify the images before recording the picture, but you can only enlarge recorded Sweep Panorama and 3D Sweep Panorama pictures to 16:9.
The camera’s menu has two commands for each type of panorama, which are enabled once the mode dial is set to the specific panorama mode. These commands control the panorama’s size and the direction in which you are required to sweep the camera.
Sweep Panorama Mode Commands
Switch the mode dial to Sweep Panorama, and the following commands are enabled (figure 8-2):
MENU>Still Shooting Menu (1)> Panorama: Size>[Standard], [Wide]
MENU>Still Shooting Menu (1)> Panorama: Direction>[Right], [Left], [Up], [Down]
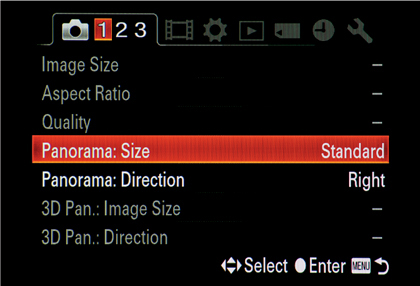
Figure 8-2: Sweep Panorama commands
Sweep Panorama has two sizes: [Standard] and [Wide]. The picture’s pixel count depends on the selected size and direction (table 8-1). With [Wide], you can pan further and get much wider coverage in the resulting picture. You can sweep the camera in four directions: [Right], [Left], [Up], and [Down].
One thing to note: the [Standard] and [Wide] options produce pictures at the same height. Although the [Wide] version might appear shorter, it isn’t. Instead, the whole picture is displayed smaller so you can see more of it in the display screen.
Sweep Panorama Size |
||
Panorama Direction |
Standard Equivalent Pixels |
Wide Equivalent Pixels |
[Right] / [Left] |
8192 x 1856 |
12416 x 1856 |
[Up] / [Down] |
3872 x 2160 |
5536 x 2160 |
Table 8-1: Sweep Panorama size
Figures 8-3(a-d) show Sweep Panorama results for several different combinations of size and direction.

Figure 8-3a: Size/Direction = Standard/Right

Figure 8-3b: Size/Direction = Wide/Right
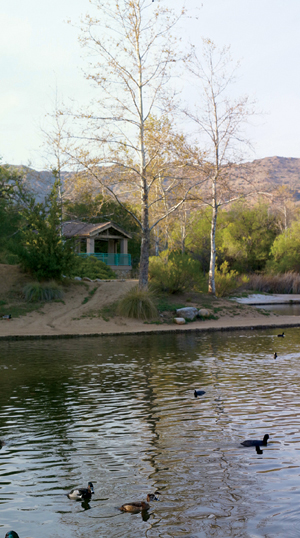
Figure 8-3c: Size/Direction = Standard/Up

Figure 8-3d: Size/Direction = Wide/Up
3D Sweep Panorama Mode Commands
Switch the mode dial to 3D Sweep Panorama, and the following commands are enabled (figure 8-4):
MENU>Still Shooting Menu (1)>3D Pan.: Image Size>[16:9], [Standard], [Wide]
MENU>Still Shooting Menu (1)>3D Pan.: Direction>[Right], [Left], [Up], [Down]
3D Sweep Panorama has three sizes: [16:9], [Standard], and [Wide] (figure 8-5(a-c)). As with Sweep Panorama, [Wide] allows you to pan further and gives the resulting picture much wider coverage, but again it appears shorter than the [Standard] 3D image when playing back on the LCD screen. Selecting [16:9] results in a 3D picture with the least amount of panoramic width coverage. It has the same ratio as a movie but creates a 3D still image. All of the panoramas in each of the three sizes have two files stored on the memory card: JPEG and MPO.
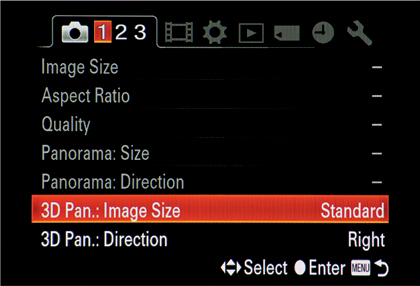
Figure 8-4: 3D Sweep Panorama commands
3D mode has only two directions to choose from: [Right] or [Left]. This may seem limiting, but it actually isn’t. Read the box on “Recording a Vertical 3D Panorama” to learn how to get around this.
As with Sweep Panorama, 3D Sweep Panorama images have pixel counts that depend on the selected size and direction (table 8-2).
3D Sweep Panorama Size (Equivalent Pixels) |
|||
Direction |
16:9 |
Standard |
Wide |
[Right] / [Left] |
1920 x 1080 |
4912 x 1080 |
7152 x 1080 |
Table 8-2: 3D Sweep Panorama size
Figures 8-5(a-c) show several combinations of 3D Sweep Panorama size and direction results.

Figure 8-5a: Size/Direction = 16:9/Right

Figure 8-5b: Size/Direction = Standard/Right

Figure 8-5c: Size/Direction = Wide/Right
Shooting a Panoramic Picture
After you select a panorama type, set its size, and choose the direction to sweep, the camera will display a Live View screen with three things:
• An arrow corresponding with the selected direction.
• A message telling you to sweep according to the arrow.
• A two-tone screen where one side has dull gray over the Live View and the other side appears unaffected (figure 8-6). The line where the two sides meet is the point where the panorama will start. Place this line at the point where you want to start recording the image.
Frame the image so the point where you wish to start the sweep is positioned just inside the non-grayed side of the display screen. Note that the grayed side depends on which direction you select. If you select [Right], the grayed side is on the left of the display screen. If you select [Up], the grayed side is on the bottom of the screen.
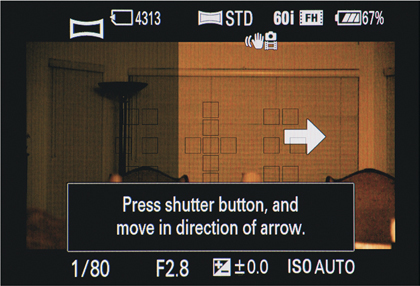
Figure 8-6: Sweep Panorama starting point
Make any adjustments you might need to the image’s WB, ISO, and exposure. Add a Creative Style if you like. Once you complete your adjustments, press the shutter button halfway again to make sure your focus is still intact.
You have one more step to complete before you can take your panoramic shot. Getting a realistic shot depends on a smooth, level, and constant sweep. It also depends on creating a very tight radius when you do the sweep. So, as you pan the camera, hold it as close to the center of the sweep as possible. The best way to accomplish this is either to hold the camera up to your eye and use the viewfinder as your sweeping guide, or mount your camera on a tripod with a vertical or horizontal swivel and sweep the camera using it. These two methods keep the panning in a tight, short radius. Holding the camera away from your body and using the LCD screen as your sweeping guide makes the radius larger and can create some distortion.
Now you are ready to record. Holding your camera steady, press the shutter button down and start panning. Notice that the arrow moves across the screen along a simulated bar as you pan. The bar represents the full amount of time you need to hold the shutter button down and pan the camera. Continue to pan the camera until the arrow has traveled the full distance. If you take your finger off the shutter button prematurely, the process will stop and you will receive an error message. We have found it best to continue to pan until the camera actually stops shooting. That way we know we have not prematurely ended the process.
Panorama Results
Each panorama has an element of mystery as to what exactly you will capture. This is what can make the feature so exciting and inviting to use. Yes, you can end up with a flawless panoramic where everything is a true representation of the scene. Most of these are pictures of stationary landscapes. But even with these ordinary scenes, you can still end up with new and exciting results.
Keep in mind that although using a tripod with a pan head should result in the best quality image, credible and sometimes creative images can be obtained when sweeping by handholding the camera.
Try moving the camera slightly up or down within the narrow range of allowable vertical movement. The resulting image may have a slightly wavy effect, or it may be narrower in height (or width, depending on the sweep direction) due to the camera’s need to create a rectangular image and trim extremes that are out of bounds.
Try taking panoramic pictures of moving subjects. Depending on the subject’s speed, panning in the direction the subject is moving may shorten or truncate it, while panning in the opposite direction may lengthen or elongate it. Even taking panoramic pictures of stationary objects can give you some interesting results. When panning, the camera takes images which overlap. Most of the time, the camera’s stitching software eliminates the overlapping areas and creates a smooth panned image. However, the resulting panoramic picture may sometimes have the same object appearing multiple times.
Panning Problems
Taking panoramics can require some trial and error before you are successful. If the camera detects inconsistent panning—i.e., too fast, too slow, or not level—or if the shutter button is released too soon, it will stop recording and display an error message (table 8-3). Although there might be some frustration, we are sure you will ultimately enjoy the results.
Panorama Mode Error Messages |
Cause |
Could not shoot panorama. Move straight in the direction of the arrow. |
• Didn’t pan all the way. • Didn’t keep the camera level horizontally or vertically. • Panned in the wrong direction. |
Could not shoot panorama. Move camera slowly. |
Panned too quickly. |
Could not shoot panorama. Move camera quickly. |
Panned too slowly. |
Table 8-3: Panorama mode error messages
It can be difficult to pan at a consistent speed each time you record. Most likely you will notice some results with a black section at the end of the picture (figure 8-7). This means you panned too quickly, and the remaining portion of the allotted size did not have anything recorded to fill that space. Try retaking the picture while panning a bit slower.
Continuous Advance Priority AE Mode
We have one more option to discuss on the mode dial: Continuous Advance Priority AE mode (figure 8-8). The name is quite a mouthful, but fortunately the mode is quite simple. It automatically sets the camera’s exposure and takes up to 12 shots per second as you continue to hold down the shutter button.
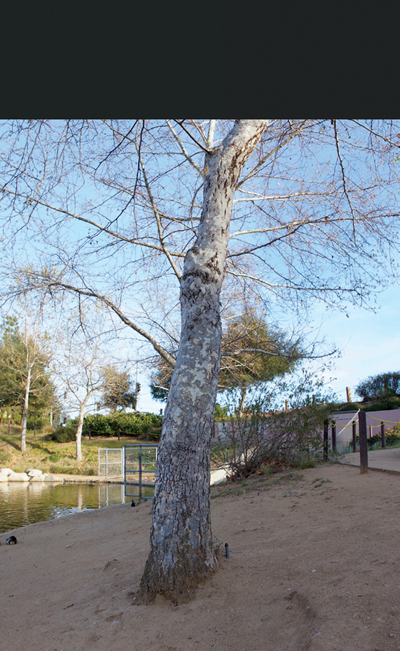
Figure 8-7: Panorama results with unrecorded space blacked out
Why would you use Continuous Advance Priority AE? Let’s say you want to take a picture of your best friend crossing the finish line at a 5K run. What are the odds that your finger will press the shutter button at just the right moment to capture this accomplishment? Most likely, not good.
Set the camera to Continuous Advance Priority AE, make sure the focus mode is set to C for Continuous AF, and press the shutter button just as your friend is about to cross the finish line. Somewhere in the 12 images/ second, there should be a picture of your friend actually crossing the line.
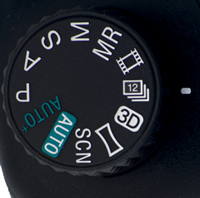
Figure 8-8: Mode dial positioned on Continuous Advance Priority AE mode
This applies to any scenario where you are trying to capture an event that happens in a split second. You can also use the Drive Mode Continuous Hi option and shoot 8 pictures/second, but that might not be fast enough to capture the event. Continuous Advance Priority AE mode gives you a better chance of capturing the moment by giving you 50 percent more shots per second. This ensures a greater chance of capturing a rapidly changing event. However, it is not a technique that is conducive for panning. You have barely more than a second of shooting time so you can’t follow a football runner rushing the length of the football field for a touchdown. Rather, it is a technique for capturing those brief moments of activity, such as when a basketball center leaps up and slam dunks the ball through the hoop.
Continuous Advance Priority AE Mode: Throughput
In a perfect world, where the camera’s memory buffer could move unlimited number of images per second to the memory card, this mode’s only limitation would be the available space on the card. The problem is that memory cards cannot accept the data quickly enough; plus, the A77’s buffer is limited.
To capture rapid sequences, the A77 has a quick memory cache that accepts the images and then transfers them to the slower memory card. Unfortunately, the A77’s buffer cannot hold more than 17 images before it is filled, and its acceptance of new pictures is limited by the memory card. Therefore, when you first hold down the shutter button in Continuous Advance Priority AE mode, the camera initially shoots at 12 images/second, but in a little over one second the buffer becomes a bottleneck. The shooting rate slows down considerably as the camera works to clear the buffer so another image can be taken.
So, how many images will be recorded before you hit the bottleneck? That depends on their size and quality. If you select [RAW], you will be taking and storing large files. If you select [RAW & JPEG], not only will you be storing large RAW files but also a set of JPEG files. All of this information needs to move from the sensors to the buffer to the memory card. In our experience, we get 12 images/ second for the first second regardless of the image’s image size, aspect ratio, and quality. Then the rate drops to one image every couple of seconds ranging from the thirteenth image when recording large files to the seventeenth image when recording the smallest JPEG files.
Continuous Advance Priority AE Mode: Focusing
Continuous Advance Priority AE mode allows you to be either in autofocus or manual focus mode. In autofocus mode, the camera shoots with the aperture wide open and does its best to keep up with focusing each shot—although it can have misses, especially if the subject is moving rapidly forward or backward. You will still see the subject on the display screen; but, instead of displaying each framed image prior to it being recorded, the camera will display each image after it is recorded, just like it does with the Drive Mode Continuous Hi option. This has not been a problem for us, since between the camera’s rapid firing and the subject moving we simply have not noticed whether we are seeing the image in Live View or after it is recorded. Also, because shooting continuously only lasts about 1½ seconds, we do not do much panning to follow the subject.
You can also switch to manual focus and then close down the aperture, which you cannot do in autofocus mode. By closing down the aperture to increase the depth of field and by using a high ISO to sustain a fast shutter speed, you can capture a sharp image of a rapidly occurring event. Here, you can employ pre-focusing on an area where you expect the action to occur. To do this, you have to understand game strategy. For example, you are shooting a baseball game and the runner is tempted to steal second base. If you think this may occur, you would pre-focus on second base and start firing just before the runner enters the frame. With continuous firing, you will have a sequence of shots recording his slide onto the base.
Continuous Advance Priority AE Mode: Feature Capabilities
Obviously several camera features do not work in this mode: any features that involve multiple shots such as bracketing, noise reduction, and HDR are inoperable. In addition, any feature that requires the camera to conduct an action prior to recording an image is not functional, such as Smile Shutter (figure 8-9). The following is a list of camera features not available in Continuous Advance Priority AE mode:
• Flash
• Object Tracking
• Face Detection
• Smile Shutter
• Picture Effect
• Auto HDR
• ISO Multi Frame Noise Reduction
• Drive Mode:
- Continuous Shooting, Self-Timer, Continuous Bracket, Single Bracket, White Balance Bracket, DRO Advance Bracket, Remote Cdr.
• Long Exposure NR command
• Movies
So, what can you use? The Drive Mode defaults to [Continuous Shooting: Hi]. You can apply a Creative style to your image; you can use the DRO function within DRO/Auto HDR; and you can set ISO, WB, and Exposure Compensation. As mentioned earlier, you can also select the shutter speed and aperture if you put the camera in manual focus mode.
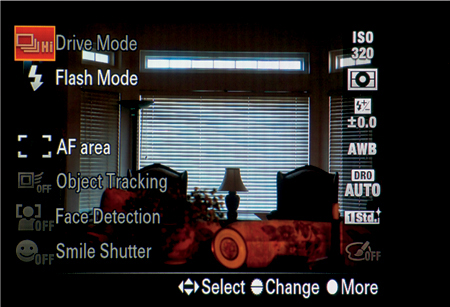
Figure 8-9: Fn button’s results when in Continuous Advance Priority AE mode
GPS Feature
Have you ever been on a trip where keeping track of each picture’s location became a major project unto itself? Who needs that extra task? Wouldn’t it be easier to have your camera keep track of where each picture was taken, along with the date and time? It would be so convenient to automatically have this data available when sorting through hundreds of pictures later.
Here the Sony A77 comes to your aid. This camera is capable of retrieving the GPS setting of your location and storing that information with your pictures. You will see the image’s longitude and latitude coordinates in the lower left corner of the display screen. The GPS information is also automatically downloaded with your saved images to your computer when you use the Sony-supplied PMB software. Then it is a simple step to view the saved GPS information while organizing your images. In addition, you can call up PMB’s Map View function and pinpoint each image’s location on a Google map.
GPS Command
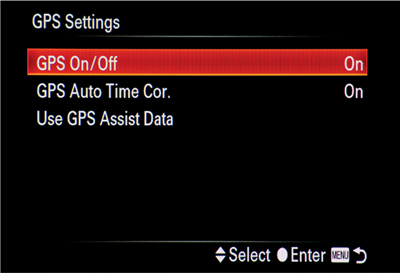
The camera’s GPS feature is controlled by a command with three subcommands (figure 8-10). These three subcommands enable the GPS feature, correct the camera’s date and time information, and speed up the retrieval of GPS information. The main GPS command is:
MENU>Custom Menu (1)>GPS Settings>[GPS On/Off], [GPS Auto Time Cor.], [Use GPS Assist Data]
The GPS status is represented by different icons which are displayed on the LCD display screen only and not the viewfinder. To see the GPS icons, ensure you have at least one of the following DISP Button (Monitor) options checked: [Graphic Display], [Display All Info.], or [For viewfinder]:
MENU>Custom Menu (2)>DISP Button(Monitor)>[Graphic Display], [Display All Info.] or [For viewfinder]
Initiate GPS
The GPS feature is controlled by the [GPS On/Off ] option.
MENU>Setup Menu (1)>GPS Settings>GPS On/Off>[On], [Off]
Simply put, when set to [On], the GPS becomes active and searches for satellite signals while the camera is on. When set to [Off], GPS is off and no GPS icon displays, regardless of the other two GPS settings.
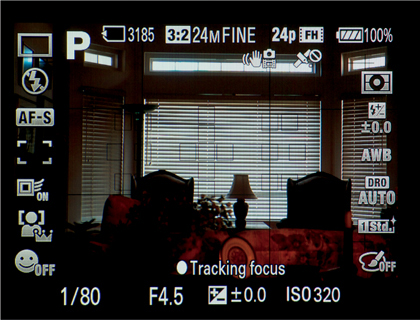
Figure 8-11: GPS satellite searching icon with one dot showing
As soon as the GPS On/Off option is set to [On], the camera displays the GPS connecting icon in the upper right of the LCD screen just below Movie Record Setting information (figure 8-11). A repeating series of zero, one, two, and three dots cycling underneath the icon indicates that the camera is trying to establish connection with GPS satellites.
The camera will continue searching for satellites until you either turn the camera off or change the GPS On/Off command to [Off]. The camera’s GPS is not as sensitive as a dedicated handheld GPS, and you may have trouble obtaining a signal when you are indoors or next to an obstruction that blocks its access to the satellite’s signal, such as a tall building. We found that the camera’s GPS had trouble locating satellites when we were in a pine forest. You can also have problems obtaining a satellite signal if you are near radio or electric towers, since their signals can disrupt the camera’s reception. If you cannot connect, move to an unobstructed location and try again.
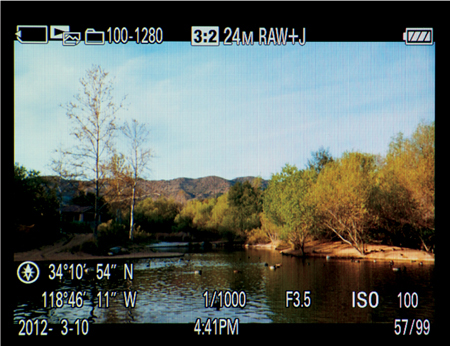
Figure 8-12: GPS location information displayed in lower left corner
Turning on the GPS system and waiting for the satellite signal does not prevent you from recording pictures or movies; you just won’t have the GPS information attached to your recorded images until the camera can retrieve it. Once the camera has retrieved the information, you can see the recorded GPS location when playing back your images (figure 8-12). If you don’t see it immediately, cycle through the three display formats using the DISP button. Remember from chapter 3, there are three different data display formats for reviewing your still pictures. The GPS information is included in the “With recording data” display format on both the viewfinder and LCD screen.
Once current GPS location information is obtained, the initial GPS icon is replaced with one of the following three icons:
The bars represent the number of satellites found. Obviously, three vertical bars is the most desirable number and leads to the most accurate GPS data, while one bar is the least desirable number and leads to more general GPS data.
If you see the following GPS error icon, turn the camera off and then back on. If the problem persists, contact Sony Technical Support for help.
GPS Date and Time Correction
When you enable the GPS feature, the second suboption, [GPS Auto Time Cor.], becomes enabled. This option allows the camera to utilize the GPS system’s date and time and adjust the camera’s clock information to local time.
MENU>Setup Menu (1)>GPS Settings>GPS Auto Time Cor.>[On], [Off]
This option can be invaluable when your travels span multiple time zones. Setting the GPS Auto Time Cor. option to [On] automatically ensures that the camera’s clock is set to your current location’s date and time. Although the Sony manual says it will correct the date and time when you turn off the camera, we found that the clock is updated only when we turn on the GPS function and the location information is retrieved. A not-so-obvious benefit of this option is that if you forget to reset the camera’s clock when you get back home, having the GPS Auto Time Cor. option turned on will do it for you.
Speeding up GPS Retrieval
The last GPS setting option, [Use GPS Assist Data], will save you time. You could end up waiting 5–10 minutes for your camera to obtain a GPS satellite connection. Most likely you won’t be happy waiting this long before you can take any pictures with GPS information. Frequently, these delays are caused by an inability to find the satellites; so, if the GPS can be told where to look for the satellites, it cuts down on your waiting time. Sony has done just that by enabling the creation and use of a file that helps your camera find the satellites easily.
Use the following command:
MENU>Setup Menu (1)>GPS Settings>Use GPS Assist Data>[OK]
This command retrieves 30 days’ worth of GPS satellite location information and saves it in a GPS Assist Data file, which is stored on your camera’s memory card (figure 8-13). Keep in mind that if you try to retrieve GPS information outside this 30-day period, the camera will locate the satellites directly from their radio signals. This will take more time and from this, the camera will build a new GPS Assist Data file if Use GPS Assist Data is set to [OK]. Also keep in mind that the file is stored on your memory card, so when you change memory cards, the camera will have to rebuild the file. In addition, if you reformat a memory card, the GPS Assist Data file will be erased and the camera will need to rebuild it.
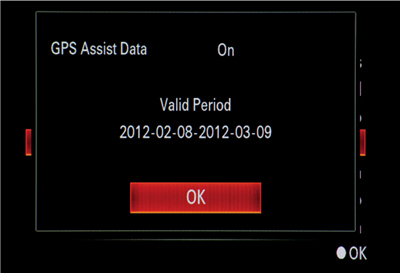
Figure 8-13: GPS Assist Data 30-day period
Another way to retrieve the GPS Assist Data file is to have the Sony-supplied PMB software connect to the Internet and build the file for you. Then, while your camera’s memory card is connected to your computer, the PMB software will download the file to the card. Put the memory card back in the camera, and you are ready to go.
To do this, execute the following steps:
1. Start up your Windows computer.
2. Make sure you are connected to the Internet.
3. Connect your camera’s memory card to the computer. Use a card reader or connect your camera with the memory card directly to the computer using a USB cable.
4. Start up the PMB application.
5. Select GPS from the menu on the left side of the screen.
6. Select the [GPS Support Tool] option.
7. Update the GPS Assist Data file. You will receive a message box informing you that the GPS Assist Data file has been stored on the memory card.
8. The memory card with the GPS Assist Data is ready to be used and you can disconnect the camera.
PMB software is not available on Mac computers. In that case, you can either build the GPS Assist File through your camera or utilize third-party software available through the Internet.
Viewing GPS Data
As mentioned earlier, GPS longitude and latitude information is displayed when you play back your images on the LCD screen or the viewfinder. You can also use PMB software to view GPS location information when reviewing an image’s file properties. Note that files with associated GPS information display with a green icon in the lower right corner of the thumbnail images (figure 8-14).
The real benefit is being able to see approximately where the image was taken on Google Maps. This is accomplished by starting the PMB software and displaying thumbnail files with GPS information. To view the GPS location, highlight the image and click the Map View icon in the lower left corner of the screen. A Map View window opens up in which Google Maps shows the corresponding GPS longitude and latitude coordinates pinpointed with a flag (figure 8-15). You can zoom right down to street level to see the location. It’s important to remember that the camera’s saved GPS coordinates are approximate. When we took a picture in our backyard, we found the resulting GPS coordinates to be off by 50 yards.
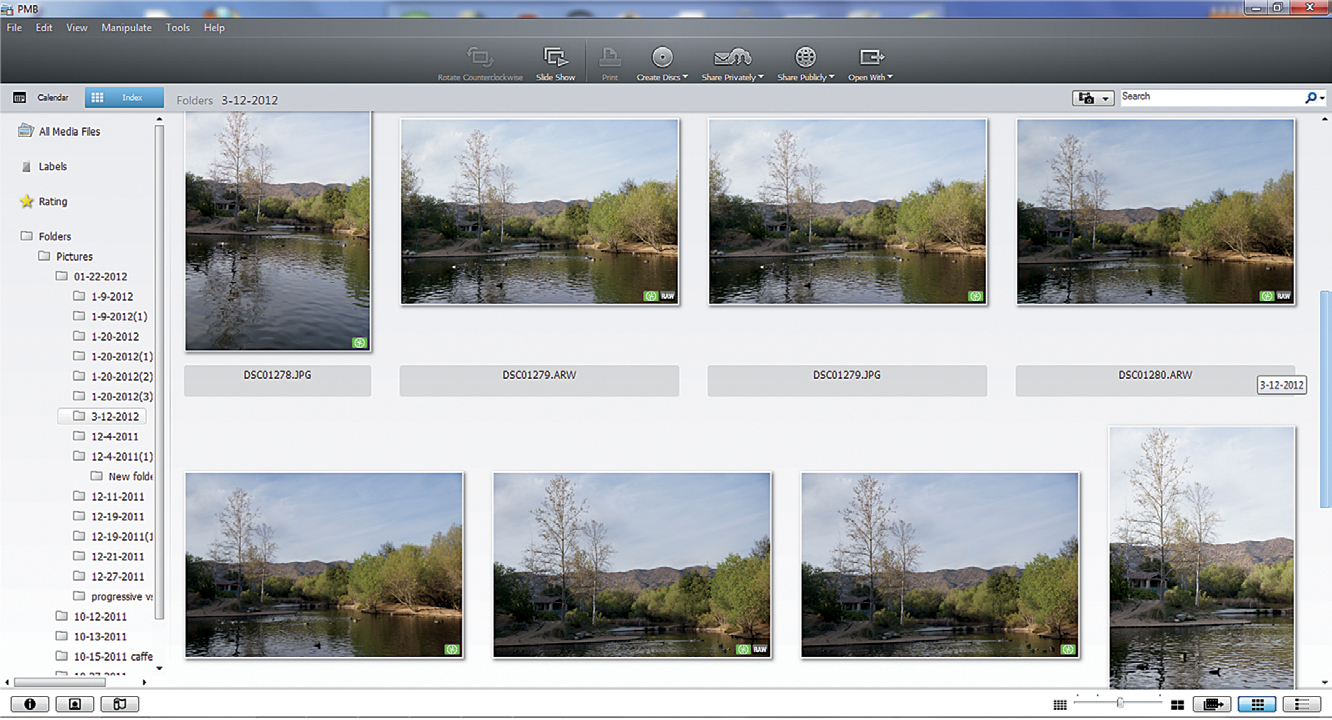
Figure 8-14: Imported images with GPS green icon
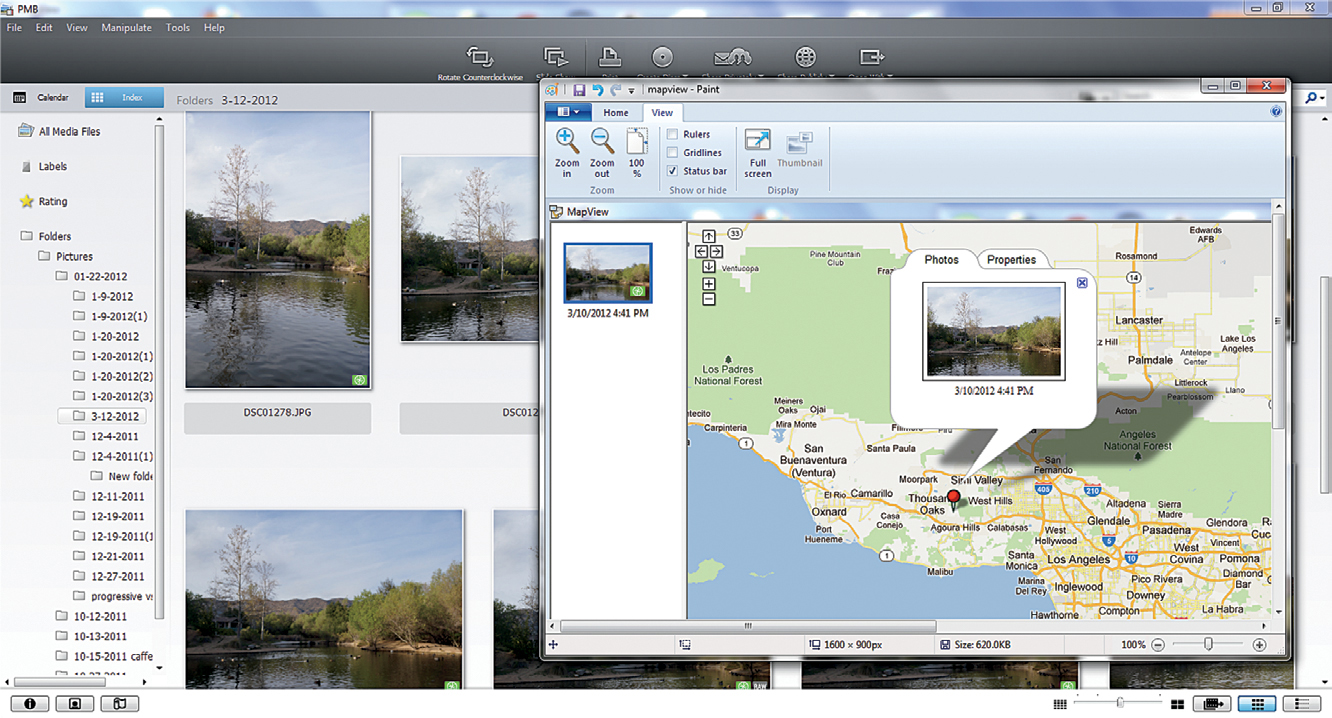
Figure 8-15: PMB Map View results
As mentioned before, Mac computer owners need to find another means of utilizing the GPS data. Adobe Photoshop Lightroom 4 can process your Sony A77 images and display their location on a world map using the stored GPS data. Since software is always evolving, check the Internet for other Mac user opportunities.
Recommendations
We strongly recommend that you turn on the GPS function when traveling. If you are like us, on any trip that involves frequently changing locations, it doesn’t take long to lose track of which church, park, lake, or mountain we captured in our favorite picture. Having the GPS turned on solves most of the ensuing debates.
You can save time by ensuring that the GPS Data Assist data file is updated at least monthly. It can be very frustrating to wait 5–10 minutes on site for the camera to pull down the GPS information, during which time the shot you wanted to take could have wandered away.
PMB software can be used to build the GPS Data Assist file, but it only works on Windows computers. Mac users can have the camera retrieve the file or employ third-party software available on the Internet. Although we are not advocating the use of third-party software for this purpose, it is something to look into. We prefer having the camera build the file. Although we have to wait a few minutes (sometimes longer), this option fits in well with the way we use the camera and manage our computers and our files.
We love panoramic shots. They are fun to shoot, and the results are impressive. We have experimented with many different shots, varied the level and/or panning speed, and taken shots of moving and stationary subjects, all giving us a variety of results. We have also played around by applying a Creative Style to add some punch to the results. We are sure you too will want to play with this feature.
We did not buy a 3D-capable television to see our 3D panoramas. Instead, we ordered inexpensive glasses with red and cyan filters and generated anaglyphs from saved Sony A77 .MPO files. Then we viewed our saved 3D pictures on our computer screen. It was definitely impressive to see how the pictures popped with the glasses. We recommend that you experiment and see if taking 3D pictures is something you enjoy. It isn’t for everyone, but you won’t know unless you try.
If you need to capture a specific event that will occur literally within a split second, consider using Continuous Advance Priority AE mode. Of course, keep in mind that the camera’s throughput for saving the images to your memory card is limited. Your timing will have to be exact to capture the event.