Chapter 18. Public Key Infrastructure (PKI)
PKI is usually defined as a set of standards and systems whose main purpose is to verify and authenticate the validity of each party involved in a network transaction. This chapter starts with an introduction to PKI and then shows you how to configure, enroll, and troubleshoot the Cisco ASA with digital certificates.
Introduction to PKI
PKI is a security architecture that provides a higher level of confidence for exchanging information over insecure networks. PKI is based on public key cryptography, a technology that was first created to encrypt and decrypt data involving two different types of keys: a public and a private key. A user gives a public key to other users, keeping the private key. Data that is encrypted with the public key can be decrypted only with the corresponding private key, and vice versa. Figure 18-1 illustrates how this works.
Figure 18-1 Private and Public Keys

The following is the sequence in Figure 18-1:
Step 1. User A obtains User B’s public key and uses it to encrypt a message destined for User B.
Step 2. User A sends the encrypted message over the unsecured network.
Step 3. User B receives the encrypted message and decrypts it using his own private key.
The following are several key terms and concepts used in PKI:
• Certificate revocation list (CRL)
• Simple Certificate Enrollment Protocol (SCEP)
These terms and concepts are defined in the following sections
Certificates
Digital certificates are commonly used to authenticate and validate users and devices while simultaneously securing information exchanged over unsecured networks. Certificates can be issued for a user or a network device. Certificates securely bind the user’s or device’s public key along with other information that describe the user’s or device’s identity.
The certificate syntax and format are defined in the X.509 standard of the International Telecommunication Union-Telecommunication Standardization Sector (ITU-T). An X.509 certificate includes the public key and information about the user or device, information about the certificate itself, and optional issuer information. Generally, certificates contain the following information:
• The entity’s public key
• The entity’s identifier information, such as the name, email address, organization, and locality
• The validity period (the length of time that the certificate is considered valid)
• Issuer’s information
• CRL distribution point
Digital certificates can be used in many implementations, such as IPSec and Secure Sockets Layer (SSL), secure email using Secure/Multipurpose Internet Mail Extensions (S/MIME), and many others. The same certificate might have different purposes. For example, a user certificate can be used for remote-access VPN, accessing application servers, and for S/MIME email authentication.
Note
Cisco ASA supports digital certificates for remote-access and site-to-site IPSec VPN session authentication, as well as for WebVPN and SSL administrative sessions.
The CA that issues the certificate determines the implementations for each certificate. The usage of the certificate is configured on the CA (that is, SSL, IPSec, and so on).
Certificate Authority (CA)
A CA is a device or entity that can issue a certificate to a user or network device. Before any PKI operations can begin, the CA generates its own public and private key pair and creates a self-signed CA certificate. A fingerprint in the certificate is used by the end entity to authenticate the received CA certificate. The fingerprint is created by the result of a hash (MD5 or SHA-1) calculation on the whole CA certificate. The fingerprint value corresponds to the ultimate root certificate, in cases in which multiple levels of CA exist. Keep in mind that SHA-1 is more secure than MD5.
CAs can be configured in a hierarchy, as illustrated in Figure 18-2. The CA at the top of a certification hierarchy is usually referred as the main root CA.
Figure 18-2 Certification Hierarchy
In the example in Figure 18-2, the root CA server has two subordinate CAs: U.S. and Australia. The U.S. CA server also has two subordinates, New York and Los Angeles. Each CA server grants or denies certificate enrollment requests from its corresponding users and network devices (Cisco ASAs in this example).
A user or network device chooses the certificate issuer as a trusted root authority by accepting the issuer CA’s self-signed certificate containing the issuer’s public key. The certificate information from all trusted CAs within the hierarchy is often referred to as the certificate chain of trust.
The Cisco ASA has a local CA that integrates basic certificate deployment, providing revocation checking of issued certificates. The LOCAL CA user enrollment is supported by browser web page login.
Note
The local CA functionality is discussed later in this chapter.
There are several CA vendors. The following are some of the CAs supported by Cisco ASA:
• Microsoft Windows 2000 and 2003 CA Server(s)
• VeriSign
• Baltimore UniCERT
• RSA Keon
• Entrust
• Cisco IOS router configured as a CA server
Several PKI implementations also include the use of registration authorities (RAs). An RA acts as an interface between the client (user or network device) and the CA server. An RA verifies and identifies all certificate requests and requests the CA to issue them. RAs can be configured within the same CA (server) or in a separate system. Microsoft CA server, RSA Keon, and Entrust are examples of PKI servers that utilize an RA.
A certificate is valid only for the period of time specified by the issuing CA. After a certificate expires, a new certificate must be requested. You can also revoke a specific user and device certificate. The inventory of serial numbers of revoked certificates is maintained on a certificate revocation list (CRL).
Certificate Revocation List
When you revoke a certificate, the CA publishes the serial number of the revoked certificate to the CRL. This CRL can be maintained on the same CA or a separate system. The CRL can be accessed by any entity trying to check the validity of any given certificate. LDAP and HTTP are the most commonly used protocols when publishing and obtaining a CRL. Storing CRLs in a separate system other than the CA server is often recommended for large environments, for better scalability and to avoid single points of failure.
Figure 18-3 illustrates how a certificate can be revoked on a CA and subsequently published to a CRL server.
Figure 18-3 Certificate Revocation and CRL Example
The following is the sequence of events in Figure 18-3:
Step 1. The user certificate is revoked in the CA server. The CA server updates the CRL/LDAP server.
Step 2. The user attempts to establish an IPSec VPN connection to the Cisco ASA.
Step 3. The Cisco ASA is configured to query the CRL server. It downloads the CRL and finds the certificate serial number on the list of revoked certificates.
Step 4. The Cisco ASA denies access to the user and sends an IKE delete message.
You need to use CRLs for several reasons. Revoking a certificate is crucial if it might have been compromised or if the user might not have authority to use such certificate. For example, you should always revoke certificates when employees leave your organization.
Simple Certificate Enrollment Protocol
Simple Certificate Enrollment Protocol (SCEP) is a protocol developed by Cisco. SCEP provides secure issuance of certificates to users and network devices in a scalable manner. It uses HTTP for the transport mechanism for enrollment and uses LDAP or HTTP for CRL checking. SCEP supports the following operations:
• CA and RA public key distribution
• Certificate enrollment
• Certificate revocation
• Certificate query
• CRL query
Cisco ASA supports enrollment via SCEP and manually via a cut-and-paste method.
Tip
Using SCEP is recommended for better scalability. The manual cut-and-paste method is normally used when the CA server does not support SCEP or an HTTP connection is not possible.
Installing Certificates
Enrollment is the process of obtaining a certificate from a CA server. This section covers the necessary steps to configure and enroll a Cisco ASA to an external CA server.
Installing Certificates Through ASDM
You can install a certificate on the Cisco ASA through ASDM from an external CA by using the following methods:
• From a certificate file
• By copying and pasting the certificate in PEM format
• By using SCEP
The following sections demonstrate how to install CA and identity certificates by each of these supported certificate installation methods.
Installing a CA Certificate from a File
Complete the following steps to install a CA certificate from a file, using ASDM.
Step 1. Log in to ASDM and navigate to Configuration > Device Management > Certificate Management > CA Certificates. You can alternatively navigate to Configuration > Remote Access VPN > Certificate Management > CA; navigating to either of these locations within ASDM enables you to accomplish the same tasks.
Step 2. Click on Add.
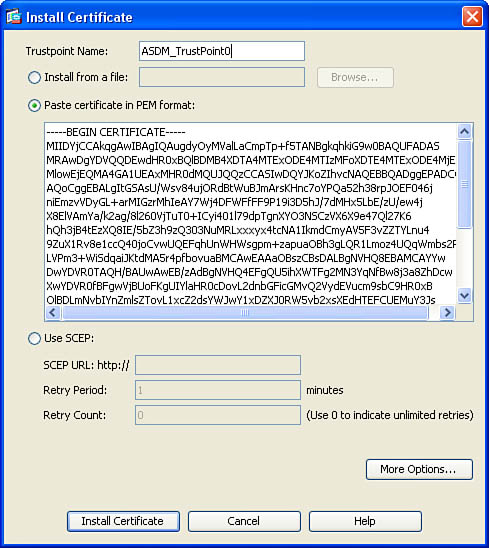
Step 3. The Install Certificate dialog box illustrated in Figure 18-4 is displayed. By default ASDM names the trustpoint ASDM_TrustPoint0. The 0 at the end of the trustpoint name increments every time a new certificate is imported. You can also edit the name to the name of your preference. In this example the trustpoint name is left to the default value of ASDM_TrustPoint0.
Figure 18-4 Install Certificate Dialog Box

Step 4. In this example the CA certificate is installed from a file. Select Install from a File and click on Browse to locate the certificate file in your local system.
Step 5. Click on Install Certificate to install the CA certificate.
Step 6. Click on Apply to apply the changes in ASDM.
Step 7. Click on Save to save the configuration on the Cisco ASA.
Installing an Identity Certificate from a File
Complete the following steps to install an identity certificate from a file, using ASDM.
Step 1. Log in to ASDM and navigate to Configuration > Device Management > Certificate Management > Identity Certificates. You can alternatively navigate to Configuration > Remote Access VPN > Certificate Management > Identity Certificates; navigating to either of these locations within ASDM enables you to accomplish the same tasks.
Step 2. Click on Add.
Step 3. The Add Identity Certificate dialog box illustrated in Figure 18-5 is displayed.
Figure 18-5 Add Identity Certificate Dialog Box
Step 4. In this example the CA certificate is installed from a file. Select Import the Identity Certificate from a File and click on Browse to locate the certificate file in your local system.
Step 5. If your certificate has a passphrase used for encryption, enter such passphrase under the Decryption Passphrase field.
Step 6. Click on Add Certificate to install the CA certificate.
Step 7. Click on Apply to apply the changes in ASDM.
Step 8. Click on Save to save the configuration on the Cisco ASA.
Installing a CA Certificate by the Copy and Paste Method
You can also install a CA certificate by pasting the PEM formatted file into ASDM. Complete the following steps to install a CA certificate by the copy-and-paste method, using ASDM.
Step 1. Log in to ASDM and navigate to Configuration > Device Management > Certificate Management > CA Certificates. You can alternatively navigate to Configuration > Remote Access VPN > Certificate Management > CA Certificates; navigating to either of these locations within ASDM enables you to accomplish the same tasks.
Step 2. Click on Add.
Step 3. The Install Certificate dialog box illustrated in Figure 18-6 is displayed. Select Paste Certificate in PEM Format and paste the CA certificate into the form field, as shown in Figure 18-6.
Figure 18-6 Pasting a CA Certificate from a PEM-Formatted File
Step 4. Click on Install Certificate to install the CA certificate.
Step 5. Click on Apply to apply the changes in ASDM.
Step 6. Click on Save to save the configuration on the Cisco ASA.
Installing a CA Certificate Using SCEP
Complete the following steps to install a CA certificate using SCEP via ASDM.
Step 1. Log in to ASDM and navigate to Configuration > Device Management > Certificate Management > CA Certificates. You can alternatively navigate to Configuration > Remote Access VPN > Certificate Management > CA Certificates; navigating to either of these locations within ASDM enables you to accomplish the same tasks.
Step 2. Click on Add.
Step 3. The Install Certificate dialog box is shown. Select Use SCEP to install the CA certificate using SCEP.
Step 4. Enter the CA server SCEP URL in the SCEP URL field.
Step 5. By default the retry period for the Cisco ASA to try to connect the CA server using SCEP is 1 minute. To define a different retry period, enter the value (in minutes) under the Retry Period field.
Step 6. The number of times the Cisco ASA will try to connect to the CA server via SCEP is defined under the Retry Count field. The default is 0, which indicates unlimited retries. In this example, the default values are used.
Step 7. You can optionally click on the More Options button to enter advanced configuration parameters. After you click on More Options, the Configuration Options for CA Certificate dialog box shown in Figure 18-7 is displayed.
Figure 18-7 Configuration Options for CA Certificate Dialog Box
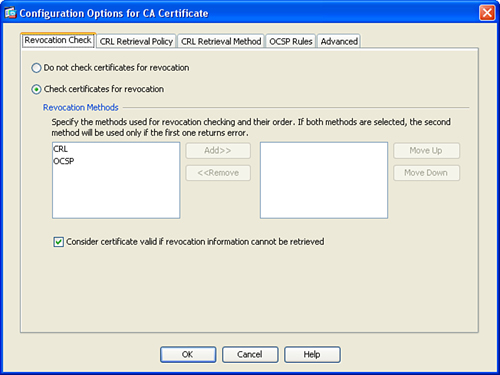
Step 8. Under the Revocation Check tab you can configure the Cisco ASA to check whether a certificate has been revoked or not, using CRL checking or OCSP. To have the Cisco ASA check whether a certificate has been revoked, select the Check Certificate for Revocation option, as shown in Figure 18-7.
Step 9. Specify the method used for revocation checking and the order on which each check will take place. The available methods are CRL and OCSP. Select the method and click on Add. If both methods are selected, the second method will be used only if the first one fails.
Step 10. As a fallback mechanism, you can configure the Cisco ASA to consider a certificate valid if revocation information cannot be retried, as shown in Figure 18-7.
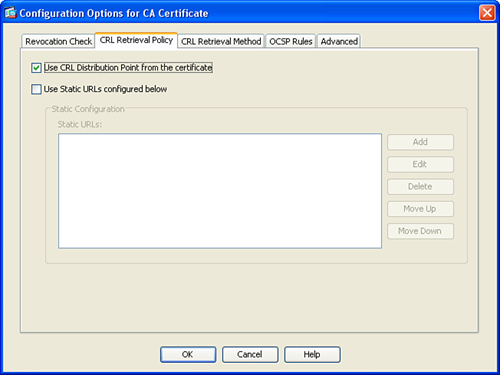
Step 11. Under the CRL Retrieval Policy tab you can specify whether the CRL distribution point is used from the certificate issued or from a configured static URL, as shown in Figure 18-8. In this example, the default behavior is used; the Use CRL Distribution Point from the Certificate Option is selected.
Figure 18-8 CRL Retrieval Policy Tab
Step 12. You can optionally use the CRL Retrieval Method tab to select the method to be used for CRL checking. You can configure the Lightweight Directory Access Protocol (LDAP), HTTP CRL retrieval, or SCEP. If you specify LDAP as the CRL retrieval option, TCP port 389 is used by the Cisco ASA by default. Additionally, if LDAP is selected, you must enter the username, password, and LDAP server IP address. The default TCP port 389 can also be changed based on your implementation requirements. In this example, HTTP is selected.
Step 13. In the OSCP Rules tab you can optionally configure OCSP rules for obtaining certificate revocation status. You must configure a certificate map before you configure OCSP rules. This certificate map matches user rules to specific fields in a certificate. In this example, OSPC is not used.
Step 14. The Advanced tab enables you to configure CRL and OCSP optional advanced parameters, as illustrated in Figure 18-9.
Figure 18-9 Advanced CRL and OSCP Options
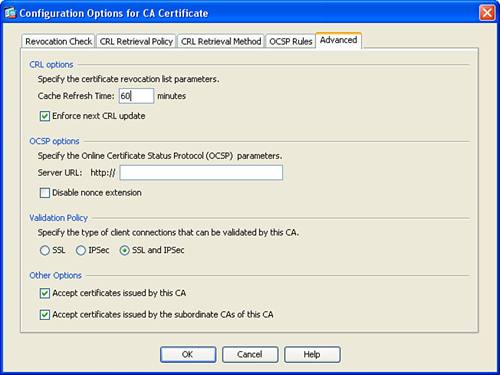
There are a two CRL advanced options you can configure under the CRL Options section. First, you can change the value of the Cache Refresh Time field. This is the number of minutes that the Cisco ASA stores/caches retrieved CRLs locally. The default value of 60 minutes is used in this example; however, the configurable values are from 1 to 1440 minutes.
By default the Cisco ASA enforces CRL checking immediately after it is configured. To disable this, uncheck the Enforce Next CRL Update option.
Under the OCSP Options section, you can specify the URL for the OCSP server to be used for certificate status check. By default the OCSP request includes the nonce extension used to prevent replay attacks. However, you can disable the nonce extension if the OCSP server is configured to send replies that do not contain this matching nonce extension or if the server does not support it.
The Validation Policy section enables you to specify the type of VPN connections that will be validated. You can select SSL, IPSec, or both. The default option is to validate certificates for both SSL and IPSec connections.
Under the Other Options section you can configure the Cisco ASA to accept certificates granted by the configured CA and/or accept certificates issued by any subordinate CAs of this CA. Both options are enabled by default, as shown in Figure 18-9.
Step 15. Click OK to accept the configured values.
Step 16. Click on Install Certificate to install the CA certificate.
Step 17. Click on Apply to apply the changes in ASDM.
Step 18. Click on Save to save the configuration on the Cisco ASA.
Installing an Identity Certificate Using SCEP
Complete the following steps to install an identity certificate using SCEP via ASDM.
Step 1. Log in to ASDM and navigate to Configuration > Device Management > Certificate Management > Identity Certificates. You can alternatively navigate to Configuration > Remote Access VPN > Certificate Management > Identity Certificates; navigating to either of these locations within ASDM enables you to accomplish the same tasks.
Step 2. Click on Add.
Step 3. The Install Certificate dialog box shown in Figure 18-10 is displayed. Select Add a New Identify Certificate.
Figure 18-10 Installing an Identity Certificate Using SCEP
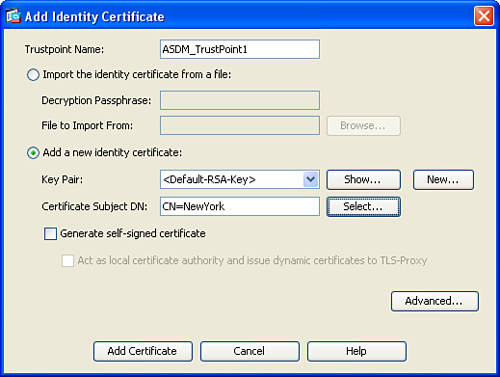
Step 4. Before starting the enrollment process, you must either select the default RSA key pair (generated by ASDM) or generate a new one. In this example, the default RSA key pair is used. To generate a new one, click on the New button. To show the current key pair, click the Show button.
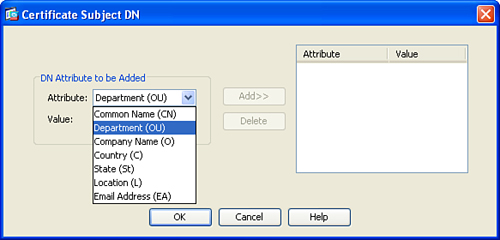
Step 5. You can define the certificate distinguished name (DN) in the Identity certificate by clicking the Select button under the Certificate Subject DN section. The Certificate Subject DN panel is displayed.
Step 6. You can define several attributes; these include the following:
• CN = Common Name
• OU = Department
• O = Company Name
• C = Country
• ST = State/Province
• L = Location
• EA = Email Address
In this example, NewYork is defined as the CN.
Click OK after defining the DN attributes for the identity certificate.
Step 7. Click on the Advanced button to enter advanced enrollment parameters. The Advanced Options dialog box is displayed.
Step 8. Select the Enrollment Mode tab.
Step 9. In this example enrollment is done via SCEP. Select the Request from CA button to enroll via SCEP.
Step 10. Enter the URL of the CA server under the Enrollment URL (SCEP) field.
Step 11. The retry period is the number of minutes that the Cisco ASA will wait before retrying to install the identity certificate. The default is one minute. The retry count is the total number of retries. The default is 0, which indicates unlimited retries. In this example the retry period and retry count are left to their default values.
Note
You can also configure a challenge phrase that is registered with the CA during SCEP enrollment. The CA typically uses this phrase to authenticate a subsequent revocation request.
Step 12. Click OK to accept the configured values.
Step 13. Click on Add Certificate to send the identity certificate request to the CA server. The enrollment request has been sent to the CA server. To check the enrollment status, click on the Refresh button.
Step 14. After the identity certificate is issued and installed, you will see it listed under Configuration > Remote Access VPN > Certificate Management > Identity Certificates and under Configuration > Device Management > Certificate Management > Identity Certificates.
Step 15. Click on Save to save the configuration on the Cisco ASA.
Tip
ASDM also enables you to enroll the Cisco ASA to an Entrust CA server. To enroll using an Entrust CA, navigate to Configuration > Remote Access VPN > Certificate Management > Identity Certificates and click the Enroll ASA SSL VPN with Entrust button. The Generate Certificate Signing Request dialog box appears, enabling you to configure and generate a certificate-signing request to send to Entrust. You can do the same thing by navigating to Configuration > Device Management > Certificate Management > Identity Certificates.
Installing Certificates Using the CLI
This section demonstrates how to install certificates using the CLI instead of ASDM.
Generating the RSA Key Pair in the CLI
Before starting the enrollment process via the CLI, you must generate the RSA key pair with the crypto key generate rsa command. To generate the keys, you must first configure a hostname and domain name. Example 18-1 demonstrates how to configure the Cisco ASA hostname and domain name and generate the RSA key pair.
Example 18-1 Generating the RSA Key Pair

Note
In Example 18-1, the name for the key pair is <Default-RSA-Key>. The <Default-RSA-Key> is replaced with a key pair label if configured, which you do by using the label keyword. If you attempt to create another key pair with the same label, the Cisco ASA displays an warning message.
Use the crypto key zeroize rsa command if an RSA key pair exists and a new pair needs to be regenerated. Example 18-2 demonstrates how to remove existing RSA key pairs.
Example 18-2 Removing Existing RSA Key Pair

To verify the generation of the RSA key pair, use the show crypto key mypubkey rsa command. Example 18-3 shows the output of this command.
Example 18-3 Viewing RSA Key Pair Information

Note
The same RSA key pair is used for Secure Shell (SSH) connections to the security appliance.
Configuring a Trustpoint
The Cisco ASA certificate configuration commands are similar to Cisco IOS commands. The crypto ca trustpoint command declares the CA that your Cisco ASA should use and enables you to configure all the necessary certificate parameters. Invoking this command puts you in ca-trustpoint configuration mode, as shown in Example 18-4.
Example 18-4 Configuring a Trustpoint

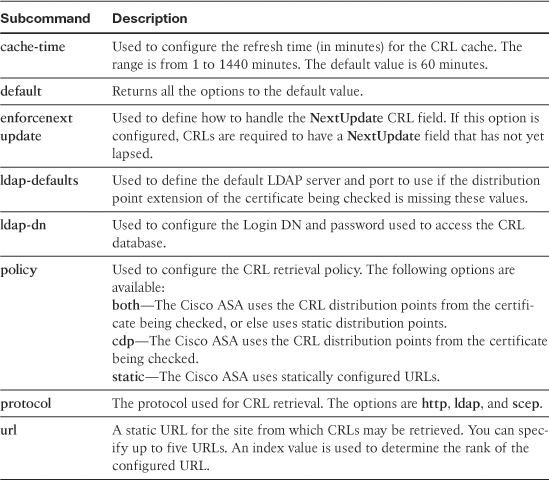
Table 18-1 lists and describes all the trustpoint subcommands.
Table 18-1 Enrollment Configuration Subcommands

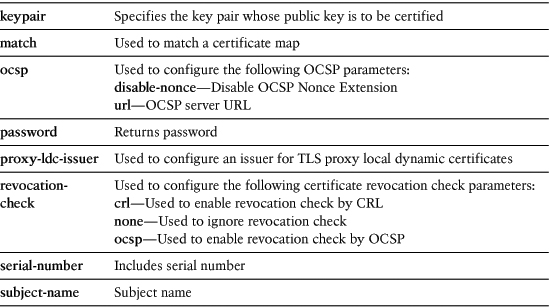
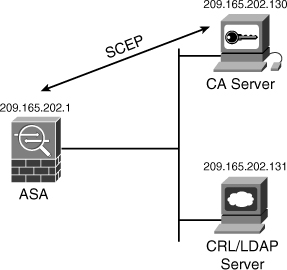
Figure 18-11 illustrates a topology that is used in the next example. A Cisco ASA is configured to enroll via SCEP to the CA server 209.165.202.130.
Figure 18-11 Enrollment via SCEP Example
Example 18-5 includes the Cisco ASA trustpoint configuration.
Example 18-5 Configuring the ASA to Enroll via SCEP
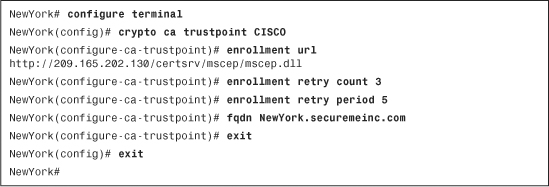
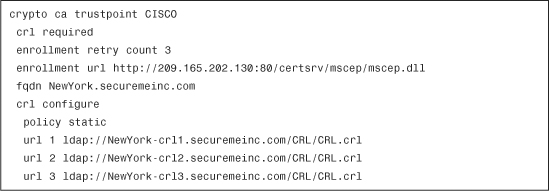
In Example 18-5, the Cisco ASA is configured with a trustpoint named CISCO. The enrollment url subcommand is used to declare the location of the CA server.
Note
In this example, the CA server is a Microsoft Windows CA Server with SCEP services. The complete URL is http://209.165.202.130/certsrv/mscep/mscep.dll.
The SCEP plug-in for Microsoft Windows can be downloaded from Microsoft’s website at www.microsoft.com.
The Cisco ASA is configured to retry three times in case the certificate is not successfully obtained from the CA Server. It is also configured to wait five minutes between each request to the CA. The fully qualified domain name (FQDN) used in the enrollment request is configured to be NewYork.securemeinc.com.
In this example, the Cisco ASA enrolls with the CA to use certificates for IPSec authentication. The Cisco ASA needs to obtain the CA certificate and request an ID certificate from the CA server. To obtain the CA certificate, use the crypto ca authenticate command. Example 18-6 demonstrates how to use this command to retrieve the CA certificate from the CA server.
Example 18-6 Obtaining the CA Certificate from the CA Server

In Example 18-6, CISCO is the name of the previously configured trustpoint. After executing this command, the Cisco ASA establishes a TCP port 80 connection to the 209.165.202.130 CA server (via SCEP). While doing this transaction, the Cisco ASA prompts you to accept the certificate.
Note
The Cisco ASA also retrieves RA certificates from the server if an RA is used.
After the CA certificate is obtained from the CA server, use the crypto ca enroll command to generate an identity certificate request to the 209.165.202.130 CA server. Example 18-7 demonstrates how to use this command to obtain the ID certificate.
Example 18-7 Obtaining the ID Certificate from the CA Server
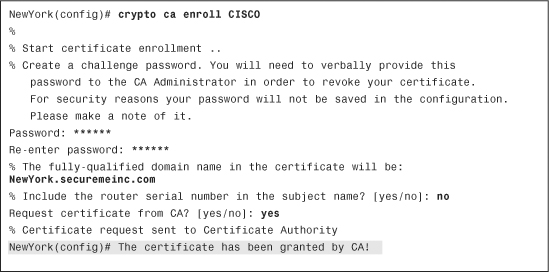
Note
The request is a PKCS#7 certificate request.
The word CISCO is the name of the previously configured trustpoint. After invoking the crypto ca enroll command, the Cisco ASA asks for a password to be used for this certificate. The Cisco ASA displays the FQDN to be used in the certificate. The Cisco ASA asks whether you would like to include its serial number in the subject name of the certificate. This is not selected in this example. The serial number is not used by IKE, but it may be used by the CA server to authenticate certificates or to associate a certificate with a particular device. If you are in doubt, ask your CA administrator whether you need to include the serial number in your certificate request. In the shaded line, the Cisco ASA finally asks whether you would like to request the certificate from the CA. If your answer is yes and the subsequent request is successful, the message in the shaded line is shown, indicating a successful certificate enrollment.
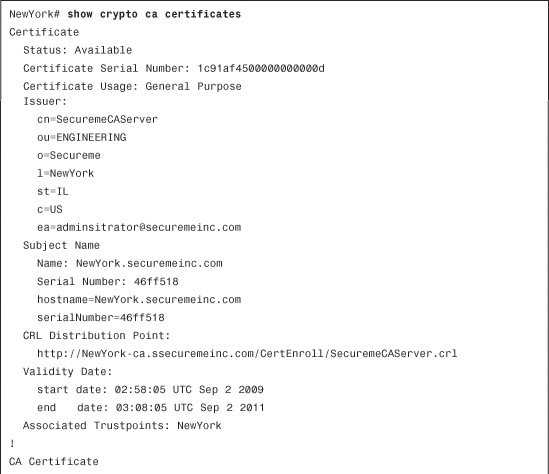
Use the show crypto ca certificates command to verify and display the root/CA and ID certificate information. Example 18-8 shows the output of this command.
Example 18-8 Output of the show crypto ca certificates command
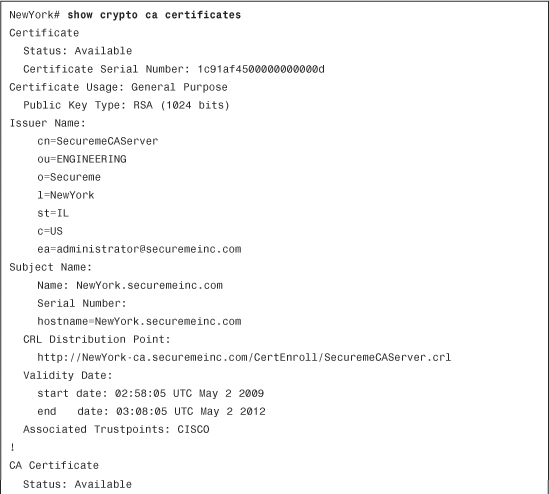
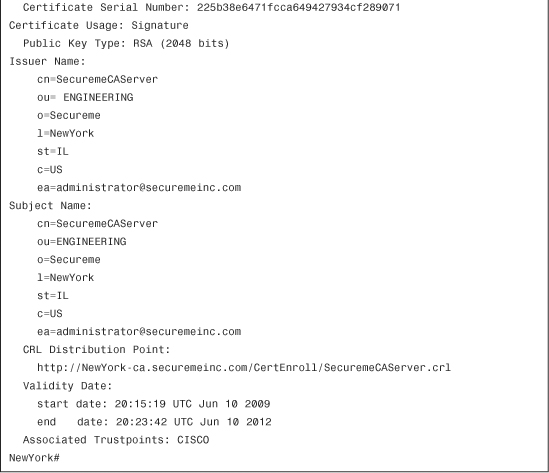
The certificate information is shown in Example 18-8, which includes the following:
• The status of each certificate
• The certificate usage
• The issuer distinguished name (DN) information (i.e., organization, organizational unit, locality, etc.)
• CRL distribution point (CDP)
• The validity period of each certificate
• The trustpoint associated to the certificate
This command is very useful for troubleshooting and verification purposes.
Manual (Cut-and-Paste) Enrollment via the CLI
The manual, or cut-and-paste, enrollment method is mostly used in any of the following circumstances:
• The CA server does not support SCEP.
• There is no IP connectivity between the Cisco ASA and the CA server.
• TCP port 80 is blocked between the Cisco ASA and the CA server.
The configuration of the Cisco ASA for manual enrollment is very similar to its configuration for the SCEP enrollment process. However, the enrollment terminal subcommand is used instead of the enrollment url subcommand. Example 18-9 shows the trustpoint configuration for manual enrollment.
Example 18-9 Configuring the Cisco ASA for Manual Enrollment
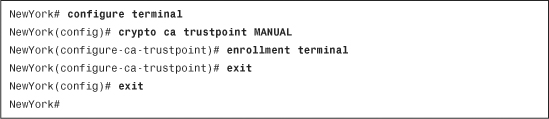
The name of the trustpoint in Example 18-9 is MANUAL. The enrollment terminal subcommand is used to specify manual enrollment.
The administrator retrieves (copies and pastes) the certificate from the CA server. Use the crypto ca authenticate command to import the CA certificate. Example 18-10 demonstrates how to import the CA certificate to the Cisco ASA manually.
Example 18-10 Importing the CA Certificate Manually
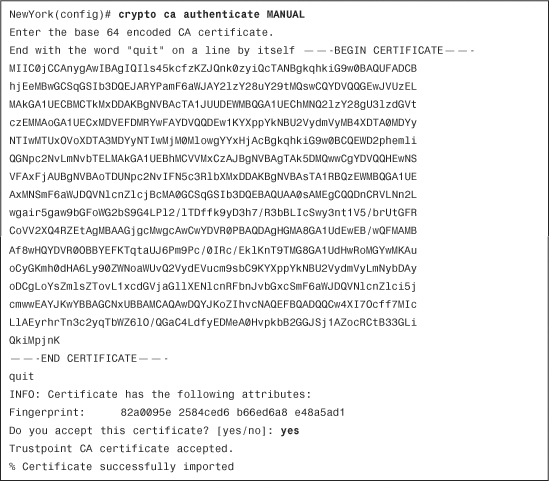
As shown in Example 18-10, the CA certificate is manually imported to the Cisco ASA by the cut-and-paste method. Enter a blank line or the word quit after pasting the Base64-encoded CA certificate to the Cisco ASA to exit the CA configuration screen. If the certificate is recognized, the Cisco ASA asks you whether you would like to accept the certificate; enter yes. The Certificate Successfully Imported message is displayed if the CA certificate import is successful.
To generate the ID certificate request, use the crypto ca enroll command. Example 18-11 demonstrates how to generate the certificate request.
Example 18-11 Generating the ID Certificate Request
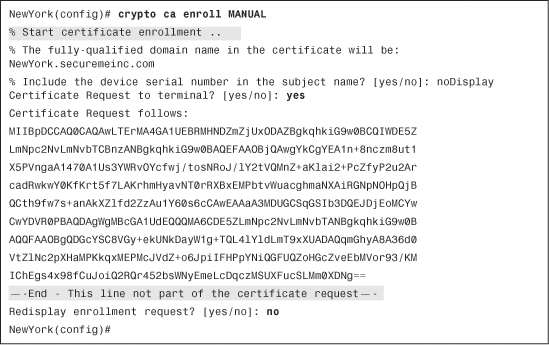
Example 18-11 shows how the certificate request is generated. Copy and paste the certificate request to your CA server and generate the new ID certificate for the Cisco ASA.
Tip
Make sure not to copy and paste the second highlighted line in Example 18-11. The certificate request will be malformed if this is included.
Note
Obtain a Base64-encoded certificate from your CA server. You cannot copy and paste a Distinguished Encoding Rules (DER) encoded certificate.
The Cisco ASA gives you the option to redisplay the certificate request if needed (as shown in Example 18-11).
After the ID certificate is approved by the CA server, use the crypto ca import command to import the Base64-encoded ID certificate. Example 18-12 demonstrates how to import the ID certificate.
Example 18-12 Manually Importing the ID Certificate
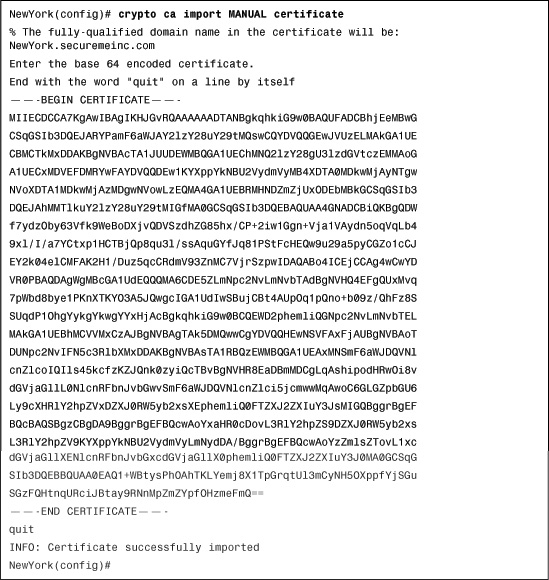
The Base64-encoded ID certificate is successfully imported to the Cisco ASA.
Configuring CRL Options via the CLI
This section teaches you how to configure CRL checking on the Cisco ASA. You can configure the Cisco ASA to do any of the following:
• Not require CRL checking
• Optionally accept the peer’s certificate if the security appliance is not able to retrieve the CRL
• Require CRL checking
To bypass CRL checking, use the crl nocheck trustpoint subcommand.
Tip
Bypassing CRL checking is insecure and therefore is not recommended.
The crl optional subcommand enables the Cisco ASA to optionally accept its peer’s certificate if the required CRL is not available.
Use the crl required subcommand to force the Cisco ASA to perform CRL checking. The CRL server must be reachable and available for a peer certificate to be validated. After this command is enabled, you must configure the CRL parameters. To configure the CRL options, use the crl configure trustpoint subcommand. After invoking this command, you are placed in the ca-crl prompt, as shown in Example 18-13.
Example 18-13 The crl configure Subcommand

Table 18-2 lists all the CRL configuration options.
Table 18-2 crl configure Configuration Options
Example 18-14 demonstrates how to configure CRL checking and the use of several of the previous options.
Example 18-14 CRL Checking Example
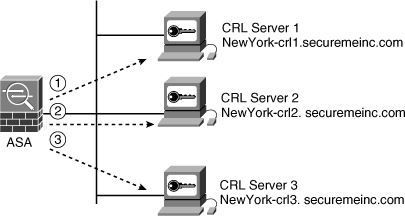
In Example 18-14, a Cisco ASA is configured to require CRL checking with the crl required trustpoint subcommand. The Cisco ASA has three CRL servers statically defined. LDAP is used as the transport protocol.
Note
Make sure to configure a domain name server on the Cisco ASA when using FQDN for CRL distribution points. Use the dns name-server ip-address command to specify the domain name server to be used.
The Cisco ASA first tries the CRL server named NewYork-crl1.securemeinc.com. Subsequently, it tries NewYork-crl2.securemeinc.com and NewYork-crl3.securemeinc.com, in that order, as shown in Figure 18-12.
Figure 18-12 CRL Checking Example
You can manually request the retrieval of the CRL by using the crypto ca crl request command. Example 18-15 demonstrates how to manually retrieve the CRL.
Example 18-15 CRL Manual Retrieval via the CLI
![]()
The CRL is received successfully. To view the CRL, use the show crypto ca crls command, as demonstrated in Example 18-16.
Example 18-16 Output of the show crypto ca crls Command
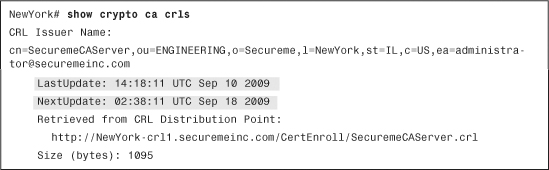
The first and second shaded lines in Example 18-16 show when the last CRL update took place and when the next one will be. The third shaded line shows the URL of the CRL distribution point.
The Local Certificate Authority
The Cisco ASA offers basic certificate authority functionality to issue digital certificates, as well as to do basic revocation checking of issued certificates. This feature is often referred to as the Local Certificate Authority (Local CA). The certificates issued by the Cisco ASA’s local CA are for both browser- and client-based SSL VPN connections. When the local CA is configured and enabled on the Cisco ASA, users can enroll for a certificate by visiting a specified browser-based enrollment webpage. This section demonstrates how to configure and enable the Cisco ASA’s local CA, using ASDM and the CLI.
Configuring the Local CA Through ASDM
Complete the following steps to configure the local CA through ASDM.
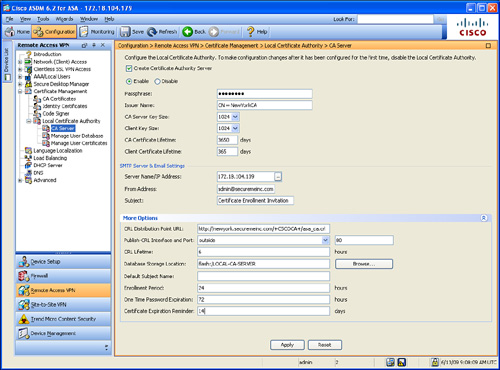
Step 1. Log in to ASDM and navigate to Configuration > Remote Access VPN > Certificate Management > Local Certificate Authority > CA Server. The screen shown in Figure 18-13 is displayed.
Figure 18-13 Configuring the Local CA Using ASDM
Step 2. Click on Create Certificate Authority Server to configure the local CA.
Step 3. Select Enable to enable the local CA.
Step 4. You can enter a passphrase to secure the Local CA server from unauthorized or accidental shutdown under the Passphrase field.
Step 5. Enter the issuer name used for the CA certificate to be generated by the Cisco ASA’s local CA under the Issuer Name field. In this example, CN = NewYorkCA is used.
Step 6. Select the key modulus size used for the CA server certificate under the CA Server Key Size pull-down menu. The configurable values are from 512 to 2048. In this example, the default size of 1024 is used.
Step 7. Select the key modulus size used for the client certificates under the Client Key Size pull-down menu. The configurable values are from 512 to 2048. In this example, the default size of 1024 is used.
Step 8. Enter the validity period (lifetime) for the local CA certificate (in days) under the CA Certificate Lifetime field. In this example, the default value of 3650 days is used.
Step 9. Enter the validity period (lifetime) for all client certificates that will be issued by the local CA (in days) under the Client Certificate Lifetime field. In this example, the default value of 365 days is used.
Step 10. The Cisco ASA uses the Simple Mail Transfer Protocol (SMTP) to send emails that deliver one-time passwords for an enrollment invitation to users. Enter the IP address or server name of the SMTP server in your network under the Server Name/IP Address field under the SMTP Server & Email Settings section. In this example, the IP address of the SMTP server is 172.18.104.139.
Step 11. Enter the email address that will be used when the emails are sent to the users under the From Address field. This is typically an administrator’s address or group, depending on your policies. In this example, the email address used is [email protected].
Step 12. Enter the subject used in the enrollment email to be sent to the users under the Subject field. In this example, the default subject (Certificate Enrollment Invitation) is used.
Step 13. Click on More Options to enter advanced local CA configuration options. Enter the URL for the CRL distribution point within the Cisco ASA to be included within each certificate under the CRL Distribution Point URL field. The default CRL distribution location is http://hostname.domain/+CSCOCA+/asa_ca.crl. In this example the http://newyork.securemeinc.com/+CSCOCA+/asa_ca.crl URL is used.
Step 14. Use the Publish-CRL Interface and Port pull-down menu and field to make the CRL available for HTTP download on a specific interface or port. TCP port 80 is the HTTP default port number. In this example the outside interface is selected with the default port (TCP port 80).
Step 15. Specify the lifetime of the CRL (in hours) under the CRL Lifetime field. The default of 6 hours is configured in this example.
Step 16. Specify the storage area for the Local CA configuration and data files within the Cisco ASA’s flash under the Database Storage Location field. The default location (flash:/LOCAL-CA-SERVER) is used in this example. Alternatively, you can click on Browse to search for a specific location.
Note
You can also use an external CIFS or FTP server to store certificates. In this example, the local flash is used for simplicity.
Step 17. Optionally, you can configure a default subject name to append to a username on issued certificates under the Default Subject Name field. This is left blank in this example.
Step 18. Enter the number of hours a user has to enroll and retrieve a user certificate under the Enrollment Period field. In this example the default enrollment period of 24 hours is used.
Step 19. The One Time Password Expiration field enables you to configure the validity period for the one-time password emailed to the user. In this example the default enrollment period of 72 hours is used.
Step 20. Enter the number of days before expiration reminders are sent to the users that have not completed the enrollment under the Certificate Expiration Reminder field. In this example the default enrollment period of 14 days is used.
Step 21. Click on Apply to apply the changes in ASDM.
Step 22. Click on Save to save the configuration on the Cisco ASA.
Configuring the Local CA Using the CLI
Use the crypto ca server command to configure the local CA using the CLI, as shown in Example 18-17.
Example 18-17 Configuring the Local CA Using the CLI
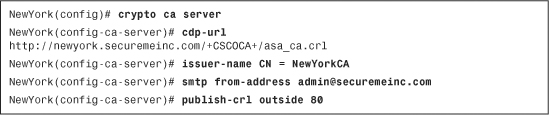
Example 18-17 shows the values used in the previous examples when configuring the local CA via ASDM. The cdp-url subcommand is used to specify the CRL distribution point URL. The issuer-name subcommand is used to specify the issuer name information to be used in the CA certificate. The smtp from-address subcommand is used to define the from email address used in the emails sent to users during the enrollment process. The publish-crl subcommand is used to specify the interface and port where the CRL distribution point is accessed.
To specify the SMTP server to be used by the Cisco ASA, use the smtp-server global configuration command, as shown in Example 18-18.
Example 18-18 Configuring the SMTP Server
![]()
The lifetime ca-certificate command can be used to specify the lifetime for the Local CA certificate. Example 18-19 shows the values used in the previous example when configuring the local CA, using ASDM.
Example 18-19 Configuring Certificate Lifetimes

The keysize command specifies the size of the public and private keys generated at user-certificate enrollment. The keysize server command is used to configure the size of the local CA’s own key-pair.
Note
As previously mentioned, the default key size for both the server and user certificates is 1024. When these values are configured, these commands are not shown in the configuration. For both the keysize command and the keysize server command, the options are 512, 768, 1024, and 2048 bits.
To enable the local CA server, issue the no shutdown subcommand, as shown in Example 18-20.
Example 18-20 Enabling the Local CA

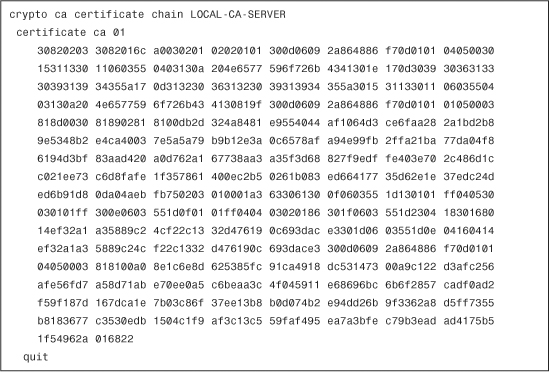
After the local CA is enabled, the Cisco ASA generates its CA certificate chain and it is displayed in the configuration, as shown in Example 18-21.
Example 18-21 Local CA Certificate Chain
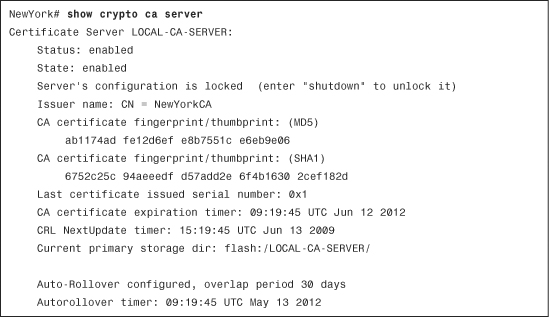
The show crypto ca server command can be used to verify that the local CA server is enabled and to show other statistics, as shown in Example 18-22.
Example 18-22 Output of the show crypto ca server Command
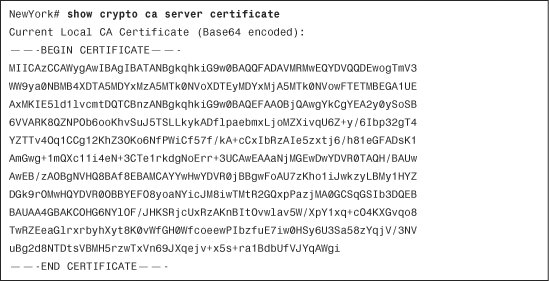
The show crypto ca server certificate command can be used to display the base-64 encoded local CA certificate, as shown in Example 18-23.
Example 18-23 Output of the show crypto ca server certificate Command
Enrolling Local CA Users Through ASDM
All users to be enrolled within the local CA must be added manually to the Cisco ASA’s local CA server user database. Complete the following steps to enroll local CA users through ASDM.
Step 1. Log in to ASDM and navigate to Configuration > Remote Access VPN > Certificate Management > Local Certificate Authority > Manage User Database.
Step 2. Click on Add to add a user. The screen shown in Figure 18-14 is displayed.
Figure 18-14 Adding Local CA Users Through ASDM
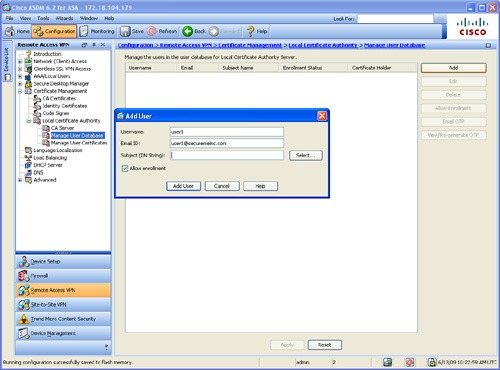
Step 3. Enter the username for the new user under the Username field. The username user1 is used in this example.
Step 4. Enter the user’s email address under the Email ID field. In this example, the certificate enrollment invitation email is sent to [email protected].
Step 5. Enter the certificate DN information under the Subject (DN String) field. Click the Select button to select and configure the available DN attributes. The Certificate Subject DN dialog box is displayed, as illustrated in Figure 18-15. Figure 18-15 shows all available DN attributes that can be configured.
Figure 18-15 Certificate Subject DN Dialog Box
Step 6. Click OK after you configure the appropriate DN attributes.
Step 7. Make sure that the Allow Enrollment check box is selected to allow this user to obtain the certificate from the local CA.
Step 8. Click Add User to add the new user.
Step 9. The user is now shown under the Manage User Database screen, as shown in Figure 18-16.
Figure 18-16 Manage User Database Screen
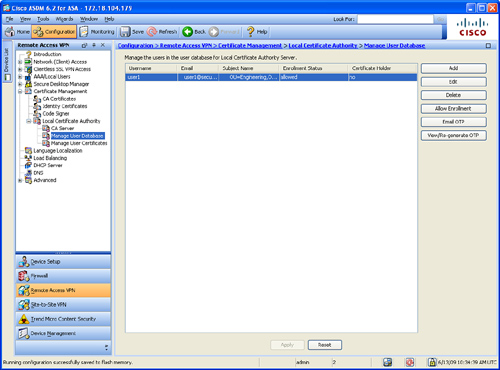
Step 10. Click the Email OTP button to send the certificate enrollment invite email to the user, along with the one-time password.
Step 11. Click on Save to save the configuration on the Cisco ASA.
The user will receive an email from the Cisco ASA with instructions on how to obtain the new certificate. The body of the email sent to user1 is shown in Example 18-24.
Example 18-24 Certificate Enrollment Invitation Email
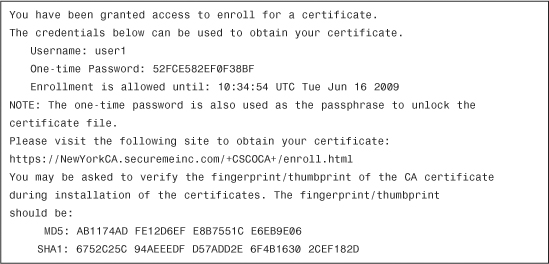
When the user visits the specified URL, the user is asked to enter the credentials included in this email. If authentication is successful, the user is allowed to install the new certificate.
Enrolling Local CA Users Through the CLI
The CLI can also be used to add local CA users. The crypto ca server user-db add and the crypto ca server user-db allow commands are used to add and allow new local CA users. The crypto ca server user-db add command has the following options:
• username—The username for the user being added.
• dn—The distinguished name information
• email—The user’s email address, where OTPs and notices are to be sent.
Example 18-25 shows how user1 is added to the local CA database.
Example 18-25 Adding New Local CA Users Through the CLI

In Example 18-25, user1 is added to the local CA user database. The Organization Unit (OU) within the DN is set to Engineering and the Organization (O) is SecureMeInc. User1’s email address is [email protected] and is entered with the email keyword. The crypto ca server user-db allow user1 command is used to allow user1 to enroll with the Cisco ASA.
To send the enrollment invitation email to the new user, use the crypto ca server user-db email-otp <username> command, as follows:
NewYork# crypto ca server user-db email-otp user1
The user receives an email from the Cisco ASA with instructions on how to obtain the new certificate.
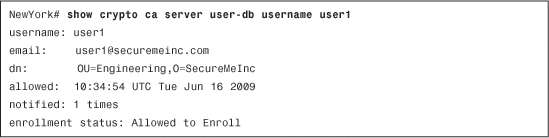
Use the show crypto ca server user-db username command to display the information about a specific user, as shown in Example 18-26.
Example 18-26 Output of the show crypto ca server user-db username user1 Command
Note
The show crypto ca server user-db (without the username keyword) displays all users within the local CA user database.
Note
You can also use the show crypto ca server user-db enrolled command to display all users that have successfully enrolled with the local CA. The show crypto ca server user-db allowed command lists all users in the user enrollment database that are currently allowed to enroll. The show crypto ca server user-db expired command displays all users holding expired certificates. The show crypto ca server user-db on-hold command shows all users that do not hold a certificate and are not currently allowed to enroll.
Configuring IPSec Site-to-Site Tunnels Using Certificates
Chapter 16, “Site-to-Site IPSec VPNs,” illustrated how to configure an IPSec site-to-site tunnel using preshared keys. This section illustrates how to use digital certificates to configure an IPSec site-to-site tunnel between two Cisco ASAs.
In the following examples, a branch office in London needs to create an IPSec site-to-site tunnel to the New York office. Figure 18-17 illustrates a high-level network topology of SecureMe’s implementation.
Figure 18-17 IPSec Site-to-Site Tunnel, Using Certificates
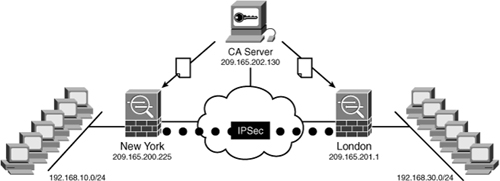
The Cisco ASAs in both locations successfully enroll with the CA server and build the IPSec site-to-site tunnel, using its corresponding certificates for authentication.
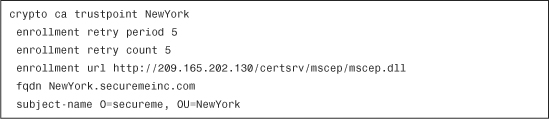
Example 18-27 includes New York’s ASA trustpoint configuration.
Example 18-27 New York ASA Trustpoint Configuration
Note
To add the identity certificate through ASDM, navigate to Configuration > Site-to-Site VPN > Certificate Management and follow the steps outlined in the previous sections of this chapter.
The Cisco ASA is configured to enroll and obtain a certificate from the CA server 209.165.202.130. The certificate distinguished name information contains O=secureme and OU=NewYork in this example. The O represents the organization name and OU represents the organizational unit.
Example 18-28 demonstrates how the ISAKMP policy is configured in NewYork’s Cisco ASA. The isakmp identity auto command is configured in this example. Usually, the IP address identity is used for preshared key authentication. The keyword hostname is generally used for certificate-based connections. The auto keyword automatically determines the ISAKMP identity. This is recommended if you have a combination of some IPSec tunnels that use preshared keys and others that use certificates for authentication.
Example 18-28 ISAKMP Policy Configuration
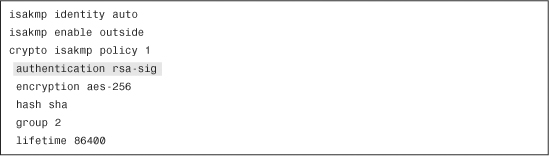
The shaded line in Example 18-28 shows that the Cisco ASA is configured for RSA signature authentication.
Example 18-29 includes NewYork’s ASA crypto map configuration.
Example 18-29 Crypto Map Configuration
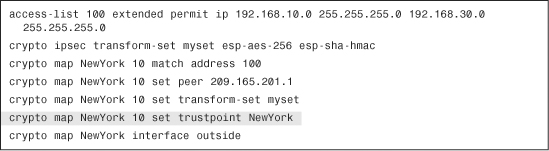
The crypto map configuration is similar to the configuration examples in Chapter 16. The shaded line in Example 18-29 associates the crypto map with the trustpoint that defines the certificate used while the IPSec connection is negotiated.
Example 18-30 includes the tunnel group configuration for NewYork’s ASA.
Example 18-30 Tunnel Group Configuration
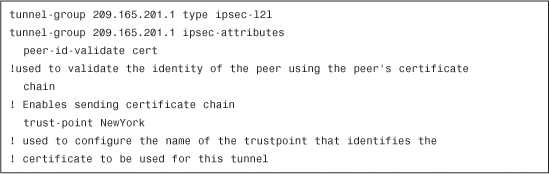
Note the differences in the configuration in Example 18-30 in comparison to the configuration of an IPSec site-to-site tunnel that uses preshared keys. The peer-id-validate cert command is used to validate the identity of the IPSec peer, using its certificate. The chain command enables the Cisco ASA to send the complete certificate chain to its peer. The trust-point command associates the trustpoint that identifies the certificate to be used for this tunnel.
Example 18-31 shows London’s Cisco ASA site-to-site IPSec configuration.
Example 18-31 London’s ASA Site-to-Site IPSec Configuration
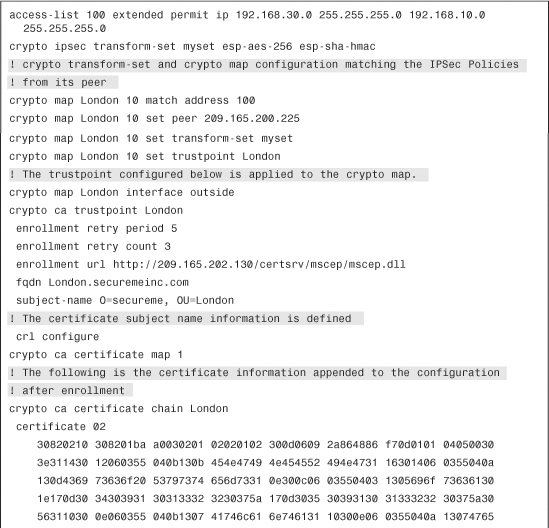
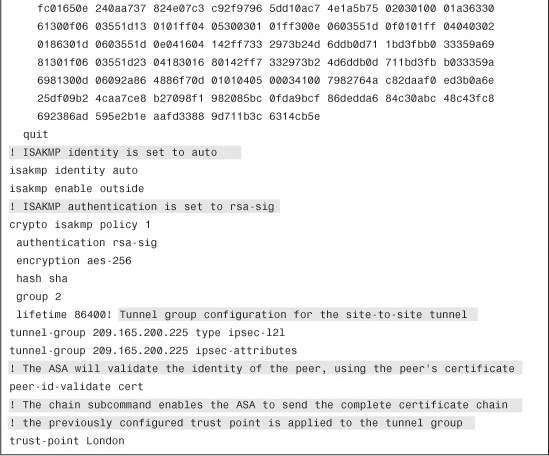
The shaded lines in Example 18-31 explain the relevant configuration parameters in London’s ASA.
Configuring the Cisco ASA to Accept Remote-Access IPSec VPN Clients Using Certificates
This section demonstrates how to configure the Cisco ASA to terminate Cisco VPN client IPSec connections using certificates. The steps to configure remote-access VPNs using preshared keys are covered in Chapter 17. Figure 18-18 illustrates the topology and components used in the following example.
Figure 18-18 Remote Access IPSec VPN Using Certificates
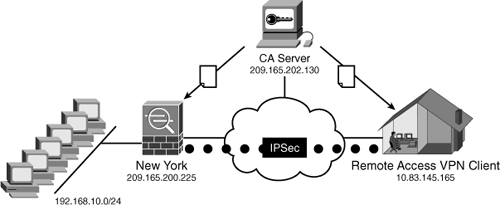
In Figure 18-18, remote-access users using the Cisco VPN Client connect to the Cisco ASA to access the corporate internal resources in New York. The clients and the Cisco ASA obtain certificates from the CA server 209.165.202.130. The steps necessary to enroll the Cisco ASA to the CA server are the same as those demonstrated previously in this chapter. The following subsection demonstrates how to enroll the Cisco VPN with the CA server.
Enrolling the Cisco VPN Client
The Cisco VPN client is capable of enrolling to a CA server via either SCEP or manual (file-based) enrollment. Click the Certificates tab on the VPN Client to configure the enrollment parameters. Figure 18-19 shows the Certificates tab of the Cisco VPN client.
Figure 18-19 Cisco VPN Client Certificate Configuration Options
Note
The Certificates tab and toolbar are only viewable in advanced mode. Running the VPN client in simple mode does not show these options. To change from simple mode to advanced mode, choose Options > Advanced Mode.
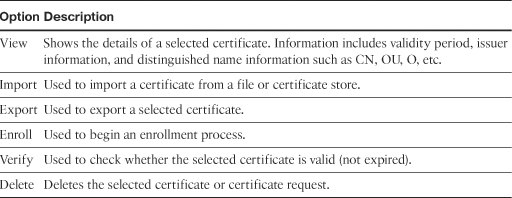
The Cisco VPN Client toolbar displays the tasks you can execute from the Certificates tab. Table 18-3 lists all the toolbar options and their usage.
Table 18-3 Cisco VPN Client Certificates Tab Toolbar Options
SCEP provides an easy mechanism to enroll the Cisco VPN Client. The following are the necessary steps to enroll the Cisco VPN Client via SCEP.
Step 1. Click the Enroll button on the toolbar. The VPN Client Certificate Enrollment window is displayed, as shown in Figure 18-20.
Figure 18-20 Cisco VPN Client Certificates Enrollment Window
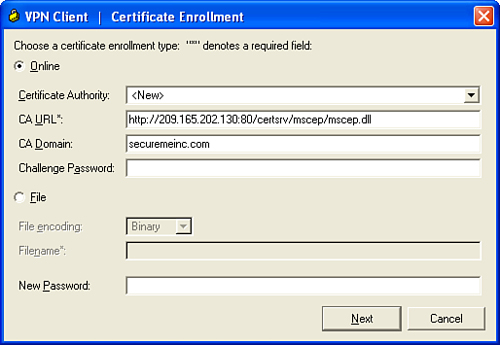
Step 2. Select Online as the certificate enrollment type.
Step 3. Enter the CA URL, domain, and challenge password (if applicable) and click Next. Various CA servers require the user to provide a password during enrollment. The Cisco VPN client enables you to enter the password in the Challenge Password field. This password is provided by the CA administrator. The New Password option is used for the password that protects this certificate. If your connection entry requires certificate authentication, you must enter this password each time you connect.
Step 4. The VPN Client Certificate Enrollment information form is displayed, as shown in Figure 18-21.
Figure 18-21 Cisco VPN Client Certificates Enrollment Form
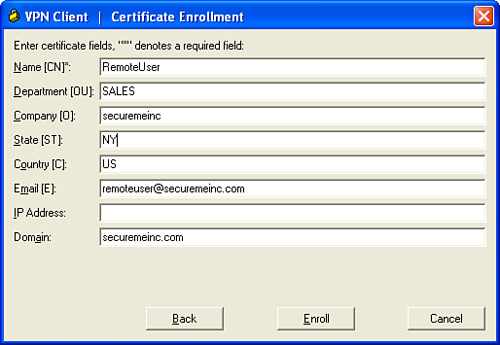
This form enables you to enter the information to be included in the certificate request. After you enter the necessary information, click Enroll to send the certificate enrollment request to the CA server via SCEP. The following are the parameters you can specify on the certificate request:
• Name [CN]—The unique common name (CN) for the user certificate. This can be the name of a user, system, or other entity. This field is required. The CN of RemoteUser is used in this example.
• Department [OU]—Usually the name of the department to which the user belongs. SALES is used in this example.
Note
By default, the Cisco ASA matches the OU with the VPN group name. Other DN fields can also be used for this purpose.
• Company [O]—The name of the company or organization to which the user belongs. securemeinc is used in this example.
• State [ST]—The name of the state. New York (NY) is used in this example.
Country [C]—A two-letter country code. US is used in this example.
Email [E]—User’s email address. [email protected] is used in this example.
• IP Address—The IP address of the user’s system. It is recommended that you do not use this field if the system’s IP address will change (for example, if DHCP is used).
• Domain—The domain name to which the user’s system belongs. This example uses securemeinc.com.
Step 5. The Cisco VPN Client sends the enrollment request to the CA server. After the certificate is granted, the Cisco VPN Client stores it on the Cisco certificate store.
Configuring the Cisco ASA
Complete the following steps after you have enrolled the Cisco ASA to the CA server. Example 18-32 shows the ISAKMP policy configuration of the Cisco ASA.
Example 18-32 ISAKMP Policy for Remote-Access VPN
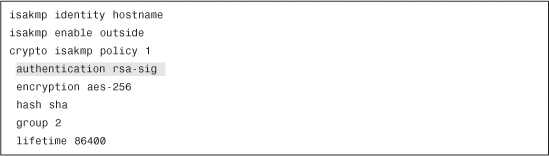
The shaded line in Example 18-32 shows how the ISAKMP authentication type is set to rsa-sig for certificate authentication.
Example 18-33 shows the crypto map configuration to dynamically terminate remote-access VPN client connections.
Example 18-33 Dynamic Crypto Map Configuration for Remote-Access VPN

The commands in Example 18-33 are the same as those covered in Chapter 17 while using preshared keys. Example 18-34 demonstrates the VPN tunnel-group configuration parameters.
Example 18-34 Tunnel-Group Configuration for Remote-Access VPN
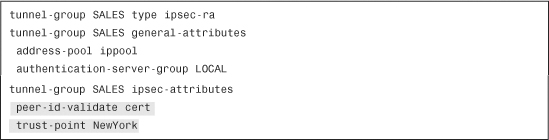
The first shaded line in Example 18-34 makes the Cisco ASA validate the identity of the VPN client by using the peer’s certificate. The second shaded line associates the group with the configured trustpoint.
The name of the VPN group in Example 18-34 is SALES. This matches the OU value from the client’s certificate. By default, the Cisco ASA binds the client connection to a specific group, using the OU value. However, you can use any DN certificate information to associate the client to a respective group. This is similar to the Cisco VPN 3000 Concentrator certificate DN-matching feature.
To configure the Cisco ASA to associate a VPN client connection using the peer’s certificate DN information, you can use the tunnel-group-map command in combination with a certificate map. Example 18-35 demonstrates how to configure the Cisco ASA to associate any VPN clients on which its certificate has an email address containing securemeinc.com to the VPN group named SALES.
Example 18-35 DN Matching Example
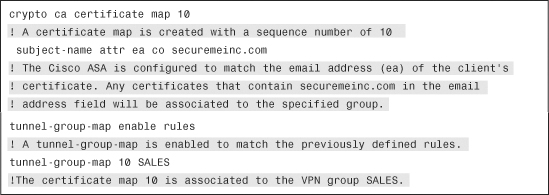
The following are all the available DN attributes:
• c—Country
• cn—Common name
• dc—Domain component
• dnq—DN qualifier
• ea—Email address
• genq—Generational qualifier
• gn—Given name
• i—Initials
• ip—IP address
• l—Locality
• n—Name
• o—Organization name
• ou—Organizational unit
• ser—Serial number
• sn—Surname
• sp—State/province
• t—Title
• uid—User ID
• uname—Unstructured name
The following are the operands that can be used with the subject-name subcommand under the certificate map:
• co—Contains
• eq—Equal to
• nc—Does not contain
• ne—Not equal to
Troubleshooting PKI
Several troubleshooting commands and techniques are used to troubleshoot PKI on the Cisco ASA.
Time and Date Mismatch
One of the most common problems experienced when first implementing PKI is time and date mismatch. The certificate validity period is the time period during which a certificate is valid. Incorrect time settings in the Cisco ASA, its peers, or the CA can cause the IKE negotiation to fail.
Tip
It is suggested that you configure Network Time Protocol (NTP) on the Cisco ASA and the CA server to avoid this problem.
Example 18-36 includes an excerpt of the output of debug crypto isakmp 127 and debug crypto ca while a Cisco ASA had incorrect clock settings.
Example 18-36 Output of debug crypto isakmp 127 and debug crypto ca with Incorrect Clock Settings
To check the validity period of the installed certificates, use the show crypto ca certificates command.
Example 18-37 includes the show crypto ca certificates and show clock commands output, showing the date mismatch.
Example 18-37 Output of show crypto ca certificates and show clock Commands
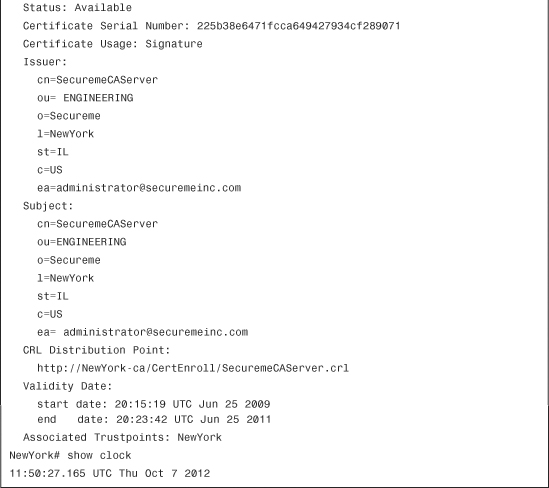
The clock set command is used to correct the time and date settings problem.
SCEP Enrollment Problems
SCEP uses TCP port 80 for its communications. Make sure that TCP port 80 is not blocked anywhere when enrolling the Cisco ASA. The following debug commands are useful when troubleshooting certificate enrollment problems on the Cisco ASA:
• debug crypto ca transactions
• debug crypto ca messages
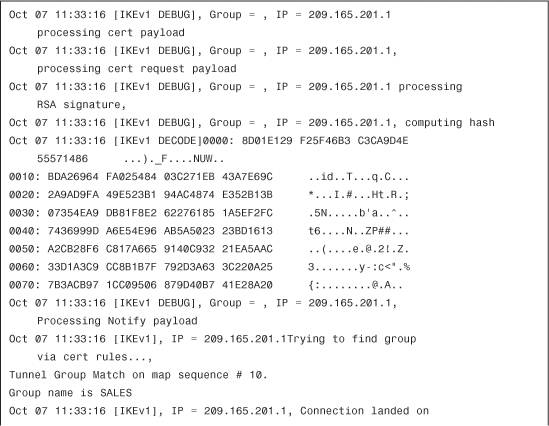
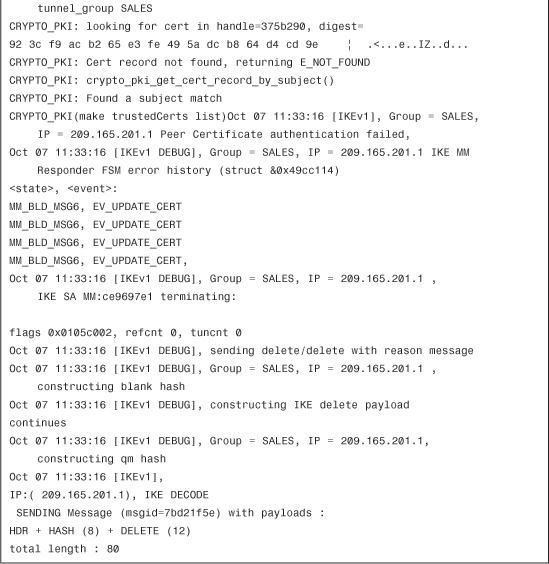
Example 18-38 includes the output of these debug commands when the Cisco ASA attempts to enroll but the CA server never responds because of communication problems.
Example 18-38 Output of debug crypto ca transactions and debug crypto ca messages
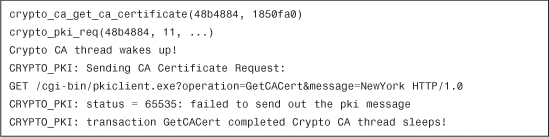
The error messages in Example 18-38 are displayed if the Cisco ASA is not able to communicate with the CA server because of any communication problems, such as routing problems, blocked ports, and so on.
Time and date settings are also crucial during enrollment. Example 18-39 shows an unsuccessful enrollment request when the incorrect time and date settings were set in the Cisco ASA. The debug crypto ca transactions and debug crypto ca messages commands are enabled.
Example 18-39 Errors Due to Incorrect Time and Date Settings During Enrollment
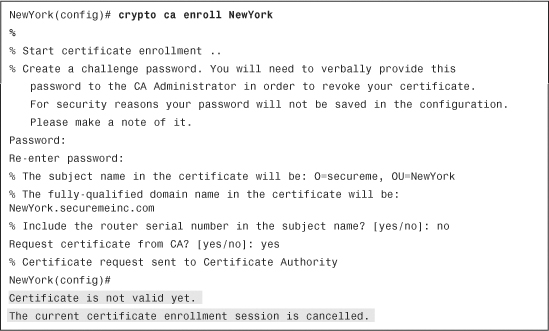
The shaded lines in Example 18-39 show that the certificate enrollment request failed because the certificate received is not valid yet. The start date in the certificate validity period was later than the current date in the Cisco ASA.
CRL Retrieval Problems
During IKE Phase 1 negotiation, if CRL checking is required, the ASA verifies the revocation status of the peer certificate. CRLs exist on external servers maintained by CAs. To verify the revocation status, the Cisco ASA retrieves the CRL by using one of the available CRL distribution points and checks the peer certificate serial number against the list of serial numbers in the CRL. The Cisco ASA can use LDAP or HTTP (SCEP) for CRL checking. LDAP uses TCP port 389. Make sure that the necessary ports are not blocked by any device between the Cisco ASA and the CRL distribution point.
Use the show crypto ca crls command to view the CRL information on the Cisco ASA, as previously shown in Example 18-16.
If you chose a CRL retrieval policy that uses static distribution points, you must enter at least one (and not more than five) valid URLs. This enables you to configure backup CRL distribution points to maximize availability.
Summary
This chapter provided an introduction to PKI and then progressed into detailed configuration and enrollment topics. To use digital certificates for authentication, you must first enroll with a CA and obtain and install a CA certificate on the Cisco ASA. Next, you must enroll and install an identity certificate from the same CA. This chapter showed how to enroll and install digital certificates on the Cisco ASA via SCEP or manually with the cut-and-paste method.
The Cisco ASA’s local CA integrates a basic certificate authority functionality to deploy certificates and provides secure revocation checking of issued certificates. In this chapter you learned how to configure the local CA through ASDM, as well as in the CLI.
Additionally, this chapter also provided detailed configuration steps an administrator can follow to configure the Cisco ASA to use digital certificates to authenticate site-to-site and remote-access IPSec VPN sessions. Several troubleshooting tips and techniques were included at the end of the chapter.