Creating Picture Formats with the FORMAT Procedure
A Brief Overview
The FORMAT procedure
enables you to define your own formats for variables. The VALUE statement
is commonly used to create numeric or character formats by defining
character strings to display in place of values. Suppose you have
airline data and you want to create several custom formats that you
can use for your report. You need to create three different types
of formats to do these tasks:
-
group airline routes into zones
-
label airport codes as International or Domestic
-
group cargo revenue figures into ranges
You can use PROC FORMAT
with the VALUE statement to create two character formats, $ROUTES.
and $DEST., and a numeric format, REVFMT.
Suppose one of the variables
in your data set has numeric values that you want to format a certain
way. For example, you have an emergency phone number listed for each
of the flight crew members in your data set. The number is listed
as 5556874239 and you want to format it as (555) 687-4239.
Use the PICTURE statement
to create a custom format that specifies a template for displaying
a numeric value. Define a format that accepts special characters,
such as leading zeros, commas, and negative numbers. Only numeric
variables can have picture formats. For example, the following PICTURE
statement tells SAS to print numbers in the specified format.
PICTURE phonepix OTHER= '(999)999-9999';
PICTURE Statement Syntax
The PICTURE statement
creates a format that specifies a template for displaying numeric
values.
|
Syntax, PROC FORMAT
with the PICTURE statement:
PROC FORMAT;
PICTURE format-name <(format-options)>
<value-range-set-1 =
'template-value'
(template-options)>
<value-range-set-n
= 'template-value'
(template-options)>;
RUN;
format-name
is the name of the
format that you are creating.
Note: A user-defined format cannot
be the name of a format supplied by SAS. The name must be a valid
SAS name. A numeric format name can be up to 32 characters long.
value-range-set
specifies one or more
variable values and a template for printing those values. value-range-set has
the following form: value-or-range =
'template-value'.
value-or-range
a single value, such
as 12 or a range of values, such as 1-100.
template-value
specifies a template
for formatting values of numeric variables.
digit selectors
are numeric characters
(0 through 9) that define positions for numeric values.
directives
are special characters
that you can use in the template to format date, time, or datetime
value.
template options
are specific to the
specified template.
format options
are specific to the
format as a whole, which includes all templates created by the PICTURE
statement.
|
Example: Using the PICTURE Statement
The following example
uses the PICTURE statement, which contains both digit selectors and
message characters. Since the RAINAMT. format has nonzero digit selectors,
values are printed with leading zeros. A numeric range is used to
include or exclude values in a range using the less than symbol (<)
preceded or followed by the value. For example, the
2<-4 range
does not include 2, but includes 4. However, 4<-<10 excludes
both 4 and 10. The keyword OTHER is used to print values and message
characters for any values that do not fall into the specified range.
Note: Not all values are printed
with leading zeros. Values that are printed with leading zeros might
not have an available format to display.
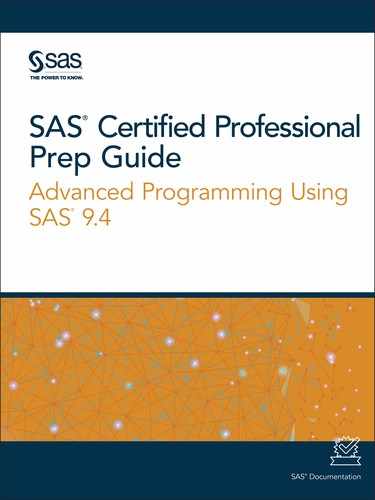
proc format;
   picture rainamt
           0-2='9.99 slight'
           2<-4='9.99 moderate'
           4<-<10='9.99 heavy'
           other='999 check value';
run;
proc print data=certadv.rain;
   format amount rainamt.;
run;
The following output
shows the values with the RAINAMT. format applied.
Figure 13.1 PROC PRINT Output with the RAINAMT. Format Applied
Creating Custom Date, Time, and Datetime Formats Using Directives
Suppose you have the
date value July 1 2019 and the time value 8:30:10 a.m. You need to
create three new columns with the date and time values, StartDate,
StartTime, and StartDateTime columns. You are given specific requirements
for displaying the date and time values in those columns. The data
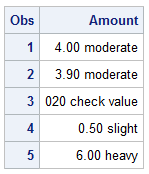
in the columns must look like the figure below.
Figure 13.2 Custom Date, Time, and Datetime Formats Illustration

Currently, SAS does
not supply formats that can create the columns that match the figure
above. However, you can use directives to create the templates that you need. Directives are
special characters that define a template to display date, time, or
datetime values. If you use directives, you must specify the DATATYPE=
option in the PICTURE statement after the template. This option specifies
that the picture applies to a SAS date, SAS time, or SAS datetime
value.
|
Syntax, PICTURE statement
with the DATATYPE= option:
PICTURE format-name (DEFAULT=length)
value-or-range-1='directives'
(DATATYPE=DATE|TIME|DATETIME);
RUN;
(DEFAULT=length)
specifies the default
length of the formatted value. If the DEFAULT= option is not used,
the length of the formatted value is based on the length of the longest
template.
'directives'
specifies special characters
that define a template for the display of date, time, or datetime
values. The special characters must be placed within quotation marks.
(DATATYPE=DATE | TIME | DATETIME)
enables the use of
directives in the template to format date, time, or datetime values.
The DATATYPE= option must be specified for each value-range set. The
DATATYPE= option must be placed within parentheses.
|
Specifying Date and Time Directives
The percent sign (%)
followed by a letter indicates a directive. Directives that you can
use to create a picture format are listed in the table below.
|
Directive
|
Description
|
Result
|
|---|---|---|
|
%A
|
Weekday name in full
|
Wednesday
|
|
%a
|
Weekday name, the first
three letters
|
Wed
|
|
%d
|
Day of the month in
one or two digits
|
2 or 11
|
|
%0d
|
Day of month two digits
|
02
|
|
%B
|
Month name in full
|
January
|
|
%3B
|
Month name, the first
three letters
|
Jan
|
|
%m
|
Month number in one
or two digits
|
4 or 12
|
|
%0m
|
Month number in two
digits
|
04
|
|
%Y
|
Year in four digits
|
2019
|
|
%0y
|
Year in two digits
|
19
|
For example, the SAS
date value of 21731 is equivalent to Mon-1–Jul-2019. You would
use the following directives to transform 21731 to Mon-1-Jul-2019:
%a-%d-%3B-%Y.
|
Directive
|
Description
|
Result
|
|---|---|---|
|
%H
|
Hour, 24-hour clock
in one or two digits
|
21
|
|
%0H
|
Hour, 24-hour clock
in two digits with a leading zero
|
021
|
|
%I
|
Hour, 12-hour clock
in one or two digits
|
9
|
|
%0I
|
Hour, 12-hour clock
in two digits with a leading zero
|
09
|
|
%M
|
Minute in one or two
digits
|
13
|
|
%0M
|
Minute, in two digits
with a leading zero
|
013
|
|
%S
|
Second in one or two
digits
|
5
|
|
%0S
|
Second in two digits
with a leading zero
|
05
|
|
%p
|
AM or PM
|
PM
|
The time value 30610
is equivalent to H:8 M:30 S:10. You would use the following directive
to transform 30610 to 8:30:10: H:%H M:%M S:%S.
Or you can transform
30610 to H:08 M:30 S:10 using the following directive: H:%0H M:%0M
S:%0S.
Note: To add a leading zero before
a single digit, insert a 0 before the directive. When you add a leading
zero, it is changing only the values of hour, minute, seconds, and
so on, to display a leading zero. It is not changing any other part
of the output.
When you create a template
with a directive, the maximum length of the formatted value is the
length of 8. Use DEFAULT= to set a length that is greater than the
default length of 8.
Example: Using Directives
Suppose you want to
display values for employee hire dates in the format dd-mmmyyyy (such
as 25-JAN2017) for the Certadv.Empdata data set.
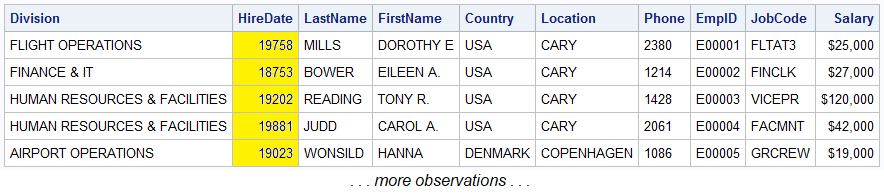
Figure 13.3 Certadv.Empdata Data Set before Format Is Applied (partial
output)
This format requires
spaces for 10 characters.
-
The keywords LOW and HIGH are used to include all values.
-
The %0d directive indicates that if the day of the month is one digit, it should be preceded by a 0.
-
Because there are only nine characters inside the single quotation marks, use DEFAULT= to increase the length to 10. If you omit DEFAULT=, the length is 8.
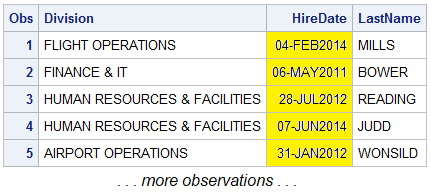
proc format;
   picture mydate (default=10)
           low-high='%0d-%3b%Y' (datatype=date);
run;

proc print data=certadv.empdata
     (keep=division hireDate lastName obs=5);
   format hiredate mydate.;
run;
The output below shows
the values for HireDate formatted with the MYDATE. picture format.
Figure 13.4 PROC PRINT Result of MYDATE. Picture Format (partial output)
Creating Custom Numeric Formats
PICTURE Statement Syntax with Digit Selectors
The PICTURE statement
can also use digit selectors with non-numeric characters. You can
use the ROUND, MULTIPLIER=, and PREFIX= options for the template.
|
Syntax, PICTURE statement
using digit selectors:
PICTURE format-name (ROUND DEFAULT=length)
value-or-range-1='digit
selectors with non-numeric characters'
(MULT | MULTIPLIER=n PREFIX='prefix');
RUN;
(ROUND)
rounds the value to
the nearest integer.
(MULT | MULTIPLIER=n)
specifies a number
to multiply the value by.
(PREFIX='prefix')
specifies a character
string to place in front of the formatted value.
|
Digit Selectors with Non-Numeric Characters
You can use digit selectors
(0 through 9) to define positions for numeric values. Digit selectors
of 0 do not print leading zeros. Nonzero digit selectors print leading
zeros. The digit selector 9 is commonly used as the nonzero digit
selector. Non-numeric characters are printed as specified. The following
example specifies a digit selector with non-numeric characters.
picture Discount (round) low-high='009.9%' (multiplier=10);
If the template contains
digit selectors, then a digit selector must be the first character
in the template. Use the PREFIX= option to specify a character string
to place in front of the formatted value.
The MULTIPLIER= Option
Use the MULTIPLER=n option
to specify a number that the variable's value will be multiplied
by before the variable is formatted. The value of the MULTIPLIER=
option depends both on the result of the multiplication and on the
digit selectors in the picture portion of value-range-set.
Suppose you have the
data set Certadv.Grocery. You need to create a format that formats
the CustomDiscount variable to a percentage. For example, if the value
is 5, it should be 5.0%.
Figure 13.5 Certadv.Grocery Data Set (partial output)
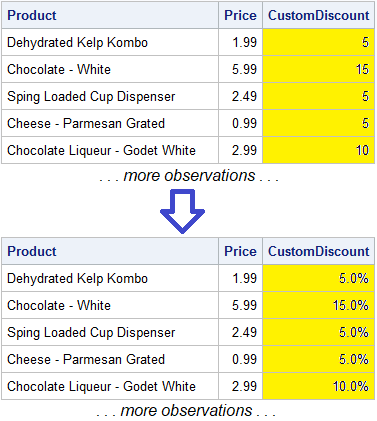
proc format;
   picture Discount low-high='009.0%' (multiplier=10);
run;
data work.customerdiscount;
   set certadv.grocery;
   format CustomDiscount Discount.;
run;
proc print data=work.customerdiscount noobs;
run;
The values for CustomDiscount
are multiplied by 10.
Note: The default is 10n,
where n is the number of digits
after the first decimal point in the picture. For example, suppose
your data contains a value 123.456, and you want to print it using
a picture of '999.999'. The format multiplies 123.456 by
103 to obtain a value of 123456, which
results in a formatted value of 123.456.
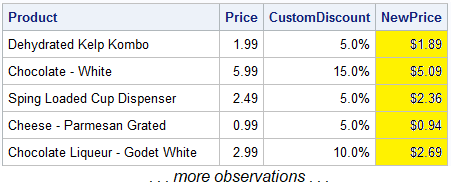
The PREFIX= Option
You can create custom
numeric formats with a character prefix using the PREFIX= option.
The PREFIX= option specifies a character prefix to place in front
of the formatted value. The prefix is placed in front of the value's
first significant digit. You must use zero-digit selectors or the
prefix is not used. Typical uses for PREFIX= are printing leading
currency symbols and minus signs.
The following example
uses the Work.CustomerDiscount created in the previous example. The
PICTURE statement creates a new format named NewPrice that formats
the values for the NewPrice column with a dollar sign. The NewPrice
column is produced by multiplying CustomDiscount by the value in the
Price column.
proc format;
   picture NewPrice low-high='000,009.99' (prefix='$');
run;
data work.newprice;
   set work.customerdiscount;
   NewPrice=Price-(Price*(CustomDiscount*0.01));
   format NewPrice NewPrice. CustomDiscount Discount.;
run;
proc print data=work.newprice;
run;
Output 13.1 PROC PRINT Result of Work.NewPrice (partial output)
CAUTION:
Truncation
of the prefix.
If the picture is not
wide enough to contain both the value and the prefix, then the format
is truncated or the prefix is omitted, which results in inaccurate
data.
The ROUND Option
The ROUND option rounds
the value to the nearest integer before formatting. Without the ROUND
option, the format multiplies the variable value by the multiplier,
truncates the decimal portion (if any), and prints the result according
to the template that you define. With the ROUND option, the format
multiplies the variable value by the multiplier, rounds that result
to the nearest integer, and then formats the value according to the
template.
Tip
The ROUND option rounds a
value of .5 to the next highest integer.CAUTION:
The picture
must be wide enough for an additional digit if rounding a number adds
a digit to the number.
For example, the picture
for the number .996 could be ‘99’ (prefix ‘.’
mult=100). After rounding the number and multiplying it by 100, the
resulting number is 100. When the picture is applied, the result is
.00, an inaccurate number. In order to ensure accuracy of numbers
when you round numbers, make the picture wide enough to accommodate
larger numbers.
Example: Creating a Custom Percent Format
In the previous examples,
two new custom formats were created: Discount., which created a percent
format, and NewPrice., which applied a prefix of a dollar sign ($).
For this example, create a custom format that rounds your Difference
column and applies a prefix of a dollar ($). First, the format applies
the multiplier, if applicable. Then it rounds the values, and finally
the format applies the numeric value to the template.
Figure 13.6 Certadv.Grocery Data Set (partial output)
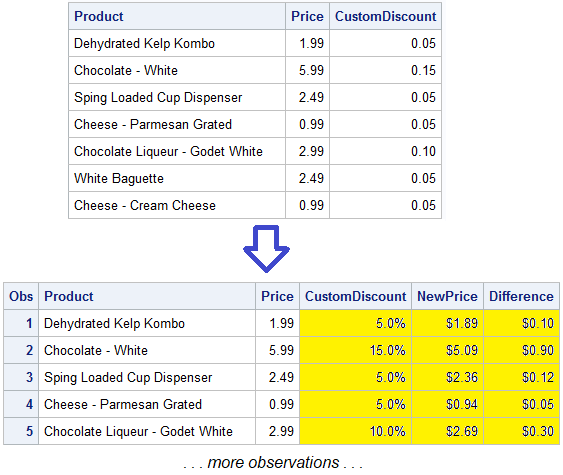
proc format;
   picture Discount low-high='009.0%' (multiplier=10);
   picture NewPrice low-high='000,009.99' (prefix='$');
   picture Diff (round) low-high='000,009.99' (prefix='$');
run;
data work.newPriceTot;
   set certadv.grocery;
   NewPrice=Price-(Price*(CustomDiscount*0.01));
   Difference=Price-NewPrice;
   format CustomDiscount Discount. NewPrice NewPrice. Difference Diff.;
run;
proc print data=work.newPriceTot;
run;
Example: Creating a Custom Numeric Format for Large Numbers
The following example
illustrates how you can create a custom numeric format for large numbers.
This example uses the ROUND, PREFIX, and MULTIPLIER= options.
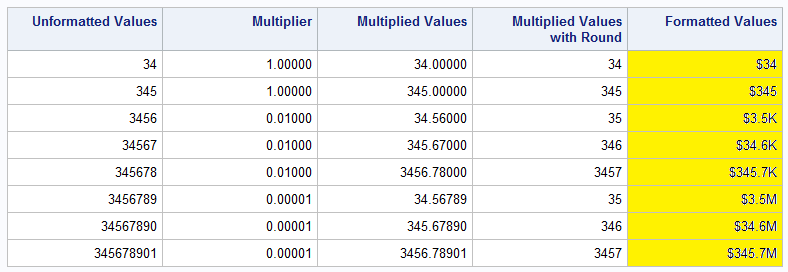
Suppose you have the
data set Certadv.Values, where the UnformattedValues column represents
your original numbers with no formats applied. The Multiplier column
displays the multiplier for each unformatted number, and the MultiValues
column displays the values with the Multiplier applied. The MultiValuesRound
column displays the values from the MultiValues column, but with the
ROUND option applied.
The FormattedValues
column below does not have any formats applied.
Figure 13.7 Certadv.Values Data Set
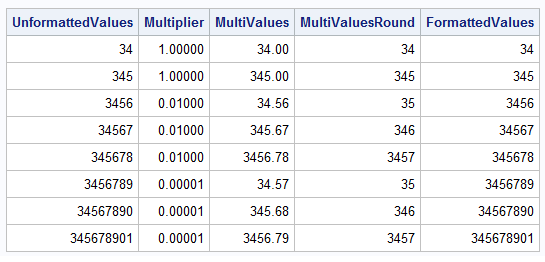
Create a PICTURE format
named dollar_KM that does the following:
-
formats values less than 1000 with a dollar sign and with a multiplier of 1
-
formats values between 1000 and 1000000 with a K, a dollar sign, and with a multiplier of 0.01
-
formats values greater than 1000000 with an M, a dollar sign, and with a multiplier of 0.00001.
proc format;
   picture dollar_KM (round default=7)
              low-<1000='009' (prefix='$' multiplier=1)
              1000-<1000000='009.9K' (prefix='$' multiplier=.01)
              1000000-high='009.9M' (prefix='$' multiplier=.00001);
run;
When you apply this
format to the FormattedValues column in a PROC PRINT step, the values
are displayed as desired.
proc print data=certadv.values noobs;
   format MultiValues 12.5
          FormattedValues dollar_KM.;
run;
Output 13.2 PROC PRINT Output of Certadv.Values
Last updated: October 16, 2019
..................Content has been hidden....................
You can't read the all page of ebook, please click here login for view all page.