
In this chapter, we will make a scene that shows the actual game world of Canyon Bunny. The game world will be composed of several game objects that share common attributes and functionalities. However, the way these objects are rendered to the scene varies from simply drawing its assigned texture to compound rendering using two or more textures.
All the game objects are represented in pixel colors in an image file, the format of which was defined in the last chapter. The next step will be to implement a level loader that is able to parse the level information stored in our level image file level-01.png.
After implementing the game objects and the mentioned level loader, we will put the new code into action by adding it to our world controller and renderer, respectively.
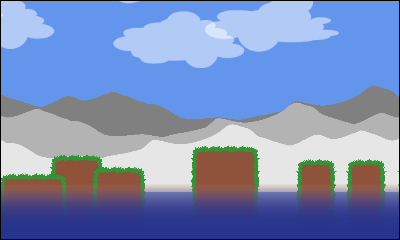
The following screenshot illustrates an example scene of what the game will look like at this point:
As a last addition, we will add a Graphical User Interface (GUI) to the scene that overlays the game world. Sometimes, this is also called a Head-Up Display (HUD), but we will use the term GUI here. The GUI will show the player's score, the number of extra lives left, and an FPS counter to measure the performance of the game.
To sum up, in this chapter, we will:
- Create game objects such as rocks, mountains, clouds, and so on
- Implement the level loader
- Implement the game GUI
Before we start implementing each individual game object, we will create an abstract class called AbstractGameObject. It will hold all the common attributes and functionalities that each of our game objects will inherit from.
Note
You might want to check the Canyon Bunny class diagram in Chapter 3, Configuring the Game, again to get an overview of the class hierarchy of the game objects.
Create a new file for the AbstractGameObject class and add the following code:
package com.packtpub.libgdx.canyonbunny.game.objects;

import com.badlogic.gdx.graphics.g2d.SpriteBatch;
import com.badlogic.gdx.math.Vector2;

public abstract class AbstractGameObject {

    public Vector2 position;
    public Vector2 dimension;
    public Vector2 origin;
    public Vector2 scale;
    public float rotation;

public AbstractGameObject () {
    position = new Vector2();
    dimension = new Vector2(1, 1);
    origin = new Vector2();
    scale = new Vector2(1, 1);
    rotation = 0;
}

  public void update (float deltaTime) {
}

  public abstract void render (SpriteBatch batch);
}
This class is able to store the position, dimension, origin, scale factor, and angle of rotation of a game object. Its methods, update() and render(), will be called inside our world controller and renderer accordingly. The default implementation to update a game object is currently empty. So, the game objects inheriting from AbstractGameObject will do nothing when updated. For rendering, a specific implementation has to be provided for each game object because we defined the render() method to be abstract.
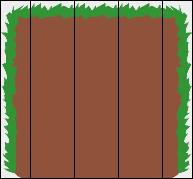
The rock game object basically consists of three distinct parts: a left edge, a middle part, and a right edge. There is one specialty about the middle part: it must be repeatable to be able to create different rocks with arbitrary lengths. Furthermore, the image for the right edge can be easily created by mirroring the image of the left edge. This means that we will need only two textures from our texture atlas to draw a complete rock of any size, as shown in the following screenshot:
Create a new file for the Rock class and add the following code:
package com.packtpub.libgdx.canyonbunny.game.objects;

import com.badlogic.gdx.graphics.g2d.SpriteBatch;
import com.badlogic.gdx.graphics.g2d.TextureRegion;
import com.packtpub.libgdx.canyonbunny.game.Assets;

public class Rock extends AbstractGameObject {

    private TextureRegion regEdge;
    private TextureRegion regMiddle;

    private int length;

  public Rock () {
    init();
  }

  private void init () {
    dimension.set(1, 1.5f);

    regEdge = Assets.instance.rock.edge;
    regMiddle = Assets.instance.rock.middle;

    // Start length of this rock
    setLength(1);
  }

  public void setLength (int length) {
    this.length = length;
  }

  public void increaseLength (int amount) {
    setLength(length + amount);
  }
}
The Rock class has two variables, regEdge and regMiddle, to store the corresponding texture regions for the edge and the middle part of a rock. Additionally, there is a length variable that describes the number of middle parts to use for a rock, or in other words, the resulting length of the rock. In the init() method, we set the dimension, the width, and the height of the rock. Remember that these values are given in meters, which relate to our game world. So, in this case, a rock is 1 meter wide and 1.5 meters tall. Next, the texture regions are stored in local variables. Obviously, this is not a necessary step and is really just for our convenience to allow quick and easy changes to the texture regions the code will use to render a specific part. Finally, setLength() is called to set the starting length of the rock. The increaseLength() method allows you to increase the length of the rock by a given amount. It will come in handy later on when our yet-to-be-implemented level loader eventually creates these rocks.
As Rock inherits from AbstractGameObject, it is mandatory to also implement its render() method. Add the following code to the Rock class:
  @Override
  public void render (SpriteBatch batch) {
    TextureRegion reg = null;

    float relX = 0;
    float relY = 0;


    // Draw left edge
    reg = regEdge;
    relX -= dimension.x / 4;
    batch.draw(reg.getTexture(), position.x + relX, position.y + relY, origin.x, origin.y, dimension.x / 4, dimension.y, scale.x, scale.y, rotation, reg.getRegionX(), reg.getRegionY(), reg.getRegionWidth(), reg.getRegionHeight(), false, false);

    // Draw middle
    relX = 0;
    reg = regMiddle;
    for (int i = 0; i < length; i++) {
        batch.draw(reg.getTexture(), position.x + relX, position.y +  relY, origin.x, origin.y, dimension.x, dimension.y, scale.x, scale.y, rotation, reg.getRegionX(), reg.getRegionY(), reg.getRegionWidth(), reg.getRegionHeight(), false, false);
      relX += dimension.x;
    }

    // Draw right edge
    reg = regEdge;
    batch.draw(reg.getTexture(),position.x + relX, position.y + relY, origin.x + dimension.x / 8, origin.y, dimension.x / 4, dimension.y, scale.x, scale.y, rotation, reg.getRegionX(), reg.getRegionY(), reg.getRegionWidth(), reg.getRegionHeight(), true, false);
  }
Before we continue, let's take a look at the signature of draw() from SpriteBatch to clear up the more or less convoluted lines of source code that are used to draw the texture regions:
public void draw (Texture texture, float x, float y,float originX, float originY, float width, float height, float scaleX, float scaleY, float rotation, int srcX, int srcY, int srcWidth, int srcHeight, boolean flipX, boolean flipY);
This method cuts out a rectangle (defined by srcX, srcY, srcWidth, and srcHeight) from the texture (here, our texture atlas) and draws it to a given position (x, y). The origin (originX, originY) defines a relative position to where the rectangle is shifted. The origin (at 0, 0) denotes the bottom-left corner. The width and height define the dimension of the image to be displayed. The scaling factor (scaleX, scaleY) defines the scale of the rectangle around the origin. The angle of rotation defines the rotation of the rectangle around the origin. The flipping of one or both the axes (flipX, flipY) means to mirror the corresponding axis of that image.
The rendering of the rock is split up into the following three drawing steps:
- Draw the left edge at the current position of the rock. A relative x- and y-value,
relXandrelY, are also added to the position. These are used to align the left edge to the left-hand side of the object's local y axis. The result of doing this is that the following middle parts will now start at0on the x axis. This makes it much easier to handle the positioning of rocks as each middle part represents one pixel in a level image, while the edges are just cosmetic details. - Draw all the middle parts according to the set length of the rock. The drawing starts at
0, which is located directly next to where the left edge ends. Each subsequent middle part is drawn next to the last middle part. This is achieved by adding the middle part's width to the relative positionrelXfor each iteration inside the loop. - Finally, the mirrored left edge is drawn next to where the last middle part ends. This mirroring is achieved by setting the
flipXparameter totrue.
The reg variable is used to store the currently selected texture region for each step.
The mountains game object consists of three mountains that each have their own layer. A tinting color and positional offset can be specified for each layer. A single mountain consists of a left and a right image. The ends of both image parts have been carefully crafted so that they can be seamlessly tiled. The following screenshot illustrates this:
The white color for the mountain images has been chosen on purpose to allow tinting.
Create a new file for the Mountains class and add the following code:
package com.packtpub.libgdx.canyonbunny.game.objects;

import com.badlogic.gdx.graphics.g2d.SpriteBatch;
import com.badlogic.gdx.graphics.g2d.TextureRegion;
import com.badlogic.gdx.math.MathUtils;
import com.packtpub.libgdx.canyonbunny.game.Assets;

public class Mountains extends AbstractGameObject {

  private TextureRegion regMountainLeft;
  private TextureRegion regMountainRight;

  private int length;

  public Mountains (int length) {
    this.length = length;
    init();
  }

  private void init () {
    dimension.set(10, 2);

    regMountainLeft = Assets.instance.levelDecoration.mountainLeft;
    regMountainRight = Assets.instance.levelDecoration.mountainRight;

    // shift mountain and extend length
    origin.x = -dimension.x * 2;
    length += dimension.x * 2;
  }

  private void drawMountain (SpriteBatch batch, float offsetX, float offsetY, float tintColor) {
    TextureRegion reg = null;
    batch.setColor(tintColor, tintColor, tintColor, 1);
    float xRel = dimension.x * offsetX;
    float yRel = dimension.y * offsetY;

    // mountains span the whole level
    int mountainLength = 0;
    mountainLength += MathUtils.ceil(length / (2 * dimension.x));
    mountainLength += MathUtils.ceil(0.5f + offsetX);
    for (int i = 0; i < mountainLength; i++) {
      // mountain left
      reg = regMountainLeft;
      batch.draw(reg.getTexture(), origin.x + xRel, position.y + origin.y + yRel, origin.x, origin.y, dimension.x, dimension.y, scale.x, scale.y, rotation, reg.getRegionX(), reg.getRegionY(), reg.getRegionWidth(), reg.getRegionHeight(), false, false);
      xRel += dimension.x;

      // mountain right
      reg = regMountainRight;
      batch.draw(reg.getTexture(),origin.x + xRel, position.y + origin.y + yRel, origin.x, origin.y, dimension.x, dimension.y, scale.x, scale.y, rotation, reg.getRegionX(), reg.getRegionY(), reg.getRegionWidth(), reg.getRegionHeight(), false, false);
      xRel += dimension.x;
    }
    // reset color to white
    batch.setColor(1, 1, 1, 1);
  }
  @Override
  public void render (SpriteBatch batch) {
      // distant mountains (dark gray)
      drawMountain(batch, 0.5f, 0.5f, 0.5f);
      // distant mountains (gray)
      drawMountain(batch, 0.25f, 0.25f, 0.7f);
      // distant mountains (light gray)
      drawMountain(batch, 0.0f, 0.0f, 0.9f);
  }
}
The construction of the Mountains class is quite similar to Rock. It inherits from AbstractGameObject and uses a length variable to store the number of times the image needs to be repeated.
The drawMountain() method is used to encapsulate the drawing code of a mountain layer so that the task to draw the three layers is greatly simplified. The tinting is achieved by setting the drawing color of SpriteBatch to the desired color value using the setColor() method. All subsequent draw calls will now produce tinted images. Afterwards, the drawing color is reset to a neutral white color, which simply means that the texture colors will be no longer manipulated. This might cause future calls to SpriteBatch to tint irrespective of whatever is drawn next.
The water overlay game object is very simple compared to the previous game objects. It consists of only one image. This image needs to overlay the ground of the whole level. There are several ways to achieve this. One way would be to span the image from side to side of the camera's viewport and move the overlay together with the camera whenever the camera is moved. This is a good way to create an illusion of water being everywhere in the level. Unfortunately, special care needs to be taken if the camera is also moved in a vertical direction. Another way to implement the image of water everywhere in the level is to just draw a single, horizontally stretched water overlay image from start to end, as shown in the following screenshot. This is exactly what the next code will do.

Create a new file for the WaterOverlay class and add the following code:
package com.packtpub.libgdx.canyonbunny.game.objects;

import com.badlogic.gdx.graphics.g2d.SpriteBatch;
import com.badlogic.gdx.graphics.g2d.TextureRegion;
import com.packtpub.libgdx.canyonbunny.game.Assets;

public class WaterOverlay extends AbstractGameObject {
  private TextureRegion regWaterOverlay;
  private float length;

  public WaterOverlay (float length) {
      this.length = length;
      init();
  }

  private void init () {
    dimension.set(length * 10, 3);

    regWaterOverlay = Assets.instance.levelDecoration.waterOverlay;

    origin.x = -dimension.x / 2;
  }

  @Override
  public void render (SpriteBatch batch) {
    TextureRegion reg = null;
    reg = regWaterOverlay;
    batch.draw(reg.getTexture(), position.x + origin.x, position.y + origin.y, origin.x, origin.y, dimension.x, dimension.y, scale.x, scale.y, rotation, reg.getRegionX(), reg.getRegionY(), reg.getRegionWidth(), reg.getRegionHeight(), false, false);
  }
}
The
WaterOverlay class is constructed similar to the previous game objects.
The clouds game object consists of a number of clouds. A cloud will use one of the three available cloud images from the texture atlas. The number of clouds depends on the given length that is divided by a constant factor to determine the final distribution of the clouds. The following screenshot illustrates this:

Create a new file for the Clouds class and add the following code:
package com.packtpub.libgdx.canyonbunny.game.objects;

import com.badlogic.gdx.graphics.g2d.SpriteBatch;
import com.badlogic.gdx.graphics.g2d.TextureRegion;
import com.badlogic.gdx.math.MathUtils;
import com.badlogic.gdx.math.Vector2;
import com.badlogic.gdx.utils.Array;
import com.packtpub.libgdx.canyonbunny.game.Assets;

public class Clouds extends AbstractGameObject {

  private float length;

  private Array<TextureRegion> regClouds;
  private Array<Cloud> clouds;

  private class Cloud extends AbstractGameObject {
    private TextureRegion regCloud;

    public Cloud () {}

    public void setRegion (TextureRegion region) {
      regCloud = region;
    }

    @Override
    public void render (SpriteBatch batch) {
      TextureRegion reg = regCloud;
      batch.draw(reg.getTexture(), position.x + origin.x, position.y + origin.y, origin.x, origin.y, dimension.x, dimension.y, scale.x, scale.y, rotation, reg.getRegionX(), reg.getRegionY(), reg.getRegionWidth(), reg.getRegionHeight(), false, false);
    }
  }

  public Clouds (float length) {
    this.length = length;
    init();
  }

  private void init () {
    dimension.set(3.0f, 1.5f);
    regClouds = new Array<TextureRegion>();
    regClouds.add(Assets.instance.levelDecoration.cloud01);
    regClouds.add(Assets.instance.levelDecoration.cloud02);
    regClouds.add(Assets.instance.levelDecoration.cloud03);

    int distFac = 5;
    int numClouds = (int)(length / distFac);
    clouds = new Array<Cloud>(2 * numClouds);
    for (int i = 0; i < numClouds; i++) {
      Cloud cloud = spawnCloud();
      cloud.position.x = i * distFac;
      clouds.add(cloud);
    }
  }

  private Cloud spawnCloud () {
    Cloud cloud = new Cloud();
    cloud.dimension.set(dimension);
    // select random cloud image
    cloud.setRegion(regClouds.random());
    // position
    Vector2 pos = new Vector2();
    pos.x = length + 10; // position after end of level
    pos.y += 1.75; // base position
    pos.y += MathUtils.random(0.0f, 0.2f)
           * (MathUtils.randomBoolean() ? 1 : -1); // random additional position
    cloud.position.set(pos);
    return cloud;
  }

  @Override
  public void render (SpriteBatch batch) {
    for (Cloud cloud : clouds)
        cloud.render(batch);
  }
}
The Clouds class is also constructed like the previous game objects. The distribution of the clouds over the level is determined by the given length value and the constant factor distFact, which is 5 in this code, meaning that there will be a cloud every five meters.
A single cloud is defined by the Clouds inner class Cloud, which also inherits from AbstractGameObject. So, a Cloud object is the actual cloud object, while Clouds is the container that maintains a list of all the currently created clouds. A new cloud can be created by simply calling the spawnCloud() method of Clouds. This will create a new Cloud object, assign a random cloud image to it, move it to the end of the level, and randomly shift it up or down a bit. The newly created cloud is also added to the list and returned to the calling method.