
We are now going to animate the gold coin and bunny head game objects. However, before we can start building new animations, some preparations need to take place first, such as adding the actual image files to the project and rebuilding the texture atlas afterwards.
Copy the following files to CanyonBunny-desktop/assets-raw/images/:
anim_bunny_normal_XX.png(whereXXis01,02, and03)anim_bunny_copter_XX.png(whereXXis01,02,03,04, and05)anim_gold_coin_XX.png(whereXXis01,02,03,04,05, and06)
Now, set the rebuildAtlas variable to true and run the Canyon Bunny desktop application once to let the texture atlas be rebuilt with the newly added images for our animations.
The following screenshot depicts all the frames, including their indices of the gold coin animation:
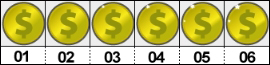
The shown frames are meant to be played back in a ping-pong loop (play mode: LOOP_PINGPONG) for the final animation. We will later refer to it as animGoldCoin in the code. The frame progression is as follows: 01, 02, 03, 04, 05, 06, 06, 05, 04, 03, 02, 01 [restart at the first frame].
The following screenshot depicts all the frames, including their indices of the bunny normal animation:

The shown frames are meant to be played back in a ping-pong loop (play mode: LOOP_PINGPONG) for the final animation and replace the current still image of the bunny head game object. We will later refer to this animation as animNormal in the code. The frame progression is as follows: 01, 02, 03, 03, 02, 01 [restart at the first frame].
The following screenshot depicts all the frames, including their indices of the bunny copter animation:
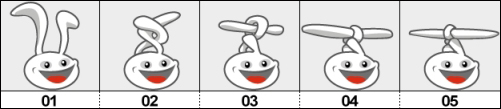
The shown frames are meant to be played back as three different animations:
- The first animation,
animCopterTransform, plays all frames once (play mode:NORMALand frame progression:01,02,03,04,05) - The second animation,
animCopterRotate, plays the last two frames in a ping-pong loop (play mode:LOOP_PINGPONGand frame progression:04,05,05,04[restart at the first frame]) - Lastly, the third animation,
animCopterTransformBack, is simply the reverse of the first animation (play mode:REVERSEDand frame progression:05,04,03,02,01)
Now, let's put all these animations in our Assets class for later use. Add the following import lines to the Assets class:
import com.badlogic.gdx.graphics.g2d.Animation;
import com.badlogic.gdx.utils.Array;
Then, make the following changes to the same class:
public class AssetGoldCoin {
  public final AtlasRegion goldCoin;
  public final Animation animGoldCoin;

  public AssetGoldCoin (TextureAtlas atlas) {
    goldCoin = atlas.findRegion("item_gold_coin");

    // Animation: Gold Coin
    Array<AtlasRegion> regions =
    atlas.findRegions("anim_gold_coin");
    AtlasRegion region = regions.first();
    for (int i = 0; i < 10; i++)
    regions.insert(0, region);
    animGoldCoin = new Animation(1.0f / 20.0f, regions, Animation.PlayMode.LOOP_PINGPONG);
  }
}

public class AssetBunny {
  public final AtlasRegion head;
  public final Animation animNormal;
  public final Animation animCopterTransform;
  public final Animation animCopterTransformBack;
  public final Animation animCopterRotate;

  public AssetBunny (TextureAtlas atlas) {
    head = atlas.findRegion("bunny_head");

    Array<AtlasRegion> regions = null;
    AtlasRegion region = null;

    // Animation: Bunny Normal
    regions = atlas.findRegions("anim_bunny_normal");
    animNormal = new Animation(1.0f / 10.0f, regions, Animation.PlayMode.LOOP_PINGPONG);

    // Animation: Bunny Copter - knot ears
    regions = atlas.findRegions("anim_bunny_copter");
    animCopterTransform = new Animation(1.0f / 10.0f, regions);

    // Animation: Bunny Copter - unknot ears
    regions = atlas.findRegions("anim_bunny_copter");
    animCopterTransformBack = new Animation(1.0f / 10.0f, regions, Animation.PlayMode.REVERSED);

    // Animation: Bunny Copter - rotate ears
    regions = new Array<AtlasRegion>();
    regions.add(atlas.findRegion("anim_bunny_copter", 4));
    regions.add(atlas.findRegion("anim_bunny_copter", 5));
    animCopterRotate = new Animation(1.0f / 15.0f, regions);
  }
}
With regards to the code for the gold coin animation, you may have stumbled upon why we are inserting 10 additional copies of the animation's first frame at the beginning. Well, actually we are cheating here a little bit to achieve an artificial pause of the continuously looped animation that will now display the first frame for a much longer period of time in comparison to the other ones. Unfortunately, there is currently no way to define a per-frame duration and so we need to use a trick to create a short pause after a full animation cycle that basically avoids too flashy gold coins in our special case.
Now, add the following import line to the AbstractGameObject class:
import com.badlogic.gdx.graphics.g2d.Animation;
Then, add the following lines of code to the same class:
public float stateTime;
public Animation animation;

public void setAnimation (Animation animation) {
  this.animation = animation;
  stateTime = 0;
}
After this, make the following changes to the same class:
public void update (float deltaTime) {
  stateTime += deltaTime;
  if (body == null) {
    updateMotionX(deltaTime);
    updateMotionY(deltaTime);

    // Move to new position
    position.x += velocity.x * deltaTime;
    position.y += velocity.y * deltaTime;
  } else {
    position.set(body.getPosition());
    rotation = body.getAngle() * MathUtils.radiansToDegrees;
  }
}
With these additions, we introduce two new common attributes that are shared with every game object in Canyon Bunny, the state time (stateTime) and the currently set animation (animation), which are going to be used for rendering the game object. We also added a convenience method called setAnimation() that allows you to change the current animation as well as reset the state time to 0. This is desirable because in almost every case, we do not want to start somewhere in the middle of a new animation but instead we want to start right from the beginning at the first frame. The change in the update() method simply makes sure that the state time is increased, which allows the animation to run.
Now, add the following import line to the GoldCoin class:
import com.badlogic.gdx.math.MathUtils;
After this, make the following changes to the same class:
private void init () {
  dimension.set(0.5f, 0.5f);

  setAnimation(Assets.instance.goldCoin.animGoldCoin);
  stateTime = MathUtils.random(0.0f, 1.0f);

  // Set bounding box for collision detection
  bounds.set(0, 0, dimension.x, dimension.y);

  collected = false;
}

public void render (SpriteBatch batch) {
  if (collected) return;

  TextureRegion reg = null;
  reg = animation.getKeyFrame(stateTime, true);
  batch.draw(reg.getTexture(), position.x, position.y, origin.x, origin.y, dimension.x, dimension.y, scale.x, scale.y, rotation, reg.getRegionX(), reg.getRegionY(), reg.getRegionWidth(), reg.getRegionHeight(), false, false);
}
In the init() method, we use the inherited setAnimation() method of AbstractGameObject to set the animGoldCoin animation. Also, the state time is initialized with a random value in the range from 0.0f to 1.0f. This is really a special use case here where we want each gold coin to use a different starting frame so that they look much more natural instead of being perfectly synchronized.
The following screenshot is of some gold coins that were initialized using the random state time:
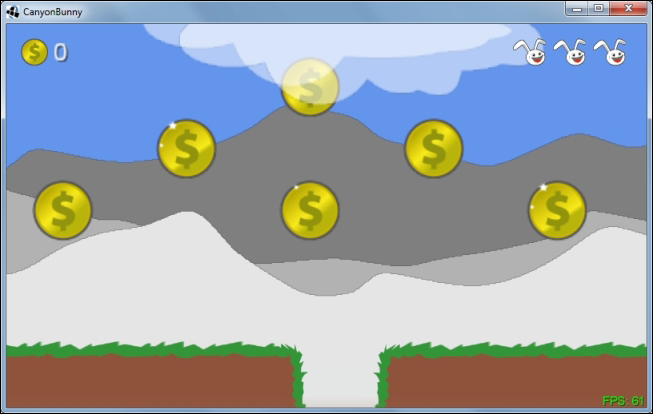
You can recognize the different state times by looking closely at the top-left corner of each gold coin where the little highlight either appears or disappears during the animation.
Animating the bunny head is going to take a little more effort as we want to trigger all three of the available animations at certain events. The basic idea of having three animations is to have one standard animation (animNormal) that appears when nothing special is going on. Currently, when a feather power-up is picked up, the bunny head is tinted in an orange color to signalize that it is in the state of being able to fly at that very moment. Now, this is where the other three animations come into play. The first animation (animCopterTransform) shows a transformation from a normal bunny to a helicopter bunny by knotting its ears into something rotor-like. The second animation (animCopterRotate) will replace the original color-tinting effect by constantly rotating the knotted rotor ears of the bunny. Finally, there will be a reversed transformation animation (animCopterTransformBack) that unknots the bunny's ears again.
Take a look at the following diagram:
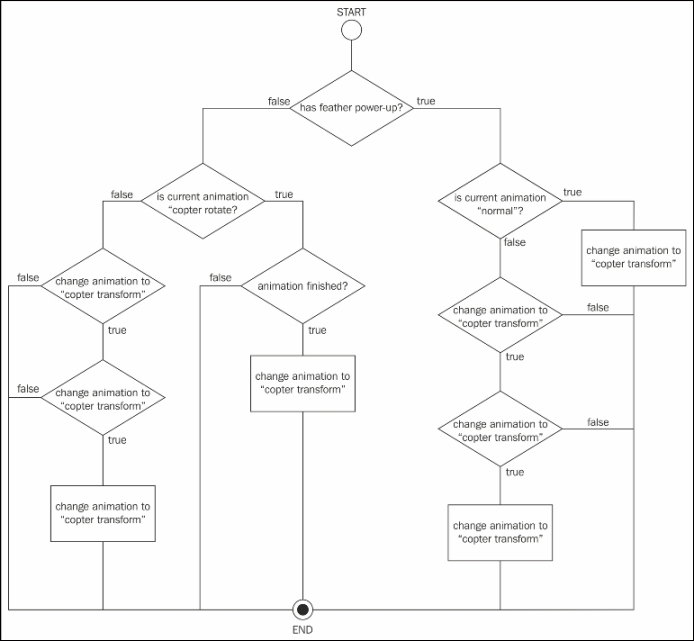
This diagram shows a state machine that we will need to implement to correctly change the states and animations of the bunny head game object. It begins with an overall check whether the feather power-up has been picked up (and is still active). Then, subsequent checks will try to find out what the current animation state is to take the correct actions accordingly.
Note
To find out more about (finite) state machines like the one we used in the preceding diagram, check out the wiki article at http://en.wikipedia.org/wiki/Finite_state_machine.
Now, add the following import line to the BunnyHead class:
import com.badlogic.gdx.graphics.g2d.Animation;
Then, add the following lines of code to the same class:
private Animation animNormal;
private Animation animCopterTransform;
private Animation animCopterTransformBack;
private Animation animCopterRotate;
After this, make the following changes to the same class:
public void init () {
  dimension.set(1, 1);

  animNormal = Assets.instance.bunny.animNormal;
  animCopterTransform = Assets.instance.bunny.animCopterTransform;
  animCopterTransformBack = Assets.instance.bunny.animCopterTransformBack;
  animCopterRotate = Assets.instance.bunny.animCopterRotate;
  setAnimation(animNormal);

  // Center image on game object
  origin.set(dimension.x / 2, dimension.y / 2);

  ...
}
In the init() method, we store the references of every animation we are going to use in the corresponding local variables for much shorter names. Moreover, the starting animation is set to animNormal.
Now, make the following changes to the same class:
@Override
public void update (float deltaTime) {
  super.update(deltaTime);
  if (velocity.x != 0) {
    viewDirection = velocity.x < 0 ? VIEW_DIRECTION.LEFT : VIEW_DIRECTION.RIGHT;
  }
  if (timeLeftFeatherPowerup > 0) {
    if (animation == animCopterTransformBack) {
      // Restart "Transform" animation if another feather power-up
      // was picked up during "TransformBack" animation. Otherwise,
      // the "TransformBack" animation would be stuck while the
      // power-up is still active.
      setAnimation(animCopterTransform);
    }
    timeLeftFeatherPowerup -= deltaTime;
    if (timeLeftFeatherPowerup < 0) {
      // disable power-up
      timeLeftFeatherPowerup = 0;
      setFeatherPowerup(false);
      setAnimation(animCopterTransformBack);
    }
  }
  dustParticles.update(deltaTime);

  // Change animation state according to feather power-up
  if (hasFeatherPowerup) {
    if (animation == animNormal) {
      setAnimation(animCopterTransform);
    } else if (animation == animCopterTransform) {
      if (animation.isAnimationFinished(stateTime))
      setAnimation(animCopterRotate);
    }
  } else {
    if (animation == animCopterRotate) {
      if (animation.isAnimationFinished(stateTime))
      setAnimation(animCopterTransformBack);
    } else if (animation == animCopterTransformBack) {
      if (animation.isAnimationFinished(stateTime))
      setAnimation(animNormal);
    }
  }
}
The update() method now contains the logic that is shown in the preceding diagram. One detail that has not been covered yet is how we can find out if an animation is finished. The Animation class provides the isAnimationFinished() method for this purpose. However, this method is only possible if the animation is played without looping, given the state time.
Now, make the following final changes to the same class:
@Override
public void render (SpriteBatch batch) {
  TextureRegion reg = null;

  // Draw Particles
  dustParticles.draw(batch);

  // Apply Skin Color
  batch.setColor(CharacterSkin.values()[GamePreferences.instance.charSkin].getColor());

  float dimCorrectionX = 0;
  float dimCorrectionY = 0;
  if (animation != animNormal) {
    dimCorrectionX = 0.05f;
    dimCorrectionY = 0.2f;
  }

  // Draw image
  reg = animation.getKeyFrame(stateTime, true);

  batch.draw(reg.getTexture(), position.x, position.y, origin.x, origin.y, dimension.x + dimCorrectionX, dimension.y + dimCorrectionY, scale.x, scale.y, rotation, reg.getRegionX(), reg.getRegionY(), reg.getRegionWidth(), reg.getRegionHeight(), viewDirection == VIEW_DIRECTION.LEFT, false);

  // Reset color to white
  batch.setColor(1, 1, 1, 1);
}
In the render() method, we have removed the color-tinting effect in favor of our new animations. If an animation other than the standard one (animNormal) is detected, we will apply correcting values to the width and height for rendering. Since the standard animation is of a different dimension than the other animations, the other ones will look off-centered without the correcting values.
You can now run the game to check out all the animations we added throughout this chapter.