
In this chapter, we will create a menu for Canyon Bunny. There will be two buttons for the player to choose from. One of the buttons is Play, which will start a new game. The other button will show an options menu that contains a few changeable settings, such as sound and music volumes. All the settings will be stored to and loaded from a Preferences file to make them permanent.
It is essential to have some sort of mechanism to manage multiple screens if we want to allow the player to switch between them. LibGDX provides a Game class, which already supports such basic screen management.
You will also learn how to use LibGDX's scene graph called Scene2D to create and organize complex menu structures as well as how to handle events such as pressed buttons.
In this chapter, we will cover the following topics:
- Create and organize complex menu structures using Scene2D UI
- Store and load the game preferences
We will now make some minor changes to our current class diagram to reflect the support for multiple screens that we want to add to our game.
Note
You might want to take a peek at the previous class diagram of Canyon Bunny for a quick refresher. See Chapter 3, Configuring the Game, for the diagram.
Take a look at the following updated class diagram:
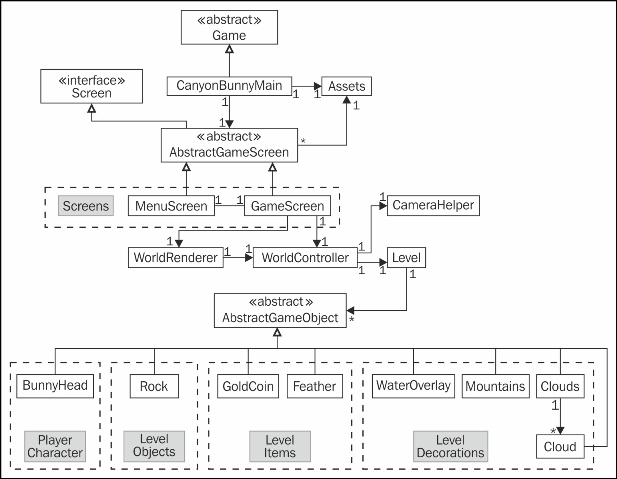
What has been changed here is that CanyonBunnyMain no longer implements the ApplicationListener interface that is used by LibGDX to control the flow of the application. Instead, CanyonBunnyMain now extends LibGDX's Game class, which in turn implements the ApplicationListener interface. The Game class provides a setScreen() method. Calling this method allows us to change the current screen to another one.
Every screen that we want to have in our game is encapsulated in a separate class and ends with *Screen. This is just a naming convention in this project and you are free to do it differently, of course. There are also three new classes shown in the preceding diagram, which are AbstractGameScreen, MenuScreen, and GameScreen. The menu and the game screen classes extend AbstractGameScreen so that we can easily define the common actions that we want to be executed for all our screens. Additionally, AbstractGameScreen implements LibGDX's Screen interface, which introduces the show() and hide() method for each screen. These methods will be called by Game and will take the place of create() and dispose(), so we will have to move our existing code accordingly.
The preceding diagram also shows that WorldController and WorldRenderer are no longer directly used by CanyonBunnyMain. Instead, GameScreen will be using them from now on as we will move all the game world-specific code from CanyonBunnyMain to GameScreen.
Create a new file for the AbstractGameScreen class and add the following code:
package com.packtpub.libgdx.canyonbunny.screens;

import com.badlogic.gdx.Game;
import com.badlogic.gdx.Screen;
import com.badlogic.gdx.assets.AssetManager;
import com.packtpub.libgdx.canyonbunny.game.Assets;

public abstract class AbstractGameScreen implements Screen {
  protected Game game;

  public AbstractGameScreen (Game game) {
    this.game = game;
  }

  public abstract void render (float deltaTime);
  public abstract void resize (int width, int height);
  public abstract void show ();
  public abstract void hide ();
  public abstract void pause ();

  public void resume () {
    Assets.instance.init(new AssetManager());
  }

  public void dispose () {
    Assets.instance.dispose();
  }
}
Each screen will take a reference to the instance of Game. This is necessary because each screen needs to call the setScreen() method of the Game class. Apart from this, we have added two lines of code that will make sure that the game's assets will be correctly loaded and disposed as LibGDX sees fit.
Next, we will implement two new screen classes. Create a new file for the MenuScreen class and add the following code:
package com.packtpub.libgdx.canyonbunny.screens;

import com.badlogic.gdx.Game;
import com.badlogic.gdx.Gdx;
import com.badlogic.gdx.graphics.GL20;

public class MenuScreen extends AbstractGameScreen {
  private static final String TAG = MenuScreen.class.getName();

  public MenuScreen (Game game) {
    super(game);
  }

  @Override
  public void render (float deltaTime) {
    Gdx.gl.glClearColor(0.0f, 0.0f, 0.0f, 1.0f);
Gdx.gl.glClear(GL20.GL_COLOR_BUFFER_BIT);
    if(Gdx.input.isTouched())
      game.setScreen(new GameScreen(game));
  }

  @Override public void resize (int width, int height) { }
  @Override public void show () { }
  @Override public void hide () { }
  @Override public void pause () { }
}
This is still a very rough implementation of the menu screen, but it will serve us well for the moment. The render() method takes care of only two things. It constantly clears the screen by filling it with a solid black color and checks whether the screen has been touched, which also includes mouse clicks if the game is running on a desktop. As soon as a touch has been detected, the screen will be switched from the menu screen to the game screen that shows our actual game world.
Next, create a new file for the GameScreen class and add the following code:
package com.packtpub.libgdx.canyonbunny.screens;

import com.badlogic.gdx.Game;
import com.badlogic.gdx.Gdx;
import com.badlogic.gdx.graphics.GL20;
import com.packtpub.libgdx.canyonbunny.game.WorldController;
import com.packtpub.libgdx.canyonbunny.game.WorldRenderer;

public class GameScreen extends AbstractGameScreen {
  private static final String TAG = GameScreen.class.getName();

  private WorldController worldController;
  private WorldRenderer worldRenderer;

  private boolean paused;

  public GameScreen (Game game) {
    super(game);
  }

  @Override
  public void render (float deltaTime) {
    // Do not update game world when paused.
    if (!paused) {
      // Update game world by the time that has passed
      // since last rendered frame.
      worldController.update(deltaTime);
    }
    // Sets the clear screen color to: Cornflower Blue
    Gdx.gl.glClearColor(0x64 / 255.0f, 0x95 / 255.0f,0xed / 255.0f, 0xff / 255.0f);
    // Clears the screen
	Gdx.gl.glClear(GL20.GL_COLOR_BUFFER_BIT);
    // Render game world to screen
    worldRenderer.render();
  }
  @Override
  public void resize (int width, int height) {
    worldRenderer.resize(width, height);
  }

  @Override
  public void show () {
    worldController = new WorldController(game);
    worldRenderer = new WorldRenderer(worldController);
    Gdx.input.setCatchBackKey(true);
  }

  @Override
  public void hide () {
    worldRenderer.dispose();
    Gdx.input.setCatchBackKey(false);
  }

  @Override
  public void pause () {
    paused = true;
  }

  @Override
  public void resume () {
    super.resume();
    // Only called on Android!
    paused = false;
  }
}
You should recognize most of the preceding code as it is merely a duplicate of the current CanyonBunnyMain class. However, some small changes have been made. First of all, the code that was in the create() and dispose() methods of CanyonBunnyMain have been moved over to the show() and hide() methods, respectively, in order to accommodate the Screen interface. Furthermore, catching Android's back key will be enabled when the game screen is shown and disabled again when the screen is hidden. This allows us to handle this event and execute a custom action (here, switch back to the menu screen) in place of the system's default action, which is to terminate the running application.
Now, let's fix CanyonBunnyMain. For clarity and brevity, we will just replace the whole class as most of its code has to be removed anyway.
Replace the current content of CanyonBunnyMain with the following code:
package com.packtpub.libgdx.canyonbunny;

import com.badlogic.gdx.Application;
import com.badlogic.gdx.Game;
import com.badlogic.gdx.Gdx;
import com.badlogic.gdx.assets.AssetManager;
import com.packtpub.libgdx.canyonbunny.game.Assets;
import com.packtpub.libgdx.canyonbunny.screens.MenuScreen;

public class CanyonBunnyMain extends Game {
  @Override
  public void create () {
    // Set Libgdx log level

    Gdx.app.setLogLevel(Application.LOG_DEBUG);
    // Load assets
    Assets.instance.init(new AssetManager());
    // Start game at menu screen
    setScreen(new MenuScreen(this));
  }
}
Our platform-independent entry point of the game has obviously become quite simple. Basically, CanyonBunnyMain has been reduced to only contain the create() method, which almost looks the same as before. What has changed inside this method is that after setting the log level and loading our assets, LibGDX is instructed through a call of the setScreen() method by the Game class to change the current screen. As we want the game to start with the menu screen, we simply pass a new instance of MenuScreen.
One last change is required to finish our preparations for multiple screen management. The WorldController class holds our game logic and needs to initiate a switch back to the menu whenever the player has lost the game or if either the Esc key or the back button is pressed.
Add the following two import lines to WorldController:
import com.badlogic.gdx.Game;
import com.packtpub.libgdx.canyonbunny.screens.MenuScreen;
After that, add the following code:
  private Game game;

  private void backToMenu () {
    // switch to menu screen
    game.setScreen(new MenuScreen(game));
  }
This allows us to save a reference to the game instance, which will enable us to switch to another screen. Additionally, a convenient method called backToMenu() has also been added that will switch to the menu screen when called.
After this, make the following changes to WorldController:
  public WorldController (Game game) {
    this.game = game;
    init();
  }
  public void update (float deltaTime) {
    handleDebugInput(deltaTime);
    if (isGameOver()) {
      timeLeftGameOverDelay -= deltaTime;
      if (timeLeftGameOverDelay < 0) backToMenu();
    } else {
      handleInputGame(deltaTime);
    }
    level.update(deltaTime);
    ...
  }
  @Override
  public boolean keyUp (int keycode) {
    ...
    // Toggle camera follow
    else if (keycode == Keys.ENTER) {
      ...
    }
    // Back to Menu
    else if (keycode == Keys.ESCAPE || keycode == Keys.BACK) {
      backToMenu();
    }
    return false;
  }
The constructor has been extended by taking a reference of the game instance as an argument, which is then stored for later reference when we need to switch the screen. In the update() method, a call to backToMenu() is initiated as soon as the game-over-delay timer runs out of time instead of restarting the game in the game world as was the case before. As mentioned earlier, we want to handle Android's back key as well as the Esc key on the desktop ourselves, which is now done inside the keyUp() method.
You can now run the game and verify that you can switch back and forth between MenuScreen and GameScreen. Touch the black screen of the menu and try to get back to it by hitting either the Esc key or the back button, respectively. Losing all lives while still in the game screen should yield the same result and bring you back to the menu screen too.