
In this last part of the chapter, we are going to implement the game's GUI and add it to the scene. The GUI will display the achieved score, extra lives, and an FPS counter.
We will need to load a bitmap font before we are able to write any text output to the screen. Fortunately, LibGDX provides a default font (Arial 15pt) that we can use. Copy the two files arial-15.fnt and arial-15.png to CanyonBunny-android/assets/images/.
This is how LibGDX's default bitmap font looks:

You can also create your own fonts using Hiero, a font generator tool provided by LibGDX. Check out the official project website https://github.com/libgdx/libgdx/wiki/Hiero. There is also a popular commercial tool called Glyph Designer, which is designed specifically for Mac. The official link is https://71squared.com/en/glyphdesigner.
Add the following import line to Assets:
import com.badlogic.gdx.graphics.g2d.BitmapFont;
Then, add the following lines of code to Assets:
  public AssetFonts fonts;

  public class AssetFonts {
    public final BitmapFont defaultSmall;
    public final BitmapFont defaultNormal;
    public final BitmapFont defaultBig;

    public AssetFonts () {
      // create three fonts using Libgdx's 15px bitmap font
      defaultSmall = new BitmapFont(
          Gdx.files.internal("images/arial-15.fnt"), true);
      defaultNormal = new BitmapFont(
          Gdx.files.internal("images/arial-15.fnt"), true);
      defaultBig = new BitmapFont(
          Gdx.files.internal("images/arial-15.fnt"), true);
      // set font sizes
      defaultSmall.setScale(0.75f);
      defaultNormal.setScale(1.0f);
      defaultBig.setScale(2.0f);
      // enable linear texture filtering for smooth fonts
      defaultSmall.getRegion().getTexture().setFilter(
          TextureFilter.Linear, TextureFilter.Linear);
      defaultNormal.getRegion().getTexture().setFilter(
          TextureFilter.Linear, TextureFilter.Linear);
      defaultBig.getRegion().getTexture().setFilter(
          TextureFilter.Linear, TextureFilter.Linear);
    }
  }
  public void init (AssetManager assetManager) {
    this.assetManager = assetManager;
    // set asset manager error handler
    assetManager.setErrorListener(this);
    // load texture atlas
    assetManager.load(Constants.TEXTURE_ATLAS_OBJECTS,
                      TextureAtlas.class);
    // start loading assets and wait until finished
    assetManager.finishLoading();

    Gdx.app.debug(TAG, "# of assets loaded: "
                       + assetManager.getAssetNames().size);
    for (String a : assetManager.getAssetNames())
      Gdx.app.debug(TAG, "asset: " + a);

    TextureAtlas atlas =
        assetManager.get(Constants.TEXTURE_ATLAS_OBJECTS);

    // enable texture filtering for pixel smoothing
    for (Texture t : atlas.getTextures())
      t.setFilter(TextureFilter.Linear, TextureFilter.Linear);

    // create game resource objects
    fonts = new AssetFonts();
    bunny = new AssetBunny(atlas);
    rock = new AssetRock(atlas);
    goldCoin = new AssetGoldCoin(atlas);
    feather = new AssetFeather(atlas);
    levelDecoration = new AssetLevelDecoration(atlas);
  }

  @Override
  public void dispose () {
    assetManager.dispose();
    fonts.defaultSmall.dispose();
    fonts.defaultNormal.dispose();
    fonts.defaultBig.dispose();
  }
The added code includes a new inner class called AssetFonts that holds the default bitmap font in three differently configured sizes. The size is configured by scaling the font either up or down. Bitmap fonts must be disposed manually so that the corresponding calls are added to the dispose() method.
We are now ready to begin with the implementation of the game's GUI. It is always good to have an idea of what should be implemented so that we have a picture of what we are aiming for, as shown here:

In the top-left corner, you see an image of the gold coin and the player's current score as text. In the top-right corner, you see three bunny heads that represent the number of extra lives the player has left. Lastly, in the bottom-right corner is a small FPS counter that shows how good or bad the performance of the running game is. The color of the FPS counter will depend on the achieved frames per second.
Add the following import line in WorldRenderer:
import com.badlogic.gdx.graphics.g2d.BitmapFont;
Next, add the following code in WorldRenderer:
  private OrthographicCamera cameraGUI;

  private void init () {
    batch = new SpriteBatch();
    camera = new OrthographicCamera(Constants.VIEWPORT_WIDTH,
                                    Constants.VIEWPORT_HEIGHT);
    camera.position.set(0, 0, 0);
    camera.update();
    cameraGUI = new OrthographicCamera(Constants.VIEWPORT_GUI_WIDTH,
                                      Constants.VIEWPORT_GUI_HEIGHT);
    cameraGUI.position.set(0, 0, 0);
    cameraGUI.setToOrtho(true); // flip y-axis
    cameraGUI.update();
  }

  public void resize (int width, int height) {
    camera.viewportWidth = (Constants.VIEWPORT_HEIGHT
                         / (float)height) * (float)width;
    camera.update();
    cameraGUI.viewportHeight = Constants.VIEWPORT_GUI_HEIGHT;
    cameraGUI.viewportWidth = (Constants.VIEWPORT_GUI_HEIGHT
                            / (float)height) * (float)width;
    cameraGUI.position.set(cameraGUI.viewportWidth / 2,
                           cameraGUI.viewportHeight / 2, 0);
    cameraGUI.update();
  }
The added code creates a second camera that is specifically set up just to render the game's GUI. The viewport of the GUI camera is defined using a different set of constants that uses much higher values. We have to do this to correctly render the bitmap font that is 15 pixels high. If we were to use the 5 meters x 5 meters viewport, only one-third of the font's glyph would be visible at any time. The rest of the added code does the same as the game camera. Also, this allows us to move the world camera (camera) independently from the GUI (cameraGUI).
The following section describes the implementation of the methods for each GUI element.
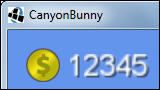
The following is a screenshot of the GUI element that shows the player's current score:
Add the following code in WorldRenderer:
  private void renderGuiScore (SpriteBatch batch) {
    float x = -15;
    float y = -15;
    batch.draw(Assets.instance.goldCoin.goldCoin,
        x, y, 50, 50, 100, 100, 0.35f, -0.35f, 0);
    Assets.instance.fonts.defaultBig.draw(batch,
        "" + worldController.score,
        x + 75, y + 37);
  }
The gold coin image is drawn in the top-left corner of the screen. Next to it, the player's current score is displayed using the big default font.
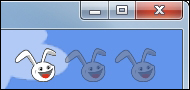
The following is a screenshot of the GUI element that shows the player's remaining extra lives:
Add the following code in WorldRenderer:
  private void renderGuiExtraLive (SpriteBatch batch) {
    float x = cameraGUI.viewportWidth - 50 -
Constants.LIVES_START * 50;
    float y = -15;
    for (int i = 0; i < Constants.LIVES_START; i++) {
      if (worldController.lives <= i)
        batch.setColor(0.5f, 0.5f, 0.5f, 0.5f);
      batch.draw(Assets.instance.bunny.head,
          x + i * 50, y, 50, 50, 120, 100, 0.35f, -0.35f, 0);
      batch.setColor(1, 1, 1, 1);
    }
  }
The three bunny head images that will represent the extra lives of the player are drawn in the top-right corner of the screen. The method starts to draw from left to right. Before a new bunny head is drawn, there is an additional check to find out whether this extra life is used up already. If this is the case, the bunny head is darkened and gets a slightly transparent look by setting the tint color of the sprite batch.
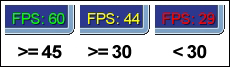
The following is a screenshot of the GUI element that shows the actual frames per second:
Add the following code in WorldRenderer:
  private void renderGuiFpsCounter (SpriteBatch batch) {
    float x = cameraGUI.viewportWidth - 55;
    float y = cameraGUI.viewportHeight - 15;
    int fps = Gdx.graphics.getFramesPerSecond();
    BitmapFont fpsFont = Assets.instance.fonts.defaultNormal;
    if (fps >= 45) {
      // 45 or more FPS show up in green
      fpsFont.setColor(0, 1, 0, 1);
    } else if (fps >= 30) {
      // 30 or more FPS show up in yellow
      fpsFont.setColor(1, 1, 0, 1);
    } else {
      // less than 30 FPS show up in red
      fpsFont.setColor(1, 0, 0, 1);
    }
    fpsFont.draw(batch, "FPS: " + fps, x, y);
    fpsFont.setColor(1, 1, 1, 1); // white
  }
An FPS counter that shows the text FPS followed by the current number of frames per second is drawn in the bottom-right corner of the screen. The color of the text depends on the achieved frame rate. If the FPS is 45 or higher, the text will show up in green, indicating a good rendering performance. Otherwise, if there are 30 or more FPS, then the text will show up in yellow, which indicates an average rendering performance. Anything below 30 FPS will show up in red, indicating a really poor rendering performance.
Add the following code in WorldRenderer:
  private void renderGui (SpriteBatch batch) {
    batch.setProjectionMatrix(cameraGUI.combined);
    batch.begin();
    // draw collected gold coins icon + text
    // (anchored to top left edge)
    renderGuiScore(batch);
    // draw extra lives icon + text (anchored to top right edge)
    renderGuiExtraLive(batch);
    // draw FPS text (anchored to bottom right edge)
    renderGuiFpsCounter(batch);
    batch.end();
  }
Furthermore, change render() in WorldRenderer:
  public void render () {
    renderWorld(batch);
    renderGui(batch);
  }
The implementation of the game's GUI is now finished.