
We will now create our own Assets class to organize and structure our assets. First, add a new constant to the Constants class that points to the description file of the texture atlas:
public class Constants {
    // Visible game world is 5 meters wide
    public static final float VIEWPORT_WIDTH = 5.0f;

    // Visible game world is 5 meters tall
    public static final float VIEWPORT_HEIGHT = 5.0f;
    // Location of description file for texture atlas
    public static final String TEXTURE_ATLAS_OBJECTS = "images/canyonbunny.pack";
}
Next, create a new file for the Assets class and add the following code:
package com.packtpub.libgdx.canyonbunny.game;

import com.badlogic.gdx.Gdx;
import com.badlogic.gdx.assets.AssetDescriptor;
import com.badlogic.gdx.assets.AssetErrorListener;
import com.badlogic.gdx.assets.AssetManager;
import com.badlogic.gdx.graphics.g2d.TextureAtlas;
import com.badlogic.gdx.utils.Disposable;
import com.packtpub.libgdx.canyonbunny.util.Constants;

public class Assets implements Disposable, AssetErrorListener {
    public static final String TAG = Assets.class.getName();

    public static final Assets instance = new Assets();

    private AssetManager assetManager;

    // singleton: prevent instantiation from other classes
    private Assets () {}

    public void init (AssetManager assetManager) {
        this.assetManager = assetManager;
        // set asset manager error handler
        assetManager.setErrorListener(this);
        // load texture atlas
        assetManager.load(Constants.TEXTURE_ATLAS_OBJECTS, TextureAtlas.class);
        // start loading assets and wait until finished
        assetManager.finishLoading();
    Gdx.app.debug(TAG, "# of assets loaded: "+ assetManager.getAssetNames().size);
    for (String a : assetManager.getAssetNames())
      Gdx.app.debug(TAG, "asset: " + a);
  }

  @Override
  public void dispose () {
    assetManager.dispose();
  }

  @Override
  public void error (String filename, Class type,Throwable throwable) {
    Gdx.app.error(TAG, "Couldn't load asset '"+ filename + "'", (Exception)throwable);
   }

   @Override
   public void error(AssetDescriptor asset, Throwable throwable) {
         Gdx.app.error(TAG, "Couldn't load asset '" + asset.fileName + "'", (Exception)throwable);

   }
}
There is quite a lot going on in the preceding code, so let's break it down. First, notice that this class is using a design pattern called singleton. Simply put, a singleton class ensures that only a single instance of it will exist; hence the name singleton. This makes sense here because there is no reason to have multiple instances that point to the same resources. A singleton is implemented by defining a private constructor that prevents other classes from instantiating it. The instance variable holds the actual instance of the class. It uses the public static final modifiers that allows read-only access and is the one and only way to access this class. The staticness of this class allows us to access it from virtually anywhere in the game code without having to pass over its reference to every method where we will use it.
Note
A singleton can be implemented to do either lazy or eager initialization. Using lazy initialization means that the instance is created only when it is requested for the very first time. Any subsequent requests will always yield the exact same instance. In contrast, eager initialization means that the instance is directly created on startup.
For more information, refer to the book Design Patterns: Elements of Reusable Object-Oriented Software, Erich Gamma, Richard Helm, Ralph Johnson, and John Vlissides, Addison Wesley.
The init() method will be called at the very beginning when the game starts. It will initialize the asset manager, which in turn will load all the assets. Loading the assets using the asset manager is simply done by calling its load() method. The method takes the path and filename as the first argument and the corresponding class to instantiate as the second argument. The loading process is started by calling finishLoading(). This is a blocking method that waits until all the assets are fully loaded. After that, we always print the number of loaded assets and their names to the console to easily check whether it is working the way we expect it to work.
The Assets class implements the Disposable and AssetErrorListener interfaces. As we know that assets should always be unloaded when they are no longer needed, we have implemented the dispose() method to delegate these requests to the asset manager. The error() method will be called whenever an error has occurred in the asset manager. However, before the asset manager calls our implementation of the interface, it needs to be told about the class that implements the AssetErrorListener interface by calling the asset manager's setErrorListener() method. We are using the error() method to print error logs only to the console. You could add additional code here to handle errors and therefore avoid the game from crashing in this case.
The next step is to retrieve our subimages from the loaded texture atlas. In general, this is done by calling the atlas's findRegion() method, which takes the asset's name as an argument. The method returns an object of the AtlasRegion class that contains information about the subimage found and also some additional information about how it is stored in the atlas.
Now, for example, if we wanted to find a subimage that is stored in assets/my_image.png, we will write the following code:
atlas.findRegion("my_image");Note that the prefix assets/ is always omitted just like any file extension, such as .png. However, the subfolder needs to be specified. The method will silently return null if the lookup fails. Therefore, be sure to double-check your spelling of the filename in this case. One very important fact to know about this method is that the lookup of a subimage is an expensive function call.
Add the following line of code to Assets to import the AtlasRegion class:
import com.badlogic.gdx.graphics.g2d.TextureAtlas.AtlasRegion;
The following is a step-by-step implementation of several smaller inner classes of the Assets class. These classes allow us to structure (or group) the subimages in logical units and also to permanently store (that is, cache) the looked up references.
We will begin with the player character and will call its class AssetBunny. It contains a member variable called head that holds the reference to the texture atlas subimage that originates from the bunny_head.png file. The lookup is done inside the constructor of the inner class. The constructor takes a reference of the corresponding atlas in which it will find the atlas region it wants. You can see the bunny head in the following screenshot:

Add the following inner class to the Assets class:
public class AssetBunny {
public final AtlasRegion head;
public AssetBunny (TextureAtlas atlas) {
head = atlas.findRegion("bunny_head");
}
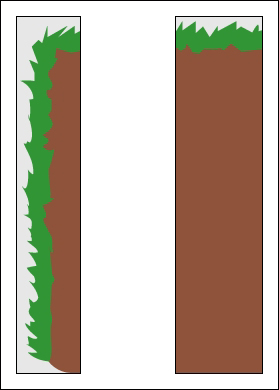
}Next is the rock game object that represents the platform in our game world. It consists of two image files: rock_edge.png and rock_middle.png. Both these following images get their own variable in the inner class called AssetRock:
Add the following inner class to the Assets class:
public class AssetRock {
    public final AtlasRegion edge;
    public final AtlasRegion middle;

    public AssetRock (TextureAtlas atlas) {
        edge = atlas.findRegion("rock_edge");
        middle = atlas.findRegion("rock_middle");
    }
}
Next is the gold coin. Its original filename is item_gold_coin.png and its inner class is named AssetGoldCoin.

Add the following inner class to the Assets class:
public class AssetGoldCoin {
    public final AtlasRegion goldCoin;

    public AssetGoldCoin (TextureAtlas atlas) {
        goldCoin = atlas.findRegion("item_gold_coin");
    }
}
Next is the feather item. Its original filename is item_feather.png and its inner class is named AssetFeather.
Add the following inner class to the Assets class:
public class AssetFeather {
    public final AtlasRegion feather;

    public AssetFeather (TextureAtlas atlas) {
        feather = atlas.findRegion("item_feather");
    }
}
Next is the last inner class called AssetLevelDecoration. It contains all the decorative images that only add to the look and feel of the level. This collection of assets consists of three differently shaped clouds (cloud01.png, cloud02.png, and cloud03.png), a very wide mountain that spans across two image halves (mountain_left.png and mountain_right.png), and an overlay (water_overlay.png) that will be stretched along the x axis to give the illusion of water existing everywhere in the game world.
Note
The overlay image for the water could have been shrunk down to a total width of one pixel because the content repeats on the x axis along which we plan to stretch it anyway. Furthermore, it makes no difference to the render performance how far an image is stretched. However, it is easier to show you an image in a printed book that is wider than one pixel.
Add the following inner class to the Assets class:
public class AssetLevelDecoration {
    public final AtlasRegion cloud01;
    public final AtlasRegion cloud02;
    public final AtlasRegion cloud03;
    public final AtlasRegion mountainLeft;
    public final AtlasRegion mountainRight;
    public final AtlasRegion waterOverlay;

    public AssetLevelDecoration (TextureAtlas atlas) {
        cloud01 = atlas.findRegion("cloud01");
        cloud02 = atlas.findRegion("cloud02");
        cloud03 = atlas.findRegion("cloud03");
        mountainLeft = atlas.findRegion("mountain_left");
        mountainRight = atlas.findRegion("mountain_right");
        waterOverlay = atlas.findRegion("water_overlay");
    }
}
So far, we have established a way to group our assets in logic units, which also cache their references after their initial lookup. What is still missing is the code that uses our new inner classes.
Add the following two imports to the Assets class:
import com.badlogic.gdx.graphics.Texture;
import com.badlogic.gdx.graphics.Texture.TextureFilter;
Then, add the following new code to the same class:
public AssetBunny bunny;
public AssetRock rock;
public AssetGoldCoin goldCoin;
public AssetFeather feather;
public AssetLevelDecoration levelDecoration;

public void init (AssetManager assetManager) {
    this.assetManager = assetManager;
    // set asset manager error handler
    assetManager.setErrorListener(this);
    // load texture atlas
    assetManager.load(Constants.TEXTURE_ATLAS_OBJECTS, TextureAtlas.class);
    // start loading assets and wait until finished
    assetManager.finishLoading();

    Gdx.app.debug(TAG, "# of assets loaded: " + assetManager.getAssetNames().size);
    for (String a : assetManager.getAssetNames())
        Gdx.app.debug(TAG, "asset: " + a);
    }

  TextureAtlas atlas = assetManager.get(Constants.TEXTURE_ATLAS_OBJECTS);

  // enable texture filtering for pixel smoothing
  for (Texture t : atlas.getTextures()) {
       t.setFilter(TextureFilter.Linear, TextureFilter.Linear);
  }

  // create game resource objects
  bunny = new AssetBunny(atlas);
  rock = new AssetRock(atlas);
  goldCoin = new AssetGoldCoin(atlas);
  feather = new AssetFeather(atlas);
  levelDecoration = new AssetLevelDecoration(atlas);
}
Now, the Assets class has one member variable for each instance of our inner classes. In the init() method, we first retrieve the reference to the loaded texture atlas by calling the get() method of the asset manager. Next, we iterate through all textures of the atlas (which currently is just one) and set the texture filter mode to TextureFilter.Linear. This will enable smoothing of the pixels when the texture is rendered. The reason why we pass this constant value twice to the method is because the mode has to be set for both cases, minification and magnification, where a rendered texture is either scaled down or up from its original size. The default texture filter mode is set to TextureFilter.Nearest for both cases.
The following screenshot is an example to compare the difference between both the modes:

Finally, we create each instance of our inner classes and pass them the reference to the texture atlas.