
The next step will be to add the game logic that constitutes the rules of our game world. However, the game logic will need to be able to detect the so-called collisions between two game objects before it can handle all of our events, such as walking over an item to collect it. So, we will implement a very basic collision detection method that tests two overlapping rectangles. If an overlap is detected, it means that there is also a collision between these two tested objects. So, we can bind a certain action to this event in the game logic to handle collisions as required.
Here, we add the code to check the collision of the bunny head with each actor game object, the gold coin, feather, and the rock.
First, add the following import lines to WorldController:
import com.badlogic.gdx.math.Rectangle;
import com.packtpub.libgdx.canyonbunny.game.objects.BunnyHead;
import com.packtpub.libgdx.canyonbunny.game.objects.BunnyHead.JUMP_STATE;
import com.packtpub.libgdx.canyonbunny.game.objects.Feather;
import com.packtpub.libgdx.canyonbunny.game.objects.GoldCoin;
import com.packtpub.libgdx.canyonbunny.game.objects.Rock;
After that, add the following code to the same class:
// Rectangles for collision detection
private Rectangle r1 = new Rectangle();
private Rectangle r2 = new Rectangle();

private void onCollisionBunnyHeadWithRock(Rock rock) {};
private void onCollisionBunnyWithGoldCoin(GoldCoin goldcoin) {};
private void onCollisionBunnyWithFeather(Feather feather) {};

private void testCollisions () {
  r1.set(level.bunnyHead.position.x, level.bunnyHead.position.y, level.bunnyHead.bounds.width, level.bunnyHead.bounds.height);

  // Test collision: Bunny Head <-> Rocks
  for (Rock rock : level.rocks) {
    r2.set(rock.position.x, rock.position.y, rock.bounds.width, rock.bounds.height);
    if (!r1.overlaps(r2)) continue;
    onCollisionBunnyHeadWithRock(rock);
    // IMPORTANT: must do all collisions for valid
    // edge testing on rocks.
  }

  // Test collision: Bunny Head <-> Gold Coins
  for (GoldCoin goldcoin : level.goldcoins) {
    if (goldcoin.collected) continue;
    r2.set(goldcoin.position.x, goldcoin.position.y, goldcoin.bounds.width, goldcoin.bounds.height);
    if (!r1.overlaps(r2)) continue;
    onCollisionBunnyWithGoldCoin(goldcoin);
    break;
  }

  // Test collision: Bunny Head <-> Feathers
  for (Feather feather : level.feathers) {
    if (feather.collected) continue;
    r2.set(feather.position.x, feather.position.y, feather.bounds.width, feather.bounds.height);
    if (!r1.overlaps(r2)) continue;
    onCollisionBunnyWithFeather(feather);
    break;
  }
}
This code adds a new method called testCollisions() that iterates through all the game objects and tests whether there is a collision between the bunny head and another game object. This particular test is subdivided into three separate methods called onCollisionBunnyHeadWithRock(), onCollisionBunnyWithGoldCoin(), and onCollisionBunnyWithFeather(), which are still empty.
Next, fill in the onCollisionBunnyHeadWithRock() method with the following code:
private void onCollisionBunnyHeadWithRock (Rock rock) {
  BunnyHead bunnyHead = level.bunnyHead;
  float heightDifference = Math.abs(bunnyHead.position.y - (  rock.position.y + rock.bounds.height));
  if (heightDifference > 0.25f) {
    boolean hitRightEdge = bunnyHead.position.x > ( rock.position.x + rock.bounds.width / 2.0f);
    if (hitRightEdge) {
      bunnyHead.position.x = rock.position.x + rock.bounds.width;
    } else {
      bunnyHead.position.x = rock.position.x - bunnyHead.bounds.width;
    }
    return;
  }

  switch (bunnyHead.jumpState) {
    case GROUNDED:
      break;
    case FALLING:
    case JUMP_FALLING:
      bunnyHead.position.y = rock.position.y + bunnyHead.bounds.height  + bunnyHead.origin.y;
      bunnyHead.jumpState = JUMP_STATE.GROUNDED;
      break;
    case JUMP_RISING:
      bunnyHead.position.y = rock.position.y + bunnyHead.bounds.height + bunnyHead.origin.y;
    break;
  }
}
This code handles collisions between the bunny head game object and a rock game object and is called when a collision is detected. Then, the bunny head game object is moved accordingly to prevent it from falling through our platforms—the rock game objects.
Next, fill in the onCollisionBunnyWithGoldCoin() method with the following code:
private void onCollisionBunnyWithGoldCoin (GoldCoin goldcoin) {
  goldcoin.collected = true;
  score += goldcoin.getScore();
  Gdx.app.log(TAG, "Gold coin collected");
}
This code handles collisions between the bunny head game object and a gold coin game object. It simply flags the gold coin as being collected so that it will disappear. Furthermore, the player's score increases by the value the gold coin game object returns from its getScore() method.
Finally, fill in the onCollisionBunnyWithFeather() method with the following code:
private void onCollisionBunnyWithFeather (Feather feather) {
  feather.collected = true;
  score += feather.getScore();
  level.bunnyHead.setFeatherPowerup(true);
  Gdx.app.log(TAG, "Feather collected");
}
This code handles collisions between the bunny head game object and a feather game object. The handling of this collision is similar to the onCollisionBunnyWithGoldCoin() method, but it also activates or refreshes the power-up effect for the bunny head.
Now, let's make one more modification to the update() method of WorldController:
public void update (float deltaTime) {
  handleDebugInput(deltaTime);
  level.update(deltaTime);
  testCollisions();
  cameraHelper.update(deltaTime);
}
You can now run the game to verify that the level loading and collision detection works. Within a very short time span, you should see that the player's character falls down a bit and then stops on top of the rock underneath it. The following is a screenshot of this scene:

You can still use all the keys (left/right/up/down arrows, comma, dot, and so on) to control the camera, so, now is a good opportunity to just fly around a bit in the game world to verify that all the game objects appear at their correct locations.
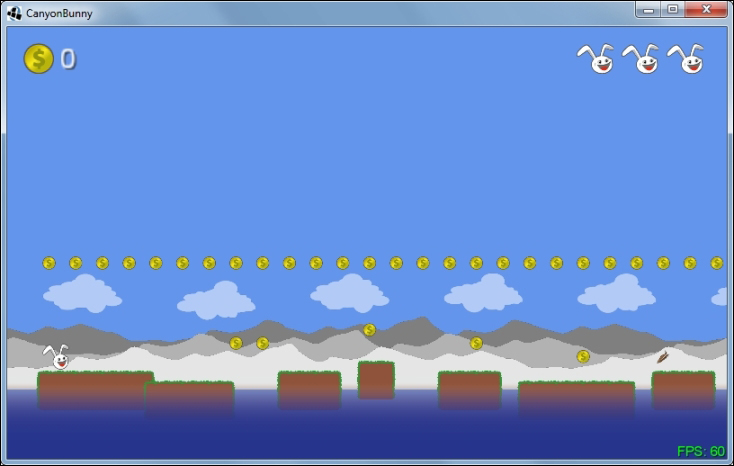
The following screenshot shows where the camera has been zoomed out a bit to view all the new game objects at once:
We will now add a toggle key to choose whether the arrow keys should control the player character or the camera. The camera should follow the player's character while being in the player control mode. Otherwise, the camera can be freely moved around. We will also add another key to let the player character jump.
Let's begin with the camera that is set to follow the player character at the start of the level. Add the highlighted line of code to the initLevel() method of WorldController:
private void initLevel () {
  score = 0;
  level = new Level(Constants.LEVEL_01);
  cameraHelper.setTarget(level.bunnyHead);
}
Next, change the handleDebugInput() and keyUp()methods of WorldController:
private void handleDebugInput (float deltaTime) {
  if (Gdx.app.getType() != ApplicationType.Desktop) return;

  if (!cameraHelper.hasTarget(level.bunnyHead)) {
    // Camera Controls (move)
    float camMoveSpeed = 5 * deltaTime;
    float camMoveSpeedAccelerationFactor = 5;
    if (Gdx.input.isKeyPressed(Keys.SHIFT_LEFT)) camMoveSpeed *= camMoveSpeedAccelerationFactor;
    if (Gdx.input.isKeyPressed(Keys.LEFT)) moveCamera(-camMoveSpeed, 0);
    if (Gdx.input.isKeyPressed(Keys.RIGHT)) moveCamera(camMoveSpeed, 0);
    if (Gdx.input.isKeyPressed(Keys.UP)) moveCamera(0, camMoveSpeed);
    if (Gdx.input.isKeyPressed(Keys.DOWN)) moveCamera(0, -camMoveSpeed);
    if (Gdx.input.isKeyPressed(Keys.BACKSPACE)) cameraHelper.setPosition(0, 0);
  }

  // Camera Controls (zoom)
  ...
}

@Override
public boolean keyUp (int keycode) {
  // Reset game world
  if (keycode == Keys.R) {
    init();
    Gdx.app.debug(TAG, "Game world resetted");
  }
  // Toggle camera follow
  else if (keycode == Keys.ENTER) {
    cameraHelper.setTarget(cameraHelper.hasTarget() ? null: level.bunnyHead);
    Gdx.app.debug(TAG, "Camera follow enabled: " + cameraHelper.hasTarget());
  }
  return false;
}
Now, we can use the Enter key to toggle between the player and camera controls. What is still missing is the code that handles the input for the player's character.
Add the following lines of code to WorldController:
private void handleInputGame (float deltaTime) {
  if (cameraHelper.hasTarget(level.bunnyHead)) {
    // Player Movement
    if (Gdx.input.isKeyPressed(Keys.LEFT)) {
      level.bunnyHead.velocity.x = -level.bunnyHead.terminalVelocity.x;
    } else if (Gdx.input.isKeyPressed(Keys.RIGHT)) {
      level.bunnyHead.velocity.x = level.bunnyHead.terminalVelocity.x;
    } else {
      // Execute auto-forward movement on non-desktop platform
      if (Gdx.app.getType() != ApplicationType.Desktop) {
        level.bunnyHead.velocity.x = level.bunnyHead.terminalVelocity.x;
      }
    }

    // Bunny Jump
    if (Gdx.input.isTouched() || Gdx.input.isKeyPressed(Keys.SPACE)) {
      level.bunnyHead.setJumping(true);
    } else {
      level.bunnyHead.setJumping(false);
    }
  }
}
After this, simply call the new method in the update() method of WorldController:
public void update (float deltaTime) {
  handleDebugInput(deltaTime);
  handleInputGame(deltaTime);
  level.update(deltaTime);
  testCollisions();
  cameraHelper.update(deltaTime);
}
The player is now controllable using the left and right arrow keys to move in the corresponding direction. We also add an autoforward moving behavior if the game is run on a non-desktop platform such as Android. Pressing either the Space bar key or touching the display of your smartphone will trigger the player character to jump. You can now run the game once again and try to pick up the first items as well as try to carefully jump from rock to rock without falling from the edge. Moreover, you might want to check what happens when you fall down. Obviously, nothing will happen in this case as we have not added any game logic yet to handle it properly. We also want to make the camera stop following the player's character too far down the level to make it more clear to the player that the level ends at the height of the water and to avoid a graphical glitch.
Note
In a later chapter, we will take a closer look at a full-blown physics engine called Box2D that implements all the necessary features to detect a collision. However, we will not revise our implementation by replacing it with Box2D's one because Canyon Bunny does not use physically accurate movements to make the game feel right. Trying to make real-world physics simulations do unrealistic physics can be a very hard and tedious task.
Whenever the player falls into the water, it will cost one extra life. The game will be over as soon as there are no extra lives left and the player falls into the water once again. There will be a short delay of three seconds between the game over message and a complete restart of the game.
Add the following lines to Constants:
// Delay after game over
public static final float TIME_DELAY_GAME_OVER = 3;
Next, add the following lines to WorldController:
private float timeLeftGameOverDelay;

public boolean isGameOver () {
  return lives < 0;
}

public boolean isPlayerInWater () {
  return level.bunnyHead.position.y < -5;
}
In isPlayerInWater(), we test the bunny head's vertical position to find out whether it fell down into the water. As the water is placed at the bottom edge of the screen (y = 0), we simply need to look for a value smaller than this. In our example, we use -5 instead of 0 to also add a little delay in time. This is because travelling all the way down to the vertical position of -5 simply takes longer than it would do if we were using 0. The resulting effect is that the game will enforce a little pause on the player after each lost life.
After this, make the following modifications to init() and update() in WorldController:
private void init () {
  Gdx.input.setInputProcessor(this);
  cameraHelper = new CameraHelper();
  lives = Constants.LIVES_START;
  timeLeftGameOverDelay = 0;
  initLevel();
}

public void update (float deltaTime) {
  handleDebugInput(deltaTime);
  if (isGameOver()) {
    timeLeftGameOverDelay -= deltaTime;
    if (timeLeftGameOverDelay < 0) init();
  } else {
    handleInputGame(deltaTime);
  }
  level.update(deltaTime);
  testCollisions();
  cameraHelper.update(deltaTime);
  if (!isGameOver() && isPlayerInWater()) {
    lives--;
    if (isGameOver())
      timeLeftGameOverDelay = Constants.TIME_DELAY_GAME_OVER;
    else
      initLevel();
  }
}
The player's character will now lose extra lives when falling down into the water. You can verify this by checking the top-right corner of the game screen. Each missing extra life will turn into a transparent bunny head icon. The game over delay and the restart of the game after that are also working now.
There is still one small modification needed to fix the camera follow behavior.
Change the update() method of CameraHelper as follows:
public void update (float deltaTime) {
  if (!hasTarget()) return;

  position.x = target.position.x + target.origin.x;
  position.y = target.position.y + target.origin.y;

  // Prevent camera from moving down too far
  position.y = Math.max(-1f, position.y);
}Here, we add the game over text and the feather icon to our game.
Add the following method to WorldRenderer:
private void renderGuiGameOverMessage (SpriteBatch batch) {
  float x = cameraGUI.viewportWidth / 2;
  float y = cameraGUI.viewportHeight / 2;
  if (worldController.isGameOver()) {
    BitmapFont fontGameOver = Assets.instance.fonts.defaultBig;
    fontGameOver.setColor(1, 0.75f, 0.25f, 1);
    fontGameOver.drawMultiLine(batch, "GAME OVER", x, y, 0, BitmapFont.HAlignment.CENTER);
    fontGameOver.setColor(1, 1, 1, 1);
  }
}
This method calculates the center of the GUI camera's viewport. The text is rendered using the big font from our assets. Its color is changed using the setColor() method of BitmapFont. The game over text is drawn using the drawMultiLine() method of BitmapFont, which takes a reference to SpriteBatch, the actual text to be displayed, a 2D position, a horizontal offset, and a constant for horizontal text alignment.
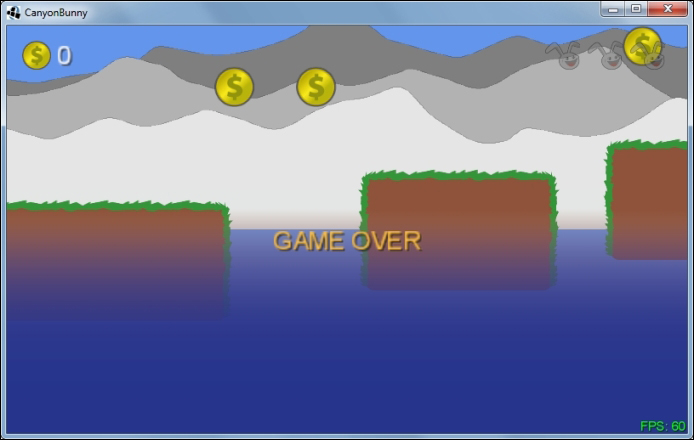
We are using the BitmapFont.HAlignment.CENTER constant to tell BitmapFont that we want it to draw the given text horizontally centered to the given position. The text message GAME OVER will only be visible if the isGameOver() method of WorldController returns true.
The following is the screenshot of a case where all the extra lives were used up until the game was over:
Now, add the following method to WorldRenderer:
private void renderGuiFeatherPowerup (SpriteBatch batch) {
  float x = -15;
  float y = 30;
  float timeLeftFeatherPowerup = worldController.level.bunnyHead.timeLeftFeatherPowerup;
  if (timeLeftFeatherPowerup > 0) {
    // Start icon fade in/out if the left power-up time
    // is less than 4 seconds. The fade interval is set
    // to 5 changes per second.
    if (timeLeftFeatherPowerup < 4) {
      if (((int)(timeLeftFeatherPowerup * 5) % 2) != 0) {
        batch.setColor(1, 1, 1, 0.5f);
      }
    }
    batch.draw(Assets.instance.feather.feather, x, y, 50, 50, 100, 100, 0.35f, -0.35f, 0);
    batch.setColor(1, 1, 1, 1);
    Assets.instance.fonts.defaultSmall.draw(batch, "" + (int)timeLeftFeatherPowerup, x + 60, y + 57);
  }
}
This method first checks whether there is still time left for the feather power-up effect to end. Only if this is the case, a feather icon is drawn in the top-left corner under the gold coin icon. A small number is drawn next to it that displays the rounded time that is still left until the effect vanishes. There is also some extra code that makes the feather icon fade back and forth when there are less than four seconds of the power-up effect to last.
The following screenshot shows an example of when the feather power-up has been picked up and has 6 seconds left:
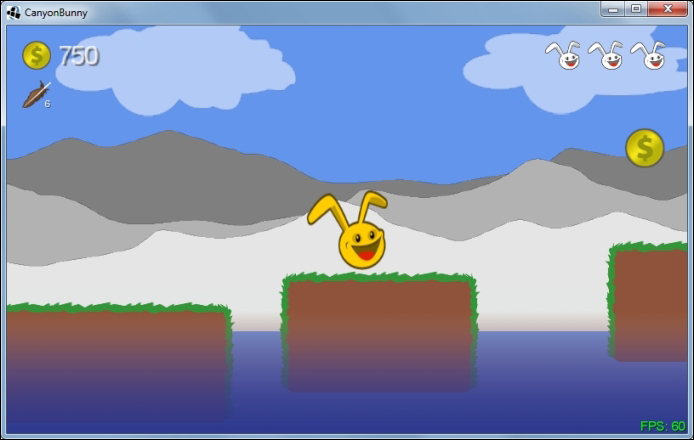
You can see this from the little number shown next to the feather icon in the top-left corner of the game screen.
As the final step for this chapter, both the new GUI render methods need to be added to the renderGui() method of WorldRenderer:
private void renderGui (SpriteBatch batch) {
  batch.setProjectionMatrix(cameraGUI.combined);
  batch.begin();

  // draw collected gold coins icon + text
  // (anchored to top left edge)
  renderGuiScore(batch);
  // draw collected feather icon (anchored to top left edge)
  renderGuiFeatherPowerup(batch);
  // draw extra lives icon + text (anchored to top right edge)
  renderGuiExtraLive(batch);
  // draw FPS text (anchored to bottom right edge)
  renderGuiFpsCounter(batch);
  // draw game over text
  renderGuiGameOverMessage(batch);

  batch.end();
}