
Let's now add some music and sound effects to our game. First, we need to know what audio files are needed and then copy them to our assets folder.
The next two tables contain descriptions of each audio file and their function in Canyon Bunny.
For sounds (generated with bfxr), refer to the following table:
|
Filename |
Event |
|---|---|
|
|
When the player jumps |
|
|
When the player jumps in mid-air (requires an active feather power-up) |
|
|
When the player picks up a gold coin |
|
|
When the player picks up a feather power-up |
|
|
When the player loses a life (for example, the player falls down into the water) |
For music (provided by Klaus "keith303" Spang), refer to the following table:
|
Filename |
Event |
|---|---|
|
|
When the application starts (indefinitely looping background music) |
Now, add all these files to CanyonBunny-android/assets/. Split up the audio files by placing them either in the music or sound subfolder. The following screenshot shows how the final structure of your assets folder should look:

After this, we need to update our Assets class in order to make the audio files accessible in the same way as the rest of our assets. We will also use AssetManager to let LibGDX handle the loading and unloading processes of the music and sound files.
Add the following two import lines to the Assets class:
import com.badlogic.gdx.audio.Music;
import com.badlogic.gdx.audio.Sound;
Then, add the following code to the same class:
public AssetSounds sounds;
public AssetMusic music;

public class AssetSounds {
  public final Sound jump;
  public final Sound jumpWithFeather;
  public final Sound pickupCoin;
  public final Sound pickupFeather;
  public final Sound liveLost;
 public AssetSounds (AssetManager am) {
    jump = am.get("sounds/jump.wav", Sound.class);
    jumpWithFeather = am.get("sounds/jump_with_feather.wav", Sound.class);
    pickupCoin = am.get("sounds/pickup_coin.wav", Sound.class);
    pickupFeather = am.get("sounds/pickup_feather.wav", Sound.class);
    liveLost = am.get("sounds/live_lost.wav", Sound.class);
  }
}

public class AssetMusic {
  public final Music song01;

  public AssetMusic (AssetManager am) {
    song01 = am.get("music/keith303_-_brand_new_highscore.mp3", Music.class);
  }
}
This adds the two new inner classes, AssetSounds and AssetMusic, which will hold the loaded instances of the music and sound effects. Next, make the following changes to the same class:
public void init (AssetManager assetManager) {
this.assetManager = assetManager;
// set asset manager error handler
assetManager.setErrorListener(this);
// load texture atlas
assetManager.load(Constants.TEXTURE_ATLAS_OBJECTS, TextureAtlas.class);
// load sounds
assetManager.load("sounds/jump.wav", Sound.class);
assetManager.load("sounds/jump_with_feather.wav", Sound.class);
assetManager.load("sounds/pickup_coin.wav", Sound.class);
assetManager.load("sounds/pickup_feather.wav", Sound.class);
assetManager.load("sounds/live_lost.wav", Sound.class);
// load music
assetManager.load("music/keith303_-_brand_new_highscore.mp3", Music.class);
// start loading assets and wait until finished
assetManager.finishLoading();
Gdx.app.debug(TAG, "# of assets loaded: " + assetManager.getAssetNames().size);
for (String a : assetManager.getAssetNames())
Gdx.app.debug(TAG, "asset: " + a);
TextureAtlas atlas = assetManager.get(Constants.TEXTURE_ATLAS_OBJECTS);
// enable texture filtering for pixel smoothing
for (Texture t : atlas.getTextures())
t.setFilter(TextureFilter.Linear, TextureFilter.Linear);
// create game resource objects
fonts = new AssetFonts();
bunny = new AssetBunny(atlas);
rock = new AssetRock(atlas);
goldCoin = new AssetGoldCoin(atlas);
feather = new AssetFeather(atlas);
levelDecoration = new AssetLevelDecoration(atlas);
sounds = new AssetSounds(assetManager);
music = new AssetMusic(assetManager);
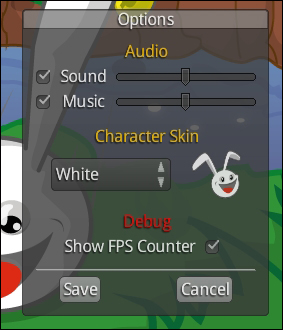
}These changes tell the asset manager to load and manage every audio file that we want to use in the game. We are now all set to play back our audio files. However, the game should also respect the current audio settings that are available in the Options menu of the menu screen, as shown in the following screenshot:
At this point, it would seem logical to just call play() on the sound and music instances in the game code where needed. However, this approach poses an issue in terms of clean code with regard to the game settings as the current game settings need to be checked every time an audio file is played. So, it would be ideal to have an audio manager as a centralized point of control over the game's audio playback. Since LibGDX does not provide an audio manager, we will build one of our own.
Create a new file for the AudioManager class and add the following code:
package com.packtpub.libgdx.canyonbunny.util;

import com.badlogic.gdx.audio.Music;
import com.badlogic.gdx.audio.Sound;

public class AudioManager {
  public static final AudioManager instance = new AudioManager();

  private Music playingMusic;

  // singleton: prevent instantiation from other classes
  private AudioManager () { }

  public void play (Sound sound) {
    play(sound, 1);
  }

  public void play (Sound sound, float volume) {
    play(sound, volume, 1);
  }

  public void play (Sound sound, float volume, float pitch) {
    play(sound, volume, pitch, 0);
  }

  public void play (Sound sound, float volume, float pitch, float pan) {
    if (!GamePreferences.instance.sound) return;
    sound.play(GamePreferences.instance.volSound * volume, pitch, pan);
  }
}
The AudioManager class is a singleton class so that we can access it from anywhere in the code. It features a couple of overloaded play() methods just like the original Sound and Music interfaces. The advantage of overloading these methods is that you can make some parameters optional. The methods in this class check against the values in GamePreferences, which holds the currently loaded audio settings among others. If the checkbox for sounds is not selected in the Options menu, GamePreferences.instance.sound will return false, and therefore any call of AudioManager class's play() will be aborted before the actual play() call of a sound is executed.
Next, add the following code to the same class:
public void play (Music music) {
  stopMusic();
  playingMusic = music;
  if (GamePreferences.instance.music) {
    music.setLooping(true);
    music.setVolume(GamePreferences.instance.volMusic);
    music.play();
  }
}

  public void stopMusic () {
    if (playingMusic != null) playingMusic.stop();
  }

public void onSettingsUpdated () {
  if (playingMusic == null) return;
  playingMusic.setVolume(GamePreferences.instance.volMusic);
  if (GamePreferences.instance.music) {
    if (!playingMusic.isPlaying()) playingMusic.play();
  } else {
    playingMusic.pause();
  }
}
This code adds another overloaded play() method, which takes an instance of Music that will be played. If music is already playing, it is stopped first. Then, new music is initialized for playback and started if Music is enabled in the game settings. The onSettingsUpdated() method is used to allow the Options menu to inform AudioManager when settings have changed to execute appropriate actions, such as setting a new music volume.
Now, let's connect the audio manager with the Options menu in the menu screen and the rest of the game.
Add the following import line to MenuScreen:
import com.packtpub.libgdx.canyonbunny.util.AudioManager;
Next, make the following changes to the same class:
private void onSaveClicked () {
  saveSettings();
  onCancelClicked();
  AudioManager.instance.onSettingsUpdated();
}

private void onCancelClicked () {
  btnMenuPlay.setVisible(true);
  btnMenuOptions.setVisible(true);
  winOptions.setVisible(false);
  AudioManager.instance.onSettingsUpdated();
}
These changes make sure that when the Options menu is closed, the audio manager will start or stop the music depending on the current audio settings.
Next, add the following import lines to the CanyonBunnyMain class:
import com.packtpub.libgdx.canyonbunny.util.AudioManager;
import com.packtpub.libgdx.canyonbunny.util.GamePreferences;
After this, make the following changes to the same class:
@Override
public void create () {
  // Set Libgdx log level
  Gdx.app.setLogLevel(Application.LOG_DEBUG);

  // Load assets
  Assets.instance.init(new AssetManager());

  // Load preferences for audio settings and start playing music
  GamePreferences.instance.load();
  AudioManager.instance.play(Assets.instance.music.song01);

  // Start game at menu screen
  ScreenTransition transition = ScreenTransitionSlice.init(2,ScreenTransitionSlice.UP_DOWN, 10, Interpolation.pow5Out);
  setScreen(new MenuScreen(this), transition);
}
These changes will make sure that after the assets and game preferences have been loaded, the music starts playing. This is done using the play() method of AudioManager, which takes care of checking the current audio settings, setting the correct music volume, and potentially starting the playback of the music file.
Next, add the following import line to the WorldController class:
import com.packtpub.libgdx.canyonbunny.util.AudioManager;
After this, make the following changes to the same class:
public void update (float deltaTime) {
  handleDebugInput(deltaTime);
  if (isGameOver()) {
    timeLeftGameOverDelay -= deltaTime;
    if (timeLeftGameOverDelay < 0) backToMenu();
  } else {
    handleInputGame(deltaTime);
  }
  level.update(deltaTime);
  testCollisions();
  cameraHelper.update(deltaTime);
  if (!isGameOver() && isPlayerInWater()) {
    AudioManager.instance.play(Assets.instance.sounds.liveLost);
    lives--;
    if (isGameOver())
    timeLeftGameOverDelay = Constants.TIME_DELAY_GAME_OVER;
    else
    initLevel();
  }
  level.mountains.updateScrollPosition(cameraHelper.getPosition());
  if (livesVisual > lives)
  livesVisual = Math.max(lives, livesVisual - 1 * deltaTime);
  if (scoreVisual < score)
  scoreVisual = Math.min(score, scoreVisual +250 * deltaTime);
}

private void onCollisionBunnyWithGoldCoin (GoldCoin goldcoin) {
  goldcoin.collected = true;
  AudioManager.instance.play(Assets.instance.sounds.pickupCoin);
  score += goldcoin.getScore();
  Gdx.app.log(TAG, "Gold coin collected");
}

private void onCollisionBunnyWithFeather (Feather feather) {
  feather.collected = true;
  AudioManager.instance.play(Assets.instance.sounds.pickupFeather);
  score += feather.getScore();
  level.bunnyHead.setFeatherPowerup(true);
  Gdx.app.log(TAG, "Feather collected");
}
These changes add the code to trigger the sound effects for the Life Lost, Picked up Gold Coin, and Picked up Feather events at the right time.
Next, add the following two import lines to the BunnyHead class:
import com.badlogic.gdx.math.MathUtils;
import com.packtpub.libgdx.canyonbunny.util.AudioManager;
After this, make the following changes to the same class:
public void setJumping (boolean jumpKeyPressed) {
  switch (jumpState) {
    case GROUNDED: // Character is standing on a platform
    if (jumpKeyPressed) {
      AudioManager.instance.play(Assets.instance.sounds.jump);
      // Start counting jump time from the beginning
      timeJumping = 0;
      jumpState = JUMP_STATE.JUMP_RISING;
    }
    break;
    case JUMP_RISING: // Rising in the air
    if (!jumpKeyPressed) {
      jumpState = JUMP_STATE.JUMP_FALLING;
    }
    break;
    case FALLING:// Falling down
    case JUMP_FALLING: // Falling down after jump
    if (jumpKeyPressed && hasFeatherPowerup) {
      AudioManager.instance.play(Assets.instance.sounds.jumpWithFeather, 1, MathUtils.random(1.0f, 1.1f));
      timeJumping = JUMP_TIME_OFFSET_FLYING;
      jumpState = JUMP_STATE.JUMP_RISING;
    }
    break;
  }
}
The changes in the code for BunnyHead trigger the sound effects for the jumped and jumped-in-mid-air events at the right time. The jumpWithFeather sound is played using a different play() method of the AudioManager class. It is also provided with a random pitch value in the range from 1.0 to 1.1, which adds a little change in the frequency, rendering the rapidly repeated sound effect more interesting.
These were the last changes and thus we conclude this chapter about working with audio in LibGDX and how to use it in Canyon Bunny.