
In this chapter, you will learn about screen transitions, a technique to create a smooth user experience, while switching from one screen to another over a certain period of time. You will be introduced to a technique known as Render to Texture (RTT) that allows easy composition of two individually rendered screens. Normally, transition effects make use of linear and nonlinear interpolation to create interesting and natural-looking results. LibGDX provides a class that implements a wide variety of common interpolation algorithms, which are suitable not only for transition effects but also for any values that should follow a certain behavior over time.
Moreover, in Chapter 7, Menus and Options, you learned how to create and manage several screens that can be shown and hidden using LibGDX's Game class. We will expand on this idea in this chapter by adding a feature to use transition effects for switching our screens. With reference to our game, Canyon Bunny, we are going to implement three distinct transition effects: fade, slide, and slice.
We need to use an interface that all our screen transitions will implement. This will allow us to easily add new transition effects later on a modular basis.
Create a new file for the ScreenTransition interface and add the following code:
package com.packtpub.libgdx.canyonbunny.screens.transitions;

import com.badlogic.gdx.graphics.Texture;
import com.badlogic.gdx.graphics.g2d.SpriteBatch;

public interface ScreenTransition {
  public float getDuration ();
  public void render (SpriteBatch batch, Texture currScreen,Texture nextScreen, float alpha);
}
The preceding interface allows us to query the duration of a transition effect and enables us to let it render its effect using two supplied textures that contain the images of the current and the next screens. In addition to this, the alpha value is used to describe the current state of progress of the transition effect that is to be rendered. Using an alpha value of 0.0, for example, will render the effect at the very beginning while a value of say, 0.25, will render it when the effect has progressed to 25 percent.
You might wonder why the render() method takes two instances of Texture instead of AbstractGameScreen. This is because, in general, a transition effect should not depend on the contents of the screens that it is working with. Therefore, both the screens, the current and the next one, need to be transformed into two self-contained units. This can be achieved by rendering each screen to its own in-memory texture. This technique is also known as RTT.
OpenGL has a feature called Framebuffer Objects (FBO) that allows this kind of offscreen rendering to textures present in memory. FBOs can be used by instantiating new objects of LibGDX's Framebuffer class.
The following is an example of how FBOs should be used in general:
// ...
Framebuffer fbo;
fbo = new Framebuffer(Format.RGB888, width, height, false);
fbo.begin(); // set render target to FBO's texture buffer
Gdx.gl.glClearColor(0.0f, 0.0f, 0.0f, 1.0f); // solid black
Gdx.gl.glClear(GL20.GL_COLOR_BUFFER_BIT); // clear FBO
batch.draw(someTextureRegion, 0, 0); // draw (to FBO)
fbo.end(); // revert render target back to normal
// retrieve result
Texture fboTexture = fbo.getColorBufferTexture();
// ...
A new FBO is initialized by passing in a format, a width and a height, and a flag indicating whether an attached depth buffer is needed. The passed format and dimensions are used to initialize the FBO's texture that will serve as its render target. The flag for the depth buffer, also referred to as the Z-buffer, enables the sorting of pixels in a three-dimensional space. Since we are creating a game in a two-dimensional space and also have taken care of the rendering order by ourselves, there is no need to enable this buffer, which would just waste precious memory.
As you can see in the preceding code example, rendering to an FBO is just a matter of calling its begin() method to temporarily redirect all subsequent draw calls to the FBO's texture buffer. The rendering to an FBO must always be finished by calling its end() method. Afterwards, the resulting texture can be retrieved by simply calling the getColorBufferTexture() method.
We will now make some mandatory changes to our platform-specific projects wherever needed to enable the OpenGL ES 2.0 mode so that we can use FBOs.
For the Android platform, make the following changes to the AndroidManifest.xml file of the CanyonBunny-android project:
<?xml version="1.0" encoding="utf-8"?>
<manifest
    xmlns:android="http://schemas.android.com/apk/res/android"
    package="com.packtpub.libgdx.canyonbunny"
    android:versionCode="1"
    android:versionName="1.0" >

    <uses-sdk android:minSdkVersion="8" android:targetSdkVersion="19" />
<uses-feature android:glEsVersion="0x00020000" android:required="true" />
    ...
</manifest>
The android:glEsVersion value is used to specify the OpenGL ES version required by the app. To specify OpenGL ES version 2.0, you would set the value as 0x00020000.
For the iOS platform, make the following changes to the Info.plist.xml file of the CanyonBunny-robovm/CanyonBunny-ios project:
<?xml version="1.0" encoding="UTF-8"?>
<!DOCTYPE plist PUBLIC "-//Apple//DTD PLIST 1.0//EN" "http://www.apple.com/DTDs/PropertyList-1.0.dtd">
<plist version="1.0">
<dict>
   ...
   <key>UIRequiredDeviceCapabilities</key>
   <array>
      <string>armv7</string>
      <string>opengles-2</string>
   </array>
   ...
</dict>
</plist>In Chapter 7, Menus and Options, you learned about LibGDX's Game class and used it to manage and switch back and forth between screens. We are now going to build a new class that expands on the idea of the Game class to support screen switching as well as an optional screen transition.
Create a new file for the DirectedGame class and add the following code:
package com.packtpub.libgdx.canyonbunny.screens;

import com.badlogic.gdx.ApplicationListener;
import com.badlogic.gdx.Gdx;
import com.badlogic.gdx.graphics.Pixmap.Format;
import com.badlogic.gdx.graphics.g2d.SpriteBatch;
import com.badlogic.gdx.graphics.glutils.FrameBuffer;
import com.packtpub.libgdx.canyonbunny.screens.transitions
    .ScreenTransition;

public abstract class DirectedGame implements ApplicationListener {
  private boolean init;
  private AbstractGameScreen currScreen;
  private AbstractGameScreen nextScreen;
  private FrameBuffer currFbo;
  private FrameBuffer nextFbo;
  private SpriteBatch batch;
  private float t;
  private ScreenTransition screenTransition;

  public void setScreen (AbstractGameScreen screen) {
    setScreen(screen, null);
  }

  public void setScreen (AbstractGameScreen screen,
      ScreenTransition screenTransition) {
    int w = Gdx.graphics.getWidth();
    int h = Gdx.graphics.getHeight();
    if (!init) {
      currFbo = new FrameBuffer(Format.RGB888, w, h, false);
      nextFbo = new FrameBuffer(Format.RGB888, w, h, false);
      batch = new SpriteBatch();
      init = true;
    }
    // start new transition
    nextScreen = screen;
    nextScreen.show(); // activate next screen
    nextScreen.resize(w, h);
    nextScreen.render(0); // let screen update() once
    if (currScreen != null) currScreen.pause();
    nextScreen.pause();
    Gdx.input.setInputProcessor(null); // disable input
    this.screenTransition = screenTransition;
    t = 0;
  }
}
This new class is meant to work in a similar way to LibGDX's Game class. Therefore, DirectedGame implements the same interface (ApplicationListener) with its corresponding methods as well as the setScreen() method, which we are already using to switch our screens. Actually, there are two variants of this method in this new class: one that allows changing to a new screen with a transition effect and one without any effect similar to the original screen.
The setScreen() method, which takes an instance of ScreenTransition, initializes two FBOs for the current and the next screens on its first call. Then, a new transition is started by storing the next-to-be screen in nextScreen, which in turn is activated and initialized so that it becomes renderable.
Next, add the following code to the same class to implement the render() method of the ApplicationListener interface:
  @Override
  public void render () {
    // get delta time and ensure an upper limit of one 60th second
    float deltaTime = Math.min(Gdx.graphics.getDeltaTime(), 1.0f / 60.0f);
    if (nextScreen == null) {
      // no ongoing transition
      if (currScreen != null) currScreen.render(deltaTime);
    } else {
      // ongoing transition
      float duration = 0;
      if (screenTransition != null)
        duration = screenTransition.getDuration();
      // update progress of ongoing transition
      t = Math.min(t + deltaTime, duration);
      if (screenTransition == null || t >= duration) {
        //no transition effect set or transition has just finished
        if (currScreen != null) currScreen.hide();
        nextScreen.resume();
        // enable input for next screen
        Gdx.input.setInputProcessor(
            nextScreen.getInputProcessor());
        // switch screens
        currScreen = nextScreen;
        nextScreen = null;
        screenTransition = null;
      } else {
        // render screens to FBOs
        currFbo.begin();
        if (currScreen != null) currScreen.render(deltaTime);
        currFbo.end();
        nextFbo.begin();
        nextScreen.render(deltaTime);
        nextFbo.end();
        // render transition effect to screen
        float alpha = t / duration;
        screenTransition.render(batch, currFbo.getColorBufferTexture(), nextFbo.getColorBufferTexture(), alpha);
      }
    }
  }
Notice the call to the next screen's render() method to which the delta time of 0 is passed. This allows the next screen to update its internal state once for initialization purposes. After this, both screens are paused so that they do not make any progress in time as long as the transition effect is not finished. Also, the input processor is set to null to avoid any interference from a potential user input during a running transition. The desired transition effect, if any, is stored in screenTransition for future reference. Finally, the t variable is used to keep a track of the effect's elapsed time and always needs to be reset to 0 to let new transitions start from the beginning.
There are basically two ways in which the render() method works. In the first case, it will simply call the render() method of the currently set screen. This holds true as long as no next screen is set, which implicates no ongoing transition effect. Otherwise, it is assumed that there is an ongoing transition. In this case, t is increased by the current delta time to let the transition effect progress correctly in time. After this, the current and the next screens are rendered to their designated FBOs. Then, the resulting two textures are eventually passed on to the transition effect's render() method to do something fancy with it. Finally, the screens are switched and the input processor is reactivated as soon as the value of t has reached the transition effect's duration. Also, nextScreen is set back to null so that the first way of rendering is used again.
Note
The delta time in the render() method of our new DirectedGame class is constrained to a maximum value of one-sixth of a second to ensure semifixed time steps in all our screens. We will use this from now on to avoid potential time-related problems that may arise from using variable time steps, which we used before.
For a thorough explanation about various time stepping strategies, check out the following article on Glen Fiedler's blog http://gafferongames.com/game-physics/fix-your-timestep/.
After this, add the following code to the same class to implement the remaining parts of the ApplicationListener interface:
  @Override
  public void resize (int width, int height) {
    if (currScreen != null) currScreen.resize(width, height);
    if (nextScreen != null) nextScreen.resize(width, height);
  }

  @Override
  public void pause () {
    if (currScreen != null) currScreen.pause();
  }

  @Override
  public void resume () {
    if (currScreen != null) currScreen.resume();
  }

  @Override
  public void dispose () {
    if (currScreen != null) currScreen.hide();
    if (nextScreen != null) nextScreen.hide();
    if (init) {
      currFbo.dispose();
      currScreen = null;
      nextFbo.dispose();
      nextScreen = null;
      batch.dispose();
      init = false;
    }
  }
The preceding code ensures that the current and the next screens will be informed about the occurring events and that the screens, the sprite batch, and the FBOs will be correctly disposed off when they are no longer needed.
As a last step, we now want to rewire some parts of Canyon Bunny to use the added screen transition capability, which we just implemented. Therefore, we are going to make some minor modifications in those places where we are still using LibGDX's Game class and replace it with our own class, DirectedGame.
Add the following import line to AbstractGameScreen:
import com.badlogic.gdx.InputProcessor;
After this, add the following line to the same class:
public abstract InputProcessor getInputProcessor ();
Next, make the following changes to the same class:
protected DirectedGame game;
     public AbstractGameScreen (DirectedGame game) {
    this.game = game;
  }
These changes introduce a new method called getInputProcessor(),which also needs to be implemented in MenuScreen and GameScreen. This is necessary to allow DirectedGame to route and control the flow of input processing as needed. As mentioned earlier, this will avoid any interference with the user input during a running transition.
Now, add the following import line to CanyonBunnyMain:
import com.packtpub.libgdx.canyonbunny.screens.DirectedGame;
After this, make the following changes to the same class:
public class CanyonBunnyMain extends DirectedGame {
   ...
}
Next, we are going to move on to MenuScreen. Make the following changes to this class:
  public MenuScreen (DirectedGame game) {
    super(game);
  }
After this, add the following code to the same class:
import com.badlogic.gdx.InputProcessor;

  @Override
  public InputProcessor getInputProcessor () {
    return stage;
  }
Finally, remove the line that sets the input processor in show() so that it now looks as follows:
  @Override
  public void show () {
stage = new Stage(new StretchViewport(Constants.VIEWPORT_GUI_WIDTH, Constants.VIEWPORT_GUI_HEIGHT));
    rebuildStage();
  }
Next, we are going to move on to GameScreen. Make the following changes to this class:
  public GameScreen (DirectedGame game) {
    super(game);
  }
After this, add the following code to the same class:
import com.badlogic.gdx.InputProcessor;

  @Override
  public InputProcessor getInputProcessor () {
    return worldController;
  }
Lastly, we are going to move on to WorldController. Add the following import line to this class:
import com.packtpub.libgdx.canyonbunny.screens.DirectedGame;
After this, make the following changes to the same class:
  private DirectedGame game;

  public WorldController (DirectedGame game) {
    this.game = game;
    init();
  }
Finally, remove the line that sets the input processor in init() so that it now looks like this:
  private void init () {
    cameraHelper = new CameraHelper();
    lives = Constants.LIVES_START;
    livesVisual = lives;
    timeLeftGameOverDelay = 0;
    initLevel();
  }
Admittedly, the game code has been subjected to a number of small but important changes, which has led us to having a generic way of handling any kind of screen transition. You might want to test run the game so as to verify that screen switching is still working the same as before.
Now that we have established a generic way to describe and use screen transitions, we can now start to implement the transition effects that we want. However, let's take a quick look at interpolation first as this will greatly improve the overall look and feel of our transition effects.
In Chapter 8, Special Effects, we have already seen an interpolation algorithm called Lerp, which stands for Linear Interpolation. As the name implies, it calculates its interpolated values in an equal stepping from start to end. This works very well for any kind of constant movement. However, if we want to create more complex effects such as acceleration, deceleration, or maybe even both in a combination, we will need to use formulas that express these progressions as nonlinear curves.
Luckily, LibGDX provides an Interpolation class that already implements many useful linear and nonlinear interpolation algorithms so that we can happily skip the math involved and just use it.
Take a look at the following diagram that shows individual graphs of each available interpolation algorithm:
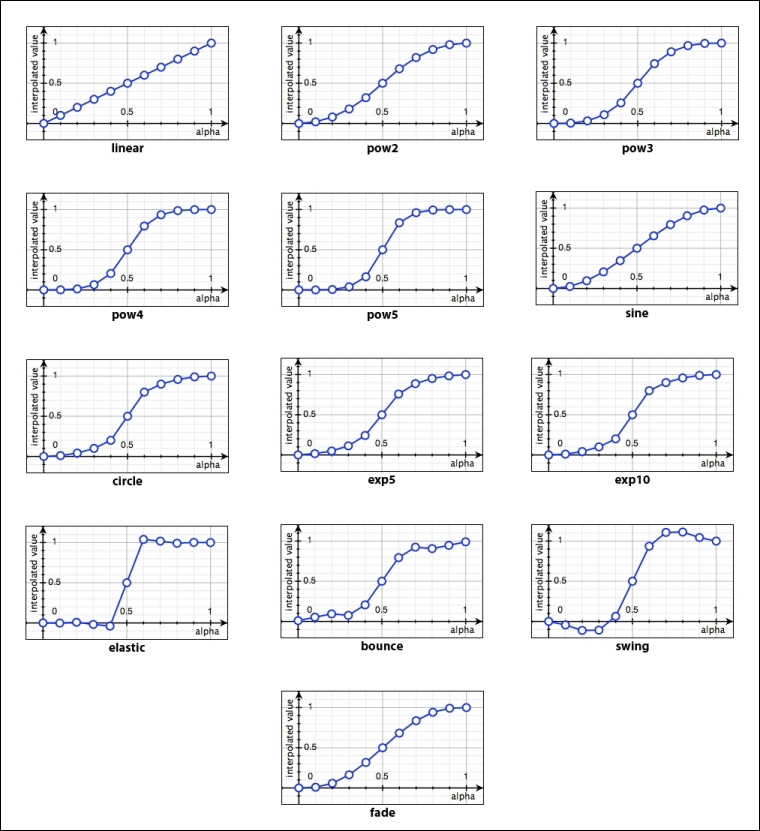
In Layman's terms, what can be seen in each graph is a kind of lookup table. The function of one of these algorithms takes the alpha value (x axis) as its input and outputs the corresponding interpolated value (y axis). The actual output simply depends on the algorithm's curve and what alpha value is used. The label below each graph also denotes the name of the method, which you will find in Interpolation. Also, note that each algorithm reverses its effect at an alpha value of 0.5. There are variants of each method for an algorithm in case you may want to apply a certain effect on the first half (alpha from 0.0 to 0.5) or on the second one (alpha from 0.5 to 1.0) only. This can be achieved using the In or Out suffix, respectively, such as fadeIn, pow4In, and swingOut.
The basic usage of Interpolation looks as follows:
float alpha = 0.25f;
float interpolatedValue = Interpolation.elastic.apply(alpha);
This code example finds the interpolated value (y axis) for a given alpha value (x axis) of 0.25 using the elastic algorithm. Remember, the alpha value can also be interpreted as progress (here, 25 percent) of the overall effect.
With this in mind, we will now start to implement three distinct effects, namely fade, slide, and slice.
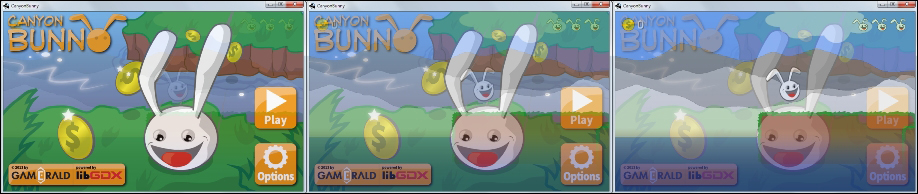
We will now create a fade transition effect that we will use to switch from the menu screen to the game screen. In this effect, the next screen overlays the current screen while gradually increasing the next screen's opacity. The opacity will start at 0 percent (fully translucent) and end at 100 percent (fully opaque).
The following sequence of screenshots shows this effect:
Now, create a new file for the ScreenTransitionFade class and add the following code:
package com.packtpub.libgdx.canyonbunny.screens.transitions;

import com.badlogic.gdx.Gdx;

import com.badlogic.gdx.graphics.GL20;
import com.badlogic.gdx.graphics.Texture;
import com.badlogic.gdx.graphics.g2d.SpriteBatch;
import com.badlogic.gdx.math.Interpolation;

public class ScreenTransitionFade implements ScreenTransition {
  private static final ScreenTransitionFade instance =
      new ScreenTransitionFade();

  private float duration;

  public static ScreenTransitionFade init (float duration) {
    instance.duration = duration;
    return instance;
  }

  @Override
  public float getDuration () {
    return duration;
  }

  @Override
  public void render (SpriteBatch batch, Texture currScreen,
      Texture nextScreen, float alpha) {
    float w = currScreen.getWidth();
    float h = currScreen.getHeight();
    alpha = Interpolation.fade.apply(alpha);

    Gdx.gl.glClearColor(0.0f, 0.0f, 0.0f, 1.0f);
    Gdx.gl.glClear(GL20.GL_COLOR_BUFFER_BIT);

    batch.begin();
    batch.setColor(1, 1, 1, 1);
    batch.draw(currScreen, 0, 0, 0, 0, w, h, 1, 1, 0, 0, 0,
        currScreen.getWidth(), currScreen.getHeight(),
        false, true);
    batch.setColor(1, 1, 1, alpha);
    batch.draw(nextScreen, 0, 0, 0, 0, w, h, 1, 1, 0, 0, 0,
        nextScreen.getWidth(), nextScreen.getHeight(),
        false, true);
    batch.end();
  }
}
First of all, notice how we were able to tuck away the render logic of our new transition effect in such a nice and compact manner. The ScreenTransitionFade class is built as a singleton so that it can be easily accessed from anywhere in the code without having to create and keep multiple instances of it. The init() method should be called before it is used. It takes one argument to define the duration of the effect. The render() method uses both the supplied textures to create the desired effect. It is achieved by first clearing the screen, followed by drawing the current screen's texture, and lastly by drawing the next screen's texture on top of the other. However, prior to the draw call of the next screen, we also change the drawing color. It is set to full white, and the alpha channel, which controls the opacity for each of the following draw calls, is set to alpha. The alpha variable contains the interpolated value where we have chosen to use the fade algorithm.
Finally, let the menu screen use the fade transition effect when the player clicks on the Play button. Add the following import lines to the MenuScreen class:
import com.packtpub.libgdx.canyonbunny.screens.transitions
    .ScreenTransition;
import com.packtpub.libgdx.canyonbunny.screens.transitions
    .ScreenTransitionFade;
After this, make the following changes to the same class:
  private void onPlayClicked () {
    ScreenTransition transition = ScreenTransitionFade.init(0.75f);
    game.setScreen(new GameScreen(game), transition);
  }
With these changes, the transition from the menu screen to the game screen will last for 0.75 seconds or 750 milliseconds until finished. You can start the game now and watch the transition live in action. Change the transition's duration to either slow down or speed up the effect.
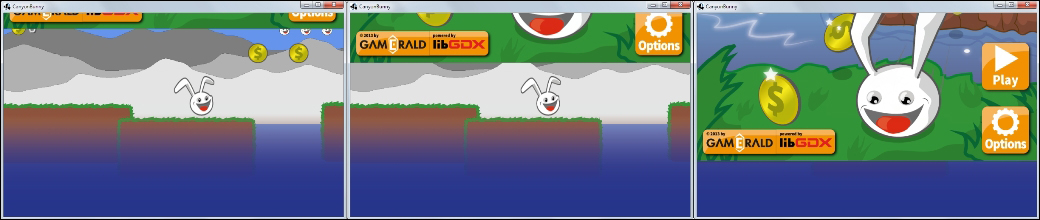
We will now create a slide transition effect that we will use to switch from the game screen to the menu screen. In this effect, the next screen slides in from the top edge and moves downwards until it is entirely visible.
The following sequence of screenshots illustrates this effect:
Now, create a new file for the ScreenTransitionSlide class and add the following code:
package com.packtpub.libgdx.canyonbunny.screens.transitions;

import com.badlogic.gdx.Gdx;

import com.badlogic.gdx.graphics.GL20;
import com.badlogic.gdx.graphics.Texture;
import com.badlogic.gdx.graphics.g2d.SpriteBatch;
import com.badlogic.gdx.math.Interpolation;

public class ScreenTransitionSlide implements ScreenTransition {
  public static final int LEFT = 1;
  public static final int RIGHT = 2;
  public static final int UP = 3;
  public static final int DOWN = 4;

  private static final ScreenTransitionSlide instance = new ScreenTransitionSlide();

  private float duration;
  private int direction;
  private boolean slideOut;
  private Interpolation easing;

  public static ScreenTransitionSlide init (float duration, int direction, boolean slideOut, Interpolation easing) {
    instance.duration = duration;
    instance.direction = direction;
    instance.slideOut = slideOut;
    instance.easing = easing;
    return instance;
  }
  @Override
  public float getDuration () {
    return duration;
  }
}
The second transition effect is implemented in the same way as we did for "fade" as a singleton class. As you will see in a moment, this class is a little bit heavier because it not only allows sliding in another screen from the top edge, but also allows you to slide out the current screen to define the direction of movement. The init() method allows you to specify all these settings and also takes an interpolation algorithm that should be used.
Next, add the following code to the same class to implement the render() method of the ScreenTransition interface:
  @Override
  public void render (SpriteBatch batch, Texture currScreen,
      Texture nextScreen, float alpha) {
    float w = currScreen.getWidth();
    float h = currScreen.getHeight();
    float x = 0;
    float y = 0;
    if (easing != null) alpha = easing.apply(alpha);

    // calculate position offset
    switch (direction) {
    case LEFT:
      x = -w * alpha;
      if (!slideOut) x += w;
      break;
    case RIGHT:
      x = w * alpha;
      if (!slideOut) x -= w;
      break;
    case UP:
      y = h * alpha;
      if (!slideOut) y -= h;
      break;
    case DOWN:
      y = -h * alpha;
      if (!slideOut) y += h;
      break;
    }
    // drawing order depends on slide type ('in' or 'out')
    Texture texBottom = slideOut ? nextScreen : currScreen;
    Texture texTop = slideOut ? currScreen : nextScreen;

    // finally, draw both screens
    Gdx.gl.glClearColor(0.0f, 0.0f, 0.0f, 1.0f);

    Gdx.gl.glClear(GL20.GL_COLOR_BUFFER_BIT);

    batch.begin();
    batch.draw(texBottom, 0, 0, 0, 0, w, h, 1, 1, 0, 0, 0,
        currScreen.getWidth(), currScreen.getHeight(), false, true);
    batch.draw(texTop, x, y, 0, 0, w, h, 1, 1, 0, 0, 0, nextScreen.getWidth(), nextScreen.getHeight(), false, true);
    batch.end();
  }
The render() method of this transition effect calculates the drawing order and position offsets for the current and the next screens using the direction, slideOut, and alpha variables. The value in alpha might be altered before it is used for calculations if an interpolation algorithm is set.
Finally, let the game screen use the slide transition effect when it wants to go back to the menu screen. Add the following import lines to the WorldController class:
import com.badlogic.gdx.math.Interpolation;
import com.packtpub.libgdx.canyonbunny.screens.transitions
    .ScreenTransition;
import com.packtpub.libgdx.canyonbunny.screens.transitions
    .ScreenTransitionSlide;
After this, make the following changes to the same class:
  private void backToMenu () {
    // switch to menu screen
    ScreenTransition transition = ScreenTransitionSlide.init(0.75f,
        ScreenTransitionSlide.DOWN, false, Interpolation.bounceOut);
    game.setScreen(new MenuScreen(game), transition);
  }
It is highly recommended to take some time and play around with the constants for UP, DOWN, LEFT, and RIGHT, as well as to try different combinations of interpolation algorithms either doing a slide-in or slide-out movement.
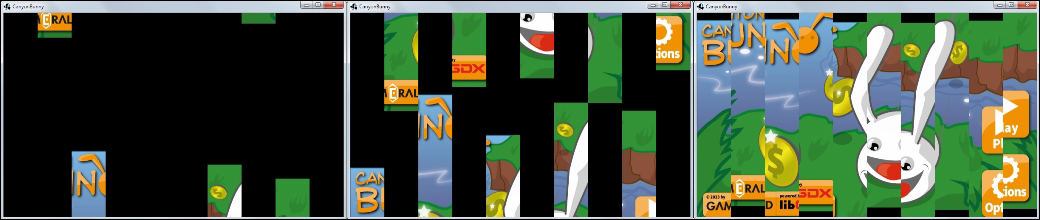
We will now create a slice transition effect that we will use at the start of the game. As you will see in a moment, we can also start a transition without a current screen to another (first) one, which is exactly what we are going to do when the game starts. In this effect, the next screen is cut in a number of vertical slices. These slices are then vertically moved off the screen to their respective starting positions. The starting position alternates between the top and bottom edges. Finally, each slice is moved in and over the current screen until it is entirely visible.
The following sequence of screenshots illustrates this effect:
Now, create a new file for the ScreenTransitionSlice class and add the following code:
package com.packtpub.libgdx.canyonbunny.screens.transitions;

import com.badlogic.gdx.Gdx;
import com.badlogic.gdx.graphics.GL20;
import com.badlogic.gdx.graphics.Texture;
import com.badlogic.gdx.graphics.g2d.SpriteBatch;
import com.badlogic.gdx.math.Interpolation;
import com.badlogic.gdx.utils.Array;

public class ScreenTransitionSlice implements ScreenTransition {
  public static final int UP = 1;
  public static final int DOWN = 2;
  public static final int UP_DOWN = 3;

  private static final ScreenTransitionSlice instance = new ScreenTransitionSlice();

  private float duration;
  private int direction;
  private Interpolation easing;
  private Array<Integer> sliceIndex = new Array<Integer>();
  public static ScreenTransitionSlice init (float duration, int direction, int numSlices, Interpolation easing) {
    instance.duration = duration;
    instance.direction = direction;
    instance.easing = easing;
    // create shuffled list of slice indices which determines
    // the order of slice animation
    instance.sliceIndex.clear();
    for (int i = 0; i < numSlices; i++)
      instance.sliceIndex.add(i);
    instance.sliceIndex.shuffle();
    return instance;
  }

  @Override
  public float getDuration () {
    return duration;
  }

  @Override
  public void render (SpriteBatch batch, Texture currScreen,
      Texture nextScreen, float alpha) {
    float w = currScreen.getWidth();
    float h = currScreen.getHeight();
    float x = 0;
    float y = 0;
    int sliceWidth = (int)(w / sliceIndex.size);

    Gdx.gl.glClearColor(0.0f, 0.0f, 0.0f, 1.0f);
    Gdx.gl.glClear(GL20.GL_COLOR_BUFFER_BIT);
    batch.begin();
    batch.draw(currScreen, 0, 0, 0, 0, w, h, 1, 1, 0, 0, 0, currScreen.getWidth(), currScreen.getHeight(), false, true);
    if (easing != null) alpha = easing.apply(alpha);
    for (int i = 0; i < sliceIndex.size; i++) {
      // current slice/column
      x = i * sliceWidth;
      // vertical displacement using randomized
      // list of slice indices
      float offsetY = h * (1 + sliceIndex.get(i)
                           / (float)sliceIndex.size);
      switch (direction) {
      case UP:
        y = -offsetY + offsetY * alpha;
        break;
      case DOWN:
        y = offsetY - offsetY * alpha;
        break;
      case UP_DOWN:
        if (i % 2 == 0) {
          y = -offsetY + offsetY * alpha;
        } else {
          y = offsetY - offsetY * alpha;
        }
        break;
      }
      batch.draw(nextScreen, x, y, 0, 0, sliceWidth, h, 1, 1, 0,
          i * sliceWidth, 0, sliceWidth, nextScreen.getHeight(),
          false, true);
    }
    batch.end();
  }
}
The effect builds a random list of indices for each slice. The randomization is used to create a small vertical displacement for the slices so that they arrive at their target location at different times.
Finally, let the main class of Canyon Bunny use the slice transition effect when the game is started. Add the following import lines to the CanyonBunnyMain class:
import com.badlogic.gdx.math.Interpolation;
import com.packtpub.libgdx.canyonbunny.screens.transitions
    .ScreenTransition;
import com.packtpub.libgdx.canyonbunny.screens.transitions
    .ScreenTransitionSlice;
After this, make the following changes to the same class:
  @Override
  public void create () {
    // Set Libgdx log level
    Gdx.app.setLogLevel(Application.LOG_DEBUG);

    // Load assets
    Assets.instance.init(new AssetManager());

    // Start game at menu screen
    ScreenTransition transition = ScreenTransitionSlice.init(2, ScreenTransitionSlice.UP_DOWN, 10, Interpolation.pow5Out);
    setScreen(new MenuScreen(this), transition);
  }