
In this chapter, we will take a look at Box2D—a physics engine to simulate realistic-looking physics of the objects in 2D space. After we cover the basics of how to use Box2D, we will move on and create a little physics simulation that is going to be triggered at the end of the level. For this to work, we will also need to add a new level object that represents the level's end.
Next, we will look at the topic of shader programs. Shaders, in general, are simple programs that are executed on the Graphics Processing Unit (GPU). We will create our own shader program consisting of a vertex and a fragment shader to achieve a simple monochrome filter effect.
Physics engines, such as Box2D and programming shaders, are very complex topics. Each deserves at least one book on their own to get hold of their gist. Nonetheless, this chapter is meant to give you the first push in the right direction on how to approach these broad topics.
Today's smartphones have an integrated accelerometer. This can be used to detect the spatial position of the device, which is delivered by the accelerometer as one value for each of the three axes. We will query the accelerometer hardware and use the read values to translate them into the player movement in Canyon Bunny.
In this chapter, we will cover the following topics:
- 2D physics using Box2D
- Shader programs
- Use accelerometer as an alternate input method to move the bunny head
Box2D was created by Erin Catto and is an open source physics engine to simulate rigid bodies in 2D space. It is written in a platform-independent C++ code that has encouraged ports to several frameworks, game engines, and programming languages in general.
You should check out at least one of these popular games if you have never seen Box2D in action before: Angry Birds, Limbo, Tiny Wings, and Crayon Physics Deluxe.
LibGDX integrates Box2D, which is similar to other frameworks, through a thin wrapper API that is congruent with Box2D's original API. This approach makes it pleasantly easy to transfer existing knowledge about Box2D by following tutorials and examples that are not based on LibGDX, and of course, using the official Box2D manual.

For more information, you can check out the official website of Box2D at http://www.box2d.org/.
Also check out the LibGDX's Box2D wiki at https://github.com/libgdx/libgdx/wiki/Box2d/.
For Box2D tutorials, you can check out the following websites:
We will now shed some light on the basic ideas behind Box2D, and find out how it allows us to define virtual worlds that can be used to simulate believable physics with rigid bodies.
First of all, let's clarify what this seemingly mysterious term rigid body means. A body, in the sense of physics, is just a collection of matter with some attributes assigned to it, such as its position and orientation. It is what we usually call an object in our real world. Now, a so-called rigid body describes an idealized body that is assumed to be solid and thus incapable of being deformed by the exerting forces. From now on, we will use the shorter term, body, for brevity since Box2D has only the support for rigid bodies anyway.
Note
LibGDX also integrates a second open source physics engine named Bullet. In contrast to Box2D, which is limited to 2D space and rigid body support only, Bullet features a full-fledged 3D physics simulation as well as support for both rigid and soft bodies. However, we will solely focus on Box2D in this chapter as 3D physics is an even more advanced topic.
In addition to the (2D) position and orientation attributes, a body also has the following features:
- A mass given in kilograms
- A velocity (directed speed) given in meters per second (m/s)
- An angular velocity (rotational speed) given in radian per second (rad/s).
There are three different body types to choose from. They are as follows:
- Static: This is a stationary body. It does not collide with other static or kinematic bodies. It is useful for floors, walls, non-moving platforms, and so on.
- Kinematic: This is a movable body. The position can be manually updated or changed according to its velocity, which is the preferred and more reliable method. Kinematic bodies do not collide with other static or kinematic bodies. They are useful for moving platforms (for example, elevators), reflecting dynamic bodies, and so on.
- Dynamic: This is a movable body. The position can be manually updated or changed according to forces, which is the preferred and more reliable method. Dynamic bodies can collide with all body types. It is useful for players, enemies, items, and so on.
Note
In a real-world scenario, humans and other movable items are always dynamic, and they collide with others. However, the ones that do not move such as trees, house, floor, and so on are classified as static; they won't go toward the dynamic objects but the dynamic objects can come and collide with them. Kinematic objects are those that don't respond to force; they would move in a predefined path according to a set velocity. An elevator would be a good example.
Shapes describe the 2D objects in a geometrical way using radiuses for circles, widths and heights for rectangles, or a certain number of points (also vertices) for more complex shapes using polygons. So, these shapes define areas that can be tested for collisions with other shapes later on. For more information about creating polygon shapes, see the Box2D manual, 4.4 Polygon Shapes.
A fixture uses exactly one shape to which it adds material properties, such as density, friction, and restitution. The shape defined in a fixture is then attached to a body by adding the fixture to it. So, it plays an important role in how bodies interact with each other. For more information about using fixtures, see the Box2D manual, 6.2 Fixture Creation.
The world is the virtual sandbox inside which the physics simulation takes place. Each body, including its fixture and shape, needs to be inserted into the world to be included in the simulation.
Box2D is a very feature-rich engine and thus contains a lot more features, such as Constraints, Joints, Sensors, and Contact Listener just to name a few, but which are not in the scope of this chapter.
For more in-depth information, consult the official manual of Box2D at http://www.box2d.org/manual.pdf.
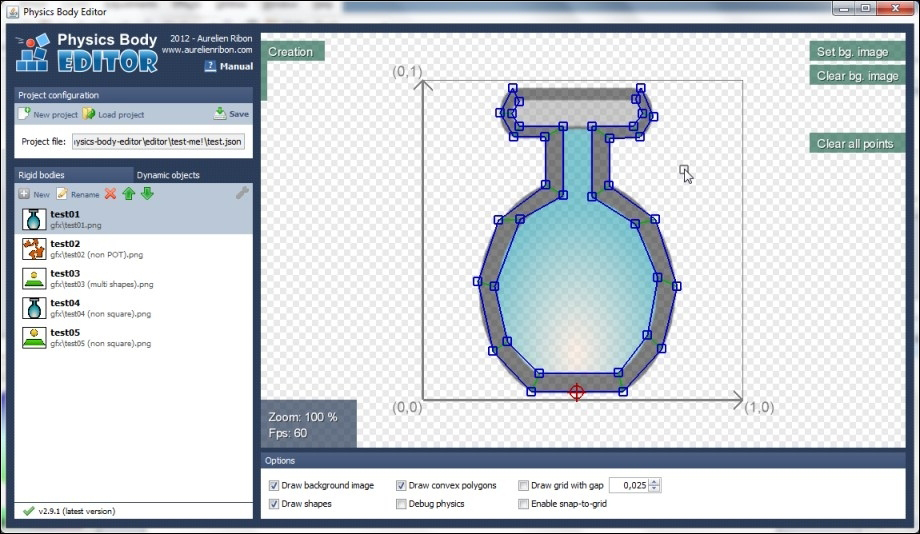
The creation of bodies for images with complex shapes can be a very time-consuming task. The Physics Body Editor, created by Aurélien Ribon, lets you build bodies in a graphical editor and comes with many useful features, such as decomposition of concave shapes into convex polygons, tracing outlines of images, and a built-in collision tester.
Check out the official project website at https://code.google.com/p/box2d-editor/. A screenshot from the project's website that shows the editor in action is as follows:
From LibGDX 1.0.0 onward, Box2D is separated from gdx.jar and moved to a new extension. However, if you are using the Gradle-based setup tool, you can simply check the Box2D box and generate your project.
Wait a minute, we have not yet added Box2D at project creation, and so now we have to add it manually. Everything in a Gradle-based project is managed by build.gradle in the project root. Go to the C:/libgdx folder and open the build.gradle file with a text editor such as Notepad or WordPad.
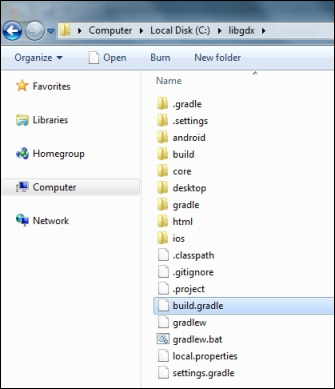
Next, add the lines of code, given in the following section, to the build.gradle to add Box2D dependency to our project:
- To add the desktop dependency, use this:
project(":desktop") { apply plugin: "java" dependencies { compile project(":core") compile "com.badlogicgames.gdx:gdx-backend-lwjgl:$gdxVersion" compile "com.badlogicgames.gdx:gdx-platform:$gdxVersion:natives-desktop" compile "com.badlogicgames.gdx:gdx-box2d-platform:$gdxVersion:natives-desktop" compile "com.badlogicgames.gdx:gdx-tools:$gdxVersion" } } - To add the Android dependency, use this:
project(":android") { apply plugin: "android" configurations { natives } dependencies { compile project(":core") compile "com.badlogicgames.gdx:gdx-backend-android:$gdxVersion" natives "com.badlogicgames.gdx:gdx-platform:$gdxVersion:natives-armeabi" natives "com.badlogicgames.gdx:gdx-platform:$gdxVersion:natives-armeabi-v7a" natives "com.badlogicgames.gdx:gdx-platform:$gdxVersion:natives-x86" compile "com.badlogicgames.gdx:gdx-box2d:$gdxVersion" natives "com.badlogicgames.gdx:gdx-box2d-platform:$gdxVersion:natives-armeabi" natives "com.badlogicgames.gdx:gdx-box2d-platform:$gdxVersion:natives-armeabi-v7a" natives "com.badlogicgames.gdx:gdx-box2d-platform:$gdxVersion:natives-x86" } } - To add the iOS dependency, use this:
project(":ios") { apply plugin: "java" apply plugin: "robovm" configurations { natives } dependencies { compile project(":core") compile "org.robovm:robovm-rt:${roboVMVersion}" compile "org.robovm:robovm-cocoatouch:${roboVMVersion}" compile "com.badlogicgames.gdx:gdx-backend-robovm:$gdxVersion" natives "com.badlogicgames.gdx:gdx-platform:$gdxVersion:natives-ios" natives "com.badlogicgames.gdx:gdx-box2d-platform:$gdxVersion:natives-ios" } } - To add the HTML dependency, use this:
project(":html") { apply plugin: "gwt" apply plugin: "war" dependencies { compile project(":core") compile "com.badlogicgames.gdx:gdx-backend-gwt:$gdxVersion" compile "com.badlogicgames.gdx:gdx:$gdxVersion:sources" compile "com.badlogicgames.gdx:gdx-backend-gwt:$gdxVersion:sources" compile "com.badlogicgames.gdx:gdx-box2d:$gdxVersion:sources" compile "com.badlogicgames.gdx:gdx-box2d-gwt:$gdxVersion:sources" } } - To add the core dependency, use this:
project(":core") {
apply plugin: "java"
dependencies {
compile "com.badlogicgames.gdx:gdx:$gdxVersion"
compile "com.badlogicgames.gdx:gdx-box2d:$gdxVersion"
    }
}
Now, refresh all dependencies. To do this, select all the five projects in the package explorer and then right-click on the Refresh Dependencies option in the Gradle menu.
Now for the folks who used the old LibGDX project generation method (gdx-setup-ui.jar), you have to copy the JAR files into the libs folder in the respective projects and add them to build path. The JAR files can be found in libgdx-1.2.0, downloaded earlier in Chapter 1, Introduction to LibGDX and Project Setup. To do this, follow these steps:
- Copy
gdx-box2d.jarto theCanyonBunnyproject. - Copy
gdx-box2d-native.jarto theCanyonBunny-desktopproject. - Copy
libgdx-box2d.sofromarmeabi,armeabi-v7a, andx86to the corresponding subfolders inside thelibsfolder in theCanyonBunny-androidproject. - Copy
gdx-box2d-gwt.jarandgdx-box2d-gwt-sources.jarto thelibsubfolder under thewarfolder in theCanyonBunny-htmlproject folder. - You will also need to add
<inherits name='com.badlogic.gdx.physics.box2d.box2d-gwt' />to yourGwtDefinition.gwt.xmlfile. - Copy
libgdx-box2d.ato thelibs/iosfolder in theCanyonBunny-robovmproject, and update therobovm.xmlfile as follows:<libs> <lib>libs/ios/libgdx.a</lib> <lib>libs/ios/libObjectAL.a</lib> <lib>libs/ios/libgdx-box2d.a</lib> </libs> - Now to add the JAR files to build the path, simply right-click on the newly added JAR files in each project and go to the Add to build path option in the Build Path menu.
Now, it's all set. Let's check the weather for raining carrots.
What, raining carrots? Absolutely! We are going to add two new game objects to Canyon Bunny. One will act as the end point or goal of a level, while the other is a regular carrot that we will use later in our physics simulation. To be able to place the goal game object in our level, we will also have to make some minor changes to the level image and level loader.
So, a screenshot to give you a better impression of what we are aiming for, while we are working on it step by step, is as follows:
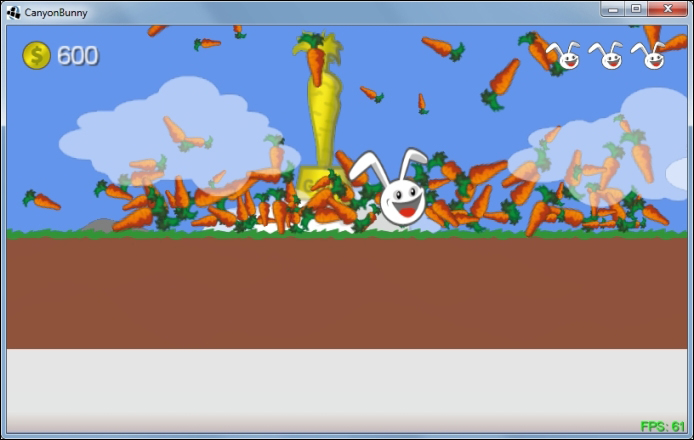
In the preceding screenshot, you can see the running physics simulation of raining carrots, which is kicked off as soon as the player character passes the goal (golden carrot statue). Lots of carrots will fall down from the sky, nicely bounce off the ground, and eventually pile up on each other.
Firstly, copy the two new images carrot.png and goal.png to CanyonBunny-desktop/assets-raw/images/. Also, do not forget to rebuild your texture atlas. After this, let's add them to our global assets class for easier access.
Add the following lines to the inner class AssetLevelDecoration of the Assets class:
public final AtlasRegion carrot;
public final AtlasRegion goal;
Next, make the following changes to the same (inner) class so that the new images will become available for later use:
public AssetLevelDecoration (TextureAtlas atlas) {
waterOverlay = atlas.findRegion("water_overlay");
carrot = atlas.findRegion("carrot");
goal = atlas.findRegion("goal");
}The carrot is just a normal game object like any other, as shown here, that we have created for Canyon Bunny so far:
Create a new file for the Carrot class and add the following code:
package com.packtpub.libgdx.canyonbunny.game.objects;

import com.badlogic.gdx.graphics.g2d.SpriteBatch;
import com.badlogic.gdx.graphics.g2d.TextureRegion;
import com.packtpub.libgdx.canyonbunny.game.Assets;

public class Carrot extends AbstractGameObject {
private TextureRegion regCarrot;

public Carrot () {
init();
  }

private void init () {
dimension.set(0.25f, 0.5f);

regCarrot = Assets.instance.levelDecoration.carrot;

    // Set bounding box for collision detection
bounds.set(0, 0, dimension.x, dimension.y);
origin.set(dimension.x / 2, dimension.y / 2);
  }
public void render (SpriteBatch batch) {
TextureRegion reg = null;

reg = regCarrot;
batch.draw(reg.getTexture(), position.x - origin.x, position.y - origin.y, origin.x, origin.y, dimension.x, dimension.y, scale.x, scale.y, rotation, reg.getRegionX(), reg.getRegionY(), reg.getRegionWidth(), reg.getRegionHeight(), false, false);
  }
}The following goal game object will be used to mark the end of a level:

Create a new file for the Goal class and add the following code:
package com.packtpub.libgdx.canyonbunny.game.objects;

import com.badlogic.gdx.graphics.g2d.SpriteBatch;
import com.badlogic.gdx.graphics.g2d.TextureRegion;
import com.packtpub.libgdx.canyonbunny.game.Assets;

public class Goal extends AbstractGameObject {
private TextureRegion regGoal;

public Goal () {
init();
  }

private void init () {
dimension.set(3.0f, 3.0f);
regGoal = Assets.instance.levelDecoration.goal;

    // Set bounding box for collision detection
bounds.set(1, Float.MIN_VALUE, 10, Float.MAX_VALUE);
origin.set(dimension.x / 2.0f, 0.0f);
  }

public void render (SpriteBatch batch) {
TextureRegion reg = null;

reg = regGoal;
batch.draw(reg.getTexture(), position.x - origin.x, position.y - origin.y, origin.x, origin.y, dimension.x, dimension.y, scale.x, scale.y, rotation, reg.getRegionX(), reg.getRegionY(), reg.getRegionWidth(), reg.getRegionHeight(), false, false);
  }
}
There is one specialty about this game object that is important enough to be mentioned. We have set the bounds of the goal to values that make it almost infinitely tall in relation to other objects in the game world. This ensures that the player character will always collide with the goal and trigger the corresponding event.
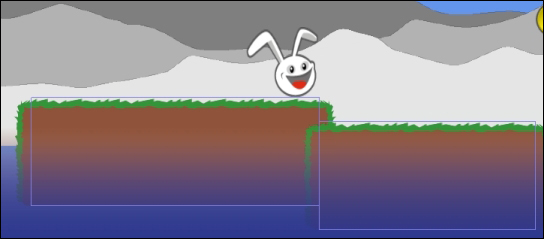
The next step is to include the goal game object in the level image. Remember that each pixel color represents a certain game object in the world of Canyon Bunny. For the goal game object, we choose red as the pixel color (R=255, G=0, B=0).
Add the new red pixel marked as Goal to the level image. Use the following screenshot for reference:
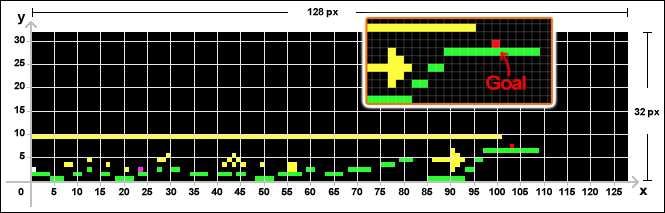
Obviously, the goal should be placed at the far right-hand side to make it harder to reach for the player. In our example level, this is the elongated platform right after the arrow that is made out of gold coins.
Now, we need to tell the level loader about the new pixel and game object to let it handle correctly.
Add the following import lines to the Level class:
import com.packtpub.libgdx.canyonbunny.game.objects.Carrot;
import com.packtpub.libgdx.canyonbunny.game.objects.Goal;
After this, add the following code to the same class:
public Array<Carrot> carrots;
public Goal goal;
Furthermore, add the following constant to the BLOCK_TYPE enumeration that defines the goal's red pixel color:
GOAL(255, 0, 0), // red
Next, make the following changes to the init() method in which we want to initialize a new array for the carrot game objects, and create a new goal game object if the corresponding pixel color was found in the level image:
private void init (String filename) {

  // objects
rocks = new Array<Rock>();
goldcoins = new Array<GoldCoin>();
feathers = new Array<Feather>();
carrots = new Array<Carrot>();

  // load image file that represents the level data
Pixmap pixmap = new Pixmap(Gdx.files.internal(filename));
  // scan pixels from top-left to bottom-right
int lastPixel = -1;
for (int pixelY = 0; pixelY<pixmap.getHeight(); pixelY++) {
for (int pixelX = 0; pixelX<pixmap.getWidth(); pixelX++) {

      // gold coin
else if
      (BLOCK_TYPE.ITEM_GOLD_COIN.sameColor(currentPixel)) {
          ...
        }
      // goal
else if (BLOCK_TYPE.GOAL.sameColor(currentPixel)) {
obj = new Goal();
offsetHeight = -7.0f;
obj.position.set(pixelX, baseHeight + offsetHeight);
goal = (Goal)obj;
        }
      // unknown object/pixel color
else {

        }
lastPixel = currentPixel;
      }
    }
  }
Finally, make the following changes to the update() and render() methods in the same class to let each carrot update correctly as well as render the goal and the carrot game objects in the right order on the screen, as follows:
public void update (float deltaTime) {
  // Feathers
for (Feather feather : feathers)
feather.update(deltaTime);
for (Carrot carrot : carrots)
carrot. Update(deltaTime);
  // Clouds
clouds.update(deltaTime);
  }

public void render (SpriteBatch batch) {
  // Draw Mountains
mountains.render(batch);
  // Draw Goal
goal.render(batch);
  // Draw Rocks
for (Rock rock : rocks)
rock.render(batch);

for (Feather feather : feathers)
feather.render(batch);
  // Draw Carrots
for (Carrot carrot : carrots)
carrot.render(batch);
  // Draw Player Character
bunnyHead.render(batch);
  }
You may want to run the game now and verify that the goal game object is visible at the end of the level. However, nothing will happen when the player character passes it. We will address the implementation details for the event handling and physics simulation next.
We will now focus on the implementation details, where we actually make use of Box2D in Canyon Bunny. Remember that we have created our own simple physics simulation for the game objects before. We do not want to replace this implementation but in fact allow the use of either one of them as it suits our needs. In other words, we want to keep the existing implementation that is doing collision detection and physics for the game objects, and just add a coexisting alternative that uses Box2D.
Add the following import line to the AbstractGameObject class:
import com.badlogic.gdx.physics.box2d.Body;
After this, add the following line to the same class:
public Body body;
The (rigid) Body class directly relates to what we have discussed at the beginning of this chapter. Next, make the following changes to the update() method in the same class:
public void update (float deltaTime) {
if (body == null) {
updateMotionX(deltaTime);
updateMotionY(deltaTime);

    // Move to the new position
position.x += velocity.x * deltaTime;
position.y += velocity.y * deltaTime;
    } else {
position.set(body.getPosition());
rotation = body.getAngle() * MathUtils.radiansToDegrees;
    }
  }
The idea here is that each game object will be using our simple physics as long as there is no Box2D body defined in the body variable. Otherwise, the current position and angle of rotation is simply taken from the body and applied to the game object to reflect the state of Box2D's calculations. In conclusion, this means that we have given full control to Box2D over the movement parameters for these game objects.
Next, add the following import lines to the WorldController class:
import com.badlogic.gdx.math.MathUtils;
import com.badlogic.gdx.math.Vector2;
import com.badlogic.gdx.physics.box2d.Body;
import com.badlogic.gdx.physics.box2d.BodyDef;
import com.badlogic.gdx.physics.box2d.BodyDef.BodyType;
import com.badlogic.gdx.physics.box2d.FixtureDef;
import com.badlogic.gdx.physics.box2d.PolygonShape;
import com.badlogic.gdx.physics.box2d.World;
import com.packtpub.libgdx.canyonbunny.game.objects.Carrot;
Then, add the following lines of code to the same class:
private boolean goalReached;
public World b2world;

private void initPhysics () {
if (b2world != null) b2world.dispose();
  b2world = new World(new Vector2(0, -9.81f), true);
  // Rocks
  Vector2 origin = new Vector2();
for (Rock rock : level.rocks) {
BodyDef bodyDef = new BodyDef();
bodyDef.type = BodyType.KinematicBody;
bodyDef.position.set(rock.position);
    Body body = b2world.createBody(bodyDef);
rock.body = body;
PolygonShape polygonShape = new PolygonShape();
origin.x = rock.bounds.width / 2.0f;
origin.y = rock.bounds.height / 2.0f;
polygonShape.setAsBox(rock.bounds.width / 2.0f, rock.bounds.height / 2.0f, origin, 0);
FixtureDef fixtureDef = new FixtureDef();
fixtureDef.shape = polygonShape;
body.createFixture(fixtureDef);
polygonShape.dispose();
    }
  }
The goalReached variable is used to keep track of the game's state whether or not the player has already managed to reach the goal. The World class directly relates to the description at the beginning of this chapter. In the initPhysics() method, we create a new instance of World, and store it in the b2world variable for later reference. The constructor of World takes an instance of Vector2 for the world's simulated gravity, and a second parameter that controls the weather bodies in Box2D can become inactive. Usually, this flag should be enabled to reduce the CPU load and in particular to preserve some battery power on mobile devices. In our case, we create a world with gravity, pulling down objects at 9.81 meters per second squared, which is the same acceleration that we experience on earth.
After the Box2D world is created, we loop through the level's list of rocks, and create the corresponding Box2D bodies that are mapped to the same position and size as defined in the loaded level. Thus, both worlds, the Box2D one and our level, will start in a synchronized model state for each rock. Creating bodies for the rocks is a necessary step because Box2D will have to take each rock into account in its calculations. Otherwise, the carrot game objects will fall through everything in the level because there simply is nothing to collide with from Box2D's point of view.
Box2D requires you to use separate definition classes to create new instances of Body and Fixture, which are named BodyDef and FixtureDef, respectively. The instance in the bodyDef variable is configured to describe a kinematic body type whose initial position is set to the same position as the rock instance. After this, we call the createBody() method of b2world and pass in the body definition to create and add the new body at once. The method returns the reference of the newly created body, which is then stored in the rock instance to activate the Box2D physics handling, according to the changes we just made in our update() method of AbstractGameObject.
The created body also needs a shape to allow interaction with other bodies. So, we create a shape using the PolygonShape class and call its setAsBox() helper method to define a rectangle. Shapes cannot be directly attached to bodies; thus, we create a new instance of the Fixture class, bind our shape to it, and eventually attach the fixture to the body of the rock by calling the createFixture() method of the body instance. Now, the shape is no longer needed as its information has been processed in the new fixture. This is why we can safely call the dispose() method on the shape to free the memory that was allocated by this shape.
A screenshot of Box2D's view of the rock bodies is as follows:
The thin blue lines forming a rectangle visualizes how (the shape) and where (the position) Box2D sees each rock. These lines have been rendered with the help of Box2D's Box2DDebugRenderer class. Let's add this feature to the game code so that it can be quickly enabled when needed.
Add the following import line to the WorldRenderer class:
import com.badlogic.gdx.physics.box2d.Box2DDebugRenderer;
After this, add the following lines of code to the same class:
private static final boolean DEBUG_DRAW_BOX2D_WORLD = false;
private Box2DDebugRenderer b2debugRenderer;
Then, make the following changes to the same class:
private void init () {
batch = new SpriteBatch();
camera = new OrthographicCamera(Constants.VIEWPORT_WIDTH, Constants.VIEWPORT_HEIGHT);
camera.position.set(0, 0, 0);
camera.update();
cameraGUI = new OrthographicCamera(Constants.VIEWPORT_GUI_WIDTH, Constants.VIEWPORT_GUI_HEIGHT);
cameraGUI.position.set(0, 0, 0);
cameraGUI.setToOrtho(true);
  // flip y-axis
cameraGUI.update();
  b2debugRenderer = new Box2DDebugRenderer();
}

private void renderWorld (SpriteBatch batch) {
worldController.cameraHelper.applyTo(camera);
batch.setProjectionMatrix(camera.combined);
batch.begin();
worldController.level.render(batch);
batch.end();
if (DEBUG_DRAW_BOX2D_WORLD) {
b2debugRenderer.render(worldController.b2world, camera.combined);
  }
}
Now, we can easily toggle the debug view for Box2D, by setting DEBUG_DRAW_BOX2D_WORLD to true or false.
Next, add the following lines of code to the Constants class:
// Number of carrots to spawn
public static final int CARROTS_SPAWN_MAX = 100;

// Spawn radius for carrots
public static final float CARROTS_SPAWN_RADIUS = 3.5f;

// Delay after game finished
public static final float TIME_DELAY_GAME_FINISHED = 6;
We will use these new constants to control the number of carrots to spawn and the delay time before the game switches back to the menu screen after the goal was reached by the player. In this particular case, we use a value of 100 carrots and a delay of 6 seconds.
Next, add the following lines of code to the WorldController class:
private void spawnCarrots (Vector2 pos, int numCarrots, float radius) {
float carrotShapeScale = 0.5f;
  // create carrots with box2d body and fixture
for (int i = 0; i<numCarrots; i++) {
    Carrot carrot = new Carrot();
    // calculate random spawn position, rotation, and scale
float x = MathUtils.random(-radius, radius);
float y = MathUtils.random(5.0f, 15.0f);
float rotation = MathUtils.random(0.0f, 360.0f)
    * MathUtils.degreesToRadians;
float carrotScale = MathUtils.random(0.5f, 1.5f);
carrot.scale.set(carrotScale, carrotScale);
    // create box2d body for carrot with start position// and angle of rotation
BodyDef bodyDef = new BodyDef();
bodyDef.position.set(pos);
bodyDef.position.add(x, y);
bodyDef.angle = rotation;
    Body body = b2world.createBody(bodyDef);
body.setType(BodyType.DynamicBody);
carrot.body = body;
    // create rectangular shape for carrot to allow// interactions (collisions) with other objects
PolygonShape polygonShape = new PolygonShape();
float halfWidth = carrot.bounds.width / 2.0f * carrotScale;
float halfHeight = carrot.bounds.height /2.0f * carrotScale;
polygonShape.setAsBox(halfWidth * carrotShapeScale, halfHeight * carrotShapeScale);
    // set physics attributes
FixtureDef fixtureDef = new FixtureDef();
fixtureDef.shape = polygonShape;
fixtureDef.density = 50;
fixtureDef.restitution = 0.5f;
fixtureDef.friction = 0.5f;
body.createFixture(fixtureDef);
polygonShape.dispose();
    // finally, add new carrot to list for updating/rendering
level.carrots.add(carrot);
    }
  }
The spawnCarrots() method contains the logic to create a variable number (numCarrots) of the new carrot game objects at a specific location (pos) in the game world. Inside the loop, a new carrot game object is created for which random values are calculated for the starting position (x, y), angle of rotation (rotation), and scale (carrotScale). The location that is passed in the pos variable is used as the center spawn point. The third parameter, radius, is used to distribute the carrots around the center spawn point of the horizontal starting position. The vertical starting position is randomly chosen in the range between 5 and 15 to ensure that the carrots will always spawn outside the game camera's view.
Also, this range helps to create a more rain-like effect by distributing the carrots in a column full of carrots, so that they will hit the ground at different points in time. The random rotation values are chosen within a range of a full circle (0 to 360 degrees), which simply means that any angle of rotation can occur. The random scale values are chosen within the range of half below or above the carrot's original size, which gives the overall effect a more natural touch as carrots are not of the same size in real life either.
Similar to what we did for the rock game object, a Box2D body, fixture, and shape must be created for each carrot game object. It should be noted once more that the reference of a Box2D body is stored in the body variable of the carrot instance to activate the Box2D update mechanism for the game object. Also, notice that the fixture is set to have a density of 50, which affects the object's calculated mass data, and thus controls whether it is a light or a heavy object. Furthermore, restitution is set to 0.5, which means that the carrots will be half-elastic to allow some rebound to happen until it comes to rest eventually. A friction value of 0.5 lets the carrots skid down on each other. Using a value of 1 or higher for friction will make the object look sticky when it gets in contact with other objects.
As a last tweak, each Box2D shape is shrunk to half the size (carrotShapeScale = 0.5f) of the carrot game object to eliminate small gaps between the adjacent carrots. Finally, each new carrot with its corresponding Box2D body is added to the level's list of carrots for updating and rendering.
Next, add the following lines of code to the WorldController class:
private void onCollisionBunnyWithGoal () {
goalReached = true;
timeLeftGameOverDelay = Constants.TIME_DELAY_GAME_FINISHED;
  Vector2 centerPosBunnyHead = new Vector2(level.bunnyHead.position);
centerPosBunnyHead.x + = level.bunnyHead.bounds.width;
spawnCarrots(centerPosBunnyHead, Constants.CARROTS_SPAWN_MAX, Constants.CARROTS_SPAWN_RADIUS);
}
This new method will handle the event when the player passes the goal-level object. The goalReached flag is set to true, which will be used to avoid unnecessary collision tests and start the countdown that will switch back to the menu screen. The countdown starts at the value that is taken from the new constant TIME_DELAY_GAME_FINISHED. Then, the spawnCarrots() method is called with the player's current position, the number of carrots, and the spawn radius.
Note
In this project, we check collision with the nearest object using the basic rectangle overlapping algorithm; however, LibGDX also provides a callback interface for detecting collisions. The callback approach will be helpful in a game with many rigid bodies at motion.
An excellent article on contact listeners can be found at http://sysmagazine.com/posts/162079/.
Now, make the following changes to the WorldController class:
private void initLevel () {
score = 0;
scoreVisual = score;
goalReached = false;
level = new Level(Constants.LEVEL_01);
cameraHelper.setTarget(level.bunnyHead);
initPhysics();
}

private void testCollisions (float deltaTIme) {
r1.set(level.bunnyHead.position.x, level.bunnyHead.position.y, level.bunnyHead.bounds.width, level.bunnyHead.bounds.height);

  // Test collision: Bunny Head <-> Rocks
  ...

  // Test collision: Bunny Head <-> Gold Coins
  ...

  // Test collision: Bunny Head <-> Feathers
  ...
  // Test collision: Bunny Head <-> Goal
if (!goalReached) {
r2.set(level.goal.bounds);
    r2.x += level.goal.position.x;
    r2.y += level.goal.position.y;
if (r1.overlaps(r2)) onCollisionBunnyWithGoal();
    }
}

public void update (float deltaTime) {
handleDebugInput(deltaTime);
if (isGameOver() || goalReached) {
timeLeftGameOverDelay-= deltaTime;
if (timeLeftGameOverDelay< 0) backToMenu();
    } else {
handleInputGame(deltaTime);
    }
level.update(deltaTime);
testCollisions();
b2world.step(deltaTime, 8, 3);
cameraHelper.update(deltaTime);
  }
At the end of the initLevel() method, right after the level is loaded, we will call the initPhysics() method. It is important to do it in this particular order because initPhysics() works with the list of rocks of the loaded level. The testCollisions() method is extended by another check that will call the onCollisionBunnyWithGoal() method as soon as it detects a collision between the player and the goal game objects.
In the update() method, we added the goalReached flag as an alternative condition to the isGameover() condition. So, from now on, a delayed switchback to the menu screen will be executed, if either condition is met.
Lastly, the Box2D world instance stored in b2world needs to be updated just like the rest of the game to make any progress. This is done by calling its step() method and passing in the delta time. The last two parameters denote the number of iterations that Box2D is allowed to execute for its velocity and position calculations. Using higher values for these parameters may increase the precision of the simulation as well as the computational workload. However, Box2D is not going to always use up the maximum number of iterations if it decides that the errors in the simulation are small enough to go unnoticed.
There are only two more, but not less important, changes to fully complete our new game feature.
Make the following changes to the Rock class:
@Override
public void update (float deltaTime) {
super.update(deltaTime);

floatCycleTimeLeft -= deltaTime;
if (floatCycleTimeLeft<= 0) {
floatCycleTimeLeft = FLOAT_CYCLE_TIME;
floatingDownwards = !floatingDownwards;
body.setLinearVelocity(0, FLOAT_AMPLITUDE * (floatingDownwards ? -1 : 1));
  } else {
body.setLinearVelocity(body.getLinearVelocity().scl(0.98f));

  }
}
These changes represent an almost direct translation from our own physics simulation to Box2D's one for the rocks' floating-on-water effect. It is crucial to understand why we have to change this part or else you will probably spend a lot of time hunting down nasty problems in conjunction with Box2D.
In our previous implementation, the rocks' movement was achieved by directly modifying its position vector. Since the rocks are now controlled by Box2D, we would have to change the position of the rock's body using the setTransform() method instead. Usually, this is a really bad idea as it can confuse Box2D when a manual change of a body position results in two or more overlapping shapes. These overlapping shapes, then, can cause quite unpredictable effects such as extreme accelerations or a disruption of resting objects. So, additional care needs to be taken if the position and/or angle of the rotation of a body are set directly.
As you can see in the preceding changed code, we are actually not using setTransform() but setLinearVelocity(). So, the general rule to avoid the mentioned problems is to tell Box2D about the physical cause to get the desired effect. This means that we have to express changes in the world through forces, which in turn are translated into velocities.
After all this, the last modification is to free the allocated memory when appropriate.
Add the following import line to the WorldController class:
import com.badlogic.gdx.utils.Disposable;
Next, let the same class implement the Disposable interface as follows:
public class WorldController extends InputAdapter
implements Disposable {
...
  }
Then, add the following lines of code to the same class:
@Override
public void dispose () {
if (b2world != null) b2world.dispose();
}
Finally, make the following changes to the GameScreen class:
@Override
public void hide () {
worldController.dispose();
worldRenderer.dispose();
Gdx.input.setCatchBackKey(false);
}
Memory that is allocated by a Box2D's world instance is now going to be freed correctly when it is no longer needed.
Now, run the game and finish the level by passing the goal to marvel at the awesome rain of carrots. A screenshot of what you should see is as follows:
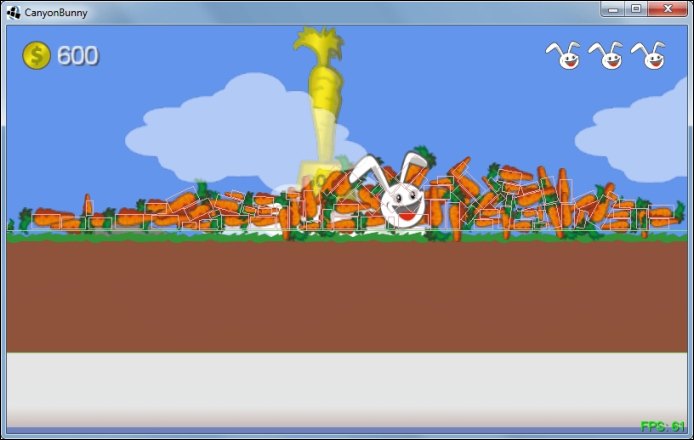
The preceding screenshot shows the spawned carrots that have already come to rest as well as the debug overlay drawn by the Box2D debug renderer. If you take a closer look at the shape location of each carrot, you will probably come to the conclusion that it must be misaligned, though the simulation appears to be perfectly fine.
Fortunately, there is no real issue at all because it is just an illusion due to the transparent area and the green leaves of the carrot. An isolated view that only shows a couple of carrots and two debug boxes is shown in the following screenshot:
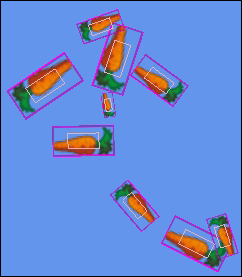
The inner box is still drawn using the Box2D debug render. The outer box, however, is the real border of the image used for the carrot game object. You can try this yourself by enabling the debug outline for TexturePacker and rebuilding the texture atlas afterwards.