
In this chapter, we will create our first sprite widget and understand how it works. Then we will create one sample of each important widget template, and analyze their corresponding parameters so that you know how to create and configure them.
At the end of this chapter, we will have a functional main menu with most of NGUI's widgets.
We will create our first sprite widget to display our main menu's background window. In order to do that easily, NGUI has a Widget Wizard with a few templates for us.
The Widget Wizard can be opened by navigating to NGUI | Open | Widget Wizard. It will look like the following screenshot:
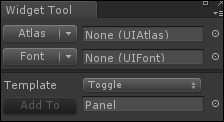
As you can see in the previous screenshot, to create a widget, you require Atlas and Font to be configured. As said in Chapter 1, Getting Started with NGUI, an atlas is a large texture containing the sprites that you need to create your UI. For the rest of this chapter, we will use the default atlas named SciFi Atlas , which is included in the plugin.
Let's select our default SciFi atlas, which contains the necessary sprites, as follows:
- In the Project view, navigate to Assets | NGUI | Examples | Atlases | SciFi.
- Drag-and-drop the prefab
SciFi Atlas.prefabin the Atlas field. - Drag-and-drop the prefab
SciFi Font – Header.prefabin the Font field.
We have our Atlas and Font prefabs selected. We can now create a widget from a template.
Let's create a widget from a template by performing the following steps:
- Click on the drop-down menu next to the Template field.
- Select the Sprite option as Template.
- Click on the drop-down menu next to the Sprite field.
- Select the sprite named Dark.
- Leave the Pivot option as Center.
- Make sure you have selected Panel in the Hierarchy view.
- Click on the Add To button.
Ok, our sprite widget has been created!
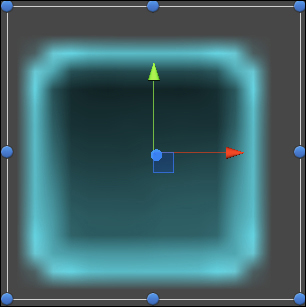
We have created our first widget: Sprite (Dark). Select it in the Hierarchy view and try the following manipulations to change its transform values.
In the Scene view, you can use the handles to move your widget or you may enter coordinates directly in the Inspector view's X, Y, or Z parameters. The following screenshot is of the Scene view with the three parameters visible:
You should always leave the Z coordinates at 0. If you need to place a widget behind or in front of another, use the Back and Forward buttons in the Inspector view to control your widget's depth.
On the Scene view, place your mouse cursor on the outside of any blue circle surrounding your widget. Your cursor will have a rotation icon next to it. You can now keep your left mouse button pressed and move your mouse to rotate the widget.
You may have noticed that in the Inspector view, the scale value is grayed out. That's because you should use the Dimensions parameter of the UISprite component instead.
On the Scene view, place your mouse cursor on any blue circle surrounding your widget. Your cursor will have a resize icon next to it. You can now click and drag your mouse to resize the widget.
To keep everything pixel perfect, you should avoid scaling widgets up or down with Unity's scale tool. Try to do everything with Dimensions. Let's see what other parameters we have for widgets.
Select Sprite (Dark) and you will find the parameters seen in the following screenshot in the Inspector view:
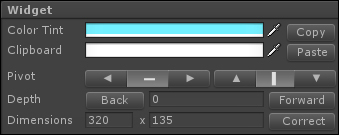
These parameters exist for any type of widget. Let's see what they are:
- Color Tint: This is the widget's alpha-enabled color.
- Clipboard: If you click on the Copy button, the current Color Tint selection is copied to this parameter. If you click on the Paste button, the Clipboard parameter's selection will be pasted to Color Tint.
- Pivot: This presents two sets of buttons that can be used to choose which corner or side you want the widget's pivot to be placed.
- Depth: This can be used to display your widget in front or behind others.
- Dimensions: This can be used to display size in pixels instead of scaling.
Now that we have seen the widget parameters, please enter these Dimensions for our newly created Sprite (Dark): 1300 x 850.
Our sprite window just got enormous and ugly. Why? Because it's a 15 x 15 sprite stretched to 1300 x 850! Let's talk about sprites and see how we can correct this.