
Labels are used to display text on the screen with a specific font as shown in the following screenshot:

Let's create a label widget with the following steps:
- Select the Panel GameObject.
- Navigate to NGUI | Open | Widget Wizard.
- Select the Label template.
- We have already selected a font; it will be used for this label.
- Click on the Add To button.
A new label has been added to the panel and placed at the center of the screen.
With Label selected, the UILabel parameters are shown in the Inspector view. They are as follows:
- Text: This is a large textbox that lets you type the text to be displayed.
- Overflow: This offers four different behaviors for the widget when the text is larger than the label's Dimensions. The four behaviors are as follows:
- Shrink Content: This shrinks the text in order to fit
- Clamp Content: This ensures overflow will never happen
- Resize Freely: This resizes to display all the content and overflow
- Resize Height: This resizes height only—column style
- Encoding: This must be checked if you want to change the characters' color by inserting the
[RRGGBB]hexadecimal values. - Effect: This will help you add a shadow or outline effect to your label. You can adjust the Distance and Color values.
- Max Lines: This is the maximum number of lines assigned for the label. For unlimited lines, leave it as 0.
- Pivot: The pivot also defines how the text is aligned.
Let's add a title for our window that will look like the following screenshot:
Please proceed with the following steps to create this title bar for our window:
- Select Panel and create a new child with Alt + Shift + N.
- Rename that new child as
Title. It will be our Title bar container. - Drag-and-drop the Label GameObject into the Title GameObject.
- Select our Title GameObject.
- Navigate to NGUI | Open | Widget Wizard.
- Create a new sprite using the Highlight sprite and perform the following steps:
- Rename this new sprite (Highlight) as
Background. - Set Sprite Type to Sliced.
- Change the Pivot option to Top (the button with the up arrow).
- Reset its Transform position to {
0,0,0}. - In the Color Tint parameter, change R to
95, G to255, B to150, and A to200. - Enter Depth as
2.
- Rename this new sprite (Highlight) as
- Attach a component to it by navigating to Component | NGUI | UI | Stretch and perform the following steps:
- Drag our Window GameObject into the Container field.
- Set Style to Horizontal.
- Enter its UISprite's Y dimension as
62.
- Select the Label GameObject from Title and perform the following steps:
- Change its text to
[AAFFFF]Main Menu. - Set its Overflow parameter to Resize Freely.
- Enter Depth as
3.
- Change its text to
- Attach a component to it by navigating to NGUI | Attach | Anchor and perform the following steps:
- Drag-and-drop the Background GameObject from Title in the Container field.
- Set the Side parameter to Center.
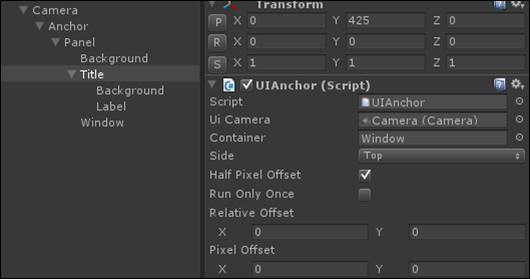
- Select our Title GameObject in the Hierarchy view.
- Attach a component to it by navigating to NGUI | Attach | Anchor and perform the following steps:
- Drag our Window GameObject into the Container field.
- Set the Side parameter to Top.
The Hierarchy and Inspector views of our Title GameObject should look like the ones in the following screenshot:
We now have a window that actually looks like a window. We used anchors to avoid setting positions manually. Now let's add some buttons!
..................Content has been hidden....................
You can't read the all page of ebook, please click here login for view all page.