
In this final chapter, we will create a game using NGUI elements, and this will ensure that you understand them and know how to use them perfectly.
Together, we will learn how to create these basic game rules, which are as follows:
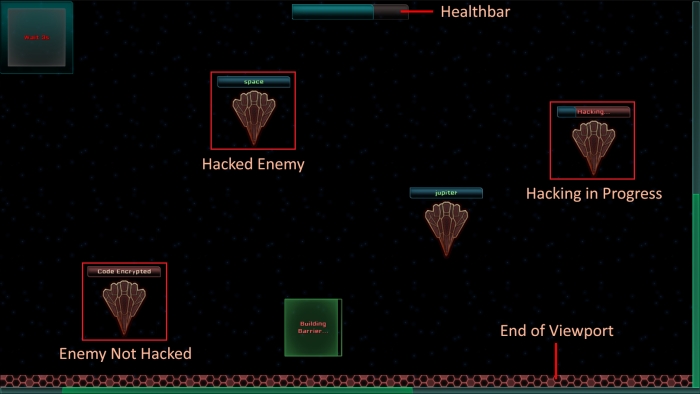
- Enemies fall down from the top of our scrollable viewport.
- The player drops Barriers on the Viewport—if the enemy collides with a built Barrier, he or she is destroyed along with the Barrier.
- Some enemies have encrypted self-destruct code. The player clicks on the enemy to hack it. When the hacking process is complete, its destruct code is displayed above it.
- The player must type in the code to destroy the enemy.
We will also add a health bar that will represent the player's health points and will decrease when enemies hit the bottom of the screen. The game will look as follows:
We want our enemies to spawn at the top of the viewport's background. At spawn, the Y value can be the same for each of the enemies, but we want a random X value.
First of all, let's open our Game scene.
Our enemies will be nested in a container placed at the top left-hand corner of our background in order to have the {0, 0} positioned at the top left-hand corner of the viewport.
First, let's create our enemies holder by performing the following steps:
- Select our Viewport GameObject and perform the following steps:
- Create a new child by pressing Alt + Shift + N.
- Rename this new child as
Enemies.
- Attach Anchor to it by navigating to NGUI | Attach. Then perform the following steps:
- Drag our Background from Viewport into the Container field.
- Set its Side parameter to TopLeft.
Ok, we now have our enemies container in which we will instantiate our Enemy prefab.
Let's create the Enemy prefab that will be instantiated as child of the Enemies GameObject. You must add the Enemy.png file included in the Assets.zip file to the Game atlas before you continue or you may create your own 128 x 160 sprite. We will use a Rigidbody to detect collisions between the enemies and our barriers.
Once the Enemy.png sprite has been added to the Game atlas, follow the given steps:
- Select our Viewport GameObject and perform the following steps:
- Create a new child with Alt + Shift + N.
- Rename this new child as
Spaceship.
- Select our new Spaceship GameObject.
- Attach a collider to it by navigating to NGUI | Attach a Collider and perform the following steps:
- Uncheck its Is Trigger Boolean to detect collisions.
- Set Size to {
128,160,1}.
- Attach a Rigidbody component to it by navigating to Component | Physics and then perform the following steps:
- Uncheck its Use Gravity Boolean.
- Check its Is Kinematic Boolean.
- Check the Freeze Position and Freeze Rotation Booleans for all its Constraints in order to avoid any unwanted behavior.
- With our selected Spaceship GameObject, create a new Sprite by navigating to NGUI | Create | Sprite:
- Change its Sprite to our new Enemy sprite.
- Change its Dimensions to
128x160. - Set its Depth to
1.
- Drag our Spaceship GameObject in your
Prefabsfolder. - Delete our Spaceship instance from the scene.
Ok, we now have our Enemy prefab ready. Let's add a new script to it that will handle the enemy's initialization and movement, and perform the following steps:
- In the Project view, select our Spaceship prefab.
- Create and attach a new
EnemyController.csC# script to it. - Open this new
EnemyController.csscript.
Let's create a new Initialize() method that will set the enemy's position outside the game with a random X and a tween duration depending on the float value that is passed as a parameter in the following manner:
public void Initialize(float _movementDuration)
{
  //Get the Viewport's Background size
  Vector2 bgSize =
    transform.parent.parent.FindChild("Background").GetComponent<UISprite>().localSize;
  //Get this enemy's sprite size
  Vector2 spriteSize =
    transform.FindChild("Sprite").GetComponent<UISprite>().localSize;
  //Set its position to a random X, and Y of -(enemyHeight/2)
  transform.localPosition =
    new Vector3(Random.Range(spriteSize.x *0.5f, bgSize.x - (spriteSize.x *0.5f)), -(spriteSize.y *0.5f), 0);
  //Tween its position towards end of background
  TweenPosition.Begin(gameObject, _movementDuration,
    new Vector3(transform.localPosition.x, -bgSize.y + (spriteSize.y * 0.5f), 0));
}
We used spriteSize.x * 0.5f in the preceding code because our enemy has a centered pivot and we want to avoid spawning it outside the background's width.
The _movementDuration parameter is used to define how much time the enemy will take to cross our entire background; it is used as speed. But to balance the speed, a value of 10 is used, which means that the enemy will need 10 seconds to hit the bottom of the background.
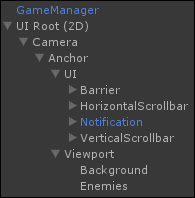
At this stage, your hierarchy should look as follows:
Before we can launch the game, we need to add an EnemySpawnController.cs script that will handle enemy spawn rates and instantiate enemies when needed. To add the script, perform the following steps:
- Select the Enemies GameObject from Viewport.
- Create and attach a new
EnemySpawnController.csC# script. - Open this new
EnemySpawnController.csscript.
In this new script, we need to add a SpawnEnemy() coroutine that will be called at random intervals to instantiate Enemy prefabs and initialize them with the correct position and tween duration. First, we need to declare these variables as shown in the following code snippet:
//We need our Enemy Prefab for Instantiation
public Object enemyPrefab;
//Random-control variables
public int firstEnemyDelay = 1;
//Min and Max intervals between 2 spawns
public float minInterval = 4;
public float maxInterval = 15;
//Min and Max Enemy MovementTime
public float minMovementTime = 20;
public float maxMovementTIme = 50;
The variables declared in the previous code will be used to control our random values. You may change them in the Inspector view. We need to assign our enemyPrefab variable.
To do this, go back to Unity and follow the given steps:
- Select the Enemies GameObject from Viewport.
- Drag our Spaceship prefab from the Project view inside the Enemy Prefab field in Enemy Spawn Controller.
Ok, the necessary variables are initialized. Now, let's go back to our EnemySpawnController.cs script and add a new SpawnEnemy() coroutine by using the following code snippet:
//Coroutine that spawns enemies
IEnumerator SpawnEnemy()
{
  //First time, set to firstEnemyDelay
  float delay = firstEnemyDelay;
  //Loop while the game is running
  while(true){
    //Wait for the correct delay
    yield return new WaitForSeconds(delay);
    //Create a new enemy, stock its EnemyController
    EnemyController newEnemy =
      NGUITools.AddChild(gameObject, enemyPrefab as GameObject).GetComponent<EnemyController>();
    //Initialize it with random speed
    newEnemy.Initialize(Random.Range (minMovementTime, maxMovementTIme));
    //Set the new random delay
    delay = Random.Range(minInterval, maxInterval);
  }
}
Our coroutine is ready. Let's start it when the game starts running. We can use the Start() method for this. Add this method just below our SpawnEnemy() coroutine in the following manner:
void Start ()
{
  //Start the Spawn Coroutine with first delay
  StartCoroutine(SpawnEnemy());
}
Save the script and click on the play button. The first enemy is spawned after the firstEnemyDelay. After the first enemy, new enemies are spawned at random X positions, at random intervals, and at a random speed.
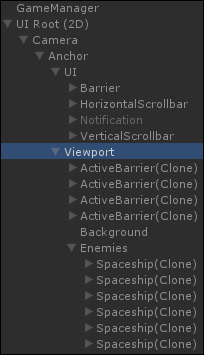
Your Hierarchy view should look as follows when a few enemies have spawned:
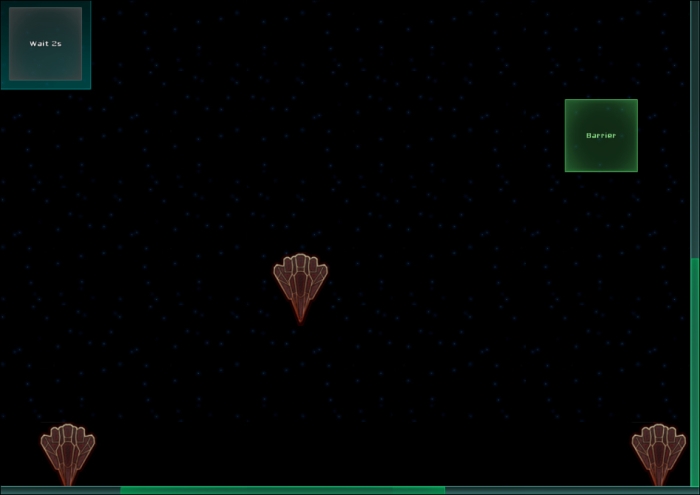
Spawned enemies move down and stop at the end of the Viewport's background as shown in the following screenshot:
Ok, we now have our mobile enemies, but we still have a slight problem. You may have noticed that you cannot drag the viewport if you click on an enemy. We had the same problem before with the ActiveBarrier prefab.
We need to add a UIForwardEvents component to the Spaceship prefab by performing the following steps:
- In the Project view, select our Spaceship prefab.
- Attach a Forward Events component to it by navigating to Component | NGUI | Interaction. Then perform the following steps:
- Check its OnPress Boolean.
- Check its OnDrag Boolean.
- Open its attached
EnemyController.csscript.
Add the following line at the end of the Initialize() method of EnemyController.cs script:
//Set the Viewport as target for UIForwardEvents
GetComponent<UIForwardEvents>().target = transform.parent.parent.gameObject;
You can now pan the viewport even if you click on an enemy. It is time to handle collisions with barriers.