
We will now learn how to create the popup list, see its parameters, and create a difficulty selector for our game.
- Select the Panel GameObject and create a new child with Alt + Shift + N.
- Rename that new child as
Difficulty. It's our difficulty box container. - Navigate to NGUI | Open | Widget Wizard and perform the following steps:
- Select Popup List as Template
- Select Dark as Foreground.
- Select Dark as Background.
- Select the Highlight sprite as Highlight.
- With our Difficulty GameObject selected, click on the Add To button.
A Popup List GameObject has just been created. Let's look at its parameters:
- Atlas: This is the atlas used for the popup list's sprites.
- Font: This is the font used for the popup list's options.
- Text Label: This is the label to update when Popup List changes selection.
- Options: This is the list of options that will pop up—one per line.
- Default: This is the option selected at start.
- Position: You may force the list of options to appear
AboveorBelowthe Popup List's button. If this parameter is set toAuto, NGUI will choose one of both depending on the available space. - Localized: This enables localization on options.
- Background: This is the background sprite for the popup list's options container.
- Highlight: This is the sprite for the currently hovered option.
- Text Color: This is the options list's text color tint.
- Background: This is the popup list's background color tint.
- Highlight: This is the hovered option's background color tint.
- Padding: This is the padding of the X and Y options.
- Text Scale: This is the options' text scale.
- Animated: If this is unchecked, the options' display will be instantaneous.
- Notify: This is the GameObject that lets you choose a method to call when the selected option changes.
Below the UIPopup List component, we have the usual UIButton and UIPlay Sound components that we have already seen before.
We will now use our new Popup List GameObject to select the game's difficulty level as shown in the following screenshot:
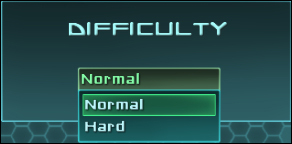
Let's create this difficulty selector as shown in the following steps:
- Select the Background and Label GameObjects from Sound and perform the following steps:
- Duplicate them.
- Drag-and-drop them into our Difficulty container.
- Select the Background GameObject from Difficulty and enter its Pixel Offset parameter to {
420,43}. - Select the Label GameObject from Difficulty and change its text to
[AAFFFF]Difficulty. - Select our Popup List in the Hierarchy view and perform the following steps:
- Rename it as
Popup. - Type in
NormalandHardseparated by a line. - In Text Color, change R to
190, G to250, B to255, and A to255. - In Background, change R to
70, G to250, B to255, and A to255. - In Highlight, change R to
70, G to255, B to150, and A to255. - In Hover, change R to
70, G to255, B to150, and A to255.
- Rename it as
- Attach a component to it by navigating to NGUI | Attach | Anchor and perform the following steps:
- Drag the Background GameObject from Difficulty in the Container field.
- Enter Pixel Offset as {
-76,-20}.
- Select our popup's Sprite GameObject and perform the following steps:
- In Color Tint, change R to
170, G to255, B to190, and A to255. - Enter Depth as
3.
- In Color Tint, change R to
- Select our popup's Label GameObject and perform the following steps:
- In Color Tint, change R to
135, G to255, B to170, and A to255. - Enter Depth as
4.
- In Color Tint, change R to
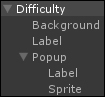
Ok, we now have a Popup List GameObject that lets us select the game's difficulty level. Your Hierarchy panel should look like the following screenshot:
Now it's time to link it to a method that will take that difficulty into account. Do this by performing the following steps:
- Open our
GameManager.csscript. - Declare a new enum for our difficulty levels as follows:
public enum Difficulties { Normal, Hard } - Declare a new
Difficultyvariable to store the current difficulty as follows:public static Difficulties Difficulty = Difficulties.Normal;
We used a static variable because it won't be destroyed when loading the game scene. By default, the difficulty level is set to Normal.
Now we need to add the OnDifficultyChange() method that will change our Difficulty variable when Popup List changes state as follows:
public void OnDifficultyChange()
{
  //If Difficulty changes to Normal, set Difficulties.Normal
  if(UIPopupList.current.value == "Normal")
  Difficulty = Difficulties.Normal;
  //Otherwise, set it to Hard
  else Difficulty = Difficulties.Hard;
}
Our method is ready; we need to call it when Popup List changes state. Do so by performing the following steps:
- Save all the modified scripts and return to Unity.
- Select the Popup List GameObjectfrom Difficulty and perform the following steps:
- Drag our GameManager GameObject into the Notify field.
- For the Method field, select
GameManager.OnDifficultyChange.
Now, the Popup List GameObject will change the Difficulty variable according to its value. We will be able to access this static variable once we're in the game.