
Now let's add a volume slider for the user to move and select his/her volume level.
A slider template is available, enabling you to adjust parameters easily by sliding a thumb along a bar. Perform the following steps to create a volume slider:
- Select the Panel GameObject and create a new child with Alt + Shift + N.
- Rename that new child as
Volume. It will be our volume settings container. - Navigate to NGUI | Open | Widget Wizard and perform the following steps:
- Select the Slider template.
- Set the Dark Sprite to Empty.
- Set the Light Sprite to Full.
- Set Highlight to Thumb.
- With the Volume GameObject selected, click on the Add To button.
A slider has been created. It has 6 parameters as follows:
- Value: This is the slider's current value, which is between 0 and 1.
- Steps: This is the number of steps to completely fill or empty the slider.
- Direction: This is the slider's fill direction, either Horizontal or Vertical.
- Foreground: This is the sprite used to fill the slider.
- Thumb: This is the sprite used for the handle to change the slider's value. By leaving this as null, a simple progress bar will be created (user cannot interact).
- Notify: This is the GameObject that lets you choose a method to call when there is a change in the slider's value. When a GameObject is assigned, you may choose a method to call on the value change.
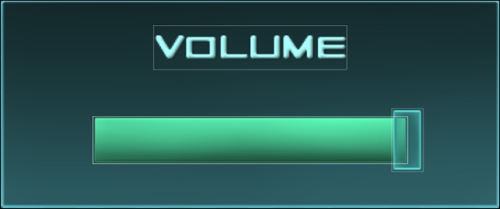
We can use this slider to create our volume slider, which will look like the following screenshot:
Proceed with the following steps to create it:
- Duplicate the Background GameObject from Nickname and perform the following steps:
- Drag the duplicate inside the Volume container GameObject.
- Set its Dimensions to
320x135.
- Attach a component to it by navigating to NGUI | Attach | Anchor and perform the following steps:
- Drag our Window GameObject inside the Container field.
- Set the Pixel Offset to {
-420,-90}.
- Duplicate the Label GameObject from Nickname and perform the following steps:
- Drag it inside the Volume GameObject.
- Drag our Volume's Background GameObject inside the Container field.
- Change its text to
[AAFFFF]Volume.
- Select the Slider GameObject.
- Attach a component to it by navigating to NGUI | Attach | Anchor and perform the following steps:
- Drag the Background GameObject from Volume inside the Container field.
- Set Pixel Offset to {
-100,-23}.
- Select the Background GameObject from Slider and perform the following steps:
- Enter Depth as
3. - In the Color Tint parameter, change R to
80, G to220, B to85, and A to255.
- Enter Depth as
- Select the Foreground GameObject from Slider and perform the following steps:
- Enter Depth as
4. - In the Color Tint parameter, change R to
95, G to255, B to190, and A to255.
- Enter Depth as
- Select the Thumb GameObject from the Slider and perform the following steps:
- Enter Depth as
5. - In the Color Tint parameter, change R to
100, G to255, B to250, and A to255.
- Enter Depth as
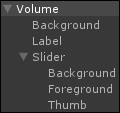
Ok, we now have a nice volume slider! Your Hierarchy view should look like the following screenshot:
We will now link it to the game's volume with a new script. Let's add some music to our main menu. First, add an audio file of your choice to your Unity project as shown in the following steps:
- Select our Main Camera GameObject.
- Attach a component to it by navigating to Component | Audio | AudioSource and perform the following steps:
- Drag a music file from the Project view to the AudioSource parameter's Audio Clip field.
- Select the Slider GameObject from Volume and perform the following steps:
- Create and attach a new
VolumeManager.csC# script to it. - Open this new
VolumeManager.csscript.
- Create and attach a new
In this new script, we will first need to declare and initialize the necessary variables. Add the following variable declarations and the Awake() method:
//We will need the Slider
UISlider slider;

void Awake ()
{
  //Get the Slider
  slider = GetComponent<UISlider>();
  //Set the Slider's value to last saved volume
  slider.value = NGUITools.soundVolume;
}
Here we initialized the slider's value to NGUITools.soundVolume because this float is persistent and will be saved across scenes—even if you exit the game.
Now let's create an OnVolumeChange() method that will modify our AudioListener method's volume each time the slider's value is changed:
public void OnVolumeChange ()
{
  //Change NGUI's UI Sounds volume
  NGUITools.soundVolume = UISlider.current.value;
  //Change the Game AudioListener's volume
  AudioListener.volume = UISlider.current.value;
}
Ok, the method is ready. We just need to call it each time the slider's value changes. Let's use the UISlider component's Notify field as follows:
- Select the Slider GameObject from Volume and perform the following steps:
- Drag-and-drop the Slider GameObject from Volume into the Notify field.
- For the Method field, select
VolumeManager.OnVolumeChange.
Now, each time the slider's value is modified, our method will be called.
You can hit the Play button; the game's volume will change with the slider. The volume is saved even when you exit the game and restart!