
Dropping barriers on the screen is not enough. We will use a self-destruct code to destroy enemies too.
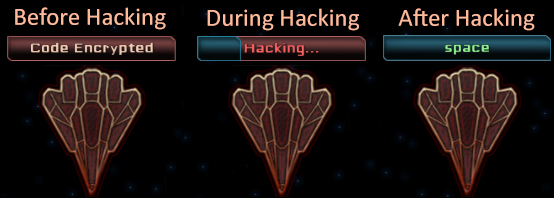
Each enemy will get a chance to have a self-destruct code. If it has one, an empty slider with Code Encrypted displayed inside it will appear above the concerned enemy.
When the player clicks on the enemy, the hacking process starts. When the hacking is complete, a word will appear as shown in the following screenshot, and the player will have to type it on his keyboard to destroy it:
Let's start by creating the hacking slider indicator inside our Spaceship prefab by performing the following steps:
- In the Project view, select our Spaceship prefab.
- Drag it in the Hierarchy view as child of the Viewport GameObject.
- Open the Wiget Tool window by navigating to NGUI | Create a Widget and then perform the following steps:
- Select the Game Atlas.
- Select the Progress Bar template.
- Select the Button sprite for the Empty field.
- Select the Button sprite for the Full field.
- With our Spaceship instance selected, click on the Add To button.
- Select the new Progress Bar GameObject and perform the following steps:
- Rename it as
DestructCode. - Set its Transform position to {
-100,100,0}. - Set the value of UISlider to
0.
- Rename it as
- Select the Background GameObject from DestructCode. Then perform the following steps:
- Change its Color Tint values to {
255,140,140,255}. - Set its Depth value to
2.
- Change its Color Tint values to {
- Select the Foreground GameObject from DestructCode and then perform the given steps:
- Change Color Tint to {
50,180,220,255}. - Set its Depth value to
3.
- Change Color Tint to {
Ok, the slider is ready. Let's add a label that will display Code Encrypted and will change to the self-destruct code when the hacking process is finished.
- In the Hierarchy view, select our DestructCode GameObject.
- Open the Widget Tool window by navigating to NGUI | Create a Widget and perform the given steps:
- Select the SciFi Font – Normal font.
- Select the Label template.
- Change the Color to R:
255, G:215, B:190, and A:255.
- With the DestructCode GameObject selected, click on the Add To button.
- Select the new Label GameObject from DestructCode and perform the following steps:
- Set its Transform position to {
100,0,0}. - Set its text to
Code Encrypted.
- Set its Transform position to {
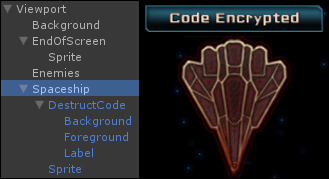
Your Hierarchy view and Spaceship should look as follows:
Great! Let's apply these new modifications to our Spaceship prefab by performing the following steps:
- In the Hierarchy view, select our Spaceship GameObject.
- Click on the Apply button at the top of the Inspector view to update the prefab.
- Delete the Spaceship instance from our Hierarchy view.
Ok, we now have a slider that will indicate the hacking status and a label that will display the self-destruct code.
Let's add some self-destruct code and hacking status in the localization files. Open the English.txt and add the following lines:
//Hacking status
CodeEncrypted = Code Encrypted
Hacking = [FF6666]Hacking...
//Self-Destruct Codes
Space = space
Neptune = neptune
Moon = moon
Mars = mars
Jupiter = jupiter
Now, open the French.txt file and add the following lines:
//Hacking status
CodeEncrypted = Code Crypté
Hacking = [FF6666]Piratage...
//Self-Destruct Codes
Space = espace
Neptune = neptune
Moon = lune
Mars = mars
Jupiter = jupiter
Good! We now have our necessary localization strings.
We will now add a new SetDestructCode() method in our EnemyController.cs script that will assign a self-destruct code to our enemy during initialization. First, let's add the necessary global variables to it.
Open our EnemyController.cs script and add the following global variables:
//Boolean to check if enemy is hacked or not
public bool hacked = false;
//We will need the Self-Destruct Code Label
private UILabel codeLabel;
//We will also need the hacking slider
private UISlider hackSlider;
//We will need to store the destructCode
public string destructCode = "";
//We will need a hackSpeed float
float hackSpeed = 0.2f;
We must set these variables. Add the following lines at the end of the Initialize() method:
//Get the hacking slider
hackSlider = transform.FindChild("DestructCode").GetComponent<UISlider>();
//Get the hacking status label
codeLabel = hackSlider.transform.FindChild("Label").GetComponent<UILabel>();
Ok, now, let's add the SetDestructCode() method that will assign a self-destruct code to the enemy. This method will have a string parameter containing the key of the self-destruct code to be assigned, as shown in the following code:
public void SetDestructCode(string randomWordKey)
{
  //If the randomWordKey is not empty...
  if(!string.IsNullOrEmpty(randomWordKey))
  {
    //... Get the corresponding localized code
    destructCode = Localization.instance.Get(randomWordKey);
    //Set the Label to "Code Encrypted"
    codeLabel.text = Localization.instance.Get("CodeEncrypted");
  }
  //If the randomWordKey is empty, disable hacking slider
  else
  hackSlider.gameObject.SetActive(false);
}
Ok, we have a method that sets the correct destruct code. Now, let's create a Hack() coroutine that will be called to start the hacking process.
The Hack() coroutine will gradually fill the hacking slider and display the enemy's self-destruct code when the hacking is complete.
Add the Hack() coroutine to the EnemyController.cs script using the following code snippet:
IEnumerator Hack()
{
  //Set the Label to "Hacking..."
  codeLabel.text = Localization.instance.Get("Hacking");
  //While hacking slider is not full
  while(hackSlider.value < 1)
  {
    //Increase slider value, framerate independant
    hackSlider.value += Time.deltaTime * hackSpeed;
    //Wait for next frame
    yield return null;
  }
  //Make sure slider is at 1
  hackSlider.value = 1;
  //Set the hacked bool to true for this enemy
  hacked = true;
  //Display the Self-Destruct code now
  codeLabel.text = "[99FF99]" + destructCode;
}
Now, let's add an OnClick() method that will actually launch the hacking process when the enemy is clicked on by the player. We do this in the following manner:
void OnClick()
{
  //If the enemy has a destruct code, launch hacking
  if(!string.IsNullOrEmpty(destructCode))
    StartCoroutine(Hack());
}
Ok, the methods are set for our enemy. Now, we can edit our EnemySpawnController.cs script to call the SetDestructCode() method when a new enemy is initialized and pass a random destruct code in parameter. First, we will add the necessary variables.
We will need a List array to store the enemies in the scene. A List is like an array but easier to manage with useful methods, such as Add() and Remove(). In order to use a List, you need to include a specific library.
Open the EnemySpawnController.cs script and simply add the following line at the very beginning of the file, along with the two other include lines already present:
//Include Lists
using System.Collections.Generic;
Now, add these new global variables within our EnemySpawnController class:
//Chance for each enemy to have a destructCode
public float destructCodeChance = 60;
//Array of strings to store destructCodes keys
public string[] wordKeys;
//We will need a list of enemies
private List<EnemyController> enemies;
//We will need a static instance of this script
public static EnemySpawnController instance;
//This will store the current word typed by the player
public string currentWord;
Ok, now initialize some of these variables in the new Awake() method:
void Awake()
{
  //Store the instance of this script
  instance = this;
  //Initialize the List
  enemies = new List<EnemyController>();
}
Before we continue, let's assign the remaining variables in the Inspector view. Save the script, go back to Unity, and select our Enemies GameObject from Viewport.
Now, set the Word Keys array and spawning values as follows:
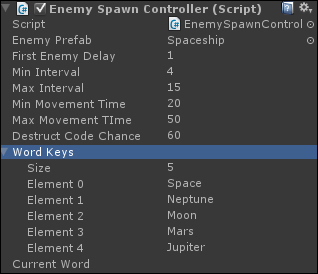
Good, our Word Keys array is now set up. Let's return to our EnemySpawnController.cs script and add the following lines in the SpawnEnemy() coroutine at the very end of its while() loop:
//Create a new empty string for destruct code
string randomCode = "";
//If the random is valid, get a random word
if(Random.Range(0f,100f) < destructCodeChance)
randomCode = GetRandomWord();
//Set the enemy's the DestructCode newEnemy.SetDestructCode(randomCode);
//Add the enemy to the list of enemies
enemies.Add(newEnemy);
When an enemy is initialized, the previous code adds it to the List of enemies and sets its self-destruct code. Now, using the following code, let's create the GetRandomWord() method that will return one of our predefined words:
private string GetRandomWord()
{
  //Return a random Word Key
  return wordKeys[Random.Range(0, wordKeys.Length)];
}
Good. Some of our enemies have a destruct code assigned. Let's just add a method to remove an enemy from the List, which will be called each time an enemy is destroyed. The method is added as follows:
public void EnemyDestroyed(EnemyController destroyedEnemy)
{
  //Remove the destroyed enemy from the List
  enemies.Remove(destroyedEnemy);
}
Open the EnemyController.cs script. Within the Kill() coroutine, just before the Destroy(gameObject) line, add the following line to remove the enemy from the List:
//Remove enemy from the List
EnemySpawnController.instance.EnemyDestroyed(this);
Perfect. Save all of the scripts and hit the play button. If you click on an enemy that has the hacking slider, the hacking process starts and displays a destruct code when finished.
The last step is to handle the player's input in order to check if he or she types one of the enemies' self-destruct words.
We will use the Update() method of our EnemySpawnController.cs script to check which characters the player types with his or her keyboard. These characters will be stored one by one and will be compared to our enemies' destruct codes.
Open our EnemySpawnController.cs script and create a new Update() method:
void Update()
{
  //If the player has typed a character
  if(!string.IsNullOrEmpty(Input.inputString))
  {
    //Add this new character to the currentWord
    currentWord += Input.inputString;
    //We need to know if the code matches at least 1 enemy
    bool codeMatches = false;
    //Check enemies' destruct codes one by one
    for each(EnemyController enemy in enemies)
    {
      //If the enemy has a destruct code AND is hacked
      if(enemy.destructCode != "" && enemy.hacked)
      {
        //currentWord contain the destruct code?
        if(currentWord.Contains(enemy.destructCode))
        {
          //Yes - Destroy it and update our bool
          StartCoroutine(enemy.Kill());
          codeMatches = true;
        }
      }
    }
    //Did the word match at least 1 enemy?
    if(codeMatches)
    //In that case, reset the currentWord to empty
    currentWord = "";
  }
}
Save this script. Now, when you hack an enemy, you can destroy it by typing its self-destruct code! If multiple enemies have the same code, they will be destroyed simultaneously.