
Now that we have a complete UI, let's configure the localization system and add a pop-up list to change our UI's language.
All our localized text strings must be contained in a .txt file for each language. For the purpose of this book, we will have English and French, and we will need the English.txt file and the French.txt file.
Let's create them right now in the following manner:
- Access your project's Assets folder with your file explorer and create a new folder named
Localization. - Inside this new folder, create a new text document named
English.txt. - Duplicate this new
English.txtfile and rename it asFrench.txt. - Open them both in your favorite IDE or text editor.
Ok, now our localization files are ready to be used with the localization system.
We can now configure the localization system to work with our UI. We need to have the localization component attached to a GameObject in the scene:
- Select our GameManager GameObject and attach a Localization component to it by navigating to Component | NGUI | Internal.
- In the Project view, navigate to Assets | Localization and drag our
English.txtandFrench.txtfiles in the languages array.
The Starting Language is set to English, and we also have French available in the array.
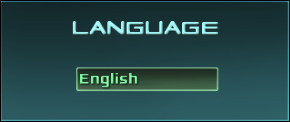
The next step is to create a language selection box as shown in the following screenshot:
If we want to see what we're doing, we should first disable the Clipping of our Container by setting the Clipping
parameter in its UIPanel to None.
Once the Clipping is disabled, follow these steps:
- Select the Popup GameObject from Difficulty:
- Check its Localized Boolean in UIPopup List.
- Rename its child Label GameObject as
CurrentDifficulty.
- Select and duplicate our Difficulty GameObject in Container.
- Rename the new duplicate as
Language. - Select our new Background GameObject in Language and set its Pixel Offset in UIAnchor to {
420, -90}. - Select our Label GameObject from Language and change its text to
[AAFFFF]Language. - Select our Popup GameObject from
Languageand perform the following steps:- Change the Options text value to have the following two options:
English
French
- Set its Position to Below.
- Check the Localized Boolean.
- Change the Options text value to have the following two options:
- Attach a Language Selection component by navigating to Component | NGUI | Interaction.
- Rename the Label, which is a child of Popup, as
CurrentLanguage.
We can now reactivate Clipping in Container by setting the Clipping parameter in its UIPanel to Alpha Clip. The clipping Size has been saved.
That's it, our localization system is in place, and when the pop-up list changes value, the Language Selection.cs script automatically changes the localization's Current Language value.
We are now ready to localize our first Label using the UILocalize component and a Key that will define which string to use from our .txt files. Perform the following steps:
- Select our Label GameObject from Title.
- Attach a Localize component to it by navigating to Component | NGUI | UI.
- Set its
Keyparameter by typingMainMenu. - Switch to our
English.txtlocalization file and add the following line:MainMenu = [AAFFFF]Main Menu
- Switch to our
French.txtlocalization file and add the following line:MainMenu = [AAFFFF]Menu Principal
Save both the .txt files and click on the play button. If you access options and change the language to French, our window's title changes from Main Menu to Menu Principal. That's because the UILocalize component updates the UILabel component it's attached to using the string present after the = in our .txt localization file. If you exit the play mode, the language will be saved and the UI will be initialized with the last selected language.
Now, we must add a UILocalize component with its specific Key to every Label in the scene, then add a localization string for each of them in both of our .txt files.
Don't be afraid; it isn't that long, and it will train you to use the Localization System:
- In the Hierarchy view, type
Labelinside the search box. - Select all the Label GameObjects matching the search by pressing Ctrl + A and attach a Localize component to the selection by navigating to Component | NGUI | UI.
- Select our Label GameObject from Title and remove its second UILocalize component as it already had one!
Now, all of our Label GameObjects have a UILocalize component attached to them. One by one, select them and set their Key parameter based on their text set in the UILabel component.
You must ignore the Labels of Popup List; they don't need a UILocalize component since we checked their Localized Booleans. Simply add localization strings for their Options with the same names: Normal, Hard, English, and French.
When you're done with setting their Key parameters, switch to our English.txt file and add every key you need, plus = followed by the corresponding localized text.
Now, copy all of these keys declarations and paste them in our French.txt file and then replace the English words with French words or any other language you choose.
By the time you're finished, our entire UI will be localized!