
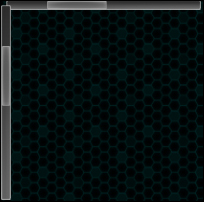
We will start by creating a clipped, draggable background, and then add linked scroll bars as shown in the following screenshot:

We want the player to be able to scroll on both axes. That means we need a background both larger and taller than the screen size. For this game, we will need quite a large environment to force him or her to scroll regularly. Let's create one that is twice the screen's size.
Perform the following steps to create the environment:
- Select our Panel GameObject and perform the following steps:
- Rename it as
Viewport. - Set its Clipping parameter to Alpha Clip.
- Set its Clipping Size to
1920x1080.
- Rename it as
- Add a Draggable Panel component to it by navigating to Component | NGUI | Interaction and perform the following steps:
- Set its Drag Effect parameter to Momentum. We don't want the player to scroll out of bounds with the spring effect.
- Set its Momentum Amount value to
10. Over 10, the background will continue scrolling too much on release. - Set its Scale parameter to {
1,1,0} to enable X and Y scrolling.
- Attach a Drag Panel Contents component to it by navigating to Component | NGUI | Interaction.
- Attach a collider to it by navigating to NGUI | Attach a Collider, and set its Size to {
3840,2160,1}.
Now that our Draggable Panel is set up, let's add a tiling background as shown in the following screenshot:

- Open the Widget Tool wizard by navigating to NGUI | Create a Widget. Then perform the following steps:
- If the Atlas field is set to None, drag the SciFi Atlas prefab in it by navigating to Assets | NGUI | Examples | Atlases.
- Select the Sprite template.
- Select the Honeycomb sprite.
- With our Viewport selected; click on the Add To button.
- Select the new Sprite (Honeycomb) GameObject and then perform the following steps:
- Rename it as
Background. - Set its Sprite Type to Tiled.
- Set its Color Tint value to {
0,40,40,255}. - Set its Depth value to
0. - Set its Dimensions to
3840x2160.
- Rename it as
Click on the play button. That's it, we now have a scrollable viewport. You can drag the background by dragging your mouse while clicking.
Let's add scroll bars to know where we are on the viewport. They must be on a separate panel rendered over our viewport, so that they won't move with the draggable background. Perform the following steps to add the scroll bars:
- Select our Anchor GameObject.
- Create a new child with Alt + Shift + N and rename it as
UI. - Add a Panel component to it by navigating to Component | NGUI | UI, and set its Depth to
1so that it can be displayed over the viewport. - Open the Widget tool wizard by navigating to NGUI | Create a Widget. Then perform the following steps:
- Select Scrollbar for the Template field.
- Select Dark sprite as Background.
- Select Highlight sprite as Foreground.
- Select Horizontal for Direction.
- With our UI GameObject selected, click on the Add To button.
- On our Widget Tool wizard window, select Vertical for Direction. With our UI GameObject selected, click on the Add To button.
We have created both our horizontal and vertical scroll bars at the center of the scene as shown in the following screenshot:
Now, we need to place them correctly and adjust their size to fit the entire screen.
- Select the vertical Scroll Bar GameObject and rename it as
VerticalScrollbar. - Attach an Anchor component to it by navigating to NGUI | Attach and perform the following steps:
- Drag our Viewport GameObject in the Container field.
- Set its Side parameter to TopRight.
- Set its Pixel Offset to {
-11,0}.
- Select our Background GameObject from VerticalScrollbar. Then perform the following steps:
- Set its Color Tint to {
130,255,245,110}. - Set the Center coordinates of Box Collider to {
0,-540,0}. - Set the Size of Box Collider to {
22,1080,0}.
- Set its Color Tint to {
- Attach a Stretch component to it by navigating to Component | NGUI | UI.
- Set its Style parameter to Vertical.
- Set its Relative Size values to {
1,0.983} in order to leave space for our horizontal scroll bar at the bottom of the screen.
- Select the Foreground GameObject from VerticalScrollbar, and set its Color Tint to {
0,255,128,255}.Our vertical scroll bar is configured. Let's do the same for the horizontal scroll bar.
- Select the horizontal Scroll Bar GameObject, and rename it as
HorizontalScrollbar. - Attach an Anchor component to it by navigating to NGUI | Attach. Then perform the following steps:
- Drag our Viewport GameObject into the Container field.
- Set its Side parameter to BottomLeft.
- Set its Pixel Offset to {
0,11}.
- Select our Background GameObject from HorizontalScrollbar and perform these steps:
- Set its Color Tint to {
130,255,245,110}. - Set the Center coordinates of Box Collider to {
960,0,0}. - Set the Size of Box Collider to {
1920,22,0}.
- Set its Color Tint to {
- Attach a Stretch component to it by navigating to Component | NGUI | UI, and set its Style parameter to Horizontal.
- Select the Foreground GameObject from HorizontalScrollbar, and set its Color Tint to {
0,255,128,255}.
Good. Both our horizontal and vertical scroll bars are set up. Now, we need to assign them to our scrollable viewport by performing the following steps:
- Select our Viewport GameObject.
- Drag our HorizontalScrollbar GameObject from UI to the Horizontal Scroll Bar field in UIDraggable Panel.
- Drag our VerticalScrollbar GameObject from UI to the Vertical Scroll Bar field in UIDraggable Panel.
- Change the Show Scroll Bars parameter to Always.
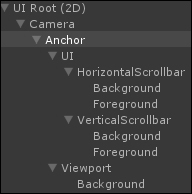
Click on the play button. That's it. Our scroll bars can be used to scroll, and they indicate where we are on the viewport as we scroll. Your hierarchy should be as shown in the following screenshot:
Now, let's add keyboard scrolling.
For this game, scrolling with the keyboard is important. In order to do so, we will create a custom script that will force our scroll bars to move depending on the pressed key. Select our Viewport GameObject, and attach a new KeyboardScroll.cs script to it. Open this new script, and declare the required variables and the Awake() method:
//We need the Scrollbars for keyboard scroll
UIScrollBar hScrollbar;
UIScrollBar vScrollbar;
public float keyboardSensitivity = 1;

void Awake()
{
  //Assign both scrollbars on Awake
  hScrollbar = GetComponent<UIDraggablePanel>().horizontalScrollBar;
  vScrollbar = GetComponent<UIDraggablePanel>().verticalScrollBar;
}
Okay, we have both of our scroll bars on Awake(), and a float value for sensitivity.
Now, let's check the horizontal and vertical input axes at each frame, and change our scroll bars' values consequently:
void Update()
{
  //Get keyboard input axes values
  Vector2 keyDelta = Vector2.zero;
  keyDelta.Set(Input.GetAxis("Horizontal"), Input.GetAxis("Vertical"));
  //If no keyboard arrow is pressed, leave
  if(keyDelta == Vector2.zero) return;
  //Make it framerate independent and multiply by sensitivity
  keyDelta *= Time.deltaTime * keyboardSensitivity;
  //Scroll by adjusting scrollbars' values
  hScrollbar.value += keyDelta.x;
  vScrollbar.value -= keyDelta.y;
}
Save the script and click on the play button. You can now scroll using the keyboard arrows. You may also adjust the Sensitivity parameter in the Inspector window as you see fit.
Now, it's time to create draggable barriers that we can drop inside our Viewport GameObject.