
Let's add some sprites to our new Game atlas. We will add the following three different types:
- Simple sprite: As its name suggests, it is simply an image displayed on screen
- Sliced sprite: In this, the image is sliced in nine parts and it is resizable without stretching corners
- Tiled sprite: In this, the tiling pattern is repeatable indefinitely
Let's start with the Simple sprites.
It is time to create two sprites, Bomb and Time, which will illustrate our powers. First, we need to create the sprites and add them to our Game atlas. They will look as shown in the following screenshot:
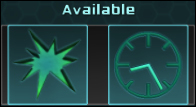
Note
You may either create them yourself, or download the Assets.zip file from http://goo.gl/bZu4mF.
If you wish to create your own sprites, a size of 128 x 128 will be enough. You can save them either as .png to support transparency, or as .psd files—they will be converted to the correct format when they will be imported in the Unity project.
When your Bomb and Time sprites are ready, or downloaded from the previous link, place them in a new Assets/Textures folder in your project. Then, perform the following steps:
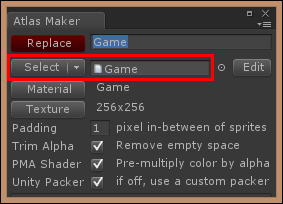
- Open Atlas Maker from NGUI, or Alt + Shift + M.
- Make sure that our new Game Atlas is selected, as shown in the following screenshot:
- In the Project view, select both our new Bomb and Time textures.
- Click on the Add/Update All button in Atlas Maker.
Good. Our two new sprites have been added to the Game atlas.
Let's add the icons to our Time and Bomb prefabs on the scene and perform the following steps:
- In the Hierarchy view, select Background by navigating to PowersContainer | Grid | Bomb and perform the following steps:
- Duplicate it.
- Rename this new duplicate as
Icon. - Change its Sprite Type parameter in UISprite to Simple.
- Set its Depth to
6so that it can be displayed over the background.
- Click on the Atlas button in UISprite and in the pop-up window, select our new Game atlas.
- Click on the Sprite button in UISprite and in the pop-up window, select our Bomb sprite.
- Select the Label GameObject from Bomb and perform the following steps:
- Delete it—the icon and tool tip are enough!
- A pop-up window appears, asking you if you want to continue because you will lose the prefab connection. Click on Continue.
- Select the Bomb GameObject from our Grid.
- Click on the Apply button in the Inspector view to update the prefab.
Good, our Bomb prefab is up to date with its new icon. Let's add the icon for the Time prefab by performing the following steps:
- Select our Icon GameObject Bomb and perform the following steps:
- Duplicate it.
- Drag this duplicate inside the Time GameObject.
- Reset its Transform position to {
0,0,0}. - Change its Sprite parameter to our own Time sprite.
- Change its Dimensions to
75x75.
- Select the Label GameObject from Time and then perform the following steps:
- Delete it—the icon and tool tip are enough!
- A pop-up window appears, asking you if you want to continue because you will lose the prefab connection. Click on Continue.
- Select the Time GameObject from Grid.
- Click on the Apply button in the Inspector view to update the prefab.
Let's also add icons for our SelectedBomb and SelectedTime prefabs so that they look nicer:
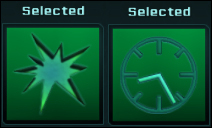
Perform the following steps to achieve this:
- From the Project view, drag the SelectedBomb prefab in our Surface GameObject.
- In the Hierarchy view, select our Icon GameObject from Grid/Bomb and perform the given steps:
- Duplicate it.
- Drag this duplicate inside our new SelectedBomb instance.
- Reset its Transform position to {
0,0,0}. - Set its Depth to
5. - Change its Dimensions to
120x120.
- Select the Label GameObject from SelectedBomb and delete it.
- Select the SelectedBomb GameObject from Surface and perform the given steps:
- Click on the Apply button in the Inspector view to update the prefab.
- Delete the SelectedBomb instance from the scene.
Let's follow the same steps for our SelectedTime prefab:
- From the Project view, drag the SelectedTime prefab in our Surface GameObject.
- In the Hierarchy view, select our Icon GameObject from Time and perform the following steps:
- Duplicate it.
- Drag this duplicate inside our new SelectedTime instance.
- Reset its Transform position to {
0,0,0}. - Set its Depth to
5. - Change its Dimensions to
100x100.
- Select the Label GameObject from SelectedTime, and delete it.
- Select the SelectedTime GameObject from Surface and perform the following steps:
- Click on the Apply button in the Inspector view to update the prefab.
- Delete the SelectedTime instance from the scene.
That's it. We have our own two icons for our powers. Now, we can learn how to create and configure our own nine-sliced sprite.
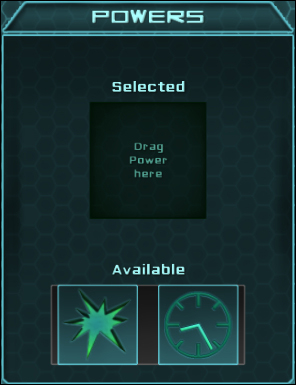
We used the dark sliced sprite all along this book. Let's create our own. Then, we will change the power selection box and the background sprites of Main Menu, as shown in the following screenshot:
You can use a 16 x 16 square sprite, such as the dark sprite. If you wish to have larger corners or add more details, simply use a larger texture size. You can also use the 64 x 64 Window.png file available in my Assets.zip archive.
When your new Window sprite is ready, place it in the Assets/Textures folder and perform the following steps:
- Open Atlas Maker by navigating to NGUI | Atlas Maker, or Alt + Shift + M and make sure our new Game atlas is selected.
- Select the new
Window.pngsprite file from Textures in the Project view. - Click on the green Add/Update All button in the Atlas Maker window.
Ok, Window.png has been added to our Game atlas, but it isn't configured. Yet.
The Window sprite has been added to the atlas, but we still need to indicate the UIAtlas component where the slicing must occur on the sprite. Let's replace our Background of Powers, and configure its slicing parameters.
In the Hierarchy view, select the Background GameObject from Powers and perform the following steps:
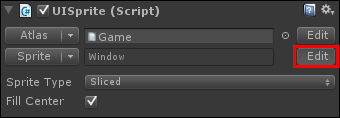
- Change its Atlas parameter in UISprite to our Game Atlas.
- Change its Sprite to our new Window sprite.
- Click on the Edit button next to the Sprite field, as shown in the following screenshot:
We are now in the sprite's parameter window. Here, we can configure its Dimensions, Border, and Padding. Set these Border values to define the slicing lines:
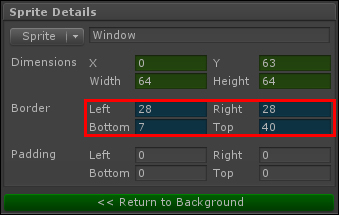
The values shown in the previous screenshot might be different if you created your own sprite.
The Window sprite should be sliced (as shown in the following screenshot) in the Preview window:
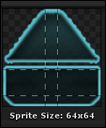
When you have entered your four values, you can click on the green Return to Background button in order to go back to where we were.
We now have a functional sliced sprite, but we need to adjust the title position of the powers. In the Hierarchy view, select our TitleLabel GameObject from Powers, and change its Pixel Offset in UIAnchor to {0, -18}.
Good! We configured our first sliced sprite and changed the power selection box's background sprite with it.
Let's change our Window sprite Main Menu too. In the Hierarchy view, select our Window GameObject from Container and perform the following steps:
- Change its Atlas to our Game Atlas.
- Change its Sprite to our new Window sprite.
The Main Menu title is not placed exactly inside the title bar. Let's change this by performing the following steps.
- Select the Title GameObject from Container, and change its Pixel Offset value in UIAnchor to {
0,10}. - Select the Background GameObject from Title and deactivate it for now.
- Select the Background GameObject from Container and then perform the following steps:
- Change its Relative Size in UIStretch to {
1,0.95}. - Change its Pixel Offset in UIAnchor to {
0,-17}.
- Change its Relative Size in UIStretch to {
Great. That looks better. If you wish, you may change the nickname box's background sprites with our new Window sprite. You can even change the buttons by using the sliced sprite Button.png included in the Assets.zip file.
Let's add a tiled sprite to create a space background for our Game scene.
You can use the Space.jpg file from the Assets.zip archive, or you may create a 256 x 256 tiling sprite representing stars in space. Place the Space.jpg sprite in the Assets/Textures folder, and then perform the following steps:
- Open our Game scene.
- Open Atlas Maker by navigating to NGUI | Atlas Maker, or Alt + Shift + M. Then perform the following steps:
- In the Project view, select our new
Space.jpgfile from Textures. - Click on the Add/Update All button of the Atlas Maker window.
- In the Project view, select our new
Ok, the new Space.jpg sprite has now been added to our Game Atlas. Let's change our Game scene's background to make it look like we're in space.
- Select the Background GameObject from Viewport.
- Change its Atlas to our Game Atlas.
- Change its Sprite to our new Space sprite.
- Change its Color Tint to {
140,200,200,255}.
That's it! Small stars are now tiling in the background. Now, it is time to add a font.