
Now we will learn how to add a text input to create a nickname box. Perform the following steps to do so:
- Select the Panel GameObject and create a new child with Alt + Shift + N. Then rename this new child as
Nickname. It will be our nickname box container. - Navigate to NGUI | Open | Widget Wizard.
- From the Project view, navigate to NGUI | Examples | Atlases | SciFi.
- Drag the SciFi Font – Normal prefab into the Font field.
- Select the Input template.
- Set Sprite (Dark) as the Background parameter.
- With the Nickname GameObject selected, click on the Add To button.
A new widget named Input has been added to the scene.
An Input GameObject has been created. Let's look at its Inspector parameters:
- Input Label: This is the text label that is to be used for this input.
- Inactive Color: This is the text color while the text is not selected.
- Active Color: This is the text color while the text is being edited.
- Default Text: This is either Blank or with the label's default text. Blank will delete the label's text when the Input GameObject is selected.
- Keyboard Type: This allows the different sets of characters to be authorized. This will also change the keyboard layout on mobile platforms.
- Select on Tab: Drag into this field the GameObject that you want to be selected when the Tab key is pressed while editing the input.
- Auto-save Key: This enables the label's text to be automatically saved to the specified
PlayerPrefs()key. - Max Characters: This is the number of maximum characters allowed.
0means infinite. - Carat Character: This is the end of text character.
- Password: If you activate this Boolean, the label's characters will be replaced by * on the screen.
- Auto-correct: This enables or disables autocorrection on mobile platforms.
Let's use this text input to create a nickname box that will look like the following screenshot:

Let's create the nickname box seen in the preceding screenshot. Perform the following steps to do so:
- Duplicate the Window GameObject and perform the following steps:
- Rename the new duplicate as
Background. - Drag it into the Nickname container GameObject.
- Enter Depth as
2. - Set Dimensions to
440x120.
- Rename the new duplicate as
- Select our Input GameObject and perform the following steps:
- Reset its Box Collider component's center to {
0,0,0}. - Type in
Nicknamefor the Auto-save Key parameter. - Enter Max Characters as
25.
- Reset its Box Collider component's center to {
- Attach a component to it by navigating to NGUI | Attach | Anchor and perform the following steps:
- Drag the Background GameObject from Nickname inside the Container field.
- Set the Pixel Offset to {
0,-17}.
- Duplicate the Label child GameObject from Title and perform the following steps:
- Drag it inside the Nickname GameObject.
- Change its text to
[AAFFFF]Nickname. - Drag the Background GameObject from Nickname inside the Container field.
- Set the Side parameter to Top.
- Set Pixel Offset to {
0,-32}.
- Select the Background child GameObject from Input and perform the following steps:
- Enter Depth as
3. - Set Pivot to Center (middle button + middle button).
- Reset the Transform field's position to {
0,0,0}. - In the Color Tint parameter, change R to
100, G to230, B to255, and A to255.
- Enter Depth as
- Select the Label child GameObject from Input and perform the following steps:
- Enter Depth as
4. - Set Pivot to Center (middle button + middle button).
- Reset the Transform field's position to {
0,0,0}. - Change the Label GameObject's text to
Enter your Name Here.
- Enter Depth as
- Select the Nickname container GameObject.
- Attach a component to it and navigate to NGUI | Attach | Anchor and perform the following steps:
- Drag-and-drop our Window GameObject inside the Container field.
- Set the Side parameter to Top.
- Set Pixel Offset to {
0,-220}.
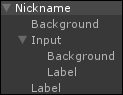
Ok, we have a Nickname box. Your Hierarchy view should look like the following screenshot:
The user can enter his nickname, up to 25 characters. If you move or change the window's dimensions, our box will move to stay at the same place.
..................Content has been hidden....................
You can't read the all page of ebook, please click here login for view all page.