
We will now create our own drag-and-drop system that will enable the user to select a power. They will be able to drag one of the two available powers inside a selection box as shown in the following screenshot:
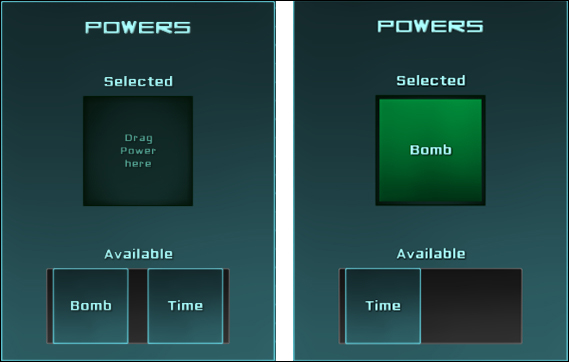
Let's create a drag-and-drop system to select which of the two powers the player can choose: a Bomb power, which will explode or a Time power, which will slow down time for a few seconds.
Let's start by creating a nice box for our powers and a draggable items container by performing the following steps:
- Select our MainMenu GameObject and perform the given steps:
- Create a new empty child GameObject by pressing Alt + Shift + N.
- Rename it as
Powers.
- Select the Background and Label GameObjects from Sound:
- Duplicate them.
- Drag these new duplicates inside our Powers GameObject.
- Select the Background GameObject in Powers and perform these steps:
- Set its Dimensions to
320x420. - Set the Pixel Offset in UIAnchor to {
0,-100}.
- Set its Dimensions to
- Select the Label GameObject in Powers:
- Rename it as
TitleLabel. - Change its text to
[AAFFFF]Powers.
- Rename it as
- Select the Label GameObject, which is a child of Title, and perform the following steps:
- Duplicate it.
- Rename this new duplicate as
SelectedLabel. - Drag it inside our Powers GameObject.
- Drag our Background GameObject in Powers to the Container field in its UIAnchor.
- Set its Side parameter in UIAnchor to Top.
- Set its Pixel Offset in UIAnchor to {
0,-95}. - Change its Font to
SciFi Font – Normal. - Change its text to
[AAFFFF]Selected.
- Select our SelectedLabel GameObject in Powers and perform the following steps:
- Duplicate it.
- Rename this new duplicate as
AvailableLabel. - Change its text to
[AAFFFF]Available. - Set its Pixel Offset in UIAnchor to {
0,-295}.
- Select our SelectedLabel GameObject in Powers and perform these steps:
- Duplicate it.
- Rename this new duplicate it as
InstructionsLabel. - Change text to
[55AA99]Drag Power Here—one word per line. - Set its Overflow parameter to Shrink Content.
- Set its Depth to
4. - Set its Dimensions to
128x45. - Set its Pixel Offset in UIAnchor to {
0,-175}.
- Select our Background sprite GameObject in Powers and perform the following steps:
- Duplicate it.
- Rename this new duplicate as
PowersContainer. - Set its Dimensions to
215x90. - Set its Color Tint to {
100,100,100,255}. - Set its Depth to
3. - Drag our AvailableLabel GameObject from Powers to the Container field in its UIAnchor.
- Set its Pixel Offset in UIAnchor to {
0,-60}.
Ok, we now have our powers box with the correct labels and a background.
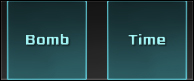
Now that we have the PowersContainer, let's create the following two draggable items:
Follow the ensuing steps to create them:
- Select our PowersContainer GameObject in Powers.
- Create a new child GameObject with Alt + Shift + N and rename it as
Bomb. - Attach a Collider object to it by navigating to NGUI | Attach. It will be used to detect the mouse and receive the correct messages for the drag-and-drop system by performing the following steps:
- Check the Is Trigger Boolean.
- Set its Size field of new Box Collider to {
90,90,1}.
- Attach a Drag Object component to it by navigating to Component | NGUI | Interaction:
- Drag our Bomb from PowersContainer in its Target field.
- Set its Scale to {
1,1,0}. - Set the Momentum Amount to
0.
- Select and duplicate the Background sprite GameObject in Powers. Then perform the following steps:
- Drag it inside our new Bomb GameObject.
- Set its Depth to
5. - Set its Dimensions to
90x90. - Remove its UIAnchor component.
- Reset its Transform position values to {
0,0,0}.
- Select and duplicate the AvailableLabel GameObject in Powers. Then perform these steps:
- Rename that new duplicate as
Label. - Drag it inside our new Bomb GameObject.
- Change its text to
[AAFFFF]Bomb. - Set its Depth to
6. - Remove its UIAnchor component.
- Reset its Transform position values to {
0,0,0}.
- Rename that new duplicate as
- Select our Bomb GameObject.
- Attach a Button Color component to it by navigating to Component | NGUI | Interaction and perform these steps:
- Drag our Background GameObject from Bomb to the Target field.
- Set its Pressed
0,255,0,150}.
- Create a new
DragItem.csC# script and attach this script to the Button Color component.
We have one draggable Bomb power with a DragItem.cs script attached to it. Let's create the second Time power by performing the following steps:
- Select and duplicate our Bomb GameObject in PowersContainer.
- Rename that new duplicate as
Time. - Select our new Label GameObject, which is a child of Time.
- Change its text to
[AAFFFF]Time.
Ok, we now have our two draggable Powers, and they are on top of each other. Let's correct this using Anchors and a Grid component, which will automatically align our items. We can do this using the following steps:
- Select our PowersContainer GameObject.
- Create a new child by pressing Alt + Shift + N and rename this new child as
Grid. - Attach a Grid component to it by navigating to Component | NGUI | Interaction.
- Drag both our Bomb and Time GameObjects in our new Grid GameObject.
- Select our Grid GameObject and perform the following steps:
- Set its Cell Width to
105. - Check the Sorted Boolean.
- Check the Reposition Now Boolean to update the table.
- Set its Transform position to {
-52,0,0}.
- Set its Cell Width to
The UIGrid component automatically aligns its children. We now have our two draggable powers aligned. If you click on play, you'll see that you can drag them around as shown in the following screenshot:
We will create a new Surface GameObject with a DropSurface.cs script and a Box Collider component to define where the draggable items can be dropped.
When the user drops an object with a DragItem component on the Surface GameObject, the DragItem component will be destroyed, and a "dropped version" of the object will be instantiated as a child of the Surface GameObject.
First, let's create and configure the Surface GameObject by performing the following steps:
- Select and duplicate our Background GameObject from Powers and rename this new duplicate as
Surface. - Select our new Surface GameObject from Powers and perform these steps:
- Change its Sprite to Highlight.
- Change its Color Tint to {
0,25,5,255}. - Set its Depth to
3. - Set its Dimensions to
130x130. - Drag our SelectedLabel GameObject from Powers to the Container field in its UIAnchor.
- Set its Pixel Offset to {
0,-80}.
- Attach a Collider object to it by navigating to NGUI | Attach | Collider. It will detect DragItems. Then perform the following steps:
- Check its Is Trigger Boolean.
- Set its Size to {
130,130,1}.
- Create and attach a new
DropSurface.csC# script to it.
Good, our surface is now ready to detect our items.
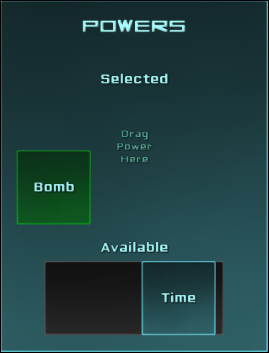
Now, we need to create two prefabs for our powers that will be instantiated as children of the Surface GameObject when a DragItem component is dropped on it. They will look as follows:
Let's create these prefabs by performing the following steps:
- Select the Bomb GameObject from Grid and the following steps:
- Duplicate it.
- Rename it as
SelectedBomb.
- Select our new SelectedBomb GameObject from Grid. Then perform the following steps:
- Change its Normal color tint to R:
0, G:145, B:60, and A:255. - Remove its Box Collider component.
- Remove its Drag Item component.
- Change its Normal color tint to R:
- Create and attach a new
Power.csC# script to it. - Select the Background sprite GameObject from SelectedBomb. Then perform the following steps:
- Change the Sprite to Light.
- Set its Depth to
4. - Set its Dimensions to
120x120.
- Select the Label GameObject from SelectedBomb and set its Depth to
5. - Drag our SelectedBomb GameObject into a folder of your choice in your Project view to create a prefab from it.
- Once our SelectedBomb is a prefab (blue in the scene's Hierarchy), you may delete it from the scene.
We now have our SelectedBomb prefab. Let's declare a variable in our DragItem.cs script that will store the prefab to instantiate on drop. We can do this by following the ensuing steps:
- Select our Bomb GameObject from Grid.
- Open the
DragItem.csscript attached to it and add this public variable using the following code:public Object CreateOnDrop;
- Save the script and go back to Unity.
- Select our Bomb GameObject from Grid and drag our SelectedBomb prefab from the Project view in the Create On Drop field in its Drag Item.
Now let's do the same for our Time power in the following manner:
- Select our SelectedBomb prefab in the Project view and perform the following steps:
- Duplicate it with Ctrl + D.
- Rename the new duplicate prefab as
SelectedTime.
- Select its Label child GameObject and change its text to
[AAFFFF]Time. - Select our Time GameObject from Grid in the scene's Hierarchy.
- Drag our SelectedTime prefab from the Project view in the Create On Drop field in its Drag Item.
We can now add an OnDrop() method to our DropSurface.cs script to handle dropped objects in the following manner:
- Select our Surface GameObject from Powers.
- Open its attached
DropSurface.csscript.
The OnDrop() event has one argument: the dropped GameObject. Let's add this method to our script to handle the drop by using the following code snippet:
//Called when an object is dropped on DropSurface
public void OnDrop(GameObject dropped)
{
  //Get the DragItem from the dropped object
  DragItem dragItem = dropped.GetComponent<DragItem>();
  //If it has none, don't go further
  if(dragItem == null) return;
  //Instantiate the defined CreateOnDrop Object
  GameObject newPower = NGUITools.AddChild(this.gameObject, dragItem.CreateOnDrop as GameObject);
  //Destroy the dropped Object
  Destroy(dropped);
}
Save the script and click on the play button. When you drop a power on the Surface GameObject, nothing happens! Why?
That's because the OnDrop() event depends on the Raycast from Camera, and at the moment of the drop, our dragged power's Box Collider component is in the way of the mouse cursor and the Surface GameObject.
We just have to disable the collider of Power while it is dragged. We can do this in the following manner:
- Select our Bomb GameObject from Grid.
- Open its attached
DragItem.csscript.
We will use the OnPress() event to do this. The OnPress() method will take the object's pressed state as an argument in the following manner:
//Method called when the Item is Pressed or Released
void OnPress(bool pressed)
{
  //Invert the collider's state
  collider.enabled = !pressed;
}
Save the script and click on play. You can now drag-and-drop the powers on the surface!
Now, let's make sure power is repositioned to its default position if the user drops it outside the Surface GameObject.
To achieve this, we can check the camera's last hit when the OnPress(false) event occurs. Open our DragItem.cs and add the following lines after collider.enabled = !pressed:
//If the Item is released
if(!pressed)
{
  //Get the last hit collider
  Collider col = UICamera.lastHit.collider;
  //If there is no collider, or no DropSurface behind the Power
  if(col == null || col.GetComponent<DropSurface>() == null)
  {
    //Get the grid in parent objects
    UIGrid grid = NGUITools.FindInParents<UIGrid>(gameObject);
    //If a grid is found, order it to Reposition now
    if(grid != null) grid.Reposition();
  }
}
Save and click on play. If you drop a Power anywhere but on the Surface GameObject, our items will be repositioned automatically. Great!
A slight problem: you can drop both of them on the surface, and then you're stuck. Let's explore the solution in the following sections.
We will now ensure that you can only have one power on the surface. If you drag a second one while the DropSurface is already occupied, the current power will be replaced by the new one and the drag item component will reappear in the PowersContainer GameObject.
We will need to know which power is currently dropped on the surface and which original drag Item component must be instantiated in Grid in PowersContainer:
- Select our SelectedBomb prefab in the Project view.
- Open its attached
Power.csscript.
This script will be used to contain information about the dropped item. Let's declare a new enum to distinguish which type of power, and an Object variable to set which prefab will be instantiated to make the draggable item in power reappear when replaced:
//Declare an enum to define type of Power
public enum Type
{
  None,
  Time,
  Bomb
}
//Declare a Type variable to choose it in Inspector
public Type type;
//Object variable to define the DragItem to recreate
public Object createOnDestroy;
Now, we need to go back to Unity and create prefabs for our Bomb and Time draggable items before we assign them to the createOnDestroy variables:
- Select our Bomb GameObject from Powers in the Hierarchy of Scene and drag it into a folder of your choice in your Project view to create a prefab from it.
- Select our SelectedBomb Prefab in the Project view and perform the following steps:
- Set its Power component's Type variable to Bomb.
- Drag our new Bomb Prefab from the Project view to the Power component's Create On Destroy field.
We assigned the Type parameter of SelectedBomb to Bomb, and it now has an assigned prefab that we will instantiate to recreate the draggable item when it gets replaced.
Now, we have to code a system that will register which type of power is currently selected. We'll use the GameManager.cs script in the following manner to store it:
- Open our
GameManager.csscript and declare this new static variable://This static variable will contain the selected power public static Power.Type SelectedPower = Power.Type.None;
- Add this new static method to set our
SelectedPowerfrom other scripts://This static method changes the SelectedPower value public static void SetPower(Power.Type newPower) { SelectedPower = newPower; }
Ok, we now have a method to register the currently selected power. It is time to modify our DropSurface.cs script:
- Select our Surface GameObject from Powers and open the
DropSurface.csscript. - Declare a new
GameObjectvariable to store our Grid GameObject:public GameObject dragItemsContainer;
- Save the script, select our Surface GameObject from Powers in the Hierarchy view. Drag our Grid GameObject from PowersContainer in its DropSurface component's Drag Items Container field.
Now, go back to our DropSurface.cs script. We will add these following lines to handle the fact that the user cannot drop two powers on the surface; it will replace the previous one and recreate its original Drag Item. In the OnDrop() method, just below the if(dragItem == null) return line, add the following:
RecreateDragItem();
Now, add a new RecreateDragItem() method to the file:
void RecreateDragItem()
{
  //If there's already a Power selected
  if(GameManager.SelectedPower != Power.Type.None)
  {
    //Get the selected power's Power.cs script
    Power selectedPowerScript = transform.GetChild(0).GetComponent<Power>();
    //Add the Drag Item to the grid
    NGUITools.AddChild(dragItemsContainer, selectedPowerScript.createOnDestroy as GameObject);
    //Destroy the currently selected Power
    Destroy(selectedPowerScript.gameObject);
  }
}
Ok, we now have to inform the GameManager.cs script that the selected Power has changed. We can do this by calling our SetPower() static method.
Add the following line in the OnDrop() method just before the Destroy(dropped) line:
//Set the new selected power in the GameManager
GameManager.SetPower(newPower.GetComponent<Power>().type);
Save all the scripts and click on the play button. You can drop the first Power on the Surface GameObject and then drop the second one. The first power is now replaced and will reappear in the Available power container.
Unfortunately, we cannot simply remove the power. Let's correct this in the following sections.
We want to remove the selected power by clicking on it. In our DropSurface.cs script, add this new OnClick() method that will be called when the user clicks on the surface:
void OnClick()
{
  //Recreate the DragItem now
  RecreateDragItem();
  //Reset SelectedPower to None
  GameManager.SetPower(Power.Type.None);
  //Force reposition of the grid
  dragItemsContainer.GetComponent<UIGrid>().Reposition();
}
Now click on play. You can now remove the selected power by right- or left-clicking on it.