
One great aspect of NGUI is that you can use Unity's animation system on any kind of widget. There also are some Tween components that let you modify most values over time, such as dimensions, color, and scale. For example, you can change an object's color from color A to color B in 5 seconds.
We have a nice main menu. But we actually have our options that are constantly displayed. That is not very user friendly.
We will use animations and tweens to hide our options and show them only when the user clicks on the Options button. With options hidden, our menu will look as shown in the following screenshot:
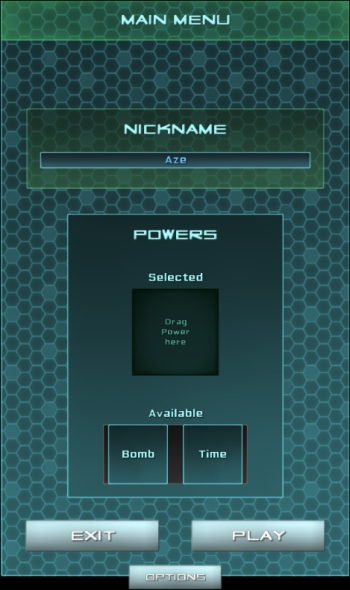
But first, let's make our powers' apparition smoother.
Let's add Scale Tweens on our prefabs to make them appear smoothly by performing the following steps:
- In the Project view, select our SelectedBomb prefab.
- Attach a Scale Tween component by navigating to Component | NGUI | Tween and perform the following steps:
- Set its From parameter to {
0,0,0,}. - Set its Duration to
0.2.
- Set its From parameter to {
- Right-click on the Tween Scale component and then click on Copy Component.
- Select our SelectedTime, Bomb, and Time prefabs.
- In the Inspector view, right-click on any existing component name and click on Paste Component As New.
Now, as soon as these widgets are created, they scale from 0 to 1 in 0.2 seconds, which makes them appear smoothly.
We can now see how we'll hide and show options using a button.
First, we have to hide our option boxes. To do that, we will use Panel Clipping and increase their width when we need to show them. Let's set up the Clipping option:
- Select our Window GameObject from MainMenu and set its Dimensions to
515x850. - Select the MainMenu GameObject and perform the following steps:
- Set its Depth in UIPanel to
-1. - Create a new child for MainMenu with Alt + Shift + N.
- Rename this new child as
Container.
- Set its Depth in UIPanel to
- Select our new Container GameObject.
- Attach a Panel component to it by navigating to Component | NGUI | UI. Then perform the following steps:
- Set its Depth to
0. - Set its Clipping parameter to Alpha Clip.
- Set its Size to
515x1080.
- Set its Depth to
- Fold all the children of MainMenu using the arrow next to each of them.
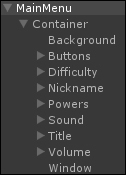
- Select every child of MainMenu, except the new Container child, and drag them all inside our new Container GameObject.
Good, our options are now hidden. Your Hierarchy should look as shown in the following screenshot:
Let's add an Options button that will show or hide these options:
- Select and duplicate our Play
Options. - Select our new Options GameObject from Buttons and perform the following steps:
- Set its Side parameter in UIAnchor to Bottom.
- Reset its Pixel Offset in UIAnchor to {
0,0}. - Set its Size in Box Collider to {
140,40,0}. - Remove its Load Level On Click component.
- Select our Background GameObject from Options and set its Dimensions to
140x40. - Select our Label GameObject from Options:
- Change its text to
Options. - Set its Overflow parameter to Shrink Content.
- Set its Dimensions to
90x25.
- Change its text to
Ok, so now we have an Options button. Next, we want it to enlarge our Window and the Panel Clipping width of Container when clicked. We can do this using code, but we will use tweens and animations in the following manner to see how they work:
- Select our Window GameObject in Container.
- Attach a Tween Width component to it by navigating to Component | NGUI | Tween. Then perform the following steps:
- Set its From parameter to
515. - Set its To parameter to
1300. - Set Duration to
0.5. - Reset Dimensions to
515x850. - Disable the Tween Width component to prevent it from tweening at start.
- Set its From parameter to
We have a Tween component that will resize the width of Window when activated. Let's use the UIPlay Tween component to start it when the Options button is clicked on:
- Select our Options button GameObject.
- Attach a Play Tween component by navigating to Component | NGUI | Interaction. Then perform the following steps:
- Drag our Window GameObject from Container in the Tween Target field.
- Set the Play direction to Toggle.
Click on play. You will see that the window resizes as needed when Options is clicked. However, the Clipping parameter doesn't. Let's correct this using a Unity animation:
- Select our Container GameObject from MainMenu.
- Open the Animation window by navigating to Window | Animation.
- Click the red record button.
- Save the animation as
ShowOptions.animand perform the following steps:- Re-enter
515for the clipping X Size from UIPanel to add a key. - Move the time cursor in the Animation window to
0:30. - Enter
1300for the clipping X Size from UIPanel to add a key. - Click on the red record button again to finish.
- Re-enter
- Uncheck its Play Automatically Boolean in the Animation component.
We have our animation ready. Now, let's link the button to the animation in the following manner:
- Select our Options GameObject from Buttons.
- Attach a Play Animation component to it by navigating to Component | NGUI | Interaction. Then perform the following steps:
- Drag our Container GameObject from MainMenu in the Target field.
- For the Clip Name parameter, type in
ShowOptions. - Set the Play direction to Toggle.
Click on play. Our window and clipping both resize perfectly in both directions when the Options button is clicked.
But you can see that our Options widgets aren't visible until you actually drag the main menu around; that's because the clipping is not refreshed after the animation.
- To solve this, we can simply force a Drag at the end of the Animation option.
- Select our MainMenu GameObject and perform the following steps:
- Create and add a new
UpdatePanel.csscript to it. - Open our new
UpdatePanel.csscript.
- Create and add a new
- Now, add this new
UpdateNow()method to the script that will force a drag of (0, 0, 0) value on our MainMenu:public void UpdateNow() { //Force a drag of {0, 0, 0} to update Panel GetComponent<UIDraggablePanel>().MoveRelative(Vector3.zero); } - Save the script and then perform the following steps:
- Select our Options GameObject in Buttons.
- Drag our MainMenu GameObject in the Notify field of the UIPlay Animation component.
- Choose our new
UpdatePanel.UpdateNowmethod for the Method field.
- Click on the play button. The Options boxes now appear after the animation!
Great! We have used NGUI's Tween and Play Animations components to enhance our UI and make it nicer and more user friendly.