
In this chapter, we will talk about C# scripting with NGUI. We will learn how to handle events and interact with them. We'll use them to:
- Play animations and Tweens
- Change labels using localized text through code
- Add keyboard keys for our UI
- Create notifications and tool tips
We will also see some of the NGUI's code-oriented components, such as event forwarding and message sending.
When using C# with NGUI, there are some methods that you will regularly use when you need to know if your object is currently hovered upon, pressed, or clicked.
If you attach a script to any object with a collider on it (for example, a button or a 3D object), you can add the following useful methods in the script to catch events:
OnHover(bool state): This method is called when the object is hovered or unhovered. Thestatebool gives the hover state; ifstateistrue, the cursor just entered the object's collider. Ifstateisfalse, the cursor has just left the collider's bounds.OnPress(bool state): This method works in the exact same way as the previousOnHover()method, except it is called when the object is pressed. It works with a touch or click. If you need to know which mouse button was used to press the object, use theUICamera.currentTouchIDvariable; if this int is equal to -1, it's a left-click. If it's equal to -2, it's a right-click. Finally, if it's equal to -3, it's a middle-click.OnClick(): This method is similar toOnPress(), except that this method is exclusively called when the click is validated, meaning when anOnPress(true)event occurs followed by anOnPress(false)event. It works with mouse click and touch.OnDrag(Vector2 delta): This method is called at each frame when the mouse or touch moves between theOnPress(true)andOnPress(false)events. TheVector2deltaargument gives you the object's movement since the last frame.OnDrop(GameObject droppedObj): This method is called when an object is dropped on the GameObject on which this script is attached. The dropped GameObject is passed as thedroppedObjparameter.OnSelect(): This method is called when the user clicks on the object. It will not be called again until another object is clicked on or the object is deselected (click on nothing).OnInput(string text): This method is called when the user types in text while an object is selected. Thetextparameter gives the entered text.OnTooltip(bool state): This method is called when the cursor is over the object for more than the duration defined by the Tooltip Delay inspector parameter of UICamera. If the Sticky Tooltip Boolean of UICamera is checked, the tool tip will remain visible until the cursor moves outside the Collider's Bounds, otherwise the tool tip disappears as soon as the cursor moves.OnScroll(float delta): This method is called when the mouse's scroll wheel is moved while the object is hovered—the delta parameter gives you the amount and direction of the scroll.OnKey(KeyCode key): This method is called when the user clicks on a key while the object is selected. The pressed key is stored in thekeyparameter.
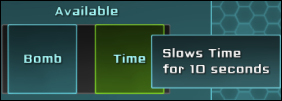
Let's now use the OnTooltip() event to show a tool tip for our powers, as shown in the following screenshot:
We will also make sure it is localized using methods integrated with NGUI.
First, we will create our tool tip that will be shown when needed. These are the steps to do so:
- Select and duplicate our Help GameObject with Ctrl + D. Then perform the following steps:
- Rename this new duplicate as
Tooltip. - Set Depth in UIPanel to
4. - Set Clipping in UIPanel to None.
- Remove its Box Collider component.
- Remove its UIDrag
Objectcomponent. - Remove its UIAnchor component.
- Reset its Transform position to {
0,0,0}.
- Rename this new duplicate as
- Select our new Background, which is a child GameObject of Tooltip. Then perform the following steps:
- Set its Depth value to
0. - Set its Pivot parameter to Top Left (left arrow + up arrow).
- Reset its Transform position to {
0,0,0}. - Set its Dimensions to
200x50.
- Set its Depth value to
- Select Label, which is a child GameObject of Tooltip. Then perform the following steps:
- Set its Depth
1. - Change its text to
This is a Tooltip. - Change its Overflow parameter to Resize Height.
- Remove its Tween Position component.
- Remove its UILocalize component.
- Set its Pivot parameter to Top Left (left arrow + up arrow).
- Set its Transform position to {
15,-15,0}. - Set its Dimensions parameter to
200x20.
- Set its Depth
- Select our Tooltip GameObject.
- Attach a Tooltip to the selected object by navigating to Component | NGUI | UI and perform the following steps:
- Drag our Label GameObject from Tooltip to its Text field.
- Drag our Window GameObject from Tooltip to its Background field.
Ok. Our tool tip is ready to be displayed. The fact that we have set the Pivot parameter of Label under Tooltip to Top left, with a position of {15, -15, 0}, will force a margin between the text and the background sprite.
The Overflow parameter will let the text be resized in height only, which will make our tool tip coherent even if we have a long tool tip—the Background sprite will automatically resize to fit the Label GameObject.
We must now show the tool tip when needed. In order to do that, we just need to use the OnTooltip() event, in which we will create a new tool tip with localized text.
In the Project view, select both our Time and Bomb prefabs and create and add a new TooltipManager.cs C# script to it.
You can now open this new TooltipManager.cs script and declare the following enum, which will define which type of tool tip it must display:
//Enum to define which type of tooltip must be shown
public enum Type
{
  Bomb,
  Time
}

//Declare the Type enum variable
public Type type;
Ok, now add the following OnTooltip() method that will create a tool tip with localized text depending on its current type:
//When a Tooltip event is triggered on this object
void OnTooltip(bool state)
{
  //If state is true, create a new Tooltip depending on the type
  if(state)
    UITooltip.ShowText(Localization.instance.Get(type.ToString() + "Tooltip"));
  //If state is false, hide tooltip by setting an empty string
  else
  UITooltip.ShowText("");
}
Save the script. As you can see, we use a useful Localization.instance.Get(string key) method that returns localized text of the corresponding key parameter that is passed. You can now change a label to localized text through code anytime!
Ok, we have added the code to show our tool tip with localized text. Now we have to add these localized strings to the English.txt file using the following code:
BombTooltip = Explodes all
enemies at once
TimeTooltip = Slows Time
for 10 seconds
Similarly, add the following lines in the French.txt file:
BombTooltip = Détruit tous les ennemis d'un coup
TimeTooltip = Ralentit le temps pour 10 secondes
Save these files and go back to Unity to assign the TooltipManager type's variables by performing the following steps:
- In the Project view, select our Bomb prefab and set its Type field in TooltipManager to
Bomb. - In the Project view, select our Time prefab and set its Type field in TooltipManager to Time.
Click on the play button. When you leave your cursor on the Bomb or Time power in the Available powers slot, our localized tool tip appears! I actually have the feeling that the delay is too long. Let's correct this.
- Select our Camera GameObject from UI Root (2D) and set its Tooltip Delay value in UICamera to
0.3.
That's better—our localized tool tip appears within 0.3 seconds of hovering.