
For optimization, NGUI uses bitmaps instead of true type fonts. We need to export our .ttf or .otf fonts to a bitmap using a free third-party tool called BMFont
, which was created by AngelCode.
Then, we will need a .txt file that will contain information about where each glyph is located in the exported font's bitmap. You can download the BMFont from www.angelcode.com/products/bmfont/. Free-to-use fonts are available at www.openfontlibrary.org/.
For our first font, we will use the Pacaya font created by Daniel Johnson—it is included in the Assets.zip archive. Download, install, and launch BMFont. Install the font now by right-clicking on the Pacaya.otf file and then selecting Install.
Once BMFont is launched and the Pacaya font is installed, go to Options | Font Settings. You can now select the Pacaya font in the Font field. The Size(px) field defines the font's size at export in pixels—set it to 24 and click on OK.
Our .otf file is loaded, and we can visualize and select the characters that we want to export with a left-click or click-and-drag. Select them all with Ctrl + A.
Go to Options | Export options. Here, you must set the Bit depth to 32. Now, the only thing you need to check is the Width and Height value of the bitmap.
To see if it's currently big enough, click on OK and go to Options | Visualize. The window shown in the following screenshot appears:
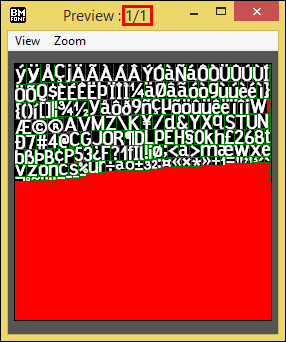
The red space represents wasted space. As you can see, we have a large amount of wasted space. You must try to set the bitmap size to reduce this red space as much as possible, while making sure you have enough space for all characters.
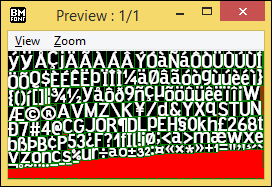
If your bitmap size is too small and can't hold all your characters, the Preview window's title will show Preview : 1/2 instead of Preview : 1/1, as shown in the following screenshot. Then, you should increase the bitmap size utile it displays Preview : 1/1. For the Pacaya font with all characters selected, enter 256 x 128. It should look as shown in the following screenshot:
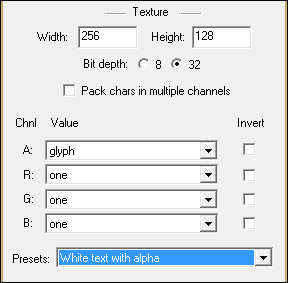
Once you have set the correct bitmap size, go back to Options | Export Options. Then, make sure the Presets field is set to White text with alpha in order to have R, G, and B channel values at one and the glyph in channel A:
When you've done that, go to Options | Save bitmap font as… and name it Pacaya. The .fnt file extension will be added automatically. Inside the output folder you selected, you should have a Pacaya_0.tga file—the actual font bitmap—and a .fnt file.
Ok, now copy these two files in a new Assets/Fonts/Sources folder.
We have our new font files. We must now create a new font for NGUI using these files.
In Unity, perform the following steps:
- Open the Font Maker window by navigating to NGUI | Font Maker, or Alt + Shift + F.
- In the Project view, browse to your
Assets/Fonts/Sourcesfolder. - Drag your
Pacaya.fntfile in the Font Data field in Font Maker. - Drag the
Pacaya_0.tgafile in the Texture field in Font Maker. - Enter
Pacayain the Font Name field. - Click on the Atlas button and choose our Game Atlas.
- Select any file in the
Sourcesfolder in the pathAssets/Fonts/of our Project view—our font will then be added to the current folder, but you need to actually select a file inside the desired destination for it to work. - Click on the green Create the Font button.
A new Pacaya prefab has been created in the Sources folder in the path Assets/Fonts/. That's the prefab NGUI needs to display the font.
Select it in the Project view, and drag it inside our Fonts folder in Assets. If you cannot find it, simply type your font's name in the Project view's search bar.
Now that we have added a new font to our project, let's assign it to a Label:
- Open our Menu scene.
- Select our Label GameObject by navigating to MainMenu | Container | Nickname | Input and perform the following steps:
- Click on the Font button in UILabel.
- Choose our new Pacaya font.
Ok. We have added a new font to our project and assigned it to a label!