
To control BeagleBone from the Internet we need to run an HTTP server on it. BeagleBone already has Node.js running as the HTTP server to be able to run Cloud9 on port 3000. There are built-in Node.js HTTP interfaces that can be used to create a new HTTP server on a specified port number. Once created, this server listens to HTML queries on the specified port. On request, it sends an HTML file to the client. The client browser renders this HTML file. So, we have to write JavaScript code to run the Node.js HTTP server and write an HTML file to be displayed. Let's create a HTML file first.
Open Cloud9 IDE and open a new file tab. Write the following code in it and save it as iot.html.
The code for iot.html is as follows:
<!DOCTYPE html>
<html>
<body>
  <h1>Beaglebone IoT</h1>
  <h2><a href="/led.html">LED</a></h2>
  <h2><a href="/servo.html">Servo</a></h2>
</body>
</html>
This is simple HTML code. This file can be viewed using the web browser. It has big header text—Beaglebone IoT. It has two links pointing to led.html and servo.html files, which do not exist yet. We will soon create them.
Let's create the Node.js HTTP server. Write this program in Cloud9 and save as baseHttpServer.js. Run this program. It will run a new Node.js server on port number 3001. Open the web browser from your laptop/computer/smartphone connected to the same router your BeagleBone is connected to. Put this address in the address bar: http://<Beaglebone's ip address>:3001/iot.html. We covered how to obtain BeagleBone's IP address in Chapter 1, Cloud9 IDE. Suppose BeagleBone's IP address is 192.168.7.2, then the address should be http://192.168.7.2:3001/iot.html. You should be able to see the text Beaglebone IoT in the browser.
The code for baseHttpServer.js file is as follows:
var http = require("http");
var fs = require('fs'),
var url = require('url'),
var port = 3001;

var myServer = http.createServer(httpRequestHandler);
myServer.listen(port);
function httpRequestHandler(request, response)
{
  var fullPath = '/var/lib/cloud9' + url.parse(request.url).pathname;
  console.log('fullPath: ', fullPath); //print file path
  fs.readFile(fullPath,fileReadHandler);
  function fileReadHandler(err, file)
  {
    if(err)
    {
       response.writeHeader(500);
       response.end('Error loading html file'),
     }
     else
     {
        response.writeHeader(200);
        response.end(file);
      }
   }
}We are first including the HTTP module and naming it as http. We need it to create a new HTTP server. Similarly, we include an fs (filesystem) and url (uniform resource locator) module. They are needed to read HTML file and parsing URL. Then we called the createServer() method from the HTTP module. It returns a new instance of class http.Server. The function createServer() takes the parameter as the name of the callback function to be called on events. Here, the httpRequestHandler() function will be called when there will be any event triggered on the port it is listening on. Then we called the method listen() on port 3001. In our case, if there is any event triggered on port 3001, the function httpRequestHandler() will be called.
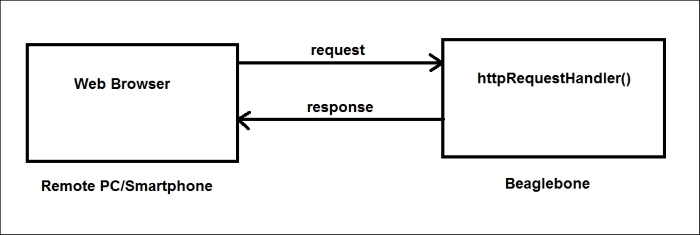
When httpRequestHandler() gets called, it is given parameters request object and response object. The request object has information about the HTTP request made to the server. The response is an object with fields that manages the response by the server. We read from the request object and fill the response object in httpRequestHandler(). This should be clear from the preceding image. First we crafted a full path of the HTML file to be sent to the client browser and printed the path for debugging. Make sure this path to the HTML file is—/var/lib/cloud9/iot.html. Then we read the HTML file and after reading the callback function fileReadHandler() will be called with err and file as arguments. Inside the function fileReadHandler(), we check for errors. If there is an error, we modify the response object with the HTTP return code 500 error. Then we called response.end(), which means the end response stream. If there is no error, we give the HTTP return code as 200 ok and send our HTML file over the response stream.
Note
Our experiment is limited to LAN. The browser from which you connect has to be inside LAN. If you want to allow connection to your BeagleBone from any system on the Internet, you can achieve it by using ngrok or any tunneling software. You can also achieve that for a specific port using the port forwarding option in your router's web configuration interface. In our case port 3001 has to be forwarded. DDNS service can help you to have persistent domain name for your BeagleBone. Please note this increases security risks.
- It is recommended to use the Firefox or Chrome browser. They are available on Android and iOS as well.
- Run command
netstat –nat | grep 3001on the BeagleBone shell to confirm port3001is waiting for connection. You should get this output:tcp 0 0 0.0.0.0:3001 0.0.0.0:* LISTEN - Use
console.log()frequently in our program to debug. It can be used to confirm control is reaching till the line. It can be used to print values of variables that you suspect might be troubling. - Some errors can be revealed from the client side. Use developer options in the browser to debug at the client side.
- When you run this program multiple times, it may happen that
baseHttpServer.jsyou ran earlier is still running. In that case, it causes a problem to start a new server on the same port. You will getevents.js:72 //unhandled exception. You can find out the pid of older process instances using the commandps aux | grep baseHttp. Then you can kill it using the commandkill -15 <pid>.