
Until now, we have dealt with onboard LEDs only, which require no extra component connected. In our next exercise, we are going to connect an external LED to BeagleBone. This requires a few components. You can get these easily in a local electronics shop or online websites like sparkfun or mouser:
- LED – We need a single LED for this exercise. An LED is actually a Light Emitting Diode. They allow flowing current in one direction only. When current passes through them, they glow. When connected in the opposite direction, no current is passed through.
- Male-to-male jumper wires – We need jumper wires to connect BeagleBone and components through a breadboard.
- 400Ω–1kΩ resistor – Passing too much current through an LED can damage it. So, there is a need to put a resistor to reduce the current. In our case, we need any resistor inside the range 400Ω-1kΩ.
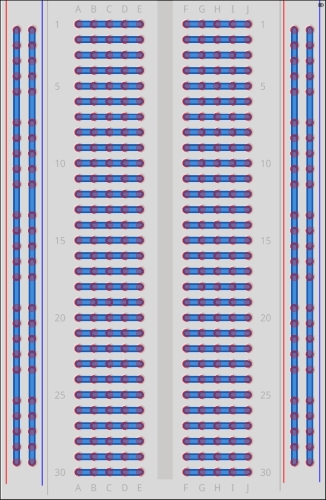
- Half-size breadboard – Creating a circuit of components requires soldering work. For circuit modification and reusing components, you need to do de-soldering as well. Someone with no soldering experience can find this tedious. A breadboard provides a hassle-free way to create solderless circuit for quick testing. A breadboard has many interconnected pin holes. You can plug components into a breadboard and create a temporary circuit. A circuit created using a breadboard is easily modifiable. Here is a diagram to show interconnection inside a breadboard. Pins at the edges are column-connected. Pins in the middle are row-connected. You have to keep interconnection in mind before creating a circuit:
Now, power off the board and disconnect the power and USB cable. Then attach components to BeagleBone as shown in the next diagram:
- Locate the 10 number pin on the
P8expansion header on BeagleBone. Let's call itP8_10pin. Plug one end of the male to male jumper cable (yellow color) here. Put another end to any free row-connected hole in the breadboard. - Plug one end of the resistor in the breadboard hole inside the same row that we plugged the yellow cable. Now, the
P8_10and resistor are connected. Put another end of the resistor so that you jump across another row that is not connected. Please refer to the diagram below for this. There is no positive or negative end for the resistor. You can connect any end to positive, and any end to negative. - An LED has positive and negative ends. You need to connect the positive end to the positive side and the negative end to the negative side of the circuit. An LED's positive pin leg is always longer than the negative pin leg. Attach the positive end of the LED in the hole from the row we connected to the other side of the resistor in the last step. Now,
P8_10is connected to the positive side of the LED through the resistor. Connect the negative end of the LED to any other free row-connected hole on breadboard. - Plug one end of the black jumper cable in the same row that we plugged the negative end of the LED. Plug another end to pin number
2on theP8header. Let's call itP8_2pin. Now,P8_2pin is connected to the negative end of the LED.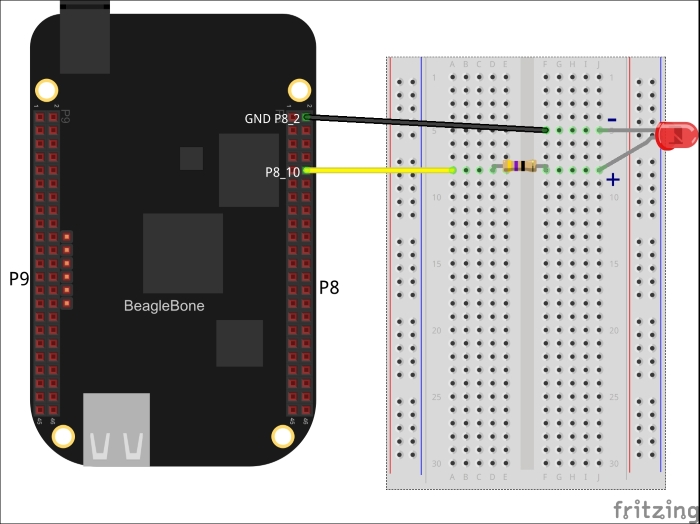
GPIO pin P8_10 is connected to the positive end of the LED through the resistor. The resistor is reducing current to protect the LED. The negative end of the LED is connected to pin P8_2. Pin P8_2 is actually a ground/negative pin. When P8_10 is HIGH, the current will flow from positive P8_10 to ground P8_2. It will flow through the LED and it will glow. When P8_10 will be LOW, both P8_10 and P8_2 will have no voltage. So, there will be no current flow and the LED will be off.
What we did ultimately can fit into this circuit diagram:
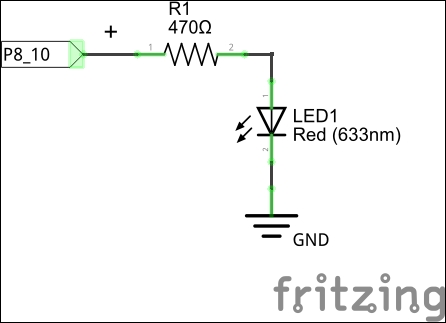
The LED in this circuit will blink if the voltage at P8_10 node is turned on and off periodically. Let's write a program to do so.