
We have created a webserver on port 3001. Now it is time to turn an external LED on and off using a HTML page remotely. Just by changing variable ledPin in the following JavaScript program to USR0, you can turn on/off onboard USER0 LED. This will save wiring efforts. We are going to use the JavaScript socket.io library for this. This library allows real-time, full-duplex, communication by sending and receiving events. Let's install it by running the following command in the BeagleBone shell.
sudo npm install –g socket.io
The npm is Node Package Manager. It is a package manager for JavaScript libraries. It works independent of the Debian package manager. The source code of socket.io is available here: https://github.com/socketio/socket.io.
Let's create an HTML file first. Open Cloud9 IDE and create a new file named led.html. Write the following code in led.html:
<!DOCTYPE html>
<html>
<head>
    <script src="/socket.io/socket.io.js"></script>
    <script>
    var socket = io.connect();
    function ledOn()
    {
      socket.emit('ledPin', 'on'),
    }
    function ledOff()
    {
      socket.emit('ledPin', 'off'),
    }
    </script>
</head>
<body>
    <input type="button" name="ON" id="onButton" value="ON" onClick="ledOn();">
    <input type="button" name="OFF" id="offButton" value="OFF" onClick="ledOff();">
</body>
</html>This HTML code is divided into two parts. One part is HTML code that creates two buttons named ON and OFF. When these buttons get clicked, they call the function ledOn() and ledOff() accordingly. This part is in the <body> tag. The second part is the JavaScript code inside the <head> tag. It uses socket.io library to talk with the server. This is client browser side scripting. The socket.io works by sending events like connect, message or disconnect. It allows you to emit custom events besides regular events. Here, we are emitting event named ledPin with data on when the ON button is clicked and data off when the OFF button is clicked. This sent event has to be handled on the server side.
Now, let's write the server side code to turn the LED on/off based on events emitted. This code is addition to the previous baseHttpServer code. Create a new file in Cloud9 and copy-paste the previous baseHttpServer.js code as it is. Then append the following code and save it as IoTLED.js. You need to connect the LED to P8_10 pin as we did in the LED blinking exercise. Please refer to Chapter 3, Blinking External LEDs for a detailed image.
Run IoTLED.js inside Cloud9 and open http://<Beaglebone's ip address>:3001/led.html inside the browser on a smartphone/laptop/desktop. You will able to see two buttons ON and OFF in the browser. By clicking these buttons you should be able to turn the LED on and off. If it does not work, try the troubleshooting steps that we covered in the baseHttpServer.js program. You can replace the LED with a buzzer or relay. This will be useful in situations when you want to turn the buzzer on and off remotely. The relay can be replaced with an LED to give you the power to control AC devices inside the home.
var b = require('bonescript'),
var ledPin = "P8_10";
b.pinMode(ledPin,b.OUTPUT);
var sockio = require('socket.io'),
var io = sockio.listen(myServer);

io.sockets.on('connection', connectionHandler);
function connectionHandler(socket)
{
  console.log("Inside connectionHandler");
  socket.on('ledPin', ledPinHandler);
  function ledPinHandler(data)
  {
    console.log("data : " + data); //print received data
    if(data == 'off')
      b.digitalWrite(ledPin,b.LOW);
     else
      b.digitalWrite(ledPin,b.HIGH);
   }
}We took the old baseHttpServer.js code as it is. It created a new Node.js HTTP server. The additional code is for using socket.io and BoneScript. We included socket.io library code and named it as sockio. Then sockio started listening on our newly created server—myServer. We mapped the event connection to the callback function connectionHandler(). Now, when there is a connection event on the socket, the function connectionHandler() will be called. Inside the connectionHandler() function, we are waiting for event ledPin. If this event is emitted by the client side, it will execute a callback function ledPinHandler(). This function finally checks if the data emitted with event ledPin is coming from the ON button or OFF button in the led.html file. Based on data, it calls BoneScript's digitalWrite() to turn the LED on or off.
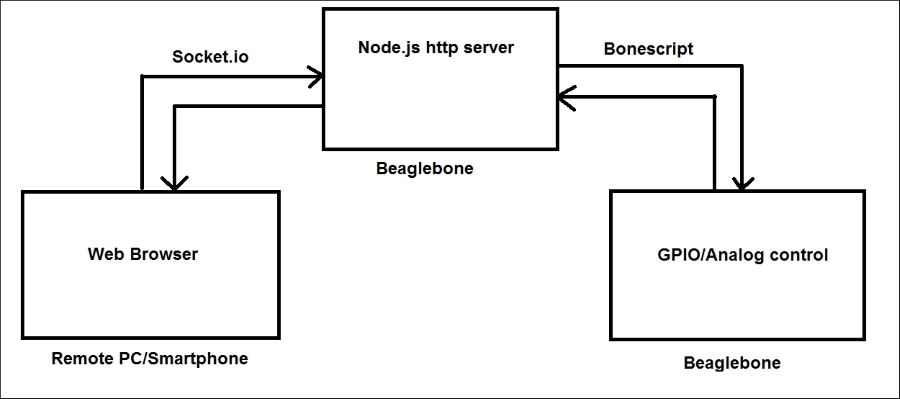
The whole communication can be seen in the preceding image. The Node.js server creates a new HTTP server and listens on port 3001. The remote web browser creates a connection with Node.js server using socket.io. It emits an event and data to the server. Based on the data, our server calls the bonescript function to control the electronic component. We avoided polling for data at the server side. The event-driven nature of JavaScript works efficiently here. Only required data is transmitted and received. In this exercise, there is one-way communication from browser to server to electronic component. But we can extend this to send data from the electronic sensor to the server and then from the server to the remote browser.
Note
IoT devices are connected all the time. So security becomes very important. A security bug can allow an attacker to take control of things remotely anywhere in the world. The security aspect of IoT is covered at the end of Chapter 10, Internet of Things Using Python.