In a designer's toolbox, one of the most effective tricks used to make things look stunning are particle systems. We can spawn a large number of particles which are small simple images or meshes, without much of a performance hit. Particle systems control these particles and their display and movement. They are very useful for elements such as liquid, smoke, clouds, magic, and in this instance, fire, as we bring life to our house's fireplace.
This recipe assumes that you have a project open with the Sample Assets included as well as a room created with
Geometry Brushes (BSP). I have provided a sample level (ModernHouseBase), which will be used for this demonstration. It is included in the Example Code, which you can access from Packt's website. If you are not familiar with building levels using BSP, feel free to follow the instructions for the Building a Room recipe of Chapter 2, Level Design – Building Out Levels or Greyboxing.
Now that we have our level open, let's start off by placing a particle system into our level:
- With the level opened, move your camera to the fireplace on the bottom story.
- Adding particle systems is very similar to adding a static mesh. Open the Content Browser tab, and we will first need to find the particle system that we want to use. If you have the Starter Content added, the particle systems are located in the
StarterContentParticlesfolder.With the folder open, you'll see a preview of all of the particle systems that you can work with, with a white border around all of them.
- Click on the
P_Firesystem and then drag it into the level into the fireplace. Once here, release it to place the particle system into the world. - Now, starting off the particle system will be too large for our fireplace, but just like working with the Geometry Brushes, we can also modify the properties here under the Details tab. Change Rotation to
-90, 70, -90and Scale to.5in all the axes.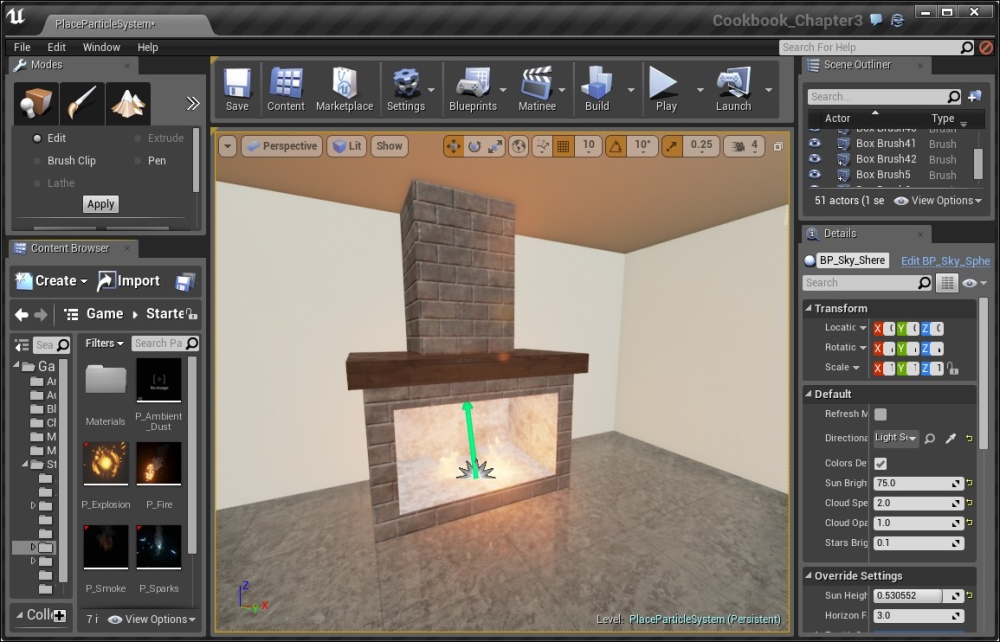
Tip
A quick way to scale all of the axes together at once is by going to the Details tab with the object selected and then, from the Transform component, clicking on the lock button to the right of the three parameters of the Scale property. Once we've locked the axes, we can then put in a .5 value in one of the parts and the other two will change as well. This will make the object always maintain its proper shape.
At this point, we now have an idea of just how easy it is to make our level look much nicer!
Tip
For more information on creating custom particle systems of your own refer to https://docs.unrealengine.com/latest/INT/Engine/Rendering/ParticleSystems/index.html.