When I started using Unreal Engine, it took me a long time in order to create any type of new level. I would keep placing static meshes to hide areas of geometry that I missed or added in blocking volumes to make it actually possible to go through certain places. One of the key reasons I had problems with this, is because I didn't know how to create a good workflow and the key to mapping things very easily by using brushes in the Geometry Editing mode.
Minimize the Perspective viewport by clicking on the button in the top-right corner of the viewport (circled in the following image):

You will then see four windows and notice a grid of sorts in all the other viewports.

Tip
You can click on the same button in the top-right corner of any of the four windows to maximize it.
When in a different viewport, controls work a bit differently. Most importantly, right-clicking and dragging will pan the camera. For more information on the differences, refer to https://docs.unrealengine.com/latest/INT/Engine/UI/LevelEditor/Viewports/ViewportControls/index.html.
We will be using the grid as a guideline in the creation of our levels in the same way that we use paper to draw things out, which is something some level designers do to get the general feel of an area. Starting to build a general area needs to have planning ahead of time to have a general idea of how you want to place buildings and guide the traversal of the player.
Holding the left mouse button and dragging will allow you to select all the objects that are contained within it, which we refer to as a marquee selection. If you are in the Geometry mode, this will let you select individual/overlapping vertices, allowing you to increase or decrease the size of your brushes very easily which we will be using to create our environment.
Another useful tip is if you press Ctrl and hold and drag the left mouse button anywhere in a viewport, it will move the brush, actor, and/or vertices that you have selected from any position. This is a good way to move objects that may not be far away or not have to move the screen and don't want to use the widget that is usually by the object.
If you hold Ctrl + Shift while moving an object, your camera will move with you as well. This can be really useful for repeating things in a certain direction.
Also, you can select multiple objects by holding Ctrl and then clicking on multiple objects.
Duplicating things that we have already created, such as walls or buildings, are an effective way of blocking out an environment very quickly.
As what we care about most here is creating the best gameplay possible. We pay less attention to fine details here and basically, want to just block out an area so that we can iterate as quickly as possible. After all, you're a lot more willing to get rid of or change a huge box than a ridiculously detailed office building.
After placing a single brush in our level, you don't really need the builder brush again. Unless you are creating something other than a box, you can just duplicate brushes and mould them using the Geometry Editing mode to quickly shape out areas that usually makes it much quicker to build.
With the knowledge of how to start a workflow, we can create a level:
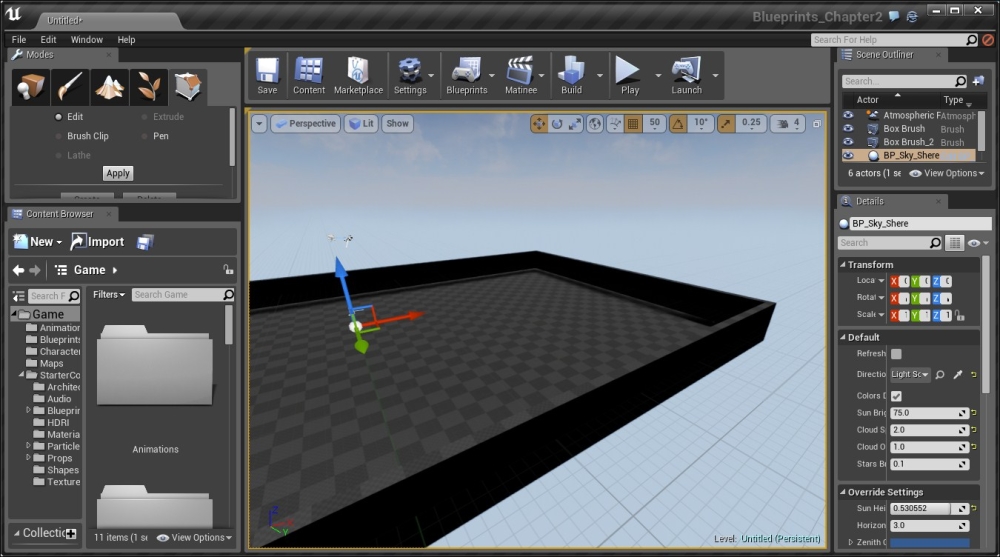
- Create a new level by going to File | New Level… and from that window, select Default.
- The floor that currently exists in the game is actually a static mesh. We don't need this, so let's get rid of it by selecting it and then pressing the Delete key.
- Next, we are going to the Restore Viewport button on the top-right of the viewport to get the four viewport split screens.
- Once there, let's add a box for our foundation. Go to the Modes tab and select the Place button and go to the BSP section. Once there, drag and drop the Box to the viewport to bring it into the world. Once created, go to the Details tab and change the Brush Settings—X to
5000, Y to3000, and Z to300.You may have noticed that when we move brushes around, they snap to certain positions. This effect is known as grid snapping and the amount of space moved is dependent on the Grid Snapping variable in the top-right of your viewport (by default, it's
10). - Increase the grid size to 50 by clicking on the grid icon on the top-right of any viewport and selecting
50for the Snap Sizes value.
Another way to modify the grid space is by pressing the [ and ] keys in the editor that will decrease and increase the grid snap points, respectively, making the level more or less detailed in your brush placement. Some people will want to use a smaller area, but I argue that when blocking something out, we really only care about the big picture and getting the overall feel of the area.
In case your brush is not aligned to the grid, you can right-click on the vertices, and it will automatically snap it onto the grid. Working with the grid is a fundamental way of making sure that you don't get any holes and/or overlays of your brushes while creating a level.
- Now duplicate our current brush by selecting it and holding the Alt key and then from the Front viewport, drag it one step (50 units) upward.

Duplicating the current brush upwards
- Now, under the Modes tab, select the Geometry Editing mode, which is the furthest on the right. You'll notice that the edges or vertices of the selected brush will be larger than they were earlier. Select the two vertices on the left-hand side of the Front viewport and drag it one step (
50units) inward.
Selecting vertices via Geometry Editing mode
- Do the same thing for the right side and the top of the brush. To do this for the top, which is much larger than the others, zoom out, select them both and then zoom in to do the movement.
- Finally, we will need to move to the Top viewport. To do this, click on the Front selection and select Top and then drag the top and bottom vertices one step inward from here.

- Finally, move back to the perspective view to see things clearly. Under the Details tab, change Brush Type to Subtractive.
A subtractive brush is used whenever you want to remove solid space, such as when you want to create a door or window. A nice change from Unreal Engine 3 is the fact that subtractive brushes only carves out space from the earlier created additive brushes so that we can place additional brushes on top of it.
The use of the subtractive brush
With this, we now have an area that our player can inhabit. The player can jump on things that are approximately
200pixels high, so we need to keep that in mind when developing our platforms as these walls are250pixels tall. - Go to the Scene Outliner tab on the top-right of the screen and then double-click on the
Player Startobject to center your camera on it. This is where the player will start the game from, so let's translate it to one of the edges of our map, pressing the End key to make it land on the ground.
- Now, we want to give the player some guidance on where to go, so I'm going to close off some areas inside the level. Drag and drop a new box into the level. Give it a size of
20,200,300and put it flush up against the wall. - Once this is done, create another duplicate and leave some space to create an opening for the player to walk through. Finally, duplicate the brush again, rotate it
90degrees in the Z axis and then use the Geometry Editing mode in order to have it fit the room by selecting the vertices using a marquee selection and then using the translate tool to move them into place.
Creating walls with openings for a player to walk through
- Next, let's build something a little more interesting, a staircase. We can do that by going into the Modes tab, selecting Place, going to the BSP section and then selecting Linear Stair and dragging it into the world and finally, placing it onto the ground.
- From this staircase, we are going to create a path to a tower. Create another box to create a walkway along the staircase. Make this walkway
1100units long. Duplicate the brush, rotate it90degrees along the Z axis, and have it go down only700units.
- Duplicate the walkway again and have it only 500 units long. In the little 500 x 500 x 600 area, we've created a box to fill that hole.

- To create a path for the player to get up there, on the last created walkway, click on the left-hand side vertices from the Front viewport and drag it up to match the new tower. It should look similar to a ramp heading up there, making it easier for people to add one final walkway to get up to there.

- Once it's all put together, we should have something that looks similar to the following image:

- In the Perspective viewport, it may be a bit hard to see what's going on. To help with this, place an additional Directional Light into the world with its rotation in the opposite direction of the Light Source object that is already there so that we can see where the shadows are. With this in the Details tab, change the Light's Intensity to
1. This is what's referred to as a fill light.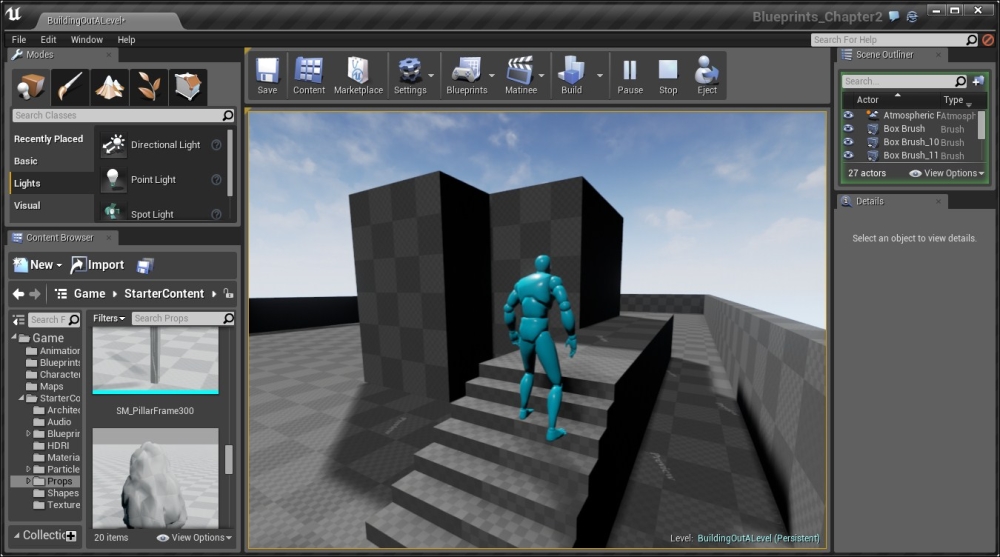
Placing an additional Directional Light as a fill light
We now have a firm basis with which we can build even more complex and interesting levels!