You may have created a menu or UI element at some point, but rather than having it static and non-moving, let's spend some time looking at how we can animate the menus by having them fly in and out or animate in some way. This will help add polish to the title as well as enable players to notice things easier as they move in.
Before we start working on this, we need to have a project created and set up. Follow the previous recipe all the way to completion.
- Open up the
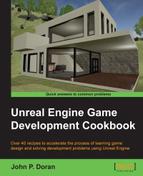
MainMenublueprint once more and from the bottom-left in the Animations tab, click on the +Animation button and give the new animation a name (MenuFlyIn). - Select the newly-created animation, and you should see the window on the right-hand side brighten up.
Creating a new animation
- Next, click on the Auto Key toggle to have the animation editor automatically set keys that are appropriate for our implementation.
- If it's not there already, move the timeline bar (the white line with two orange ends on the top and bottom) to the
0.00mark on the animation timeline. - Next, select the Game Name object and under the Color and Opacity option, open it up and change the A (alpha) value to
0. - Now, move the timeline bar to the
1.00mark and then open the color again and set the A value to1.
You'll notice that now there is a transition going from a completely transparent text to a fully shown one. This is a good start. Let's have the buttons fly in after the text appears.
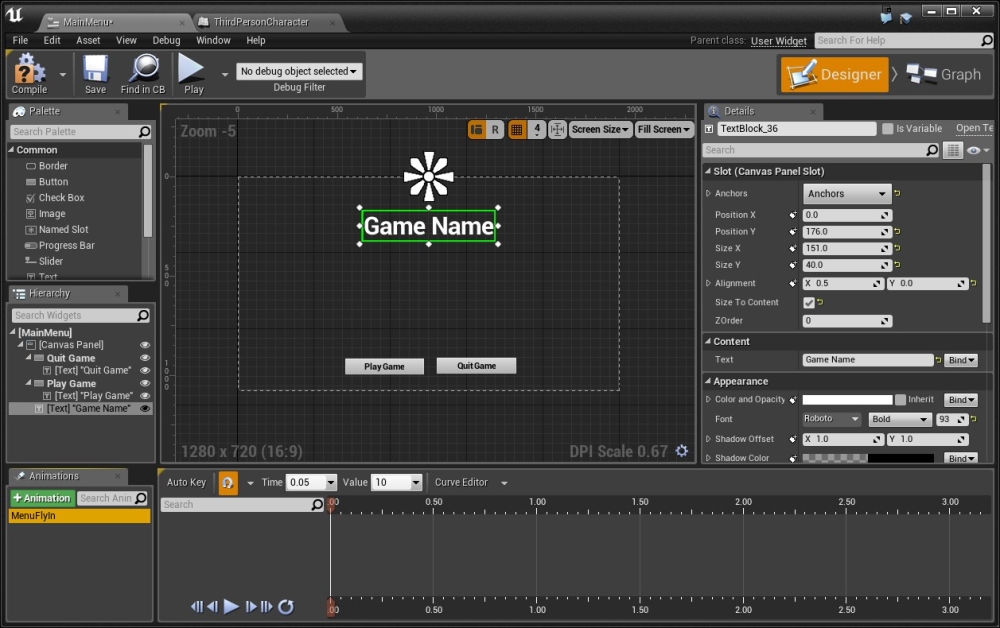
- Next, move the timeline bar to the
2.00mark and select the Play Game button. Now from the Details tab, you'll notice that under the variables there are new + icons to the left of variables. This will save the value for use in the animations. Click on the + icon by the Position Y value. - Now move the timeline bar to the
1.00mark and move the Play Game button off the screen. By doing the animation in this way, we are saving where we want it to be at the end, and then we will go back and do the animations. - Do the same animation for the Quit Game button.
Animation for the Quit Game button
Now that our animation is created, let's make it so that when the object starts, it plays this animation:
- Click on the Graph button and from the MyBlueprint tab under the Graphs section, double-click on the Event Construct event, which is called as soon as we add the menu to the scene. Grab the pin on the end of it and create a Play Animation action.
- Drag and drop a MenuFlyIn animation into the scene and select Get. Connect its output pin to the In Animation property of the Play Animation action.

Now that we have the animation working for the menu, let's have it play when we leave the menu:
- Select the Play Animation and Menu Fly In variables and copy them. Then, move to the OnClicked (Play Game) action, drag the OnClicked event over to the left, and remove its original connection to the Open Level action by holding down Alt and clicking.
- Paste (Ctrl + V) the new objects and connect the output of OnClicked (Play Game) to the input of Play Animation. Now change the Play Mode to Reverse.
- To the right of that, create a Delay action. For the Duration variable, we want to wait as long as the animation is, so from the Menu Fly In variable, create another pin and a Get End Time action. Connect Return Value of the Get End Time variable to the input of the Delay action.
- Connect the output of the Play Animation variable to the input of the Delay variable and the Completed output of the Delay variable to the input of the Open Level action.

- Now, we need to do the same for the OnClicked (Quit Game) event.

- Now compile, save, and run the game!

Our menu is now completed! You learned about how animation works inside UMG.
Note
For more examples of using UMG for animation, refer to https://docs.unrealengine.com/latest/INT/Engine/UMG/UserGuide/Animation/index.html.
I would love to write an entire book about creating UIs for games, but there just isn't enough space in this book to dive deeply into it. However, for those interested in doing more complex UI, here are some additional tutorials, which may prove to be beneficial:
- Basic Inventory System in Blueprint: http://www.tomlooman.com/tutorial-basic-inventory-system-in-blueprint/
- Creating / Scripting an In-Game Pause Menu: https://docs.unrealengine.com/latest/INT/Engine/UMG/QuickStart/5/index.html
- Level Menus (UMG): https://www.youtube.com/watch?v=wPzIvBP8-PA
- UMG Using a Gamepad: https://www.youtube.com/watch?v=tCXuNu4RETs
- UMG, Create Scrollable List of Clickable Buttons From Dynamic Array: https://wiki.unrealengine.com/UMG,_Create_Scrollable_List_of_Clickable_Buttons_From_Dynamic_Array