
A neat feature of many titles is being able to see enemies or important objects through walls, similar to the detective mode in Batman: Arkham Knight, the thermal vision in Splinter Cell, or the outlines in Evolve and other games. Let's implement similar functionality now.
Before we start working within the Unreal Editor we will need to have a project to work with:
- First, open up the Unreal Editor by clicking on the Launch button from the Unreal Engine Launcher.
- Start a new project from the Project Browser tab by selecting the New Project tab. Select First person and make sure that With Starter Content is selected. Give the project a Name (
Cookbook_Chapter7). Once you are done, click on Create Project. - You should see a level similar to this:

In order to see other objects, let's first add an object that we'd like to see into the level:
- Open up the
Example_Mapfile and from the Content Browser tab, go into theCharacterfolder and drag aHeroTPPskeletal mesh into the level. This will be our enemy that we will want to see no matter where they will be.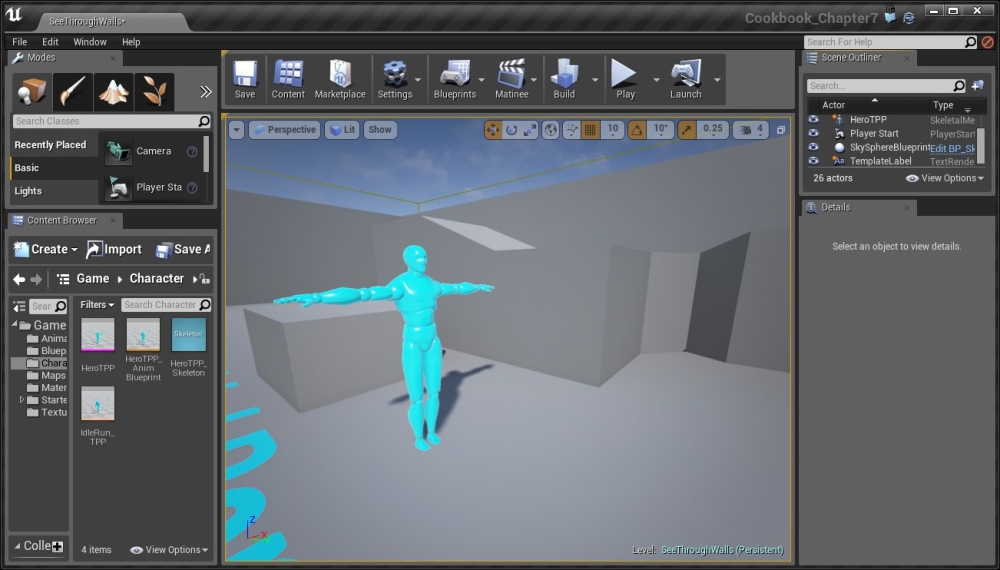
Adding the enemy
- Let's now create a new material that we can work with and give it a name (
SeeThruMaterial). Once it's created, open up the Material Editor. - First, create
Constant3Vectorwith a color of your choice and assign it to the Emissive Color property. - After this, deselect it so that nothing is selected and go to the Details tab. From here, change the Blend Mode to Translucent.
This blending mode is used for objects that require some form of translucency and is applied onto areas in front of it, but this mode also has another feature that is perfect for what we want to do. We will look into it next.
Note
For more information on how to use Transparency effectively, refer to https://docs.unrealengine.com/latest/INT/Engine/Rendering/Materials/HowTo/Transparency/index.html.
- Go into the Translucency section and toggle the Disable Depth Bias property to be enabled. This will say that we should draw this on the top of the screen even if we're behind something else.
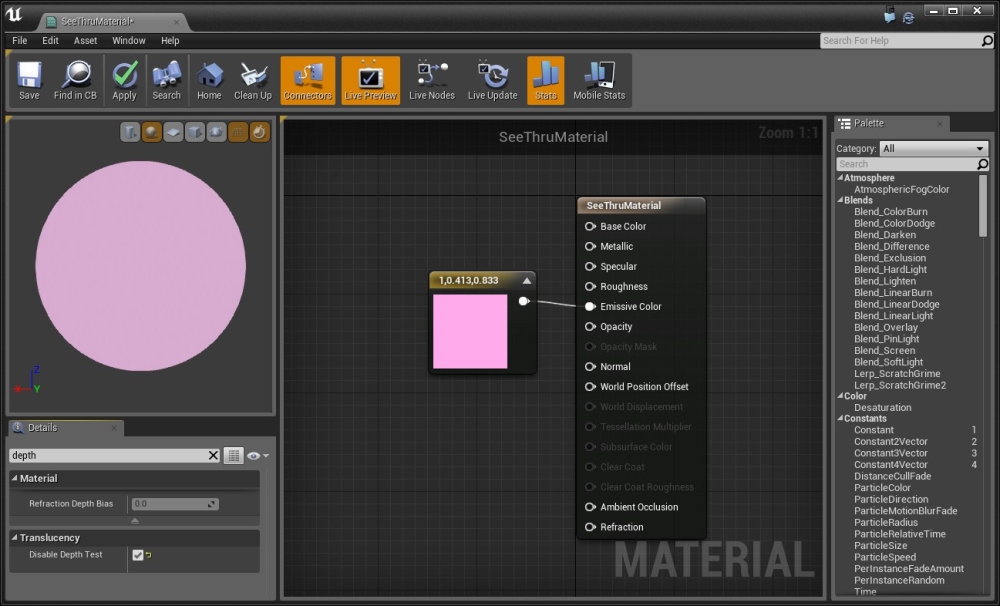
Setting the translucence value
- Once you're done, hit the Apply button and then close the editor. Then, apply the newly created material to the enemy and move around the camera to see the effect that we generated!
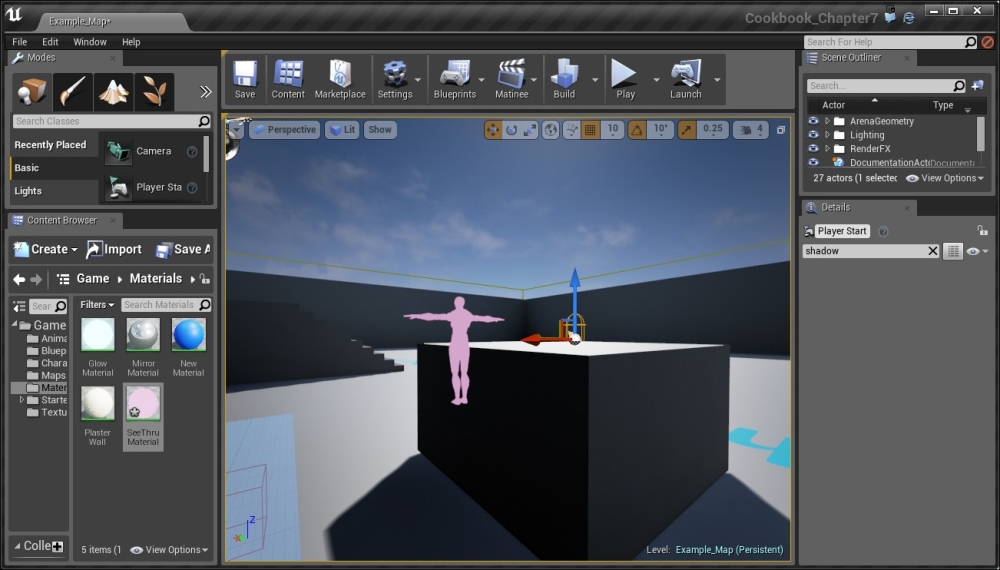
Applying translucence to the enemy
- To see it in action in the game, go to the toolbar and hit the Play button to start the project!
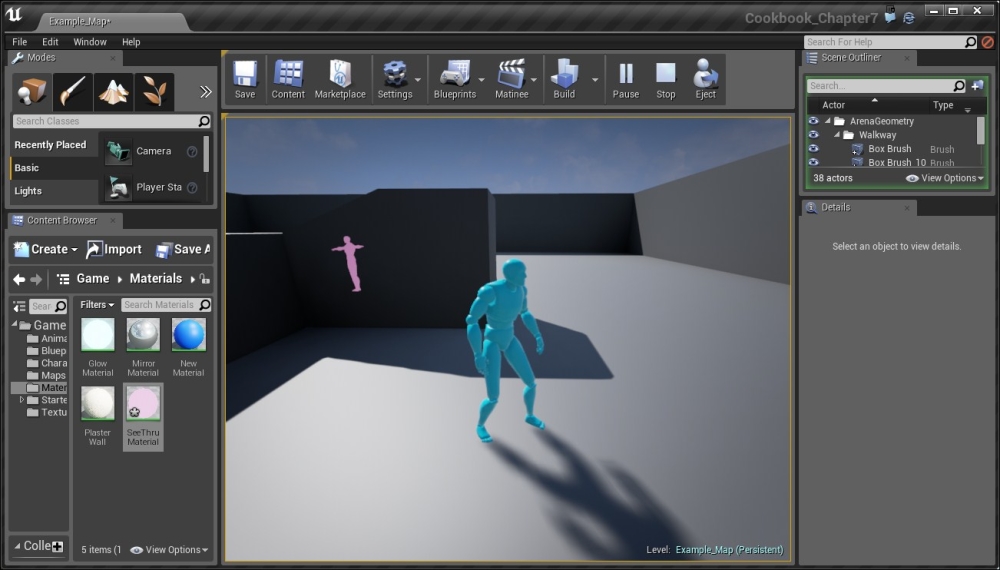
With this, we can see the object no matter what! Later on, you can use this recipe with the knowledge of blueprints to toggle the effect.
Note
Tom Looman also came up with another implementation using the Render Custom Depth flag that looks similar to the game Evolve with outlines. It can be found at http://www.tomlooman.com/ue4-evolves-outline-post-effect/.
Now, there is much more that exists in the Material editor, especially when you add more complex interactions and/or apply them to meshes to create some interesting effects. Here are some additional tutorials that may be useful to you going further:
- Much like working with brushes, you can also modify the UVs of the materials. Learn how to do this at https://www.youtube.com/watch?v=YcoHWSxFEko.
- You can use a process called instancing using parameters to change the material as the game continues. There's a good tutorial on this at https://www.youtube.com/watch?v=NX-NNyGV3oQ.
- Sjoerd De Jong (also known as Hourences) also has some amazing resources for you to look at, with an Example Project of his with materials and meshes that you can take apart, some videos of the project. I originally started learning Unreal Engine 3 8 years ago from his tutorials, and I'm really glad to hear that he's still creating awesome stuff. Check it out at http://www.hourences.com/thesolusproject/.
- While this book is focused on using Unreal Engine 4, it may be useful to see a brief tutorial talking about building a level from scratch using a 3D modeling program and bringing it into the engine. A fairly good example tutorial series by The 3D Tutor on the subject can be found at https://www.youtube.com/watch?v=eJ0zu6GIqxQ&list=PLK3nRt7ToxJ0kxAocxw1KvpM1tF3X5JB2.
- Once you feel comfortable creating levels, you may also want to build out a character with animations. An introduction to UE4's animation tools can be found at https://www.youtube.com/watch?v=knbZ_g8Hgvk&list=PLZlv_N0_O1gb2ZoKzTApbv3LvhaXJ9elg.