
So far, our app is capable of simply searching points that are close to a defined location. In this chapter, we are going to make a huge steep and make our app filter the data by geographic boundaries and by any field in the data.
By the end of this chapter, you will be able to search geocaching points that are inside a given city, state, country, or any boundary defined by you. In addition, you will be able to search points by any of its properties such as difficult levels, name, user, and so on. It will also be possible to combine multiple filters.
In the process, we will see how to work with polygons and how the relations between geometries can be analyzed in a geoprocessing application.
To achieve these goals, we will go through the following topics:
- How to describe polygons using well-known text
- Using the Shapely package to handle geometries
- Importing polygon data
- Importing line data
- The use of base classes and inheritance
- The types of geometry relationships
- Filtering by multiple properties and method chaining
Supposing we want to filter our data by a given region, it's possible to assume that this region is represented by a polygon.
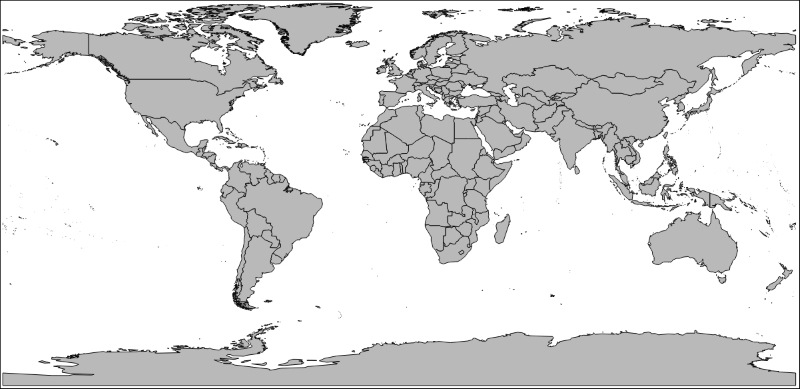
For example, the following image represents the world counties' borders, it was rendered from a Shapefile where each feature is a country and it's geometry is a polygon.
Differently from the geocaching point, whose geometries are only a pair of coordinates, a polygon is a sequence of at least three-point coordinates beginning and ending at the same point.
By now, you can assume that we won't be able to store the polygon's coordinates with the same structure that we had with the geocaching point. We will need to store the whole OGR geometry or store something that can be transformed from or to it.
How these polygons are represented is an important subject, because mastering it allows you to manipulate them any way you need to do any kind of work. It also allows you to build polygons from point coordinates (from a GPS for example) or form shapes such as a rectangle.
Well-known text (WKT) is a human readable markup language to represent geometries in a spatial application. It was originally defined by the Open Geospatial Consortium (OGC) and is accepted by many software as a form of data exchange. The WKT has a binary equivalent called well-known binary (WKB). It is used for data storage and transfer where human readability is not required.
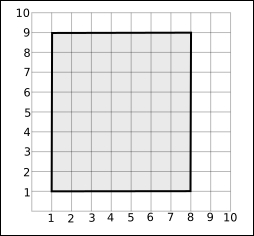
Let's go through some examples to see how WKT works. First, we will create an OGR geometry of the polygon shown in the following image:
- Make a copy of your
Chapter3folder inside the geopy project and rename it toChapter4. - Locate the
Chapter4experimentsdirectory and delete the files inside it. If you don't have this directory, create it. - Inside the
Chapter4experimentsfolder, create a new Python file. To do this in PyCharm, right-click on the folder and choose New | Python File. Name this filewkt_experiments.py. - Type the following code:
# coding=utf-8

import ogr

wkt_rectangle = "POLYGON ((1 1, 1 9, 8 9, 8 1, 1 1))"
geometry = ogr.CreateGeometryFromWkt(wkt_rectangle)

print(geometry.__class__)
print(geometry.Area())
print(8*7)
- Now run it (Alt + Shift + F10 and choose
wkt_experiments). You should see the following output:<class 'osgeo.ogr.Geometry'> 56.0 56 Process finished with exit code 0
What we did here was to define the WKT representation of a polygon in a Python string. Note that it started from coordinate
1.1and listed all the coordinates clockwise ending at1.1again (the direction is not important; it could also be counter clockwise).In the next line, we called OGR's
CreateGeometryFromWktfunction that passed the string as a parameter. Internally, it converted the string into a OGR geometry object.To make sure that everything went fine in the next three lines, we printed the class name of the object, the area calculated by OGR, and the manually calculated area.
Now, a more complicated polygon, one with a hole in the middle or an island.

- Edit your code:
# coding=utf-8 import ogr wkt_rectangle = "POLYGON ((1 1, 1 9, 8 9, 8 1, 1 1))" geometry = ogr.CreateGeometryFromWkt(wkt_rectangle) print(geometry.__class__) print(geometry.Area()) print(8*7) wkt_rectangle2 = "POLYGON ((1 1, 8 1, 8 9, 1 9, 1 1)," "(4 2, 4 5, 7 5, 7 2, 4 2))" geometry2 = ogr.CreateGeometryFromWkt(wkt_rectangle2) print(geometry.__class__) print(geometry2.Area()) print((8*7) - (3*3)) - Now run it again (Shift + F10). You should see the following output:
<class 'osgeo.ogr.Geometry'>
56.0
56
<class 'osgeo.ogr.Geometry'>
47.0
47
Every polygon ring comes inside the parenthesis separated by commas. The exterior ring should be described first, then all the interior rings.
Managing geometries with WKT gets complicated as the complexity and the number of coordinates increase. To solve this and other problems, we will use another package that will make things a lot easier for us.