
In this chapter, we will take another step in code optimization; we will experiment with the possibility of using multiple processor cores to perform calculations.
Using the satellite images from the previous chapter, we will use Python's multiprocessing library to distribute tasks and make them run in parallel. As an example, we will experiment with different techniques to produce true color compositions from Landsat 8 data, with better resolution and a greater level of detail.
To achieve our objects, we will go through these topics:
- How multiprocessing works
- How to iterate through two-dimensional image blocks
- Image resizing and resampling
- Parallel processing in image operations
- Image pan sharpening
The implementation of Python that we are using, CPython, has a mechanism called global interpreter lock (GIL). GIL's purpose is to make CPython thread-safe; it works by preventing the code from being executed by more than one thread at once.
With that limitation, multiprocessing in Python works by forking the running program (for example, making a copy of the state of the program) and sending it to another computer core. As a consequence, the new process comes with an overhead.
Let's try a simple code:
- First, make a copy of the previous chapter folder in your
geopyproject and rename it toChapter10. - Clean the
Chapter10/outputfolder (delete all files in it). - Expand the
Chapter10/experimentsfolder, right-click on it, and create a new Python file. Name itparallel.py. - Add this code to this new file:
# coding=utf-8

from datetime import datetime
import multiprocessing as mp

def an_expensive_function(text):
    for i in range(500):
        out = "{} {} {}"
        out.format(text, text, text)
    return "dummy output"
This is a simple function that receives text and performs string formatting multiple times. The only purpose of this function is to consume CPU time, so we can test whether we can speed up our code by running parallel processes.
- Now, create an
if __name__ == '__main__':block at the end of the file so we can test the code and measure its execution time.if __name__ == '__main__': texts = [] for t in range(100000): texts.append('test text') t1 = datetime.now() result = map(an_expensive_function, texts) print("Execution time: {}".format(datetime.now() - t1))This code makes a list of
100000strings, then this list is mapped to the function; this means thatan_expensive_functionis called100000. Note that here we are using a simpler technique for measuring the execution time for this piece of code;t1holds the start time and in the end it's subtracted from the current time. This avoids the overhead of using a profiler and is also more suitable for what we are going to do than thetimeitmodule. - Run the code and check the result in the console:
Execution time: 0:00:35.667500

Process finished with exit code 0
My computer took approximately 35 seconds to run the function 100,000 times; probably your results will be different. If your computer is much faster, change this number to get an execution time of at least 10 seconds. Take note of your result.
- Now edit the
if __name__ == '__main__':block so we can execute this code in parallel:if __name__ == '__main__': texts = [] for t in range(100000): texts.append('test text') multi = True t1 = datetime.now() if multi: my_pool = mp.Pool(processes=8) result = my_pool.map(an_expensive_function, texts) else: result = map(an_expensive_function, texts) print("Execution time: {}".format(datetime.now() - t1))The
Poolclass represents a pool of worker processes; they stand by, waiting until we submit some jobs to be done.In order to use all of your processor cores, you need to create the same number as, or more than, the number of cores of your processor. Or, if you don't want to fully load your computer processor, use fewer processes than the number of cores. This is done by changing the
processesargument.We put the code in an
ifblock so we can easily switch between parallel and single processes. - Run your code and see the difference:
Execution time: 0:00:08.373000

Process finished with exit code 0
The code ran approximately four times faster for me.
- Now, open your Task Manager, or your system monitor and open the CPU load graphs.
- Run the code again, using
multi=True, and take a look at the CPU load graph: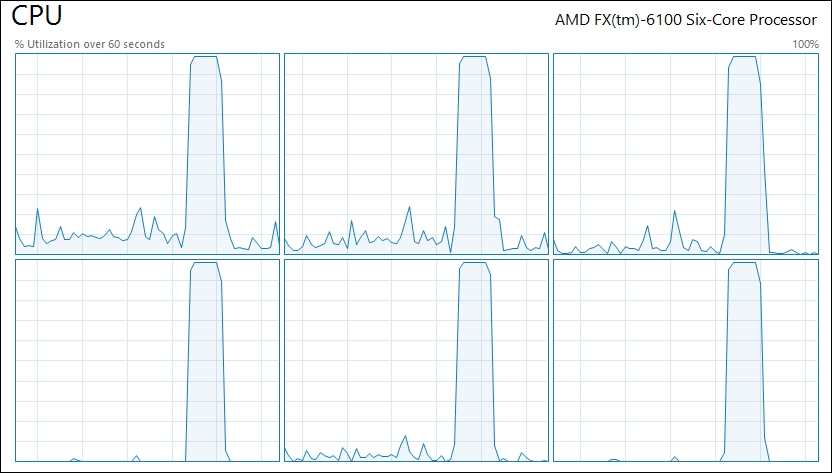
- Change to
multi=Falseand run it again. Inspect the graph now: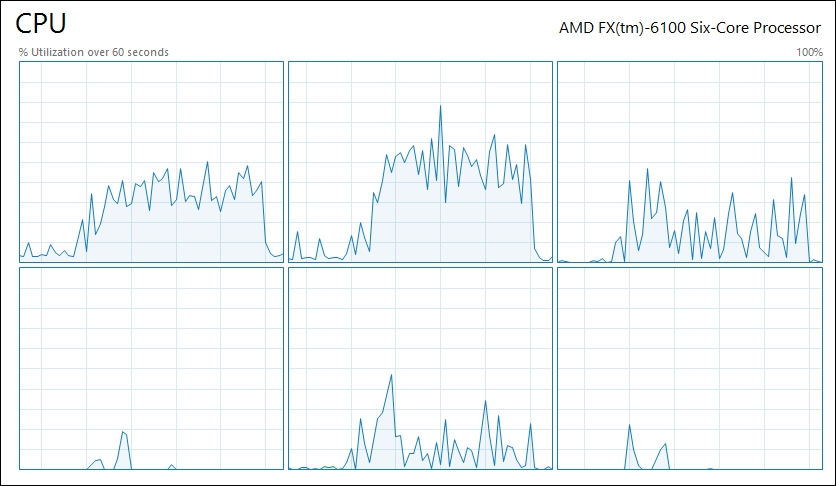
Note that when using multiprocessing, all cores were fully occupied for a short period of time. However, when using a single process, some of the cores are partially occupied for a long time. This pattern may vary according to the computer architecture.