Now we will prepare an environment that is capable of using this data source. We are going to adapt the previous experiments into building blocks for the application and put them inside an application class, just as we did with the Geocaching app.
First let's organize the folder and files.
- Create a new package called
map_makerinside yourChapter5folder. To do this, right-click on the folder and chose New | Python Package. - Move the
my_datasource.pyfile to themap_makefolder (drag and drop it). - Copy the
map_style.xmlandmap_functions.pyfiles that are inside themapnik_experimentsfolder to themap_makerfolder. - Rename
map_style.xmltostyles.xml. - In the
Chapter5root, create a file namedmap_maker_app.py. The complete tree structure should look like this:Chapter5 │ geocaching_app.py | map_maker_app.py │ models.py │ ├───mapnik_experiments │ ├───map_maker │ __init__.py │ my_datasource.py | styles.xml | map_functions.py │ ├───utils
Now we create the class that represents the application.
- In the
map_maker_app.pyfile, create this new class and its__init__method:# coding=utf-8 import cv2 import mapnik class MapMakerApp(object): def __init__(self, output_image=None): """Application class.""" self.output_image = output_imageoutput_imagewill be the image that the app will write to the maps. It's not private because we may want to change it during the application execution. - Copy the
display_mapfunction from themap_functions.pyfile, and adapt it to work as a method of our new class:class MapMakerApp(object): def __init__(self, output_image=None): """Application class.""" self.output_image = output_image def display_map(self): """Opens and displays a map image file. :param image_file: Path to the image. """ image = cv2.imread(self.output_image) cv2.imshow('image', image) cv2.waitKey(0) cv2.destroyAllWindows()This function now uses the
output_imageproperty to display the map and takes no arguments apart from the class instance (self) when called.Next, let's work on the
create_mapfunction. - Copy the
create_mapfunction from themap_functions.pyfile and make the following changes to the class:# coding=utf-8 import cv2 import mapnik class MapMakerApp(object): def __init__(self, output_image="map.png", style_file="map_maker/styles.xml", map_size=(800, 600)): """Application class. :param output_image: Path to the image output of the map. :param style_file: Mapnik XML file containing only the style for the map. :param map_size: Size of the map in pixels. """ self.output_image = output_image self.style_file = style_file self.map_size = map_size def display_map(self): """Opens and displays a map image file.""" image = cv2.imread(self.output_image) cv2.imshow('image', image) cv2.waitKey(0) cv2.destroyAllWindows() def create_map(self): """Creates a map and writes it to a file.""" map = mapnik.Map(*self.map_size) mapnik.load_map(map, self.style_file) layers = map.layers map.zoom_all() mapnik.render_to_file(map, self.output_image)
As we did with display_map, now the create_map function takes no arguments (except for self) and all parameters come from the instance attributes, the ones that were added to the __init__ method. We also improved the default values for those arguments.
All the layer and data source definitions were removed from create_map because in the next steps we will plug in the PythonDatasource that we created earlier.
To use this type of data source and implement the ability to display any number of data sources on the map, we will make our app class take control of the organization of the layers and the data that they use, always following the premise that the application should have a high level of abstraction:
- Include this import at the beginning of the file:
from map_maker.my_datasource import MapDatasource
- Modify the class
__init__method and create anadd_layermethod, as follows:class MapMakerApp(object): def __init__(self, output_image="map.png", style_file="map_maker/styles.xml", map_size=(800, 600)): """Application class. :param output_image: Path to the image output of the map. :param style_file: Mapnik XML file containing only the style for the map. :param map_size: Size of the map in pixels. """ self.output_image = output_image self.style_file = style_file self.map_size = map_size self._layers = {} def display_map(self):... def create_map(self):... def add_layer(self, geo_data, name, style='style1'): """Add data to the map to be displayed in a layer with a given style. :param geo_data: a BaseGeoCollection subclass instance. """ data source = mapnik.Python(factory='MapDatasource', data=geo_data) layer = {"data source": data source, "data": geo_data, "style": style} self._layers[name] = layerWhat we did here is use a private attribute (
_layers) to keep track of the layers that we will use by their names. Theadd_layermethod is responsible for instantiating theMapDatasourceclass and passing to it the data.The data that we will use here is a subclass of
BaseGeoCollectionthat we used in the previous chapters. With this, we will manipulate the map using only high-level objects, and also get all their functionality for free.As we said before, Python Datasource does not work on Windows, so we need to create a workaround to make things work despite the operating system. What we are going to do is save the data to a temporary file and then use Mapnik's GeoJSON plugin to create a data source.
- Add these imports to the beginning of the file:
# coding=utf-8

import platform
import tempfile
from models import BoundaryCollection, PointCollection
import cv2
import mapnik
- Now let's create a folder to hold our temporary files. Create a new folder named
tempinside yourChapter5folder. - Modify the
add_layermethod to include the workaround:#... def add_layer(self, geo_data, name, style='style1'): """Add data to the map to be displayed in a layer with a given style. :param geo_data: a BaseGeoCollection subclass instance. """ if platform.system() == "Windows": print("Windows system") temp_file, filename = tempfile.mkstemp(dir="temp") print temp_file, filename geo_data.export_geojson(filename) data source = mapnik.GeoJSON(file=filename) else: data source = mapnik.Python(factory='MapDatasource', data=geo_data) layer = {"data source": data source, "data": geo_data, "style": style} self._layers[name] = layerHere, we used
platform.system()to detect whether the operating system is Windows. If so, instead of creating a Python DataSource, it creates a temporary file and exportsgeo_datato it. Then we use the GeoJSON plugin to open that file, creating a DataSource.Now that the workaround is complete, we need to go back to the
MapDatasourcedefinition and make it accept the data that we are passing to it. - In the
my_datasource.pyfile, include the following__init__method in theMapDatasourceclass:class MapDatasource(mapnik.PythonDatasource): """Implementation of Mapinik's PythonDatasource.""" def __init__(self, data): super(MapDatasource, self).__init__(envelope, geometry_type, data_type) self.data = data def features(self, query=None): raise NotImplementedErrorOur subclass of
PythonDatasourcenow takes one obligatorydataargument. Since we are increasing the level of abstraction, we will make theMapDatasourceclass define all the other arguments automatically by inspecting the data it receives; with this change, we won't need to worry about the geometry type or data type. - Make another change to the
__init__method:class MapDatasource(mapnik.PythonDatasource): """Implementation of Mapinik's PythonDatasource.""" def __init__(self, data): data_type = mapnik.DataType.vector if isinstance(data, PointCollection): geometry_type = mapnik.GeometryType.Point elif isinstance(data, BoundaryCollection): geometry_type = mapnik.GeometryType.Polygon else: raise TypeError super(MapDatasource, self).__init__( envelope=None, geometry_type=geometry_type, data_type=data_type) self.data = data def features(self, query=None): raise NotImplementedErrorHere,
isinstance()checks which type isdata, and for each of the possible types it defines the correspondinggeometry_typeto be passed to the parent__init__method.For now, we only have one data type: the vector. Anyway, we will make this definition explicit (
data_type = mapnik.DataType.vector) because in the next chapter, the raster type will be introduced.Before we go any further, let's test the app as it is.
- Now edit the
if __name__ == '__main__':block at the end of the file:if __name__ == '__main__': world_borders = BoundaryCollection( "../data/world_borders_simple.shp") map_app = MapMakerApp() map_app.add_layer(world_borders, 'world') map_app.create_map() map_app.display_map() - Run the code; you should see an empty map and an output like this in the console:
File imported: ../data/world_borders_simple.shp
Windows system
File exported: geopyChapter5	emp	mpfqv9ch
The map is empty because two points are still missing: the
featuresmethod, which is the glue between our geo data and the Mapnik data source, and making thecreate_mapfunction use the layers that we have defined. - Let's start with the
create_mapmethod. Change its code so it can iterate over our layers and add them to the map:#... def create_map(self): """Creates a map and writes it to a file.""" map = mapnik.Map(*self.map_size) mapnik.load_map(map, self.style_file) layers = map.layers for name, layer in self._layers.iteritems(): new_layer = mapnik.Layer(name) new_layer.datasource = layer["data source"] new_layer.stylers.append(layer['style']) layers.append(new_layer) map.zoom_all() mapnik.render_to_file(map, self.output_image) - Now edit
styles.xmlin order to remove the extent restriction from it:<Map background-color="white"> <Style name="style1"> <Rule> <PolygonSymbolizer fill="#f2eff9" /> <LineSymbolizer stroke="red" stroke-width="1.0" smooth="0.5" /> <TextSymbolizer face-name="DejaVu Sans Book" size="10" fill="black" halo-fill= "white" halo-radius="1" placement="interior" allow-overlap="false">[NAME] </TextSymbolizer> </Rule> </Style> <Style name="style2"> <Rule> <PointSymbolizer file="marker.svg" transform="scale(0.3)"/> </Rule> </Style> </Map> - Now run the code again and look at the output. If you are using Windows, you should see a rendered map. If you are using Linux you should get an exception:
Traceback (most recent call last):

  File … in <module>
    raise NotImplementedError
NotImplementedError

Process finished with exit code 1
If you got this exception (in Linux), it is because everything went fine and Mapnik called our unimplemented features method.
So now let's implement this method.
- Go to the
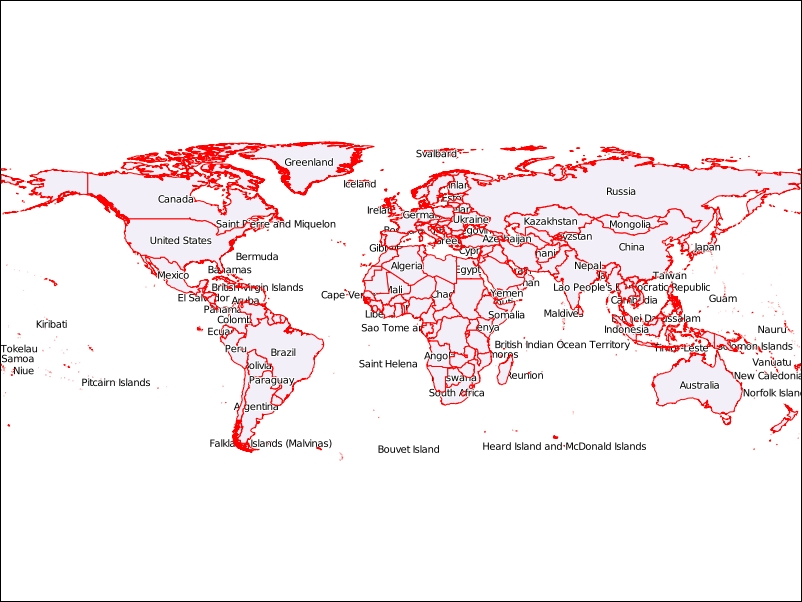
my_datasource.pyfile and edit our class:class MapDatasource(mapnik.PythonDatasource): """Implementation of Mapinik's PythonDatasource.""" def __init__(self, data): data_type = mapnik.DataType.Vector if isinstance(data, PointCollection): geometry_type = mapnik.GeometryType.Point elif isinstance(data, BoundaryCollection): geometry_type = mapnik.GeometryType.Polygon else: raise TypeError super(MapDatasource, self).__init__( envelope=None, geometry_type=geometry_type, data_type=data_type) self.data = data def features(self, query=None): keys = ['name',] features = [] for item in self.data.data: features.append([item.geom.wkb, {'name': item.name}]) return mapnik.PythonDatasource.wkb_features(keys, features) - Run the code again; now you should see the rendered map in the output:
Since the BaseGeoCollection class has filtering capabilities that were implemented before, it's possible to filter the data before passing it to the map.
Let's try some examples:
- In the
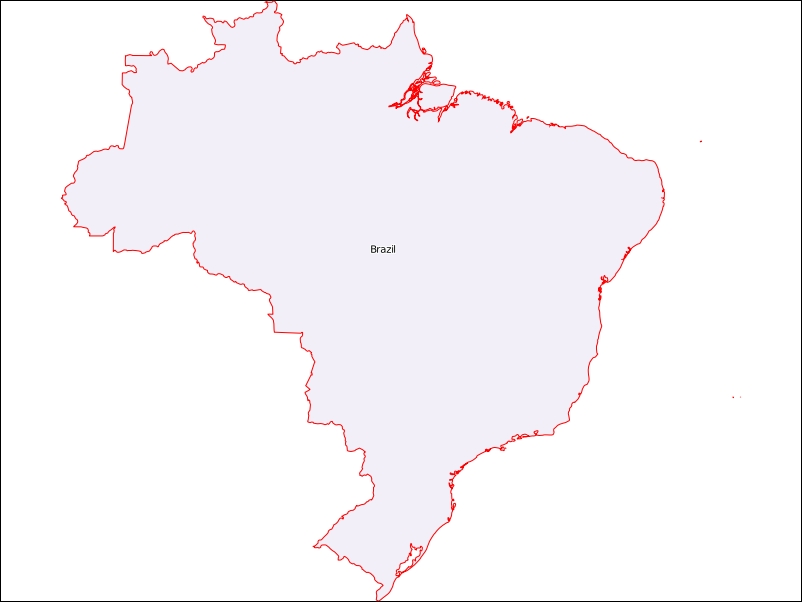
map_maker_app.pyfile, edit theif __name__ == '__main__':block:if __name__ == '__main__': world_borders = BoundaryCollection( "../data/world_borders_simple.shp") my_country = world_borders.filter('name', 'Brazil') map_app = MapMakerApp() map_app.add_layer(my_country, 'countries') map_app.create_map() map_app.display_map()Here, we are using the
filterfunction of theBaseGeoCollectionclass to filter the countries by name; feel free to try to filter by your country. - Run the code and you should see a map containing only one country (zoom should be active), as in the following screenshot:
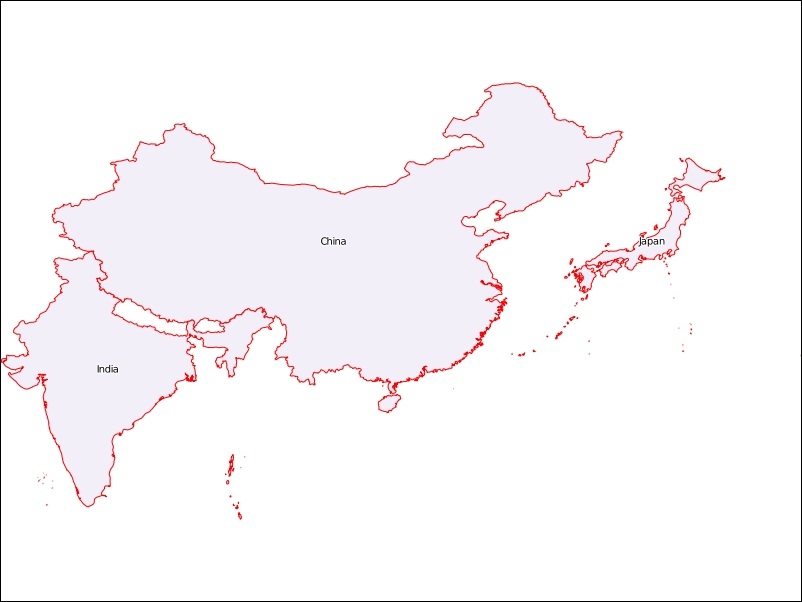
- Now try combining filters to show more than one country:
if __name__ == '__main__': world_borders = BoundaryCollection( "../data/world_borders_simple.shp") countries = world_borders.filter('name', 'China') + world_borders.filter('name', 'India') + world_borders.filter('name', 'Japan') map_app = MapMakerApp() map_app.add_layer(countries, 'countries') map_app.create_map() map_app.display_map() - Run the code again and see the results.