
Image processing, be it for geographic applications or not, generally requires the execution of a sequence of transformations (that is, steps) in order to obtain the desired final result. In these sequences, the output of one step is the input of the next one. In computing, this is called processing pipeline.
This type of data manipulation is very versatile, because you have a range of functions or steps than can be arranged into numerous combinations to produce a wide range of results.
What we did so far, in this chapter's examples, was we opened an image from the disk, performed a given operation, and saved the results to another image on the disk. Then, in the next step, we opened the result from the previous one and so on.
Despite the steps are not yet connected, we can imagine the following image processing pipeline:

Saving intermediary steps to the disk is useful when we want to use the images from them, or in other situations, when the pipeline uses parallel processing or other more complex methods.
For some cases, it would be more interesting just to pass data along the pipeline without touching the hard drive, only using the computer memory. With this, one should expect a noticeable gain in speed and a lesser production of residual files.
In order to conciliate these two situations, we can use type checks for our functions' arguments, making them accept either arrays or file paths. Navigate to your open_raster_file function and alter its code:
def open_raster_file(file_path, unchanged=True):
    """Opens a raster file.

    :param file_path: Path of the raster file or np array.
    :param unchanged: Set to true to keep the original format.
    """
    if isinstance(file_path, np.ndarray):
        return file_path
    flags = cv2.CV_LOAD_IMAGE_UNCHANGED if unchanged else -1
    image = cv2.imread(file_path, flags=flags)
    return image
This function will now check the type of file_path. If it is already a NumPy array, it will be returned. This changes the behavior of all of our functions because they can now receive arrays as input.
If we add a return statement to all the functions and make them return the output arrays, we would be able to combine the function as follows:
    create_hillshade(
        crop_image(
            adjust_values('mosaic.png'),
            (-48, -21, -46, -23), roi), 'shaded.png')
You don't need to type this code. This notation is hard to understand. The order in which the functions are called is unintuitive and it's difficult to figure out of which function is each argument.
It would be much nicer if we could execute the pipeline by chaining the functions, like we did in the Chaining filters section in Chapter 4, Improving the App Search Capabilities. Actually, it would be great to use something with a notation as follows:
adjust_values().crop_image().create_hillshade()
As in Chapter 4, Improving the App Search Capabilities, the only thing we need is to have a class and the methods that return the same type of class. With these two things, there are no limits on how the steps can be combined. So, let's do it.
Our RasterData class will follow the pattern used before with our vectors. When instantiated, the class will receive a file path or an array. As said before, in order to use method chaining to perform a processing pipeline, each processing method must return another instance of the RasterData class.
We will start with class declaration and then fill it with the methods. To make it easier to cut and paste the work we have already done, we will do the following steps inside the image_experiments.py file:
- At the top of the
image_experiments.pyfile, after the imports, create the class:# coding=utf-8 import cv2 import numpy as np class RasterData(object): def __init__(self, input_data, unchanged=True, shape=None): """Represents a raster data in the form of an array. :param input_data: Raster files or Numpy array. :param unchanged: True to keep the original format. :param shape: When using multiple input data, this param determines the shape of the composition. """ self.data = None if isinstance(input_data, list) or isinstance(input_data, tuple): self.combine_images(input_data, shape) else: self.import_data(input_data, unchanged)The array will be stored in the
dataproperty, so we will initially set it toNone.There are a few other changes to make this class consistent with the others and avoid redundancy in the names. The first one is to use an
import_datamethod like before. - Cut and paste the
open_raster_filefunction into the class, rename it toimport_data, and change it to behave like a method:class RasterData(object): def __init__(self, input_data, unchanged=True, shape=None): ... def import_data(self, image, unchanged=True): """Opens a raster file. :param image: Path of the raster file or np array. :param unchanged: True to keep the original format. """ if isinstance(image, np.ndarray): self.data = image return image flags = cv2.CV_LOAD_IMAGE_UNCHANGED if unchanged else -1 self.data = cv2.imread(image, flags=flags)Instead of returning an array, it will now put the array in the
dataproperty.Next, since we will be removing the obligation of writing the image to the disk from the steps, we will need a method to perform this action.
- Add the
write_imagemethod:class RasterData(object): def __init__(self, input_data, unchanged=True, shape=None): ... def import_data(self, input_image, unchanged=True): ... def write_image(self, output_image): """Write the data to the disk as an image. :param output_image: Path and name of the output image. """ cv2.imwrite(output_image, self.data) return self - Following the examples' order, cut and paste the
combine_imagesfunction as a method to the class:class RasterData(object): def __init__(self, input_data, unchanged=True, shape=None): ... def import_data(self, input_image, unchanged=True): ... def write_image(self, output_image): ... def combine_images(self, input_images, shape): """Combine images in a mosaic. :param input_images: Path to the input images. :param shape: Shape of the mosaic in columns and rows. """ if len(input_images) != shape[0] * shape[1]: raise ValueError("Number of images doesn't match the" " mosaic shape.") images = [] for item in input_images: if isinstance(item, RasterData): images.append(item.data) else: images.append(RasterData(item).data) rows = [] for row in range(shape[0]): start = (row * shape[1]) end = start + shape[1] rows.append(np.concatenate(images[start:end], axis=1)) mosaic = np.concatenate(rows, axis=0) self.data = mosaic return selfNow, it's possible to create an empty RasterData instance and then populate it with a mosaic using this method. Or, you can create the instance with a list containing any combination of image paths, arrays, or even other RasterData instances as an argument. It will automatically combine them, put the result in the
dataproperty, and return itself.Now that you got the hang of it, let's do the same transformation with the last three functions.
- Cut and paste the
adjust_values,crop_imageandcreate_hillshadefunctions as methods into the class. Your complete class should be as follows:class RasterData(object): def __init__(self, input_data, unchanged=True, shape=None): """Represents a raster data in the form of an array. :param input_data: Raster files or Numpy array. :param unchanged: True to keep the original format. :param shape: When using multiple input data, this param determines the shape of the composition. """ self.data = None if isinstance(input_data, list) or isinstance(input_data, tuple): self.combine_images(input_data, shape) else: self.import_data(input_data, unchanged) def import_data(self, image, unchanged=True): """Opens a raster file. :param image: Path of the raster file or np array. :param unchanged: True to keep the original format. """ if isinstance(image, np.ndarray): self.data = image return image flags = cv2.CV_LOAD_IMAGE_UNCHANGED if unchanged else -1 self.data = cv2.imread(image, flags=flags) def write_image(self, output_image): """Write the data to the disk as an image. :param output_image: Path and name of the output image. """ cv2.imwrite(output_image, self.data) return self def combine_images(self, input_images, shape): """Combine images in a mosaic. :param input_images: Path to the input images. :param shape: Shape of the mosaic in columns and rows. """ if len(input_images) != shape[0] * shape[1]: raise ValueError("Number of images doesn't match the" " mosaic shape.") images = [] for item in input_images: if isinstance(item, RasterData): images.append(item.data) else: images.append(RasterData(item).data) rows = [] for row in range(shape[0]): start = (row * shape[1]) end = start + shape[1] rows.append(np.concatenate(images[start:end], axis=1)) mosaic = np.concatenate(rows, axis=0) self.data = mosaic return self def adjust_values(self, img_range=None): """Create a visualization of the data in the input_image by projecting a range of values into a grayscale image. :param img_range: specified range of values or None to use the range of the image (minimum and maximum). """ image = self.data if img_range: min = img_range[0] max = img_range[1] else: min = image.min() max = image.max() interval = max - min factor = 256.0 / interval output = image * factor self.data = output return self def crop_image(self, image_extent, bbox): """Crops an image by a bounding box. bbox and image_extent format: (xmin, ymin, xmax, ymax). :param input_image: Array containing the data or path to an image. :param image_extent: The geographic extent of the image. :param output_image: The image path to write the output. :param bbox: The bounding box of the region of interest. """ input_image = self.data img_shape = input_image.shape img_geo_width = abs(image_extent[2] - image_extent[0]) img_geo_height = abs(image_extent[3] - image_extent[1]) # How much pixels are contained in one geographic unit. pixel_width = img_shape[1] / img_geo_width pixel_height = img_shape[0] / img_geo_height # Index of the pixel to cut. x_min = abs(bbox[0] - image_extent[0]) * pixel_width x_max = abs(bbox[2] - image_extent[0]) * pixel_width y_min = abs(bbox[1] - image_extent[1]) * pixel_height y_max = abs(bbox[3] - image_extent[1]) * pixel_height output = input_image[y_min:y_max, x_min:x_max] self.data = output return self def create_hillshade(self, azimuth=90, angle_altitude=60): """Creates a shaded relief image from a digital elevation model. :param input_image: Array containing the data or path to an image. :param azimuth: Simulated sun azimuth. :param angle_altitude: Sun altitude angle. """ input_image = self.data x, y = np.gradient(input_image) slope = np.pi / 2 - np.arctan(np.sqrt(x * x + y * y)) aspect = np.arctan2(-x, y) az_rad = azimuth * np.pi / 180 alt_rad = angle_altitude * np.pi / 180 a = np.sin(alt_rad) * np.sin(slope) b = np.cos(alt_rad) * np.cos(slope) * np.cos(az_rad - aspect) output = 255 * (a + b + 1) / 2 self.data = output return selfThe class is complete and we can make a pipeline to test it.
- Edit and organize the
if __name__ == '__main__':block to test the image processing pipeline:if __name__ == '__main__': elevation_data = [ '../../data/ASTGTM2_S22W048_dem.tif', '../../data/ASTGTM2_S22W047_dem.tif', '../../data/ASTGTM2_S23W048_dem.tif', '../../data/ASTGTM2_S23W047_dem.tif'] roi = (-46.8, -21.7, -46.3, -22.1) # Region of interest. iex = (-48, -21, -46, -23) # Image extent. RasterData(elevation_data, shape=(2, 2)).adjust_values(). crop_image(iex, roi).create_hillshade(). write_image('../output/pipeline_output.png')Due to the width limitation of the book, the pipeline is broken into three lines, but you can type it in a single line in PyCharm if you wish.
- Run the code and admire the result.
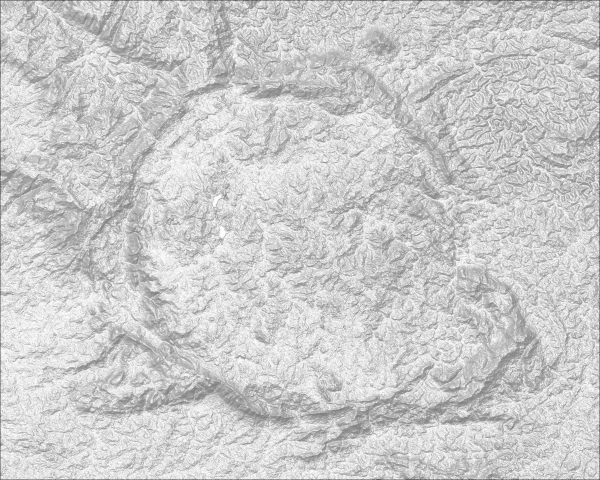
At this point, you have a fantastic accomplishment. I'm not talking about the shaded relief image, I'm talking about the ability to consistently develop processing steps and combine them into a processing pipeline in order to achieve the final result. The structure that we developed here can be used to do almost anything in terms of geoprocessing.
Also, note that the image generated by the pipeline is of a much superior quality than the one created before. This happened because the data was in the memory the whole time. This avoided data loss due to compression when the data was saved to a file multiple times.
A few remarks about the functionality of the structure as we implemented it are as follows:
- All the processing methods do two things in the end: they change the instance data and return the instance itself. The implication of this is that the class instance will mutate along the pipeline and the old data will be replaced by new ones as the process goes on. With this, Python's garbage collector will eliminate old results from the memory and save space.
- If, at any step, you want to save the current state of processing, just insert a call to the
write_imagemethod (it will also return self and it can be piped). This is a powerful tool for debugging and also can save time when you only want to repeat the steps later in a long pipeline. - You can fork the pipeline. You can create a bifurcation where more than one result can be produced by following different paths. To do this, you can use the
copy()function or you can write the result to the disk before the bifurcation. Later in the book we will see that, sometimes, while performing parallel processing, we will need these techniques too.