
Now that our environment is ready, we can begin working with bigger datasets. Let's start by profiling the import process and then optimize it. We will start with our small geocaching dataset and after the code is optimized we will move to bigger sets.
- In your
geodata_app.pyfile, edit theif __name__ == '__main__':block to call the profiler.if __name__ == '__main__': profile = cProfile.Profile() profile.enable() import_initial_data("../data/geocaching.gpx", 'geocaching') profile.disable() profile.print_stats(sort='cumulative') - Run the code and see the results. Don't worry about duplicated entries in the database now, we will clean it later. (I removed some information from the following output for space reasons.)
Importing geocaching...
112 features.
Done!
 1649407 function calls (1635888 primitive calls) in 5.858 seconds

cumtime  percall filename:lineno(function)
  5.863    5.863 geodata_app.py:24(import_initial_data)
  5.862    5.862 managers.py:11(import_data)
  4.899    0.002 related.py:749(create)
  4.888    0.002 manager.py:126(manager_method)
  3.621    0.001 base.py:654(save)
  3.582    0.001 base.py:737(save_base)
  3.491    0.001 query.py:341(create)
  1.924    0.001 base.py:799(_save_table)

ncalls  tottime  percall  cumtime  percall filename:lineno(function)
     1    0.001    0.001    5.863    5.863 (import_initial_data)
     1    0.029    0.029    5.862    5.862 (import_data)
  2497    0.018    0.000    4.899    0.002 related.py:749(create)
Take a look at ncalls and cumtime for each of the functions. The create function is called a lot of times and accumulates almost five seconds on my computer. This is the function (method) called when we add a tag to a GeoObject. The time spent on this function is relevant when we import geocaching data because every point has a lot of attributes. Maybe we can make this process more efficient.
As we saw in the profiler, the method we are using to insert the tags into the database creates a bottleneck when we import geocaching data with our current code. If we can change how it's done, we can make the code run faster.
- Go to your manager and edit the
import_datamethod of theGeoCollectionmanager:class GeoCollection(GeoManager): """This class represents a collection of spatial data.""" def import_data(self, file_path, atype): """Opens an vector file compatible with OGR and parses the data. :param str file_path: The full path to the file. """ from models import Tag features = open_vector_file(file_path) tags = [] for feature in features: geom = shape(feature['geometry']) geo_object = self.model(geom=geom.wkt, atype=atype) geo_object.save() geoo_id = geo_object.id for key, value in feature['properties'].iteritems(): tags.append(Tag(key=key, value=value, geo_object_id=geoo_id)) Tag.objects.bulk_create(tags)Instead of creating the tags one by one, now we add them to a list without hitting the database; only in the end do we call
bulk_create, which inserts all entries in a single request. Note that theimportstatements for theTagmodel are inside the function. This will avoid an error with circular imports, becausemodelsalso import the managers. - Run your code and see what happens:
django.db.utils.DataError: value too long for type character varying(250)


Process finished with exit code 1
Since
bulk_insertsends everything together to the database, we can't catch exceptions for individual tags.The solution is to validate the tag before we insert it. At this point we are making a trade-off between generalization and performance because the validation may fail depending on the type of data, whereas the error catching could be triggered by a wide range of reasons.
- Edit the code again:
class GeoCollection(GeoManager): """This class represents a collection of spatial data.""" def import_data(self, file_path, atype): """Opens an vector file compatible with OGR and parses the data. :param str file_path: The full path to the file. """ from models import Tag features = open_vector_file(file_path) tags = [] for feature in features: geom = shape(feature['geometry']) geo_object = self.model(geom=geom.wkt, atype=atype) geo_object.save() geoo_id = geo_object.id for key, value in feature['properties'].iteritems(): if value and (isinstance(value, unicode) or isinstance(value, str)): if len(value) <= 250: tags.append(Tag(key=key, value=value, geo_object_id=geoo_id)) Tag.objects.bulk_create(tags) - Now run
geodata_app.pyagain and look at the profiler results:506679 function calls (506308 primitive calls) in 1.144 seconds Ordered by: cumulative time ncalls cumtime percall filename:lineno(function) 1 1.144 1.144 geodata_app.py:24(import_initial_data) 1 1.142 1.142 managers.py:12(import_data) 1 0.556 0.556 geo_functions.py:91(open_vector_file) 1 0.549 0.549 geo_functions.py:9(read_gpx_file) 1 0.541 0.541 xmltodict.py:155(parse) 1 0.541 0.541 {built-in method Parse} 6186 0.387 0.000 pyexpat.c:566(StartElement) 6186 0.380 0.000 xmltodict.py:89(startElement) 112 0.317 0.003 base.py:654(save) 112 0.316 0.003 base.py:737(save_base) 14/113 0.290 0.003 manager.py:126(manager_method) 12487 0.278 0.000 collections.py:38(__init__) 113 0.235 0.002 query.py:910(_insert) 113 0.228 0.002 compiler.py:969(execute_sql) 6186 0.178 0.000 xmltodict.py:84(_attrs_to_dict) 1 0.170 0.170 query.py:356(bulk_create)
The import now runs five times faster. Note how the profile changed. The database part of the process felt down on the list and now the most time-consuming part is the conversion from XML (the GPX file) to a dictionary.
Looking at the output, we also see that we have another.
At this point, we have much more efficient code and we won't change how the XML conversion is done. Instead, we will move on to testing and optimizing the process for other types of data.
Remember that we made a branch in our code to import GPX files, because OGR/GDAL was unable to import the nested data inside those files. So we should expect that when importing shapefiles or GML files, we will have a different profile for code execution time. Let's try it:
- Now we will test the code with the world borders dataset. Change the
if __name__ == '__main__':block ofgeodata_app.py:if __name__ == '__main__': profile = cProfile.Profile() profile.enable() import_initial_data("../data/world_borders_simple.shp", 'boundary') profile.disable() profile.print_stats(sort='cumulative') - Run the code:
ValueError: A LinearRing must have at least 3 coordinate tuples

Process finished with exit code 1
Well, it doesn't work. What is happening here is that Shapely is complaining about the geometry that is being passed to it. This is because this branch of the code is passing a WKT geometry instead of coordinates.
Django can receive the geometry as a WKT and we are using Shapely for the conversion. This may be a time-consuming step and we are going to eliminate it. At this point, we are just using common sense to optimize the code: the fewer the steps, the faster the code.
- Edit the
GeoCollectionmanager:class GeoCollection(GeoManager): """This class represents a collection of spatial data.""" def import_data(self, file_path, atype): """Opens an vector file compatible with OGR and parses the data. :param str file_path: The full path to the file. """ from models import Tag features = open_vector_file(file_path) tags = [] for feature in features: geo_object = self.model(geom=feature['geom'], atype=atype) geo_object.save() geoo_id = geo_object.id for key, value in feature['properties'].iteritems(): if value and (isinstance(value, unicode) or isinstance(value, str)): if len(value) <= 250: tags.append(Tag(key=key, value=value, geo_object_id=geoo_id)) Tag.objects.bulk_create(tags)We eliminated the Shapely use (you can remove it from the imports too) and changed how the geometry is retrieved from the dictionary.
- Now go to
geo_functions.pyand edit theread_ogr_featuresfunction:def read_ogr_features(layer): """Convert OGR features from a layer into dictionaries. :param layer: OGR layer. """ features = [] layer_defn = layer.GetLayerDefn() layer.ResetReading() type = ogr.GeometryTypeToName(layer.GetGeomType()) for item in layer: attributes = {} for index in range(layer_defn.GetFieldCount()): field_defn = layer_defn.GetFieldDefn(index) key = field_defn.GetName() value = item.GetFieldAsString(index) attributes[key] = value feature = { "geom": item.GetGeometryRef().ExportToWkt(), "properties": attributes} features.append(feature) return featuresAs a trade-off between generalization and performance, we changed the
featuredictionary from the universal GeoJSON format to contain only two keys:geomwith a WKT geometry andproperties. - Now edit the
read_gpx_filefunction so it's compliant with the new format:def read_gpx_file(file_path): """Reads a GPX file containing geocaching points. :param str file_path: The full path to the file. """ with open(file_path) as gpx_file: gpx_dict = xmltodict.parse(gpx_file.read()) output = [] for wpt in gpx_dict['gpx']['wpt']: geometry = "POINT(" + wpt.pop('@lat') + " " + wpt.pop('@lon') + ")" # If geocache is not on the dict, skip this wpt. try: geocache = wpt.pop('geocache') except KeyError: continue attributes = {'status': geocache.pop('@status')} # Merge the dictionaries. attributes.update(wpt) attributes.update(geocache) # Construct a GeoJSON feature and append to the list. feature = { "geom": geometry, "properties": attributes} output.append(feature) return output - Run your code again (you can also test importing points again if you wish, you will get a few milliseconds of improvement). Look at the result:
Importing boundary...
245 features.
Done!
90746 function calls (90228 primitive calls) in 5.164 seconds
OpenStreetMap (OSM) is a collaborative mapping project where everyone can make an account and collaborate in the map making. It's something like Wikipedia, but instead of articles the community make maps.
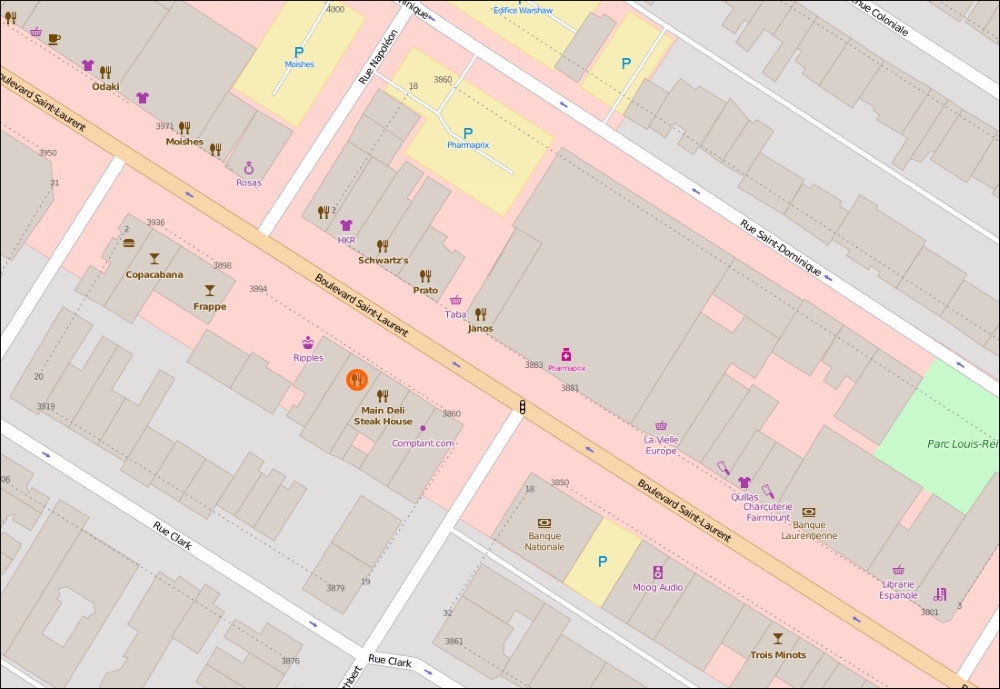
The data is all available for download, and some regions have incredibly detailed maps. What we want here is to get points of interest (POI). These are points that represent the location of restaurants, supermarkets, banks, and so on.
Take a look at the following screenshot of Boulevard Saint-Laurent in Montreal. Each one of those small icons is a POI:
OSM data can be easily obtained using its API, which is called Overpass API. It allows the user to make advanced queries and filter data of interest.
The obtained data is in XML format adapted for OSM needs. We are going to use overpy, a Python package that translates this data into Python objects.
At this point, I have to admit that through my career I have been deeply inspired by OSM and its data format. It's simple and yet flexible, to the point where everything in OSM is represented by the same schema.
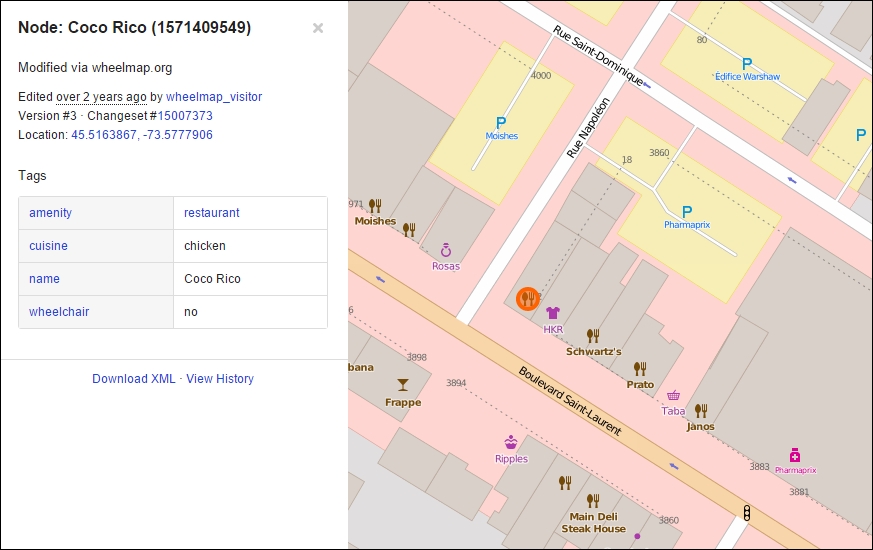
OSM consists of nodes, a lot of nodes. Actually by this date it had 3,037,479,553 nodes. That's right, more than three billion nodes. Nodes can be points or can be related to other nodes as part of something represented by a line or polygon.
Every node can have an arbitrary number of tags made of key/value pairs, just like our data. Take a look at the information obtained from one of the POI:
So, storing OpenStreetMap POIs in our database will be pretty straightforward. First, let's create a utility function to download points for a given region of interest.
- Go to the
utilsfolder and create a new Python file namedosm_data.py. - Add the following code to this file:
# coding=utf-8


import overpy


def get_osm_poi(bbox):
    """Downloads points of interest from OpenStreetMap.

    :param bbox: The bounding box of the region to get the points.
    """
    api = overpy.Overpass()
    result = api.query("""
      <osm-script>
          <query type="node">
            <bbox-query s="{ymin}" n="{ymax}" w="{xmin}" e="{xmax}"/>
            <has-kv k="amenity"/>
          </query>
          <print/>
        </osm-script>
        """.format(**bbox))
    print("Found {} POIs".format(len(result.nodes)))
    return result


if __name__ == "__main__":
    bbox = {"xmin":-71.606, "ymin":46.714,
            "xmax":-71.140, "ymax":48.982}
    result = get_osm_poi(bbox)
    print(result.nodes[0].tags)
This is a simple wrapper for
overpythat queries all points in a given region and has theamenitykey. In theif __name__ == '__main__':block, we make a simple test, get some points, and print the tags of one of them.Note
You can get more information on the Overpass API at this site: http://wiki.openstreetmap.org/wiki/Overpass_API/Language_Guide.
- Run the code on this file. Remember to press Alt + Shift + F10 to choose a different file and select
osm_datain the list. You should get an output like this:Found 3523 POIs {'operator': 'Desjardins', 'amenity': 'bank', 'atm': 'yes', 'name': 'Caisse Populaire Desjardins'} Process finished with exit code 0 If you don't have overpy installed, just click on it in your code, press Alt + F10 and select "Install Package"Now, let's import this data into our database. Open your
manage.pyfile. We will create a new method to ourGeoCollectionmanager, very similar toimport_data, but specific to OSM data. - Edit your
manage.pyfile and add this new method to theGeoCollectionclass:#... def import_osm_data(self, result): """Import OpenStreetMap points of interest. :param str file_path: The full path to the file. """ from models import Tag tags = [] for node in result.nodes: geometry = "POINT(" + str(node.lat) + " " + str(node.lon) + ")" geo_object = self.model(geom=geometry, atype="poi") geo_object.save() geoo_id = geo_object.id for key, value in node.tags.iteritems(): tags.append(Tag(key=key, value=value, geo_object_id=geoo_id)) Tag.objects.bulk_create(tags)We could have reused the code that is common for both
import_dataandimport_osm_data, but in this chapter we are emphasizing speed and, as was stated earlier, sometimes it's easier to achieve better execution times with specific functions. In this case, we were able to remove the verifications when creating the tags, making the loop run faster.Now let's test this new method:
- Open the
geodata_app.pyfile and add this import at the beginning of the file:from utils.osm_data import get_osm_poi
- Now edit the
if __name__ == '__main__':block:if __name__ == '__main__': bbox = {"xmin":-71.206, "ymin":47.714, "xmax":-71.140, "ymax":48.982} result = get_osm_poi(bbox) GeoObject.objects.import_osm_data(result) points = GeoObject.objects.filter(atype='poi') print(len(points)) - Finally, run the code and see if you get an output resembling the following (the number of points may be different for you):
Found 14 POIs
14

Process finished with exit code 0
Before we continue with real imports, let's clean the database of all the data we put into it for testing. Let's make a simple function for this job in our app:
- In
geodata_app.py, add this function:def clean_database(): """Remove all records from the database.""" from django.db import connection cursor = connection.cursor() cursor.execute('DELETE FROM geodata_tag;') cursor.execute('DELETE FROM geodata_geoobject;')Here we are calling SQL commands directly on the database in order to avoid all Django overheads and get a better performance.
- Now call it from the
if __name__ == '__main__':block:if __name__ == '__main__': clean_database() - Run the code; it may take a while to finish.
- Keep it as a resource in case you want to make other tests or if you need to start over.
Now it's time to put real data into our database. We will import all the data that we used so far, plus additional data:
- Geocaching points (extended version)
- World borders
- Canadian districts borders
- Points of interest in Canada
- Go to your
geodata_app.pyfile and edit theif __name__ == '__main__':block:if __name__ == '__main__': import_initial_data("../data/canada_div.gml", 'canada') import_initial_data("../data/world_borders_simple.shp", 'world') import_initial_data("../data/geocaching_big.gpx", 'geocaching')
This time we are setting more specific types for our data to make our queries easier.
- Now, run the code to begin importing. In the end you should have this output:
Importing canada...
293 features.
Done!
Importing world...
245 features.
Done!
Importing geocaching...
1638 features.
Done!

Process finished with exit code 0
Now it's time to fetch points of interest from OpenStreetMap and add them to our database.
- Add this function to your
geodata_app.py:def import_from_osm(district): # tags = Tag.objects.filter(value="Montreal") borders = GeoObject.objects.get(atype='canada', tags__key='CDNAME', tags__value=district) extent = borders.geom.extent print("Extent: {}".format(extent)) bbox = {"xmin":extent[0], "ymin":extent[1], "xmax":extent[2], "ymax":extent[3]} osm_poi = get_osm_poi(bbox) GeoObject.objects.import_osm_data(osm_poi) print("Done!")This function takes a district name. Get it from our database and use its extent to query the OSM API.
- Change the
if __name__ == '__main__':block:if __name__ == '__main__': import_from_osm('Montréal') - Now, run the code. It may take some time to download the data from OSM. When it's done, your output should be something like the following (the number of features may be different):
Extent: (-73.9763757739999, 45.4021292300001, -73.476065978, 45.703747476)
Found 5430 POIs
Done!

--- Memory Error ----
At this point, you will probably have your first contact with another issue in code optimization: memory consumption. Unless you have a large amount of RAM, you'll be faced with Python's MemoryError. This means that your computer ran out of memory while parsing the huge amount of POIs acquired from OSM.
This happened because the whole XML from OSM was parsed into Python objects and later into Django objects, and they were all stored in the memory at the same time.
The solution here is to read one XML tag at a time. If it's a node, put it into the database, get its tags, and release the memory. To do that, we will use a XML file available on the sample data, so we don't need to download it again.
- Open the
managers.pyfile and add this import at the beginning of the file:import xml.etree.cElementTree as ET
- Go to your
GeoCollectionmanager and edit theimport_osm_datamethod:#... #... def import_osm_data(self, input_file): """Import OpenStreetMap points of interest. :param str input_file: The full path to the file. """ from models import Tag tags = [] tags_counter = 0 nodes_counter = 0 xml_iter = ET.iterparse(input_file) for event, elem in xml_iter: if elem.tag == 'node': lat, lon = elem.get('lat'), elem.get('lon') geometry = "POINT(" + str(lat) + " " + str(lon) + ")" geo_object = self.model(geom=geometry, atype="poi") geo_object.save() geoo_id = geo_object.id nodes_counter += 1 if nodes_counter % 10000 == 0: print("{} Nodes...".format(nodes_counter)) print("Creating tags...") Tag.objects.bulk_create(tags) tags = [] for child_tag in elem: key = child_tag.get('k') value = child_tag.get('v') if len(value) <= 250: tags.append(Tag(key=key, value=value, geo_object_id=geoo_id)) tags_counter += 1 elem.clear() print("Creating tags...") Tag.objects.bulk_create(tags) print("Imported {} nodes with {} tags.".format( nodes_counter, tags_counter)) print("Done!")ElementTree is a Python module designed for XML parsing;
cElementTreehas the same functionality but is implemented in C. The only restriction on usingcElementTreeis when C library loading is not available, which is not the case here.Note that the solution to optimizing tag creation is to accumulate the tags in a list, bulk-create tags every 10,000 nodes, and then clear the list.
- Edit the
if __name__ == '__main__':block of thegeodata_app.pyfile to test the code:if __name__ == '__main__': GeoObject.objects.import_osm_data("../data/osm.xml") - Now run it. While you wait, you can open the Windows Task Manager, or the system monitor on Ubuntu, and see how your computer resources are being consumed and/or watch the progress in the console output:
10000 Nodes...
Creating tags...
20000 Nodes...
Creating tags...
30000 Nodes...
Creating tags...
40000 Nodes...
Creating tags...
50000 Nodes...

...

Imported 269300 nodes with 1272599 tags.
Done!
If you were watching your computer resources, you should have seen that the memory consumption fluctuated around some value. As the memory didn't keep increasing as more and more nodes were imported, we would be able to import virtually any given number of points on files of any size because the code is stable and has no memory leaks.
On my computer, Python consumed something around 100 Mb of memory during the program execution. The processor cores stayed mostly at 5% of load (Python and PostgreSQL) and the hard drive was 100% occupied with database writing.
It would be possible to tweak the database for a better performance, but this is beyond the scope of this book.
Remember that, if you want to make more tests, you can always clean the database with the function that we created before. Just remember to import all the data again before we continue.